マップにイメージ レイヤーを追加する (Android SDK)
Note
Azure Maps Android SDK の廃止
Android 用 Azure Maps Native SDK は非推奨となり、2025 年 3 月 31 日に廃止されます。 サービスの中断を回避するには、2025 年 3 月 31 日までに Azure Maps Web SDK に移行します。 詳細については、「Azure Maps Android SDK 移行ガイド」を参照してください。
この記事では、固定された一連の座標に画像をオーバーレイする方法について説明します。 以下、マップでオーバーレイできるさまざまな種類の画像のうち、いくつか例を挙げます。
- ドローンからキャプチャされた画像
- ビルのフロアプラン
- 歴史などの目的に特化したマップ画像
- 仕事の現場のブループリント
ヒント
イメージ レイヤーは、マップに画像をオーバーレイする簡単な方法です。 大きな画像の場合、大量のメモリを消費し、パフォーマンスの問題を引き起こすおそれがあることにご注意ください。 その場合は、お客様の画像をタイルに分割したうえで、タイル レイヤーとしてマップに読み込むことを検討してください。
イメージ レイヤーを追加する
次のコードでは、1922 年のニュージャージー州ニューアークの地図の画像がマップにオーバーレイされています。 このイメージはプロジェクトの drawable フォルダーに追加されます。 イメージ レイヤーは、形式 [Top Left Corner, Top Right Corner, Bottom Right Corner, Bottom Left Corner] で四隅に画像と座標を設定することで作成されます。 多くの場合、label レイヤーの下にイメージ レイヤーを追加することが推奨されます。
//Create an image layer.
ImageLayer layer = new ImageLayer(
    imageCoordinates(
        new Position[] {
            new Position(-74.22655, 40.773941), //Top Left Corner
            new Position(-74.12544, 40.773941), //Top Right Corner
            new Position(-74.12544, 40.712216), //Bottom Right Corner
            new Position(-74.22655, 40.712216)  //Bottom Left Corner
        }
    ),
    setImage(R.drawable.newark_nj_1922)
);

//Add the image layer to the map, below the label layer.
map.layers.add(layer, "labels");
//Create an image layer.
val layer = ImageLayer(
    imageCoordinates(
        arrayOf<Position>(
            Position(-74.22655, 40.773941),  //Top Left Corner
            Position(-74.12544, 40.773941),  //Top Right Corner
            Position(-74.12544, 40.712216),  //Bottom Right Corner
            Position(-74.22655, 40.712216)   //Bottom Left Corner
        )
    ),
    setImage(R.drawable.newark_nj_1922)
)

//Add the image layer to the map, below the label layer.
map.layers.add(layer, "labels")
あるいは、オンライン上でホストされている画像の URL を指定できます。 ただし、行動計画上許されるなら、プロジェクトの drawable フォルダーに画像を追加してください。画像がローカルで利用可能になり、ダウンロードする必要がなくなるため、読み込みが速くなります。
//Create an image layer.
ImageLayer layer = new ImageLayer(
    imageCoordinates(
        new Position[] {
            new Position(-74.22655, 40.773941), //Top Left Corner
            new Position(-74.12544, 40.773941), //Top Right Corner
            new Position(-74.12544, 40.712216), //Bottom Right Corner
            new Position(-74.22655, 40.712216)  //Bottom Left Corner
        }
    ),
    setUrl("https://www.lib.utexas.edu/maps/historical/newark_nj_1922.jpg")
);

//Add the image layer to the map, below the label layer.
map.layers.add(layer, "labels");
//Create an image layer.
val layer = ImageLayer(
    imageCoordinates(
        arrayOf<Position>(
            Position(-74.22655, 40.773941),  //Top Left Corner
            Position(-74.12544, 40.773941),  //Top Right Corner
            Position(-74.12544, 40.712216),  //Bottom Right Corner
            Position(-74.22655, 40.712216) //Bottom Left Corner
        )
    ),
    setUrl("https://www.lib.utexas.edu/maps/historical/newark_nj_1922.jpg")
)

//Add the image layer to the map, below the label layer.
map.layers.add(layer, "labels")
次のスクリーンショットからは、ニュージャージー州ニューアークの 1922 年の地図を確認できます。イメージ レイヤーでオーバーレイされています。
KML ファイルをグラウンド オーバーレイとしてインポートする
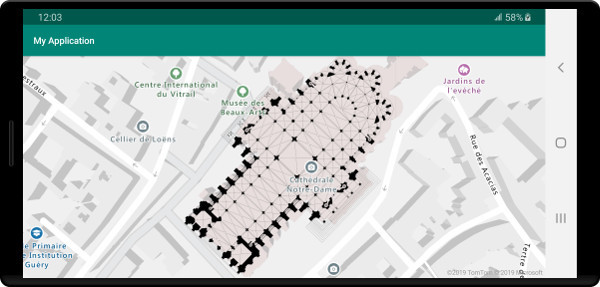
このサンプルからは、KML グラウンド オーバーレイ情報を画像レイヤーとしてマップに追加する方法がわかります。 KML グランド オーバーレイからは、東西南北の座標が反時計回りで与えられます。 しかしながら、画像レイヤーでは、画像の四隅の座標が求められます。 このサンプルの KML グラウンド オーバーレイはシャルトル大聖堂のものであり、その出典は Wikimedia です。
<?xml version="1.0" encoding="UTF-8"?>
<kml xmlns="http://www.opengis.net/kml/2.2" xmlns:gx="http://www.google.com/kml/ext/2.2" xmlns:kml="http://www.opengis.net/kml/2.2" xmlns:atom="http://www.w3.org/2005/Atom">
<GroundOverlay>
    <name>Map of Chartres cathedral</name>
    <Icon>
        <href>https://upload.wikimedia.org/wikipedia/commons/thumb/e/e3/Chartres.svg/1600px-Chartres.svg.png</href>
        <viewBoundScale>0.75</viewBoundScale>
    </Icon>
    <LatLonBox>
        <north>48.44820923628113</north>
        <south>48.44737203258976</south>
        <east>1.488833825534365</east>
        <west>1.486788581643038</west>
        <rotation>46.44067597839695</rotation>
    </LatLonBox>
</GroundOverlay>
</kml>
このコードでは、ImageLayer クラスの静的 getCoordinatesFromEdges メソッドが使用されています。 このメソッドでは、KML グラウンド オーバーレイの東西南北情報と回転情報を利用し、画像の四隅が計算されます。
//Calculate the corner coordinates of the ground overlay.
Position[] corners = ImageLayer.getCoordinatesFromEdges(
    //North, south, east, west
    48.44820923628113, 48.44737203258976, 1.488833825534365, 1.486788581643038,

    //KML rotations are counter-clockwise, subtract from 360 to make them clockwise.
    360 - 46.44067597839695
);

//Create an image layer.
ImageLayer layer = new ImageLayer(
    imageCoordinates(corners),
    setUrl("https://upload.wikimedia.org/wikipedia/commons/thumb/e/e3/Chartres.svg/1600px-Chartres.svg.png")
);

//Add the image layer to the map, below the label layer.
map.layers.add(layer, "labels");
//Calculate the corner coordinates of the ground overlay.
val corners: Array<Position> =
    ImageLayer.getCoordinatesFromEdges( //North, south, east, west
        48.44820923628113,
        48.44737203258976,
        1.488833825534365,
        1.486788581643038,  //KML rotations are counter-clockwise, subtract from 360 to make them clockwise.
        360 - 46.44067597839695
    )

//Create an image layer.
val layer = ImageLayer(
    imageCoordinates(corners),
    setUrl("https://upload.wikimedia.org/wikipedia/commons/thumb/e/e3/Chartres.svg/1600px-Chartres.svg.png")
)

//Add the image layer to the map, below the label layer.
map.layers.add(layer, "labels")
次のスクリーンショットからは、イメージ レイヤーでオーバーレイされた KML グラウンド オーバーレイの地図を確認できます。
ヒント
イメージ レイヤー クラスの getPixels メソッドと getPositions メソッドを使用することで、配置されたイメージ レイヤーの地理的座標とローカル画像のピクセル座標の間で変換を行います。
次のステップ
地図上で画像をオーバーレイする各種方法の詳細については、次の記事を参照してください。