Distribuire il modello TensorFlow in un'app di Windows con le API di Windows Machine Learning
Questa sezione finale spiega come creare una semplice app UWP con un'interfaccia utente grafica per trasmettere la webcam e rilevare gli oggetti valutando il modello YOLO con Windows ML.
Creare un'app UWP in Visual Studio
- Aprire Visual Studio e selezionare
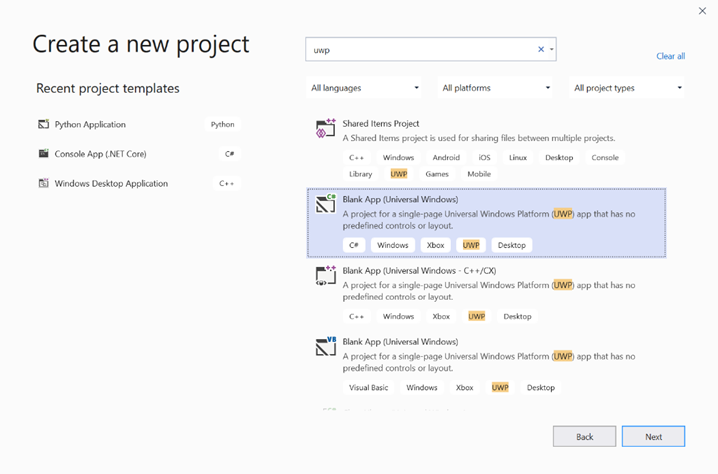
Create a new project.Cerca UWP e selezionareBlank App (Universal Windows).

- Nella pagina successiva configurare le impostazioni del progetto assegnando al progetto un nome e un percorso. Selezionare quindi una versione di destinazione e minima del sistema operativo dell'app. Per usare le API di Windows ML è necessario usare X oppure è possibile scegliere il pacchetto NuGet da supportare fino a X. Se si sceglie di usare il pacchetto NuGet, seguire queste istruzioni [collegamento].
Chiamare le API di Windows ML per valutare il modello
Passaggio 1: Usare il generatore di codice di Machine Learning per generare classi wrapper per le API di Windows ML.
Passaggio 2: Modificare il codice generato nel file con estensione cs generato. Il file finale è simile al seguente:
using System;
using System.Collections.Generic;
using System.Threading.Tasks;
using Windows.Media;
using Windows.Storage;
using Windows.Storage.Streams;
using Windows.AI.MachineLearning;
namespace yolodemo
{

    public sealed class YoloInput
    {
        public TensorFloat input_100; // shape(-1,3,416,416)
    }

    public sealed class YoloOutput
    {
        public TensorFloat concat_1600; // shape(-1,-1,-1)
    }

    public sealed class YoloModel
    {
        private LearningModel model;
        private LearningModelSession session;
        private LearningModelBinding binding;
        public static async Task<YoloModel> CreateFromStreamAsync(IRandomAccessStreamReference stream)
        {
            YoloModel learningModel = new YoloModel();
            learningModel.model = await LearningModel.LoadFromStreamAsync(stream);
            learningModel.session = new LearningModelSession(learningModel.model);
            learningModel.binding = new LearningModelBinding(learningModel.session);
            return learningModel;
        }
        public async Task<YoloOutput> EvaluateAsync(YoloInput input)
        {
            binding.Bind("input_1:0", input.input_100);
            var result = await session.EvaluateAsync(binding, "0");
            var output = new YoloOutput();
            output.concat_1600 = result.Outputs["concat_16:0"] as TensorFloat;
            return output;
        }
    }
}
Valutare ogni fotogramma video per rilevare gli oggetti e disegnare rettangoli di delimitazione.
- Aggiungere le librerie seguenti a mainPage.xaml.cs.
using System.Threading.Tasks;
using Windows.Devices.Enumeration;
using Windows.Media;
using Windows.Media.Capture;
using Windows.Storage;
using Windows.UI;
using Windows.UI.Xaml.Media.Imaging;
using Windows.UI.Xaml.Shapes;
using Windows.AI.MachineLearning;
- Aggiungere le variabili seguenti in
public sealed partial class MainPage : Page.
private MediaCapture _media_capture;
private LearningModel _model;
private LearningModelSession _session;
private LearningModelBinding _binding;
private readonly SolidColorBrush _fill_brush = new SolidColorBrush(Colors.Transparent);
private readonly SolidColorBrush _line_brush = new SolidColorBrush(Colors.DarkGreen);
private readonly double _line_thickness = 2.0;
        private readonly string[] _labels =
            {
                "<list of labels>"
        };
- Creare una struttura per la formattazione dei risultati del rilevamento.
        internal struct DetectionResult
        {
            public string label;
            public List<float> bbox;
            public double prob;
        }
- Creare un oggetto Comparer che confronta due oggetti di tipo Box. Questa classe verrà utilizzata per disegnare rettangoli di delimitazione intorno agli oggetti rilevati.
        class Comparer : IComparer<DetectionResult>
        {
            public int Compare(DetectionResult x, DetectionResult y)
            {
                return y.prob.CompareTo(x.prob);
            }
        }
- Aggiungere il metodo seguente per inizializzare il flusso webcam del dispositivo e iniziare a elaborare ogni fotogramma per rilevare gli oggetti.
        private async Task InitCameraAsync()
        {
            if (_media_capture == null || _media_capture.CameraStreamState == Windows.Media.Devices.CameraStreamState.Shutdown || _media_capture.CameraStreamState == Windows.Media.Devices.CameraStreamState.NotStreaming)
            {
                if (_media_capture != null)
                {
                    _media_capture.Dispose();
                }

                MediaCaptureInitializationSettings settings = new MediaCaptureInitializationSettings();
                var cameras = await DeviceInformation.FindAllAsync(DeviceClass.VideoCapture);
                var camera = cameras.FirstOrDefault();
                settings.VideoDeviceId = camera.Id;

                _media_capture = new MediaCapture();
                await _media_capture.InitializeAsync(settings);
                WebCam.Source = _media_capture;
            }

            if (_media_capture.CameraStreamState == Windows.Media.Devices.CameraStreamState.NotStreaming)
            {
                await _media_capture.StartPreviewAsync();
                WebCam.Visibility = Visibility.Visible;
            }

            ProcessFrame();
        }
- Aggiungere il metodo seguente per elaborare ogni fotogramma. Questo metodo chiama EvaluateFrame e DrawBoxes, che verrà implementato in un passaggio successivo.
        private async Task ProcessFrame()
        {
            var frame = new VideoFrame(Windows.Graphics.Imaging.BitmapPixelFormat.Bgra8, (int)WebCam.Width, (int)WebCam.Height);
            await _media_capture.GetPreviewFrameAsync(frame);
            var results = await EvaluateFrame(frame);
            await DrawBoxes(results.ToArray(), frame);
            ProcessFrame();
        }
- Creare un nuovo float Sigmoid
        private float Sigmoid(float val)
        {
            var x = (float)Math.Exp(val);
            return x / (1.0f + x);
        }
- Creare una soglia per rilevare correttamente gli oggetti.
        private float ComputeIOU(DetectionResult DRa, DetectionResult DRb)
        {
            float ay1 = DRa.bbox[0];
            float ax1 = DRa.bbox[1];
            float ay2 = DRa.bbox[2];
            float ax2 = DRa.bbox[3];
            float by1 = DRb.bbox[0];
            float bx1 = DRb.bbox[1];
            float by2 = DRb.bbox[2];
            float bx2 = DRb.bbox[3];

            Debug.Assert(ay1 < ay2);
            Debug.Assert(ax1 < ax2);
            Debug.Assert(by1 < by2);
            Debug.Assert(bx1 < bx2);

            // determine the coordinates of the intersection rectangle
            float x_left = Math.Max(ax1, bx1);
            float y_top = Math.Max(ay1, by1);
            float x_right = Math.Min(ax2, bx2);
            float y_bottom = Math.Min(ay2, by2);

            if (x_right < x_left || y_bottom < y_top)
                return 0;
            float intersection_area = (x_right - x_left) * (y_bottom - y_top);
            float bb1_area = (ax2 - ax1) * (ay2 - ay1);
            float bb2_area = (bx2 - bx1) * (by2 - by1);
            float iou = intersection_area / (bb1_area + bb2_area - intersection_area);

            Debug.Assert(iou >= 0 && iou <= 1);
            return iou;
        }
- Implementare l'elenco seguente per tenere traccia degli oggetti correnti rilevati nel frame.
        private List<DetectionResult> NMS(IReadOnlyList<DetectionResult> detections,
            float IOU_threshold = 0.45f,
            float score_threshold=0.3f)
        {
            List<DetectionResult> final_detections = new List<DetectionResult>();
            for (int i = 0; i < detections.Count; i++)
            {
                int j = 0;
                for (j = 0; j < final_detections.Count; j++)
                {
                    if (ComputeIOU(final_detections[j], detections[i]) > IOU_threshold)
                    {
                        break;
                    }
                }
                if (j==final_detections.Count)
                {
                    final_detections.Add(detections[i]);
                }
            }
            return final_detections;
        }
- Implementare il metodo seguente.
        private List<DetectionResult> ParseResult(float[] results)
        {
            int c_values = 84;
            int c_boxes = results.Length / c_values;
            float confidence_threshold = 0.5f;
            List<DetectionResult> detections = new List<DetectionResult>();
            this.OverlayCanvas.Children.Clear();
            for (int i_box = 0; i_box < c_boxes; i_box++)
            {
                float max_prob = 0.0f;
                int label_index = -1;
                for (int j_confidence = 4; j_confidence < c_values; j_confidence++)
                {
                    int index = i_box * c_values + j_confidence;
                    if (results[index] > max_prob)
                    {
                        max_prob = results[index];
                        label_index = j_confidence - 4;
                    }
                }
                if (max_prob > confidence_threshold)
                {
                    List<float> bbox = new List<float>();
                    bbox.Add(results[i_box * c_values + 0]);
                    bbox.Add(results[i_box * c_values + 1]);
                    bbox.Add(results[i_box * c_values + 2]);
                    bbox.Add(results[i_box * c_values + 3]);

                    detections.Add(new DetectionResult()
                    {
                        label = _labels[label_index],
                        bbox = bbox,
                        prob = max_prob
                    });
                }
            }
            return detections;
        }
- Aggiungere il metodo seguente per disegnare le caselle intorno agli oggetti rilevati nella cornice.
private async Task DrawBoxes(float[] results, VideoFrame frame)
        {
            List<DetectionResult> detections = ParseResult(results);
            Comparer cp = new Comparer();
            detections.Sort(cp);
            IReadOnlyList<DetectionResult> final_detetions = NMS(detections);

            for (int i=0; i < final_detetions.Count; ++i)
            {
                int top = (int)(final_detetions[i].bbox[0] * WebCam.Height);
                int left = (int)(final_detetions[i].bbox[1] * WebCam.Width);
                int bottom = (int)(final_detetions[i].bbox[2] * WebCam.Height);
                int right = (int)(final_detetions[i].bbox[3] * WebCam.Width);

                var brush = new ImageBrush();
                var bitmap_source = new SoftwareBitmapSource();
                await bitmap_source.SetBitmapAsync(frame.SoftwareBitmap);

                brush.ImageSource = bitmap_source;
                // brush.Stretch = Stretch.Fill;

                this.OverlayCanvas.Background = brush;

                var r = new Rectangle();
                r.Tag = i;
                r.Width = right - left;
                r.Height = bottom - top;
                r.Fill = this._fill_brush;
                r.Stroke = this._line_brush;
                r.StrokeThickness = this._line_thickness;
                r.Margin = new Thickness(left, top, 0, 0);

                this.OverlayCanvas.Children.Add(r);
                // Default configuration for border
                // Render text label


                var border = new Border();
                var backgroundColorBrush = new SolidColorBrush(Colors.Black);
                var foregroundColorBrush = new SolidColorBrush(Colors.SpringGreen);
                var textBlock = new TextBlock();
                textBlock.Foreground = foregroundColorBrush;
                textBlock.FontSize = 18;

                textBlock.Text = final_detetions[i].label;
                // Hide
                textBlock.Visibility = Visibility.Collapsed;
                border.Background = backgroundColorBrush;
                border.Child = textBlock;

                Canvas.SetLeft(border, final_detetions[i].bbox[1] * 416 + 2);
                Canvas.SetTop(border, final_detetions[i].bbox[0] * 416 + 2);
                textBlock.Visibility = Visibility.Visible;
                // Add to canvas
                this.OverlayCanvas.Children.Add(border);
            }
        }
- Ora che abbiamo gestito l'infrastruttura necessaria, è il momento di incorporare la valutazione stessa. Questo metodo valuta il modello rispetto al frame corrente per rilevare gli oggetti.
        private async Task<List<float>> EvaluateFrame(VideoFrame frame)
        {
            _binding.Clear();
            _binding.Bind("input_1:0", frame);
            var results = await _session.EvaluateAsync(_binding, "");
            Debug.Print("output done\n");

            TensorFloat result = results.Outputs["Identity:0"] as TensorFloat;
            var shape = result.Shape;
            var data = result.GetAsVectorView();

            return data.ToList<float>();
        }
- L'app deve iniziare in qualche modo. Aggiungere un metodo che avvia il flusso webcam e la valutazione del modello quando l'utente preme il
Gopulsante.
        private void button_go_Click(object sender, RoutedEventArgs e)
        {
            InitModelAsync();
            InitCameraAsync();
        }
- Aggiungere un metodo per chiamare le API di Windows ML per valutare il modello. Prima il modello viene caricato dall'archiviazione e quindi viene creata una sessione e associata alla memoria.
        private async Task InitModelAsync()
        {
            var model_file = await StorageFile.GetFileFromApplicationUriAsync(new Uri("ms-appx:///Assets//Yolo.onnx"));
            _model = await LearningModel.LoadFromStorageFileAsync(model_file);
            var device = new LearningModelDevice(LearningModelDeviceKind.Cpu);
            _session = new LearningModelSession(_model, device);
            _binding = new LearningModelBinding(_session);
        }
Avvia l'applicazione
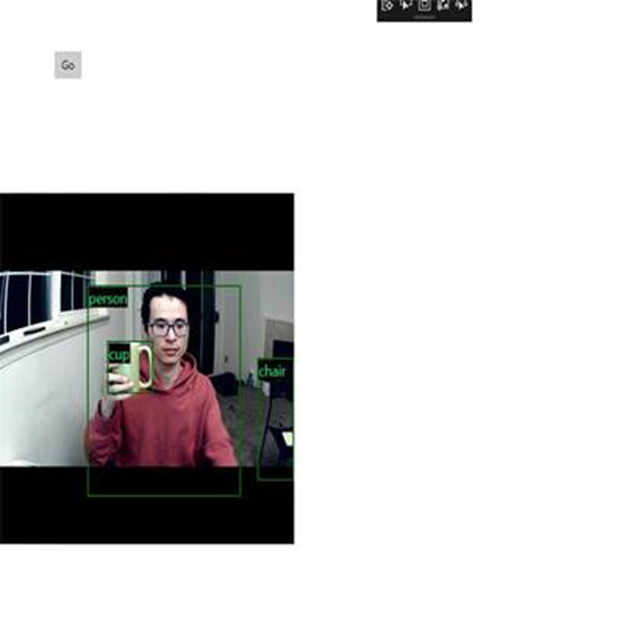
È stata creata un'applicazione di rilevamento oggetti in tempo reale. Selezionare il Run pulsante sulla barra superiore di Visual Studio per avviare l'app. L'app dovrebbe essere simile alla seguente.

Risorse aggiuntive
Per altre informazioni sugli argomenti presentati in questa esercitazione, vedere le risorse seguenti:
- Strumenti di Windows ML: altre informazioni su strumenti come dashboard di Windows ML, WinMLRunner e generatore di codice di Windows ML mglen .
- Modello ONNX: altre informazioni sul formato ONNX.
- Prestazioni e memoria di Windows ML: altre informazioni su come gestire le prestazioni delle app con Windows ML.
- Informazioni di riferimento sulle API di Windows Machine Learning: altre informazioni sulle tre aree delle API di Windows ML.