Exercise - Send an email with attachments
In this exercise, you create a flow that sends an email with dynamic attachments. You also configure the Send an email (V2) action to include recipients, a subject, and a body, and then you dynamically retrieve files from SharePoint or OneDrive to attach to the email.
Scenario
You need to send a follow-up email to a client and include specific documents, such as a proposal or an invoice, that are stored in SharePoint or OneDrive. Instead of manually sending the email and attaching the files, you create a flow that automates this process to help ensure accuracy and save time.
Make sure that you prepare your SharePoint folder and files as follows. If you don't have a SharePoint or OneDrive folder to place files, you can still complete the exercise but can skip the dynamic attachment part.
Open your SharePoint site in your browser.
Create a new folder:
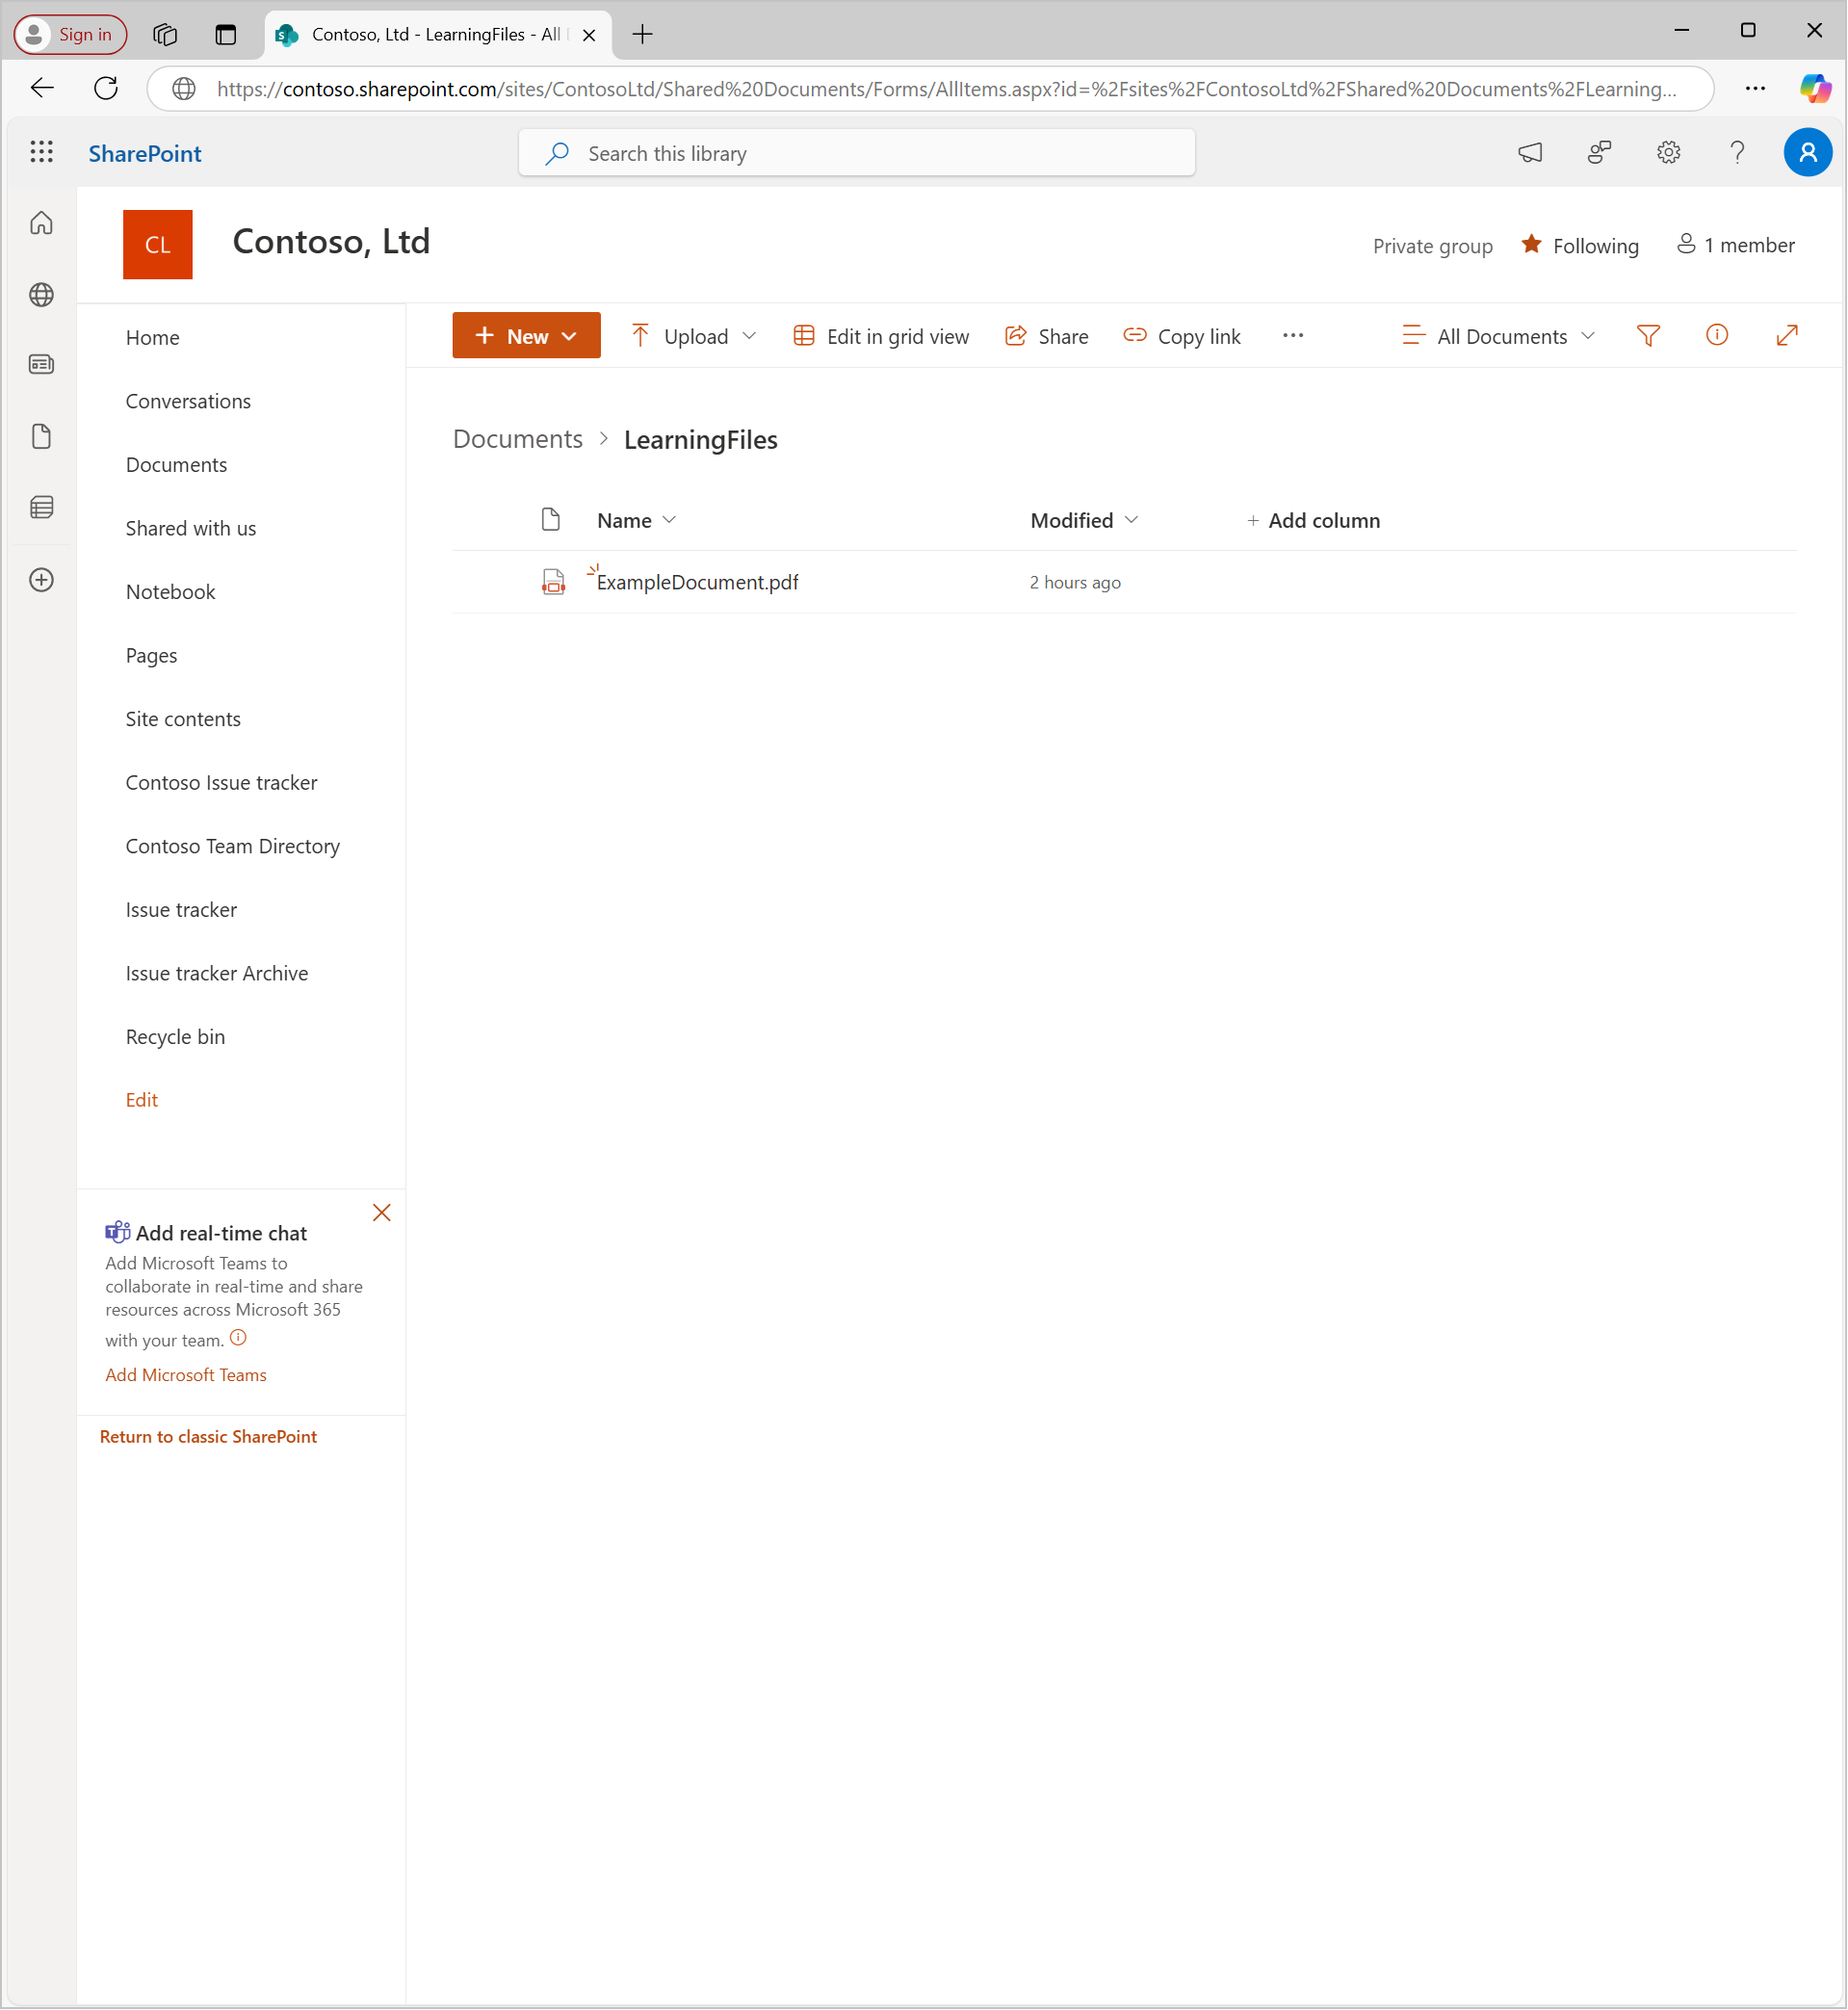
- Go to your Documents folder.
- Create a new folder called LearningFiles.
Upload a file to the folder:
- Open the LearningFiles folder.
- Upload a document from your computer (such as ExampleDocument.pdf).
Verify that the file successfully uploads to the LearningFiles folder.

Create the flow
To create the flow, follow these steps:
- Go to Microsoft Power Automate (https://make.powerautomate.com) and select Create.
- Select Instant cloud flow.
- In the Flow name field, enter Send Email with Attachments.
- For the trigger, select Manually trigger a flow and then select Create.
Configure the trigger
To configure the trigger, select the Manually trigger a flow card and then add the following inputs:
- Recipient Email - Text input (to allow the user to specify the email recipient)
- Email Subject - Text input (to allow the user to specify the subject of the email)

Add the Get file content using path action (SharePoint Connector)
To add the Get file content using path action (SharePoint Connector), follow these steps:
- Select the plus (+) icon under the trigger, select Add an action, and then search for and select the Get file content using path action under the SharePoint Connector.
- Configure the action as follows:
- Site Address - Select the SharePoint site where the file is stored.
- File Path - Select the folder icon and then go to your Shared Documents folder (which is the same as the Documents folder in the SharePoint web interface). Go to the LearningFiles folder and select the file that you uploaded in the first step of the exercise.
Note
If you're using OneDrive, replace this action with Get file content from the OneDrive Connector and then configure it similarly.
Add the Get file metadata using path action (SharePoint Connector)
To add the Get file metadata using path action (SharePoint Connector), follow these steps:
- Select the plus (+) icon under the last action, select Add an action, and then search for and select the Get file metadata using path action under the SharePoint Connector.
- Configure the action as follows:
- Site Address - Select the SharePoint site where the file is stored.
- File Path - Select the folder icon, go to Shared Documents > LearningFiles folder, and then select the file that you uploaded in the first step of the exercise.
Note
If you're using OneDrive, replace this action with Get file metadata using path from the OneDrive Connector and then configure it similarly.
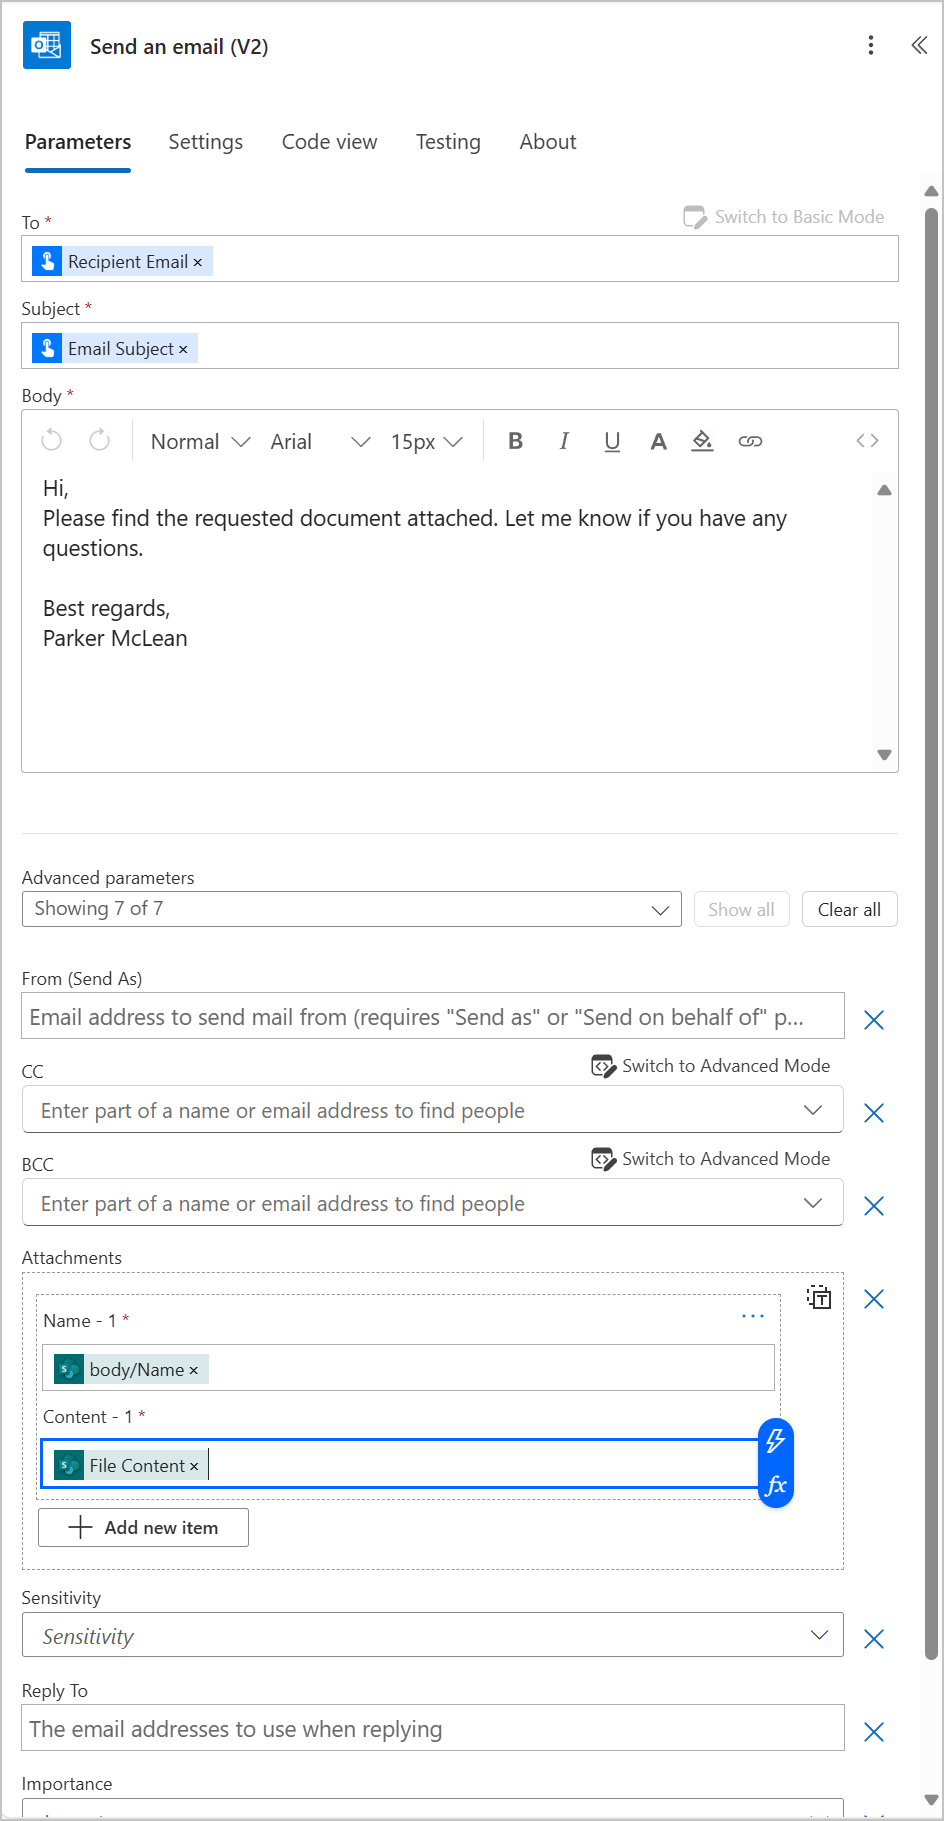
Add the Send an email (V2) action
To add the Send an email (V2) action, follow these steps:
Select the plus (+) icon under the last action, select Add an action, and then search for and select Send an email (V2) under the Office 365 Outlook Connector.
You might need to sign in to the connector first to create a connection. Complete the sign-in prompts to continue.
Configure the action as follows:
To field - Complete the following actions:
- Select Switch to Advanced Mode.
- Place your cursor in the To field and then select the lightning bolt icon.
- Search for and select Recipient Email from the Manually trigger a flow heading.
Subject field - Complete the following actions:
- Select the lightning bolt icon.
- Search for and select Email Subject from the Manually trigger a flow heading (you might need to first select Show more in the heading).
Body - Write the email body, for example:
Hi, Please find the requested document attached. Let me know if you have any questions.
Best regards, [Your Name]
Select Show all next to the Advanced parameters dropdown menu, configure an attachment by selecting Add new item under Attachments, and then complete the following actions:
- Name field - Select the lightning bolt icon and then select body/Name from under the Get file metadata using path heading (if necessary, select See more to reveal all options).
- Content field - Select the lightning bolt icon and then select File Content from under the Get file content using path heading.

Test and run the flow
Your next task is to test and run the flow by following these steps:
- Select Save.
- Select Test > Manually > Test.
- The first time that you run the flow, the system displays a confirmation of the connection sign-ins. Select Continue if this step appears.
- Enter the following test inputs:
- Recipient Email - Enter your email address.
- Email Subject - Enter an email subject, such as Important file attached.
- Select Run flow.
Verify the results
The last step in this exercise is to verify the results by following these steps:
- Open the inbox of the recipient email address.
- Check that the email was delivered with the specified subject, body, and correct attachment.
By completing this exercise, you learned how to configure the Send an email (V2) action to include attachments from the cloud and automate the sending of documents. You can adapt this workflow for countless business scenarios, which helps save time and ensure consistency.