Cenni preliminari sugli oggetti TileBrush
TileBrush gli oggetti offrono un notevole controllo sul modo in cui un'area viene dipinta con un'immagine, Drawing, o Visual. In questo argomento viene descritto come usare TileBrush le funzionalità per ottenere un maggiore controllo sul modo in cui un ImageBrushoggetto , DrawingBrusho VisualBrush disegna un'area.
Prerequisiti
Per comprendere questo argomento, è utile comprendere come usare le funzionalità di base della ImageBrushclasse , DrawingBrusho VisualBrush . Per un'introduzione a questi tipi, vedere Disegnare con oggetti Image, Drawing e Visual.
Disegno di un'area mediante tessere
ImageBrush, DrawingBrushsono VisualBrush tipi di TileBrush oggetti . I pennelli tessera forniscono un elevato livello di controllo sulla modalità di disegno di un'area con un'immagine, un disegno o un oggetto visivo. Anziché ad esempio disegnare un'area con una sola immagine estesa, è possibile usare una serie di immagini affiancate che creano un modello.
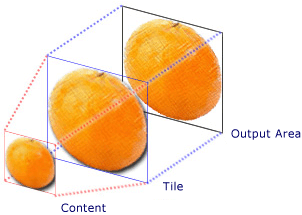
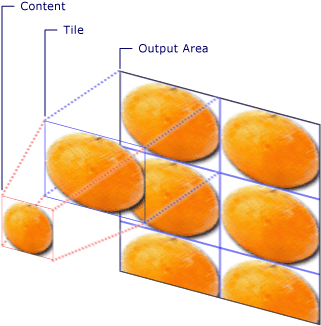
Il disegno di un'area con un pennello tessera include tre componenti: il contenuto, la tessera di base e l'area di output.

Componenti di un oggetto TileBrush con una sola tessera

Componenti di un oggetto TileBrush con TileMode impostata su Tile
L'area di output è l'area da disegnare, ad esempio l'oggetto Fill di un Ellipse oggetto o Background di un oggetto Button. Le sezioni successive descrivono gli altri due componenti di un oggetto TileBrush.
Contenuto del pennello
Esistono tre tipi diversi di TileBrush e ogni vernice con un tipo diverso di contenuto.
Se il pennello è un ImageBrushoggetto , questo contenuto è un'immagine La ImageSource proprietà specifica il contenuto dell'oggetto ImageBrush.
Se il pennello è un DrawingBrushoggetto , questo contenuto è un disegno. La Drawing proprietà specifica il contenuto dell'oggetto DrawingBrush.
Se il pennello è , VisualBrushquesto contenuto è un oggetto visivo. La Visual proprietà specifica il contenuto dell'oggetto VisualBrush.
È possibile specificare la posizione e le dimensioni del TileBrush contenuto usando la Viewbox proprietà , anche se è comune lasciare il Viewbox set sul valore predefinito. Per impostazione predefinita, l'oggetto Viewbox è configurato per contenere completamente il contenuto del pennello. Per altre informazioni sulla configurazione di Viewbox, vedere la pagina delle Viewbox proprietà.
Tessera di base
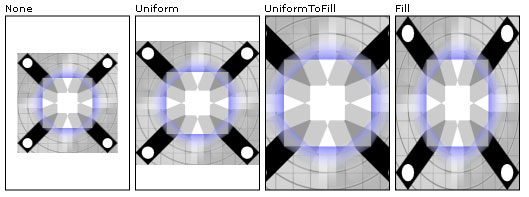
Un TileBrush oggetto proietta il contenuto in un riquadro di base. La Stretch proprietà controlla la modalità TileBrush di estensione del contenuto per riempire il riquadro di base. La Stretch proprietà accetta i valori seguenti, definiti dall'enumerazione Stretch :
None: il contenuto del pennello non viene esteso per riempire il riquadro.
Fill: il contenuto del pennello viene ridimensionato per adattarsi al riquadro. Poiché l'altezza e la larghezza del contenuto vengono ridimensionate in modo indipendente, è possibile che non vengano mantenute le proporzioni originali del contenuto. In altre parole, il contenuto del pennello potrebbe essere distorto per adattarsi completamente alla tessera di output.
Uniform: il contenuto del pennello viene ridimensionato in modo che si adatti completamente all'interno del riquadro. Vengono mantenute le proporzioni del contenuto.
UniformToFill: il contenuto del pennello viene ridimensionato in modo che riempia completamente l'area di output mantenendo le proporzioni originali del contenuto.
L'immagine seguente illustra le diverse Stretch impostazioni.

Nell'esempio seguente viene impostato il contenuto di un oggetto ImageBrush in modo che non si estende per riempire l'area di output.
<Rectangle
  Width="125" Height="175"
  Stroke="Black"
  StrokeThickness="1"
  Margin="0,0,5,0">
  <Rectangle.Fill>
    <ImageBrush
      Stretch="None"
      ImageSource="sampleImages\testImage.gif"/>
  </Rectangle.Fill>
</Rectangle>
// Create a rectangle.
Rectangle myRectangle = new Rectangle();
myRectangle.Width = 125;
myRectangle.Height = 175;
myRectangle.Stroke = Brushes.Black;
myRectangle.StrokeThickness = 1;
myRectangle.Margin = new Thickness(0,5,0,0);

// Load the image.
BitmapImage theImage =
    new BitmapImage(
        new Uri("sampleImages\\testImage.gif", UriKind.Relative));
ImageBrush myImageBrush = new ImageBrush(theImage);

// Configure the brush so that it
// doesn't stretch its image to fill
// the rectangle.
myImageBrush.Stretch = Stretch.None;

// Use the ImageBrush to paint the rectangle's background.
myRectangle.Fill = myImageBrush;
' Create a rectangle.
Dim myRectangle As New Rectangle()
With myRectangle
    .Width = 125
    .Height = 175
    .Stroke = Brushes.Black
    .StrokeThickness = 1
    .Margin = New Thickness(0, 5, 0, 0)
End With

' Load the image.
Dim theImage As New BitmapImage(New Uri("sampleImages\testImage.gif", UriKind.Relative))
Dim myImageBrush As New ImageBrush(theImage)

' Configure the brush so that it
' doesn't stretch its image to fill
' the rectangle.
myImageBrush.Stretch = Stretch.None

' Use the ImageBrush to paint the rectangle's background.
myRectangle.Fill = myImageBrush
Per impostazione predefinita, un genera TileBrush un singolo riquadro (il riquadro di base) e estende tale riquadro per riempire completamente l'area di output. È possibile modificare le dimensioni e la posizione del riquadro di base impostando le Viewport proprietà e ViewportUnits .
Dimensioni della tessera di base
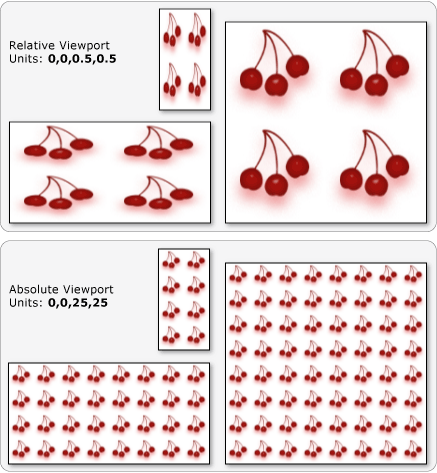
La Viewport proprietà determina le dimensioni e la posizione del riquadro di base e la ViewportUnits proprietà determina se l'oggetto Viewport viene specificato utilizzando coordinate assolute o relative. Se le coordinate sono relative, sono condizionate dalle dimensioni dell'area di output. I punti (0,0) e (1,1) rappresentano rispettivamente l'angolo superiore sinistro e l'angolo inferiore destro dell'area di output. Per specificare che la Viewport proprietà utilizza coordinate assolute, impostare la ViewportUnits proprietà su Absolute.
La figura seguente mostra la differenza nell'output tra un TileBrush oggetto con rispetto all'assoluto ViewportUnitsrelativo. Si noti che ogni immagine illustra un modello affiancato. Nella sezione successiva viene indicato come specificare il modello di affiancamento.

Nell'esempio seguente viene usata un'immagine per creare una tessera di larghezza pari al 50% dell'altezza. La tessera di base viene posizionata nel punto (0,0) dell'area di output.
<Rectangle
 Width="50" Height="100">
  <Rectangle.Fill>

    <!-- Paints an area with 4 tiles. -->
    <ImageBrush ImageSource="sampleImages\cherries_larger.jpg"
      Viewport="0,0,0.5,0.5"
      ViewportUnits="RelativeToBoundingBox"
      TileMode="Tile" />
  </Rectangle.Fill>
</Rectangle>
// Create a rectangle.
Rectangle myRectangle = new Rectangle();
myRectangle.Width = 50;
myRectangle.Height = 100;

// Load the image.
BitmapImage theImage =
    new BitmapImage(
        new Uri("sampleImages\\cherries_larger.jpg", UriKind.Relative));
ImageBrush myImageBrush = new ImageBrush(theImage);

// Create tiles that are 1/4 the size of
// the output area.
myImageBrush.Viewport = new Rect(0,0,0.25,0.25);
myImageBrush.ViewportUnits = BrushMappingMode.RelativeToBoundingBox;

// Set the tile mode to Tile.
myImageBrush.TileMode = TileMode.Tile;

// Use the ImageBrush to paint the rectangle's background.
myRectangle.Fill = myImageBrush;
' Create a rectangle.
Dim myRectangle As New Rectangle()
myRectangle.Width = 50
myRectangle.Height = 100

' Load the image.
Dim theImage As New BitmapImage(New Uri("sampleImages\cherries_larger.jpg", UriKind.Relative))
Dim myImageBrush As New ImageBrush(theImage)

' Create tiles that are 1/4 the size of
' the output area.
myImageBrush.Viewport = New Rect(0, 0, 0.25, 0.25)
myImageBrush.ViewportUnits = BrushMappingMode.RelativeToBoundingBox

' Set the tile mode to Tile.
myImageBrush.TileMode = TileMode.Tile

' Use the ImageBrush to paint the rectangle's background.
myRectangle.Fill = myImageBrush
L'esempio seguente imposta i riquadri di un oggetto ImageBrush su 25 per 25 pixel indipendenti dal dispositivo. Poiché sono ViewportUnits assoluti, i ImageBrush riquadri sono sempre 25 per 25 pixel, indipendentemente dalle dimensioni dell'area da disegnare.
<Rectangle
 Width="50" Height="100">
  <Rectangle.Fill>

    <!-- Paints an area with 25 x 25 tiles. -->
    <ImageBrush ImageSource="sampleImages\cherries_larger.jpg"
      Viewport="0,0,25,25"
      ViewportUnits="Absolute"
      TileMode="Tile" />
  </Rectangle.Fill>
</Rectangle>
// Create a rectangle.
Rectangle myRectangle = new Rectangle();
myRectangle.Width = 50;
myRectangle.Height = 100;

// Load the image.
BitmapImage theImage =
    new BitmapImage(
        new Uri("sampleImages\\cherries_larger.jpg", UriKind.Relative));
ImageBrush myImageBrush = new ImageBrush(theImage);

// Create tiles that are 25 x 25, regardless of the size
// of the output area.
myImageBrush.Viewport = new Rect(0, 0, 25, 25);
myImageBrush.ViewportUnits = BrushMappingMode.Absolute;

// Set the tile mode to Tile.
myImageBrush.TileMode = TileMode.Tile;

// Use the ImageBrush to paint the rectangle's background.
myRectangle.Fill = myImageBrush;
' Create a rectangle.
Dim myRectangle As New Rectangle()
myRectangle.Width = 50
myRectangle.Height = 100

' Load the image.
Dim theImage As New BitmapImage(New Uri("sampleImages\cherries_larger.jpg", UriKind.Relative))
Dim myImageBrush As New ImageBrush(theImage)

' Create tiles that are 25 x 25, regardless of the size
' of the output area.
myImageBrush.Viewport = New Rect(0, 0, 25, 25)
myImageBrush.ViewportUnits = BrushMappingMode.Absolute

' Set the tile mode to Tile.
myImageBrush.TileMode = TileMode.Tile

' Use the ImageBrush to paint the rectangle's background.
myRectangle.Fill = myImageBrush
Comportamento dell'affiancamento
Un TileBrush produce un motivo affiancato quando il riquadro di base non riempie completamente l'area di output e viene None specificata un'altra modalità di affiancamento. Quando il riquadro di un pennello di riquadro non riempie completamente l'area di output, la relativa TileMode proprietà specifica se il riquadro di base deve essere duplicato per riempire l'area di output e, in tal caso, come deve essere duplicato il riquadro di base. La TileMode proprietà accetta i valori seguenti, definiti dall'enumerazione TileMode :
None: viene disegnato solo il riquadro di base.
Tile: il riquadro di base viene disegnato e l'area rimanente viene riempita ripetendo il riquadro di base in modo che il bordo destro di un riquadro sia adiacente al bordo sinistro del successivo e in modo analogo per inferiore e superiore.
FlipX: uguale a Tile, ma le colonne alternative dei riquadri vengono capovolte orizzontalmente.
FlipY: uguale a Tile, ma le righe alternative dei riquadri vengono capovolte verticalmente.
L'immagine seguente illustra le diverse modalità di affiancamento.

Nell'esempio seguente viene usata un'immagine per disegnare un rettangolo di larghezza e altezza pari a 100 pixel. Impostando il pennello Viewport è stato impostato su 0,0,0,25,0,25,25, il riquadro di base del pennello viene impostato su 1/4 dell'area di output. Il pennello TileMode è impostato su FlipXY. In questo modo il rettangolo viene riempito con righe di tessere.
<Rectangle
 Width="100" Height="100" >
  <Rectangle.Fill>
    <ImageBrush ImageSource="sampleImages\triangle.jpg"
      Viewport="0,0,0.25,0.25"
      TileMode="FlipXY"
      />
  </Rectangle.Fill>
</Rectangle>
// Create a rectangle.
Rectangle myRectangle = new Rectangle();
myRectangle.Width = 100;
myRectangle.Height = 100;

// Load the image.
BitmapImage theImage =
    new BitmapImage(
        new Uri("sampleImages\\triangle.jpg", UriKind.Relative));
ImageBrush myImageBrush = new ImageBrush(theImage);

// Create tiles that are 1/4 the size of
// the output area.
myImageBrush.Viewport = new Rect(0,0,0.25,0.25);

// Set the tile mode to FlipXY.
myImageBrush.TileMode = TileMode.FlipXY;

// Use the ImageBrush to paint the rectangle's background.
myRectangle.Fill = myImageBrush;
' Create a rectangle.
Dim myRectangle As New Rectangle()
myRectangle.Width = 100
myRectangle.Height = 100

' Load the image.
Dim theImage As New BitmapImage(New Uri("sampleImages\triangle.jpg", UriKind.Relative))
Dim myImageBrush As New ImageBrush(theImage)

' Create tiles that are 1/4 the size of
' the output area.
myImageBrush.Viewport = New Rect(0, 0, 0.25, 0.25)

' Set the tile mode to FlipXY.
myImageBrush.TileMode = TileMode.FlipXY

' Use the ImageBrush to paint the rectangle's background.
myRectangle.Fill = myImageBrush
Vedi anche
.NET Desktop feedback
