Procedura: impostare l'allineamento orizzontale e verticale di un TileBrush
Questo esempio spiega come controllare l'allineamento orizzontale e verticale del contenuto in una tessera. Per controllare l'allineamento orizzontale e verticale di un TileBrushoggetto , utilizzare le relative AlignmentX proprietà e AlignmentY .
Le AlignmentX proprietà e AlignmentY di un TileBrush oggetto vengono utilizzate quando una delle condizioni seguenti è vera:
La Stretch proprietà è Uniform o UniformToFill e e Viewbox hanno Viewport proporzioni diverse.
La Stretch proprietà è None e e ViewboxViewport sono dimensioni diverse.
Allinea TileBrush all'angolo superiore sinistro
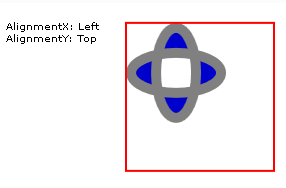
Nell'esempio seguente il contenuto di un oggetto DrawingBrush, che è un tipo di TileBrush, viene allineato all'angolo superiore sinistro del riquadro. Per allineare il contenuto, nell'esempio viene impostata la AlignmentX proprietà dell'oggetto DrawingBrush su Left e la AlignmentY proprietà su Top. Questo esempio produce il seguente output:

TileBrush con contenuto allineato all'angolo superiore sinistro
//
// Create a TileBrush and align its
// content to the top-left of its tile.
//
DrawingBrush topLeftAlignedTileBrush = new DrawingBrush();
topLeftAlignedTileBrush.AlignmentX = AlignmentX.Left;
topLeftAlignedTileBrush.AlignmentY = AlignmentY.Top;

// Set Stretch to None so that the brush's
// content doesn't automatically expand to
// fill the entire tile.
topLeftAlignedTileBrush.Stretch = Stretch.None;

// Define the brush's content.
GeometryGroup ellipses = new GeometryGroup();
ellipses.Children.Add(new EllipseGeometry(new Point(50, 50), 20, 45));
ellipses.Children.Add(new EllipseGeometry(new Point(50, 50), 45, 20));
Pen drawingPen = new Pen(Brushes.Gray, 10);
GeometryDrawing ellipseDrawing = new GeometryDrawing(Brushes.Blue, drawingPen, ellipses);
topLeftAlignedTileBrush.Drawing = ellipseDrawing;

// Use the brush to paint a rectangle.
Rectangle rectangle1 = new Rectangle();
rectangle1.Width = 150;
rectangle1.Height = 150;
rectangle1.Stroke = Brushes.Red;
rectangle1.StrokeThickness = 2;
rectangle1.Margin = new Thickness(20);
rectangle1.Fill = topLeftAlignedTileBrush;
'
' Create a TileBrush and align its
' content to the top-left of its tile.
'
Dim topLeftAlignedTileBrush As New DrawingBrush()
topLeftAlignedTileBrush.AlignmentX = AlignmentX.Left
topLeftAlignedTileBrush.AlignmentY = AlignmentY.Top

' Set Stretch to None so that the brush's
' content doesn't automatically expand to
' fill the entire tile.
topLeftAlignedTileBrush.Stretch = Stretch.None

' Define the brush's content.
Dim ellipses As New GeometryGroup()
ellipses.Children.Add(New EllipseGeometry(New Point(50, 50), 20, 45))
ellipses.Children.Add(New EllipseGeometry(New Point(50, 50), 45, 20))
Dim drawingPen As New Pen(Brushes.Gray, 10)
Dim ellipseDrawing As New GeometryDrawing(Brushes.Blue, drawingPen, ellipses)
topLeftAlignedTileBrush.Drawing = ellipseDrawing

' Use the brush to paint a rectangle.
Dim rectangle1 As New Rectangle()
With rectangle1
    .Width = 150
    .Height = 150
    .Stroke = Brushes.Red
    .StrokeThickness = 2
    .Margin = New Thickness(20)
    .Fill = topLeftAlignedTileBrush
End With
<Rectangle
  Width="150" Height="150"
  Stroke="Red" StrokeThickness="2"
  Margin="20">
  <Rectangle.Fill>

    <!-- This brush's content is aligned to the top-left
         of its tile. -->
    <DrawingBrush
      Stretch="None"
      AlignmentX="Left"
      AlignmentY="Top">
      <DrawingBrush.Drawing>
        <GeometryDrawing Brush="MediumBlue">
          <GeometryDrawing.Geometry>
            <GeometryGroup>
              <EllipseGeometry RadiusX="20" RadiusY="45" Center="50,50" />
              <EllipseGeometry RadiusX="45" RadiusY="20" Center="50,50" />
            </GeometryGroup>
          </GeometryDrawing.Geometry>
          <GeometryDrawing.Pen>
            <Pen Brush="Gray" Thickness="10" />
          </GeometryDrawing.Pen>
        </GeometryDrawing>
      </DrawingBrush.Drawing>
    </DrawingBrush>
  </Rectangle.Fill>
</Rectangle>
Allineare DrawingBrush all'angolo inferiore destro
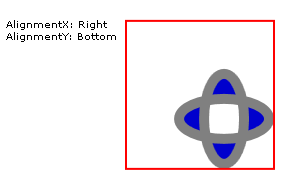
Nell'esempio seguente il contenuto di un DrawingBrush oggetto viene allineato all'angolo inferiore destro del riquadro impostando la AlignmentX proprietà su Right e la AlignmentY proprietà su Bottom. Questo esempio produce l'output seguente.

TileBrush con contenuto allineato all'angolo in basso a destra
//
// Create a TileBrush and align its
// content to the bottom-right of its tile.
//
DrawingBrush bottomRightAlignedTileBrush = new DrawingBrush();
bottomRightAlignedTileBrush.AlignmentX = AlignmentX.Right;
bottomRightAlignedTileBrush.AlignmentY = AlignmentY.Bottom;
bottomRightAlignedTileBrush.Stretch = Stretch.None;

// Define the brush's content.
bottomRightAlignedTileBrush.Drawing = ellipseDrawing;

// Use the brush to paint a rectangle.
Rectangle rectangle2 = new Rectangle();
rectangle2.Width = 150;
rectangle2.Height = 150;
rectangle2.Stroke = Brushes.Red;
rectangle2.StrokeThickness = 2;
rectangle2.Margin = new Thickness(20);
rectangle2.Fill = bottomRightAlignedTileBrush;
'
' Create a TileBrush and align its
' content to the bottom-right of its tile.
'
Dim bottomRightAlignedTileBrush As New DrawingBrush()
With bottomRightAlignedTileBrush
    .AlignmentX = AlignmentX.Right
    .AlignmentY = AlignmentY.Bottom
    .Stretch = Stretch.None

    ' Define the brush's content.
    .Drawing = ellipseDrawing
End With

' Use the brush to paint a rectangle.
Dim rectangle2 As New Rectangle()
With rectangle2
    .Width = 150
    .Height = 150
    .Stroke = Brushes.Red
    .StrokeThickness = 2
    .Margin = New Thickness(20)
    .Fill = bottomRightAlignedTileBrush
End With
<Rectangle
  Width="150" Height="150"
  Stroke="Red" StrokeThickness="2"
  Margin="20">
  <Rectangle.Fill>

    <!-- This brush's content is aligned to the bottom right
         of its tile. -->
    <DrawingBrush
      Stretch="None"
      AlignmentX="Right"
      AlignmentY="Bottom">
      <DrawingBrush.Drawing>
        <GeometryDrawing Brush="MediumBlue">
          <GeometryDrawing.Geometry>
            <GeometryGroup>
              <EllipseGeometry RadiusX="20" RadiusY="45" Center="50,50" />
              <EllipseGeometry RadiusX="45" RadiusY="20" Center="50,50" />
            </GeometryGroup>
          </GeometryDrawing.Geometry>
          <GeometryDrawing.Pen>
            <Pen Brush="Gray" Thickness="10" />
          </GeometryDrawing.Pen>
        </GeometryDrawing>
      </DrawingBrush.Drawing>
    </DrawingBrush>
  </Rectangle.Fill>
</Rectangle>
Allineare DrawingBrush all'angolo superiore sinistro
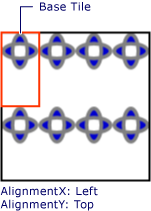
Nell'esempio seguente il contenuto di un DrawingBrush oggetto viene allineato all'angolo superiore sinistro del riquadro impostando la AlignmentX proprietà su Left e la AlignmentY proprietà su Top. Imposta anche l'oggetto Viewport e TileMode di DrawingBrush per produrre un modello di riquadro. Questo esempio produce l'output seguente.

Modello di tessera con contenuto allineato all'angolo superiore sinistro nella tessera di base
L'illustrazione evidenzia una tessera di base, in modo da mostrarne il modo in cui è allineato il contenuto. Si noti che l'impostazione AlignmentX non ha alcun effetto perché il contenuto dell'oggetto DrawingBrush riempie completamente il riquadro di base orizzontalmente.
//
// Create a TileBrush that generates a
// tiled pattern and align its
// content to the top-left of its tile.
//
DrawingBrush tiledTopLeftAlignedTileBrush = new DrawingBrush();
tiledTopLeftAlignedTileBrush.AlignmentX = AlignmentX.Left;
tiledTopLeftAlignedTileBrush.AlignmentY = AlignmentY.Top;
tiledTopLeftAlignedTileBrush.Stretch = Stretch.Uniform;

// Set the brush's Viewport and TileMode to produce a
// tiled pattern.
tiledTopLeftAlignedTileBrush.Viewport = new Rect(0, 0, 0.25, 0.5);
tiledTopLeftAlignedTileBrush.TileMode = TileMode.Tile;

// Define the brush's content.
tiledTopLeftAlignedTileBrush.Drawing = ellipseDrawing;

// Use the brush to paint a rectangle.
Rectangle rectangle3 = new Rectangle();
rectangle3.Width = 150;
rectangle3.Height = 150;
rectangle3.Stroke = Brushes.Black;
rectangle3.StrokeThickness = 2;
rectangle3.Margin = new Thickness(20);
rectangle3.Fill = tiledTopLeftAlignedTileBrush;
'
' Create a TileBrush that generates a
' tiled pattern and align its
' content to the top-left of its tile.
'
Dim tiledTopLeftAlignedTileBrush As New DrawingBrush()
With tiledTopLeftAlignedTileBrush
    .AlignmentX = AlignmentX.Left
    .AlignmentY = AlignmentY.Top
    .Stretch = Stretch.Uniform

    ' Set the brush's Viewport and TileMode to produce a
    ' tiled pattern.
    .Viewport = New Rect(0, 0, 0.25, 0.5)
    .TileMode = TileMode.Tile

    ' Define the brush's content.
    .Drawing = ellipseDrawing
End With

' Use the brush to paint a rectangle.
Dim rectangle3 As New Rectangle()
With rectangle3
    .Width = 150
    .Height = 150
    .Stroke = Brushes.Black
    .StrokeThickness = 2
    .Margin = New Thickness(20)
    .Fill = tiledTopLeftAlignedTileBrush
End With
<Rectangle
 Width="150" Height="150"
 Stroke="Black" StrokeThickness="2"
 Margin="20">
  <Rectangle.Fill>

    <!-- This brush's content is aligned to the top left
         of its tile.  -->
    <DrawingBrush
      Stretch="Uniform"
      Viewport="0,0,0.25,0.5"
      TileMode="Tile"
      AlignmentX="Left"
      AlignmentY="Top">
      <DrawingBrush.Drawing>
        <GeometryDrawing Brush="MediumBlue">
          <GeometryDrawing.Geometry>
            <GeometryGroup>
              <EllipseGeometry RadiusX="20" RadiusY="45" Center="50,50" />
              <EllipseGeometry RadiusX="45" RadiusY="20" Center="50,50" />
            </GeometryGroup>
          </GeometryDrawing.Geometry>
          <GeometryDrawing.Pen>
            <Pen Brush="Gray" Thickness="10" />
          </GeometryDrawing.Pen>
        </GeometryDrawing>
      </DrawingBrush.Drawing>
    </DrawingBrush>
  </Rectangle.Fill>
</Rectangle>
Allinea DrawingBrush affiancato all'angolo inferiore destro
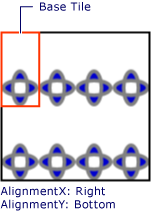
L'esempio finale allinea il contenuto di un riquadro DrawingBrush in basso a destra del riquadro di base impostando la AlignmentX proprietà su Right e la AlignmentY proprietà su Bottom. Questo esempio produce l'output seguente.

Modello di tessera con contenuto allineato all'angolo inferiore destro nella tessera di base
Anche in questo caso, l'impostazione AlignmentX non ha alcun effetto perché il contenuto dell'oggetto DrawingBrush riempie completamente il riquadro di base orizzontalmente.
//
// Create a TileBrush and align its
// content to the bottom-right of its tile.
//
DrawingBrush bottomRightAlignedTileBrush = new DrawingBrush();
bottomRightAlignedTileBrush.AlignmentX = AlignmentX.Right;
bottomRightAlignedTileBrush.AlignmentY = AlignmentY.Bottom;
bottomRightAlignedTileBrush.Stretch = Stretch.None;

// Define the brush's content.
bottomRightAlignedTileBrush.Drawing = ellipseDrawing;

// Use the brush to paint a rectangle.
Rectangle rectangle2 = new Rectangle();
rectangle2.Width = 150;
rectangle2.Height = 150;
rectangle2.Stroke = Brushes.Red;
rectangle2.StrokeThickness = 2;
rectangle2.Margin = new Thickness(20);
rectangle2.Fill = bottomRightAlignedTileBrush;
'
' Create a TileBrush and align its
' content to the bottom-right of its tile.
'
Dim bottomRightAlignedTileBrush As New DrawingBrush()
With bottomRightAlignedTileBrush
    .AlignmentX = AlignmentX.Right
    .AlignmentY = AlignmentY.Bottom
    .Stretch = Stretch.None

    ' Define the brush's content.
    .Drawing = ellipseDrawing
End With

' Use the brush to paint a rectangle.
Dim rectangle2 As New Rectangle()
With rectangle2
    .Width = 150
    .Height = 150
    .Stroke = Brushes.Red
    .StrokeThickness = 2
    .Margin = New Thickness(20)
    .Fill = bottomRightAlignedTileBrush
End With
<Rectangle
  Width="150" Height="150"
  Stroke="Red" StrokeThickness="2"
  Margin="20">
  <Rectangle.Fill>

    <!-- This brush's content is aligned to the bottom right
         of its tile. -->
    <DrawingBrush
      Stretch="None"
      AlignmentX="Right"
      AlignmentY="Bottom">
      <DrawingBrush.Drawing>
        <GeometryDrawing Brush="MediumBlue">
          <GeometryDrawing.Geometry>
            <GeometryGroup>
              <EllipseGeometry RadiusX="20" RadiusY="45" Center="50,50" />
              <EllipseGeometry RadiusX="45" RadiusY="20" Center="50,50" />
            </GeometryGroup>
          </GeometryDrawing.Geometry>
          <GeometryDrawing.Pen>
            <Pen Brush="Gray" Thickness="10" />
          </GeometryDrawing.Pen>
        </GeometryDrawing>
      </DrawingBrush.Drawing>
    </DrawingBrush>
  </Rectangle.Fill>
</Rectangle>
Gli esempi usano DrawingBrush oggetti per illustrare come vengono usate le AlignmentX proprietà e AlignmentY . Queste proprietà si comportano in modo identico per tutti i pennelli del riquadro: DrawingBrush, ImageBrushe VisualBrush. Per altre informazioni sui pennelli tessera, vedere Disegnare con oggetti Image, Drawing e Visual.
Vedi anche
.NET Desktop feedback
