Using a Host Guest communication channel in Windows Virtual PC
Host Guest Communication
In Windows® Virtual PC (WVPC), the virtual machine (guest) and the Windows 7 host need to communicate with each other for sharing data, devices and functionality, such as clipboard sharing, printer sharing, file system and drive sharing, Start menu integration and file association with virtual apps. Such communication is also necessary for displaying the video of the VM on the Windows 7 desktop. In this article, we will discuss in detail how such a guest host communication channel is designed and implemented in WVPC and how you can leverage it to add additional functionality. The communication mechanism is modeled as typical client server architecture with the Windows 7 host acting as the client and the VM acting as the server.
Applications can make use of this feature to start a communication channel and transfer data between the host and guest. The communication channel enables a named pipe client application on the host to exchange data with a TCP server application running in the guest. It is generic and can be used by third-party applications, using its COM APIs which are scriptable. Here are some example applications you could build:
- An application running in the virtual machine could monitor various parameters such as anti-virus status, low disk space, etc. and it can then communicate the status to an application running on the host using its own protocol developed over the communication channel.
- Consider a file created in a virtual application running in a VM, which needs to be printed on a printer connected only to the host. A printer application can be developed to redirect the print command issued in the VM to the host and complete the printing, using the guest-host communication channel.
- An application could be developed to execute a command line tool or script entered on the host command line interface to be redirected to the guest and executed there.
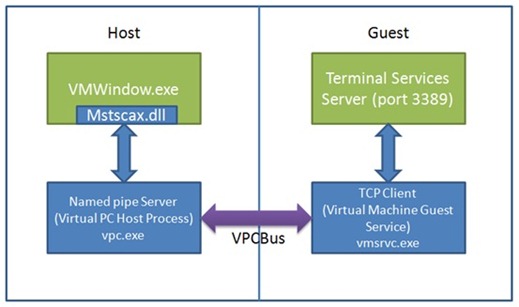
WVPC itself leverages RDP technology from Microsoft Remote Desktop Services® (RDS; formerly Terminal Services) on top of this guest-host communication channel, to show the guest video on the host. When Integration Features are enabled, or a virtual application is started, a TS session is started from host to guest. Traditionally, TS sessions use the network as a communication channel between a client and server. In contrast, since the VM and the host are running on the same hardware, the TS session initiated by WVPC does not require any network connection, but is established using the guest – host communication channel.
Host Guest Communication Channel Architecture
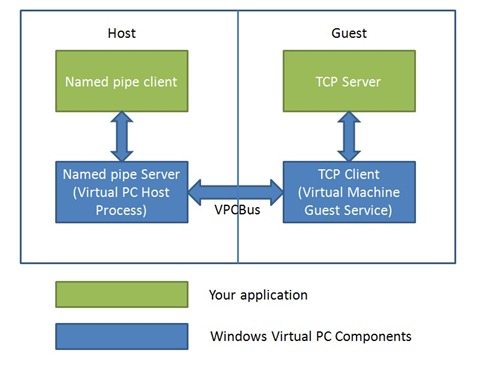
Overall the architecture of host-guest communication channel is shown in Figure 1.
Figure 1. Architectural overview of Host-Guest Communication Channel
In the above diagram, green boxes are application specific, and blue boxes illustrate the host-guest communication protocol implemented in WVPC. To initiate communication, a TS session is established by VMWindow.exe, a component of WVPC, which acts as a named pipe client, with TS server running inside the VM acts as the TCP server. Typically, an application on the host makes a COM call (StartCommunicationChannel) to setup the channel. And then, applications can communicate with the TCP server that is already set up in the guest. StartCommunication COM call starts a named pipe server on the guest and application’s named pipe client can send data to and receive data from this named pipe server. This server is hosted by WVPC Host Process (vpc.exe). On the guest side, a TCP client is established which communicates to the TCP server which is assumed to be up and running when the COM call is made. The TCP client is hosted by Virtual Machine Guest Service (vmsrvc.exe). Under the hood, the named pipe server on the host (vpc.exe) and TCP client on the guest (vmsrvc.exe) communicate with each other using VPCBus. VPCBus is a new integral component of WVPC which provides the communication infrastructure between the WVPC (Virtual PC host process) and the guest VM. The VPCBus achieves this internally by introducing new synthetic devices inside guest VM. These synthetic devices act as communication channels.
As explained in a previous blog, Integration Components need to be installed in the guest to make use of the communication mechanism. Usage of the new communication mechanism is shown in Figure 2:
Figure 2. Usage of the WVPC Guest Host Communication Channel
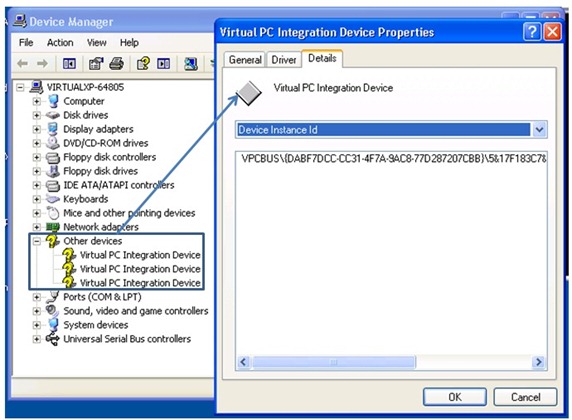
The entire communication between guest and host happens over VPCBus. For every communication channel established, two VPCBus channels are opened between host and guest. When integration components are enabled, you can see these VPCBus channels in guest device management. These devices come under “Other devices” category and are named “Virtual PC Integration Device”. These are the devices used by WVPC for performing a TS session inside the guest (Fig. 3).
Figure 3. Guest Host Communication Channel components shown in the Device Manager
Named pipe client in the Host
The typical sequence of actions for an application using the communication channel is as follows:
- TCP Server starts in the guest and waits for connection over predefined port number and on LocalHost IP(127.0.0.1). The server can be started manually or be configured to run automatically when guest starts.
- The Client application starts and gets interface handle for the VM in which TCP server is running.
- The client VM opens a named event and waits for it to be signaled. The event name is in predefined format "Local\<ChassisTag>_ChannelReady. The chasis Tag for a VM can be found using IVM interface property ChassisAssetTag.
- When the event gets signaled the client requests the WVPC (Virtual PC host process) to start Named pipe server and establish connection with TCP server in guest. This is done using “StartCommunicationChannel” API. As part of this API client passes the name of Named pipe to be used and the port number on which TCP server is listening.
- WVPC establishes the VPCBus channels with guest. This results in Guest VPCBus component initiating connection with the TCP Server.
- TCP Server accepts connection and waits for Data from client.
- The client then connects to the named pipe using standard Win32 File APIs and starts exchanging data using Read/Write APIs.
With this sequence, host and guest can communicate with each other for the given purpose. For the illustration, let’s take a look at sample named pipe client on the host side which sends “Hello World” to message to guest.
    1: LPCWSTR VMNAME = L"Windows XP Mode";
    2: LPCWSTR PIPE_NAME = L"\\\\.\\pipe\\mynamedpipe";
    3: LPCWSTR PORT_NUMBER = L"6174";
    4:
    5: int __cdecl main(int , char* )
    6: {
    7:     IVMVirtualMachine* vmObj = NULL;
    8:     IVMVirtualPC* pIVPC = NULL;
    9:     HRESULT hr = S_OK;
   10:     BSTR bName = NULL;
   11:     BSTR bPipeName = NULL;
   12:     BSTR bPortNumber = NULL;
   13:     HANDLE hPipe = INVALID_HANDLE_VALUE;
   14:     WCHAR pszWriteThis[] = L"Hello World!";
   15:     DWORD bytesWritten = 0;
   16:
   17:     //
   18:     // Initialize VPC COM interfaces.
   19:     //
   20:
   21:     hr = InitVPCComInterfaces(&pIVPC);
   22:     if (FAILED(hr)) {
   23:         goto Cleanup;
   24:     }
   25:
   26:     //
   27:     // Find the VM on which communication is to be done.
   28:     //
   29:
   30:     bName = SysAllocString(VMNAME);
   31:     if (bName == NULL) {
   32:         hr = HRESULT_FROM_WIN32(ERROR_OUTOFMEMORY);
   33:         goto Cleanup;
   34:     }
   35:
   36:     hr = pIVPC->FindVirtualMachine(bName, &vmObj);
   37:     if (hr != S_OK) {
   38:         goto Cleanup;
   39:     }
   40:
   41:     //
   42:     // Need to wait for the communication channel infrastructure to be up
   43:     // before it is put to use. VM needs to be up and running before
   44:     // channel gets ready.
   45:     //
   46:
   47:     hr = WaitForChannelReady(vmObj);
   48:     if (FAILED(hr)) {
   49:         goto Cleanup;
   50:     }
   51:
   52:     bPipeName = SysAllocString(PIPE_NAME);
   53:     bPortNumber = SysAllocString(PORT_NUMBER);
   54:     if (bPipeName == NULL || bPortNumber == NULL) {
   55:         hr = HRESULT_FROM_WIN32(ERROR_OUTOFMEMORY);
   56:         goto Cleanup;
   57:     }
   58:
   59:     //
   60:     // Set up the communication channel to be used by host and guest.
   61:     //
   62:
   63:     hr = vmObj->StartCommunicationChannel(vmEndpoint_NamedPipe,
   64:                                           bPipeName,
   65:                                           vmEndpoint_TCPIP,
   66:                                           bPortNumber);
   67:     if (FAILED(hr)) {
   68:         goto Cleanup;
   69:     }
   70:
   71:     //
   72:     // Now communication channel is set up and data transfer can be initiated.
   73:     //
   74:
   75:     hPipe = CreateFile(PIPE_NAME,
   76:                        GENERIC_READ |
   77:                        GENERIC_WRITE,
   78:                        0,
   79:                        NULL,
   80:                        OPEN_EXISTING,
   81:                        0,
   82:                        NULL);
   83:
   84:     if (hPipe == INVALID_HANDLE_VALUE) {
   85:         goto Cleanup;
   86:     }
   87:
   88:     wprintf(L"Sending '%s' to guest.\n", pszWriteThis);
   89:
   90:     if (WriteFile(hPipe,
   91:                   pszWriteThis,
   92:                   sizeof(pszWriteThis),
   93:                   &bytesWritten,
   94:                   NULL) == FALSE) {
   95:         goto Cleanup;
   96:     }
   97:
   98: Cleanup:
   99:
  100:     SAFE_RELEASE(pIVPC);
  101:     SAFE_RELEASE(vmObj);
  102:     SAFE_FREE(bName);
  103:     SAFE_FREE(bPipeName);
  104:     SAFE_FREE(bPortNumber);
  105:     if (hPipe != INVALID_HANDLE_VALUE) {
  106:         CloseHandle(hPipe);
  107:     }
  108:
  109:     return 1;
  110: }
  111: HRESULT
  112: InitVPCComInterfaces(
  113:     IVMVirtualPC** ppIVPC
  114:     )
  115: {
  116:     HRESULT hr = S_OK;
  117:     if (ppIVPC == NULL) {
  118:         return E_INVALIDARG;
  119:     }
  120:
  121:     *ppIVPC = NULL;
  122:     hr = CoInitializeEx(NULL, COINIT_APARTMENTTHREADED);
  123:     if (FAILED(hr)) {
  124:         return hr;
  125:     }
  126:
  127:     REFCLSID classID = _uuidof(VMVirtualPC);
  128:
  129:     hr = CoCreateInstance(classID,
  130:                           NULL,
  131:                           CLSCTX_ALL,
  132:                           IID_IVMVirtualPC,
  133:                           (LPVOID*)ppIVPC);
  134:
  135:     // test connection
  136:     if (SUCCEEDED(hr) && (*ppIVPC != NULL)) {
  137:         // Make a call to the interface and see if it works.
  138:         BSTR bVer;
  139:         hr = (*ppIVPC)->get_Version(&bVer);
  140:         ::SysFreeString(bVer);
  141:     }
  142:
  143:     return hr;
  144: }
  145:
The application begins by getting the interface handle to the virtual machine (line 36) on which the communication is to be done. The VM needs to be running before the StartCommuincationChannel COM call is made. Also, after VM starts execution, it takes time for communication mechanism to be up as it has to wait for the Virtual PC Integration Components Service (service name: 1-vmsrvc) to be started in the guest. Applications can determine when the channel is ready by calling WaitForChannelReady() function (described in detail later).
StartCommunicationChannel takes four arguments – two are end-point types (VMEndpointType), the name with which the named pipe server will be started in the Virtual PC Host Process (\\.\pipe\mynamedpipe in the sample) on the host and the port number on which the TCP server is running ins the guest.
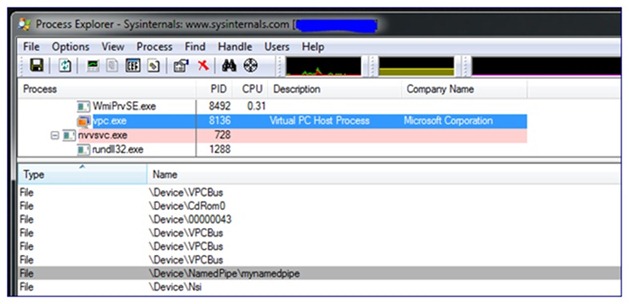
StartCommunicationChannel call (line 63) results in the requested named pipe server starting up in the Virtual PC Host Process (vpc.exe). This can be viewed using Process Explorer as in the screenshot below (Figure 4).
Figure 4. Named pipe server starting up in the Virtual PC Host Process (vpc.exe)
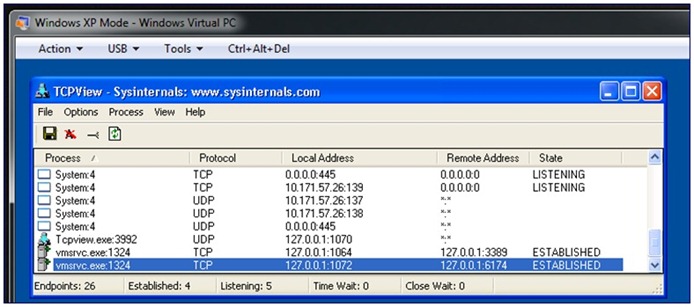
The application then continues to connect (line 75) to the named pipe server it requested and writes out the byte stream (line 90) to be sent to the guest. Behind the scenes, the Virtual PC Host Process will transfer this data over to the Virtual PC Guest Service running in the guest. The guest service acts as a TCP client connecting to the TCP server in the guest and sends the data to it. You can see using TCPView the Virtual PC guest service (vmsrvc.exe) connected to the sample application TCP Server on port 6174 as shown in the screenshot below (Figure 5).
Figure 5. VPC guest service (vmsrvc.exe) connected to the sample TCP Server on port 6174
Host application then disconnects from the named pipe server (line 106). Disconnecting from the named pipe server also causes Virtual PC Host Process to stop this server instance.
Waiting for the Communication Mechanism
Virtual PC Host Process fires a well-known named event to indicate that the communication channel for a virtual machine is ready to be used. The event name is of the format “<vm_chassis_tag>_ChannelReady”. Applications can wait for this event in order to be certain that communication mechanism is up. Below is one way of implementing the wait routine. If StartCommunicationChannel COM call is made before this event is set the call fails with ERROR_NOT_READY.
    1: HRESULT WaitForChannelReady(IVMVirtualMachine* vmObj)
    2: {
    3:     HRESULT hr = S_OK;
    4:     BSTR bChassisAssetTag = SysAllocStringByteLen(NULL, MAX_PATH);
    5:     WCHAR ChannelReadyEventName[MAX_PATH] = {0};
    6:     HANDLE hEvent = NULL;
    7:
    8:     //
    9:     // Build the well known name for the named event. Format is:
   10:     // "Local\<ChassisTag>_ChannelReady"
   11:     //
   12:
   13:     hr = vmObj->get_ChassisAssetTag(&bChassisAssetTag);
   14:     if (hr != S_OK) {
   15:         goto Cleanup;
   16:     }
   17:
   18:     hr = StringCchCopy(ChannelReadyEventName, MAX_PATH, L"Local\\");
   19:     if (FAILED(hr)) {
   20:         goto Cleanup;
   21:     }
   22:
   23:     hr = StringCchCat(ChannelReadyEventName, MAX_PATH, bChassisAssetTag);
   24:     if (FAILED(hr)) {
   25:         goto Cleanup;
   26:     }
   27:
   28:     hr = StringCchCat(ChannelReadyEventName, MAX_PATH, L"_ChannelReady");
   29:     if (FAILED(hr)) {
   30:         goto Cleanup;
   31:     }
   32:
   33:     hEvent = CreateEvent(NULL, TRUE, FALSE, ChannelReadyEventName);
   34:     if(hEvent == NULL) {
   35:         hr = HRESULT_FROM_WIN32(GetLastError());
   36:         goto Cleanup;
   37:     }
   38:
   39:     if (WaitForSingleObject(hEvent, INFINITE) == WAIT_FAILED) {
   40:         hr = HRESULT_FROM_WIN32(GetLastError());
   41:         goto Cleanup;
   42:     }
   43:
   44: Cleanup:
   45:
   46:     if (hEvent != NULL) {
   47:         CloseHandle(hEvent);
   48:     }
   49:
   50:     return hr;
   51: }
Sample TCP Server in Guest
The sample TCP Server below prints the data it receives from the host application on the console. The code for the server below is fairly typical and adapted from https://msdn.microsoft.com/en-us/library/ms737593(VS.85).aspx
    1: #include <windows.h>
    2: #include <winsock2.h>
    3: #include <ws2tcpip.h>
    4: #include <stdlib.h>
    5: #include <stdio.h>
    6:
    7: // Need to link with Ws2_32.lib, Mswsock.lib, and Advapi32.lib
    8: #define DEFAULT_BUFLEN 512
    9: #define DEFAULT_PORT "6174"
   10:
   11: int __cdecl main(void)
   12: {
   13:     WSADATA wsaData;
   14:     SOCKET ListenSocket = INVALID_SOCKET,
   15:            ClientSocket = INVALID_SOCKET;
   16:     struct addrinfo *result = NULL,
   17:                     hints = {0};
   18:     CHAR recvbuf[DEFAULT_BUFLEN] = {0};
   19:     int iResult = 0;
   20:     int recvbuflen = DEFAULT_BUFLEN;
   21:
   22:     // Initialize Winsock
   23:     iResult = WSAStartup(MAKEWORD(2,2), &wsaData);
   24:     if (iResult != 0) {
   25:         wprintf(L"WSAStartup failed: %d\n", iResult);
   26:         return 1;
   27:     }
   28:
   29:     ZeroMemory(&hints, sizeof(hints));
   30:     hints.ai_family = AF_INET;
   31:     hints.ai_socktype = SOCK_STREAM;
   32:     hints.ai_protocol = IPPROTO_TCP;
   33:     hints.ai_flags = AI_PASSIVE;
   34:
   35:     // Resolve the server address and port
   36:     iResult = getaddrinfo(NULL, DEFAULT_PORT, &hints, &result);
   37:     if ( iResult != 0 ) {
   38:         wprintf(L"getaddrinfo failed: %d\n", iResult);
   39:         WSACleanup();
   40:         return 1;
   41:     }
   42:
   43:     // Create a SOCKET for connecting to server
   44:     ListenSocket = socket(result->ai_family, result->ai_socktype, result->ai_protocol);
   45:     if (ListenSocket == INVALID_SOCKET) {
   46:         wprintf(L"socket failed: %ld\n", WSAGetLastError());
   47:         freeaddrinfo(result);
   48:         WSACleanup();
   49:         return 1;
   50:     }
   51:
   52:     // Setup the TCP listening socket
   53:     iResult = bind( ListenSocket, result->ai_addr, (int)result->ai_addrlen);
   54:     if (iResult == SOCKET_ERROR) {
   55:         wprintf(L"bind failed: %d\n", WSAGetLastError());
   56:         freeaddrinfo(result);
   57:         closesocket(ListenSocket);
   58:         WSACleanup();
   59:         return 1;
   60:     }
   61:
   62:     freeaddrinfo(result);
   63:
   64:     wprintf(L"Waiting for message from host...\n");
   65:
   66:     iResult = listen(ListenSocket, SOMAXCONN);
   67:     if (iResult == SOCKET_ERROR) {
   68:         wprintf(L"listen failed: %d\n", WSAGetLastError());
   69:         closesocket(ListenSocket);
   70:         WSACleanup();
   71:         return 1;
   72:     }
   73:
   74:     // Accept a client socket
   75:     ClientSocket = accept(ListenSocket, NULL, NULL);
   76:     if (ClientSocket == INVALID_SOCKET) {
   77:         wprintf(L"accept failed: %d\n", WSAGetLastError());
   78:         closesocket(ListenSocket);
   79:         WSACleanup();
   80:         return 1;
   81:     }
   82:
   83:     // No longer need server socket
   84:     closesocket(ListenSocket);
   85:
   86:     iResult = recv(ClientSocket, recvbuf, recvbuflen, 0);
   87:     if (iResult > 0) {
   88:         wprintf(L"Bytes received: %d\n", iResult);
   89:         wprintf(L"Message received from host is '%s'\n", recvbuf);
   90:     }
   91:     else if (iResult == 0)
   92:         wprintf(L"Connection closing...\n");
   93:     else  {
   94:         wprintf(L"recv failed: %d\n", WSAGetLastError());
   95:         closesocket(ClientSocket);
   96:         WSACleanup();
   97:         return 1;
   98:     }
   99:
  100:
  101:     // shutdown the connection since we're done
  102:     iResult = shutdown(ClientSocket, SD_SEND);
  103:     if (iResult == SOCKET_ERROR) {
  104:         wprintf(L"shutdown failed: %d\n", WSAGetLastError());
  105:         closesocket(ClientSocket);
  106:         WSACleanup();
  107:         return 1;
  108:     }
  109:
  110:     // cleanup
  111:     closesocket(ClientSocket);
  112:     WSACleanup();
  113:
  114:     return 0;
  115: }
StartCommunicationChannel and Event Logging
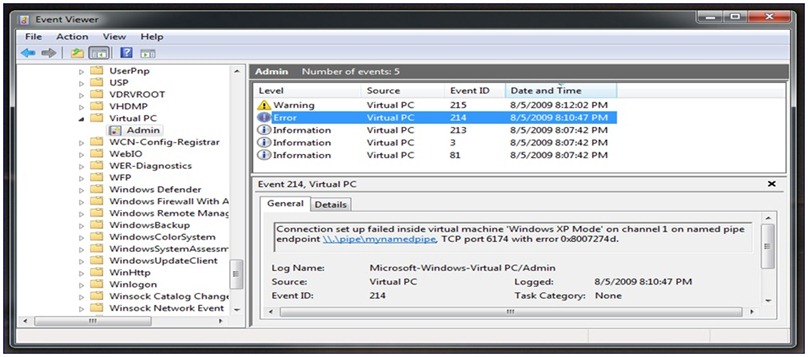
To help debug situations around host-guest communication mechanism, WVPC logs events in the event log. Here is an entry for a failure case:
Figure 6. Example Event Log for a Guest Host Communication Failure Case
Conclusion
Guest-Host communication in WVPC is built as a fast, efficient and extensible client-server style communication mechanism. Further, WVPC has leveraged RDP technology on top of this channel, to enable efficient graphics rendering, drive sharing, seamless virtual applications and other guest-host integration features such as clipboard sharing. Its proximity to the client server architecture and usage of named pipe and TCP interfaces will help enable several communication scenarios between host and guest. With the help of the sample applications presented above, we hope that you can build your own applications making use of the Host-Guest communication mechanism provided in Windows Virtual PC. Check out WVPC and Windows XP Mode today, and let us know what you think, either via the comments section here, or sharing your feedback on the WVPC and Windows XP Mode Forum on Technet here.
Technorati Tags: Windows 7,Windows Virtual PC,Windows XP Mode,Application Compatibility,Windows Upgrade,VPC,VHD,VM,Virtual Machine,Virtualization,VM communication
Yadnyesh Joshi and Gaurav Sinha
Software Development Engineers
Microsoft Virtualization Team
Comments
- Anonymous
January 01, 2003
The comment has been removed - Anonymous
October 25, 2009
The comment has been removed - Anonymous
November 03, 2009
Hi, I have an arror for the last 2 weeks and can not solve it.. Can you help, Please? MS customer support proove to be worthless....(Cases # 1115314625;1116093869; few more...) Just Install W7
- ran all updateds
- INstall XP mode
- installed Virtual PC
- set VM with .vhd file crated by V PC 2007 under Vista Proff - workef fine in DELL Precision t5400 Mouse integrated ok but everything else is dead. ERROR MESSAGE: Could not enable integration features Some body HELP!!!! Thanks Alex alexoks@comcast.net
Anonymous
November 10, 2009
The comment has been removedAnonymous
January 21, 2010
My host and guest can not communicate because I get the message at guest startup: "Could not enaable integration features - Ensure tht the remote access and group jpolicy settings in the virtual machine operating system allow remote connections ..." What do I need to do to fix this issue?Anonymous
April 23, 2010
Hi! I have the same question as lawrence. Why are the integration features shown as yellow question marks? This looks to me something is wrong. But they seem to workAnonymous
February 11, 2011
The comment has been removedAnonymous
September 18, 2013
I like Your Article about " " Perfect just what I was searching for! .Anonymous
December 11, 2014
Nice Article..
