Deploy your BDC model to a specific BCS Service using Visual Studio 2010
When deploying a BDC model in Visual Studio 2010, some people may see this error message “… There is no default Business Data Connectivity Service Proxy available for the given SPServiceContext…” or similar ones. This probably means the SiteUrl feature property is not appropriately set.
SiteUrl is a SharePoint feature property that determines where a feature will be deployed. When a BCS feature is deployed, SharePoint server will look up a BCS service (if there are more than one BCS service connected to the site, it will select the default one) connected to the appointed SiteUrl. If the SiteUrl property is omitted, it assumes the value of SiteUrl is https://localhost:80. The SharePoint BDC project in VS2010 helps you customize the feature properties like SiteUrl. Let me show you how you can easily manage SiteUrl property here.
Assume you have two BCS services, BCS1 and BCS2, and two web applications, one on port 80 (https://localhost:80) named WebApp80, and the other on port 90 (https://localhost:90) named WebApp90. In SharePoint 2010 Central Administration, you can link services up with web applications. Browse to the Web Application Management page, select the web application WebApp80 as shown in the screenshot below.
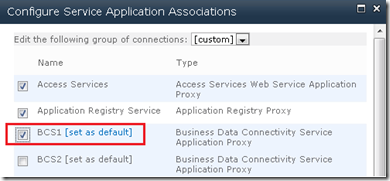
If you click the Service Connections button on the top ribbon, the Configure Service Application Associations dialog will be displayed. Now you can select BCS1 as the default BCS service for the current web application as shown in the screenshot below.
It is the same for adding BCS2 to WebApp90. Now BCS1 is the default BCS service for WebApp80 and BCS2 is the default BCS service for WebApp90.
Now let’s create a new BDC project. SiteUrl by default is not set for a new project. So the solution will be deployed to BCS1. If we want to deploy the solution to the BCS service other than BCS1, how can we do that? Here are the steps.
1. Select the BDC folder node in the Solution Explorer and view its properties in the Property Window. Click the […] at the end of Feature Properties row in the Property Window. See the screenshot below.
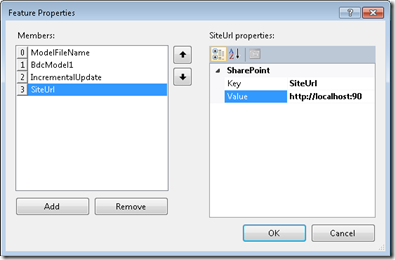
2. The Feature Properties dialog will be displayed. Now we can add the SiteUrl property and set its value to https://localhost:90 where BCS2 is the default BCS service.

3. Now if we deploy the solution again, it will be deployed to BCS2.
Enjoy using this feature!
Jeff Chen


