Tutorial: Updating your Windows Phone Splash Screen with Transparent Images
With the new beta of the Windows Phone 7 tools out (and the delivery a cool new developer device to my office!) I’ve been updating my sample application and working through a few new features. As I’ve done this I’ve found several things I’ve had to do some research on that I thought I would document to (hopefully) save you some time doing the same. My next couple of posts will cover some of those topics starting with a quickie on splash screens.
Splash Screens
A default splash screen is provided for you in the project template as SplashScreenImage.jpg. If you replace this file, you need to keep the same name and ensure the Build Action is set to Content so it winds up in the XAP file at deployment time. This allows the loader to display the image directly while your application is being initialized.
Another typical thing for a splash screen (or for the main application) is using transparent images. I’ll start off with an image (from Flickr by Der Stefan under Creative Commons) that I want to use as an icon:
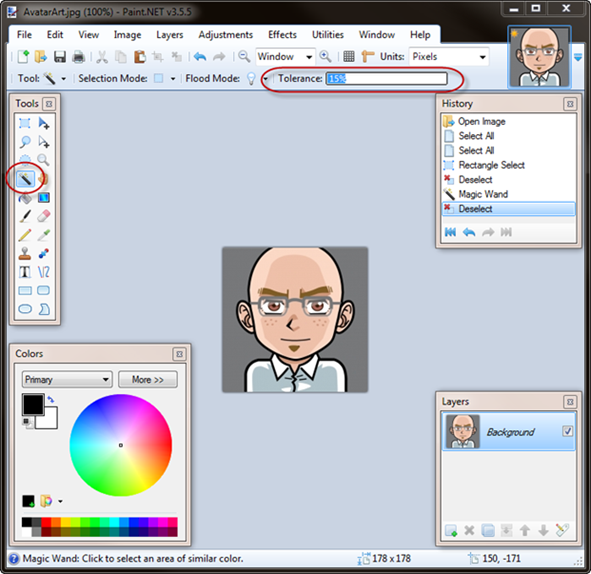
The next step is to remove the grey background and make the image transparent. There are a lot of high end tools for this but my favorite is Paint.NET which is (a) written on .NET and (b) free. The first step is to select the magic wand from the toolbar and then reduce the Tolerance setting to a low number (0% is best, although you may need to go higher if the background is not a solid fill of one color):
As you select a grey area Paint.NET will figure out the boundaries of the filled in region and select it. At that point you can simply hit the Delete key to remove that region:
Finally save the image as a PNG (default settings are fine on the save dialog). At this point you can crop the image or make other adjustments as required. For this image I found a thin white strip at the top which was easily removed by doing a box select and Crop to Image.
The next thing I want to do is fix up the splash screen. I’ll start by opening SplashScreenImage.jpg from the project which is a dark grey background with a wait symbol:
To add our transparent image, select Layers, Import From File, then select the PNG we just created. This will create a new layer that contains our updated image:
At this point you can move / size / whatever you need to get the image you want. As you save the image the default will be to create a PDN (Paint.NET file) so it can maintain your layers. We want to simply replace the original and flatten the image so just select the original file with a type of JPG and then choose to Flatten the image:
Now build and hit F5 to deploy / debug the application and you will see our updated splash screen:
Next up I’m going to cover how to persist application settings between startup/shutdown events.
Enjoy!
Comments
Anonymous
July 17, 2010
Just what I've been looking for. Thank you very much JasonzAnonymous
July 19, 2010
thanks for introducing to paint.NetAnonymous
July 21, 2010
Hi, can you please release the source code that is updated for Beta version of Windows Phone 7. There are a lot of changes in the application and opening this application in Beta generates a lot of errors. Seeing the updated version of your tips calculator will help us understand the way of writing applications for Beta version of Windows Phone 7 SDK.


