Data Science in a Box using IPython: Installing IPython notebook (2/4)
In the previous blog, we demonstrated how to create a Windows Azure Linux VM in detail. We will continue the installation process for the IPython notebook and related packages.
Python 2.7 or 3.3
One of the discussions that happened at the Python in Finance conference is which version of Python you should use? My personally opinion is that unless you have a special need, you should stick with Python 2.7. 2.7 comes as the default on most of the latest Linux distros. Until 3.3 becomes the default Python interpreter on your OS, it is better to use 2.7.
The Basics of package management for Python
There are several ways you can get Python packages installed. The easiest is probably by running the OS default installer, but sometimes it may not have the latest version in the version of Linux you are running. For Ubuntu, apt-get is the installer for the OS. apt-get will install your packages in /usr/lib/python/dist-packages.
Another option is to use easy_install. Easy install is part of Python, not part of the Ubuntu OS. We need to have python-setuptools package installed using apt-get first, before being able to use it. If you use easy_install, all your packages will end up in /usr/local/lib/python/site-packages instead.
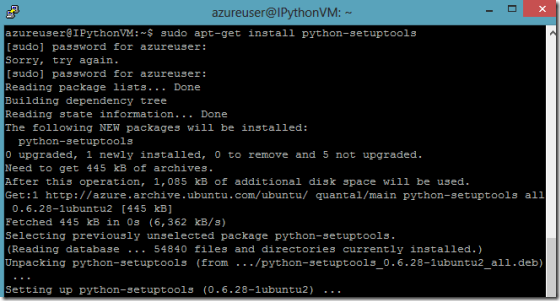
type sudo apt-get install python-setuptools
PIP is another tool for installing and managing python packages, it is recommended over easy_install. For our purposes, we simply will use which ever of these tools that can install our packages easily and correctly.
type sudo apt-get install python-pip, this might take a few minutes as pip has many dependency packages that it must install.
Installing IPython, Tornado web server, Matplotlib and other packages
Matplotlib is a popular 2D plotting library, it is one of IPython notebook’s component. As you interact with the Notebook, plots are generated on the server using matplotlib and sent for displaying in your web browser.
To install, type: sudo apt-get install python-matplotlib
IPython notebook is browser based, it uses the Tornado webserver. The Python-based Tornado webserver supports web sockets for interactive and efficient communication between the webserver and the browser.
To install, type: sudo apt-get install python-tornado
Upon completion, we will now install Python itself. The IPython team recommends installing through easy_install to get the latest package from their website.
sudo easy_install https://github.com/ipython/ipython/tarball/master
This should install version 1.0 dev version of IPython.
We also need to install a package called Pyzmq, Zero MQ is a very fast networking package that IPython uses for its clustered configuration. IPython is capable of interactively controlling a cluster of machines and run massively parallel Big Compute and Big Data applications.
Type: sudo apt-get install python-zmq
Finally , Jinja2, is a fast, modern and designer friendly templating language for Python is is now required for IPython notebook.
Type: sudo apt-get install python-jinja2
Configuring IPython notebook
Type: ipython profile create nbserver to create a profile. The command generates a default in your home directory under .ipython/profile_nbserver/ipython_config.py Note that any directory starts with a “.” is a hidden directory in Linux. You must type ls –al to see it.
The .ipython directory is shown below in blue.
Once we’ve created a profile, the next step is to create an SSL certificate and generate a password to protect the notebook webpage.
Type: cd ~\.ipython\profile_nbserver to switch into the profile we just created.
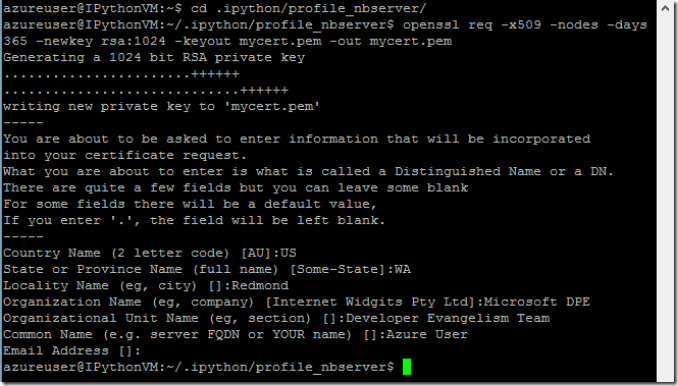
Then, type: openssl req -x509 -nodes -days 365 -newkey rsa:1024 -keyout mycert.pem -out mycert.pem to create a certificate. Below is a sample session we used to create the certificate.
Since this is a self-signed certificate, the notebook your browser will give you a security warning. For long-term production use, you will want to use a properly signed certificate associated with your organization. Since certificate management is beyond the scope of this demo, we will stick to a self-signed certificate for now.
The next step is to create a password to protect your notebook.
Type: python -c "import IPython;print IPython.lib.passwd()" # password generation
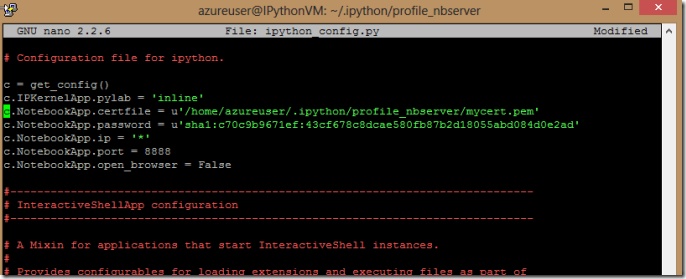
Next, we will edit the profile's configuration file, the ipython_notebook_config.py file in the profile directory you are in. This file has a number of fields and by default all are commented out. You can open this file with any text editor of your liking, and you should ensure that it has at least the following content, you may use either the Unix vi editor or nano which would be easier for beginners.
Make sure you make a copy of the sha1:c70c9b9671ef:43cf678c8dcae580fb87b2d18055abd084d0e2ad string you got from the python password generator line above.
Type: nano ipython_config.py
This will go into the editor, copy the appropriate line into your editor. Note # is the comment sign for Python.
 c = get_config()

 # This starts plotting support always with matplotlib
 c.IPKernelApp.pylab = 'inline'

 # You must give the path to the certificate file.

 # If using a Linux VM:
 c.NotebookApp.certfile = u'/home/azureuser/.ipython/profile_nbserver/mycert.pem'

 # Create your own password as indicated above
 c.NotebookApp.password = u'sha1:c70c9b9671ef:43cf678c8dcae580fb87b2d18055abd084d0e2ad'  #use your own

 # Network and browser details. We use a fixed port (9999) so it matches
 # our Windows Azure setup, where we've allowed traffic on that port

 c.NotebookApp.ip = '*'
 c.NotebookApp.port = 8888
 c.NotebookApp.open_browser = False
Press control –X to exit nano and press Y to save the file.
Configure the Windows Azure Virtual Machines Firewall
This was done in Post 1 of this blog series. Please see Create your first Linux Virtual Machine section of the blog.
Run the IPython Notebook
At this point we are ready to start the IPython Notebook. To do this, navigate to the directory you want to store notebooks in and start the IPython Notebook Server:
Type: ipython notebook --profile=nbserver
You should now be able to access your IPython Notebook at the address https://[Your Chosen Name Here].cloudapp.net.
In our case it is: https://ipythonvm.cloudapp.net
Type in the Password you set when you ran the python -c "import IPython;print IPython.lib.passwd()" command.
Once logged in, you should see an empty directory. Click on “New NoteBook” to start.
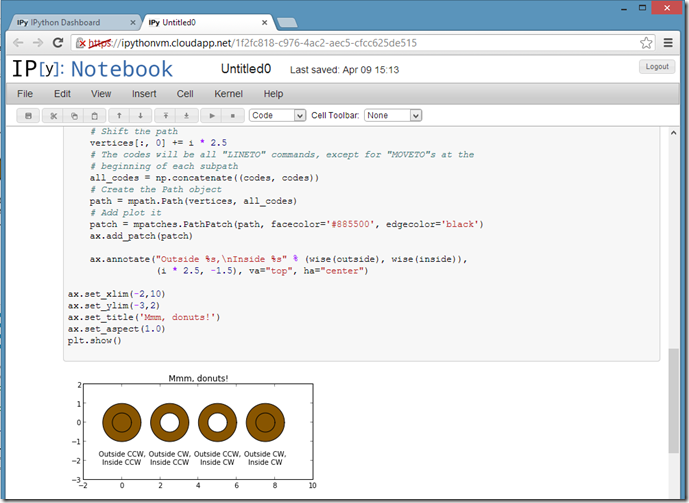
To reward your hard work, we’ll have IPython notebook plot a few donuts for us. You can copy and paste the code from: https://matplotlib.org/examples/api/donut_demo.html Please your cursor to the end of the last line, Press shift + Enter to run the code right after the last line. If all goes well, you should see a set of 4 chocolate donuts almost instantly.
Conclusion
In the second part of this blog series, we showed you the minimum steps to install the IPython notebook inside a Windows Azure VM running Linux Ubuntu 12.10. In the next blog, we’ll take a look at a few popular, common packages for machine learning, data analysis, and scientific Computing. If you have questions, please contact me at @wenmingye on twitter.
Comments
- Anonymous
September 13, 2013
I recommend using ssh and port forwarding instead of putting the IPython Notebook on the internet. (e.g. ssh -i prvate_key user@ip_address -L 8889:localhost:8888)


