My Take on an Azure Open Source Cross-Platform DevOps Toolkit–Part 5
| My Take on an Azure Open Source Cross-Platform DevOps Toolkit–Part 1 | Click Here |
| My Take on an Azure Open Source Cross-Platform DevOps Toolkit–Part 2 | Click Here |
| My Take on an Azure Open Source Cross-Platform DevOps Toolkit–Part 3 | Click Here |
| My Take on an Azure Open Source Cross-Platform DevOps Toolkit–Part 4 | Click Here |
| My Take on an Azure Open Source Cross-Platform DevOps Toolkit–Part 5 | Click Here |
| My Take on an Azure Open Source Cross-Platform DevOps Toolkit–Part 6 | Click Here |
| My Take on an Azure Open Source Cross-Platform DevOps Toolkit–Part 7 | Click Here |
| My Take on an Azure Open Source Cross-Platform DevOps Toolkit–Part 8 | Click Here |
| My Take on an Azure Open Source Cross-Platform DevOps Toolkit–Part 9 | Click Here |
| My Take on an Azure Open Source Cross-Platform DevOps Toolkit–Part 10 | Click Here |
| My Take on an Azure Open Source Cross-Platform DevOps Toolkit–Part 11 | Click Here |
| My Take on an Azure Open Source Cross-Platform DevOps Toolkit–Part 12 | Click Here |
Finish the persistent store tooling and finish building out the first three steps of the pipeline
By the end of this post we will have succeeded in accomplishing the first three steps of the pipeline.
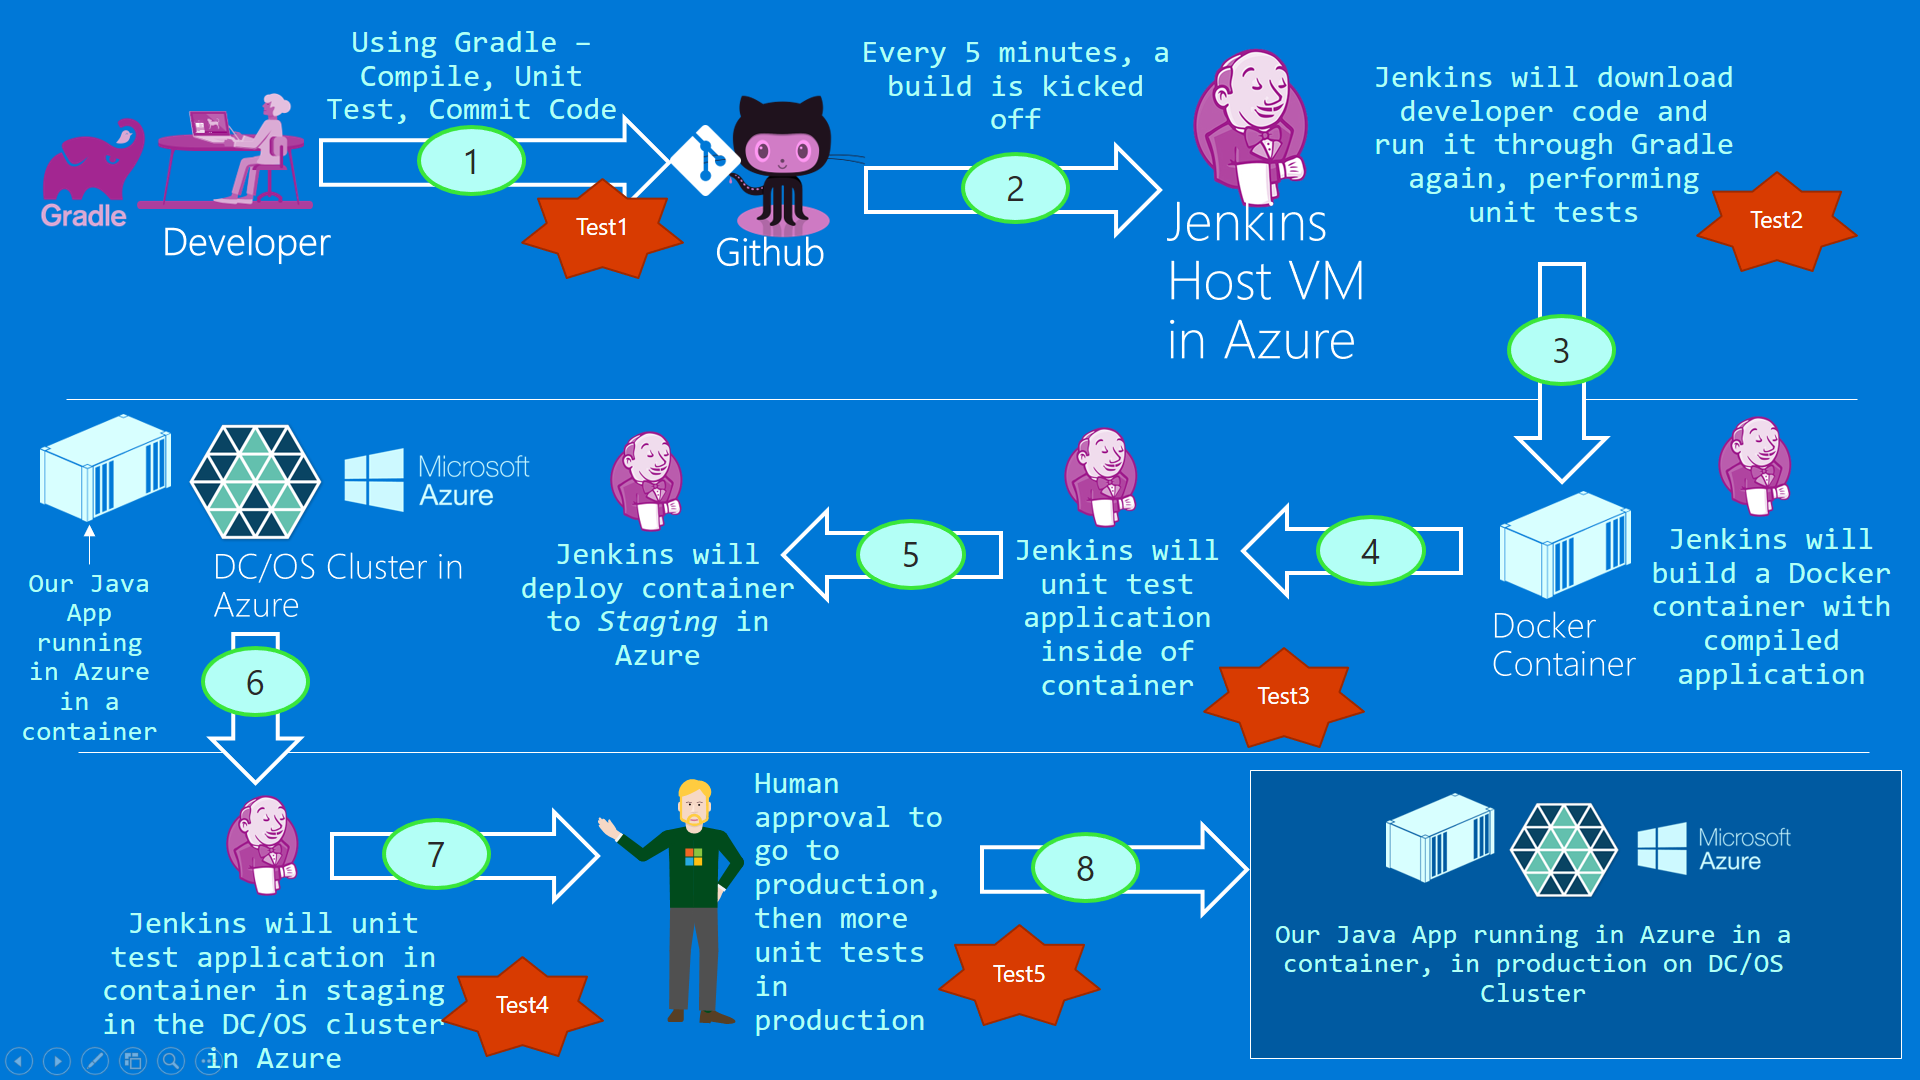
Here is where we are:
- The developer uses Eclipse to run Gradle on their local developer workstation, compiling and testing the application for the first time, before even checking in their code to Github.
- The developer checks in code to Github which is then processed by our fully automated Jenkins Pipeline
- In step 2 Jenkins already fired off and executed the pipeline
- Our primitive approach to all this is that Jenkins automatically execute every five minutes, regardless of whether or not the developer did anything to check in code
- In step 3 the Github repo of httpservice that represents our Java application gets downloaded and Gradle is run to compile and unit test our application. All this now happens on Jenkins in Azure. This is already the second time that app gets unit tested.
Finishing the MySQL Pipeline Tooling
So we will now wrap up the code that interacts with MySQL. This code is used throughout the pipeline to track and display state.
If you look at the diagram below, you will note that all the states are numbered. And every one of those states is reading from and writing to the MySQL database to reflect the current status of pipeline execution. It is important that we track pipeline state throughout the process.


Figure 1: The big picture
Explaining the code
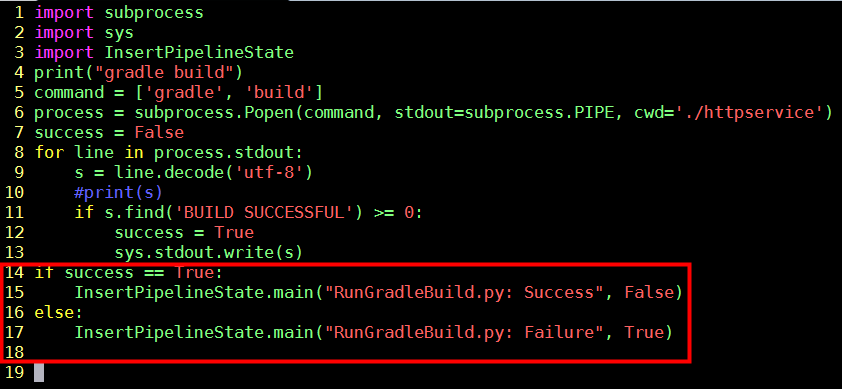
Notice in the image below that in lines 14 to 17 we update the messages table in our Jenkins database. Notice that we send false to indicate that no errors were found and true indicate that errors were found.
What we need to do next is too show you the code that represents lines 15 to 17. It is a Python script called InsertPipelineState.py
RunGradleBuild.py
There are a few important things to notice about this python script:
- As stated before, it leverages the persistent store of MySQL
- But its main job is to compile and test our Java application after we download httpservice
- Remember that Gradle those both the compilation and a running of your unit tests
- By the time this executes , it will represent two separate builds and tests of the Java-based application
- The first one happened at the developer workstation when they were using Eclipse
- The second unit test is executing here in the Jenkins build server. It effectively replicates what was done at the developers workstation
- The goal of this code is to just do a quick sanity check that the developer had sent their code to Github after already conducting units test successfully. Unit tests need to be executed frequently.
- Lines
- 5: Represents the Gradle build command
- 11: We are doing a string search for the words BUILD SUCCESSFUL which means that Gradle was able to compile our code correctly as well as perform the unit tests without error
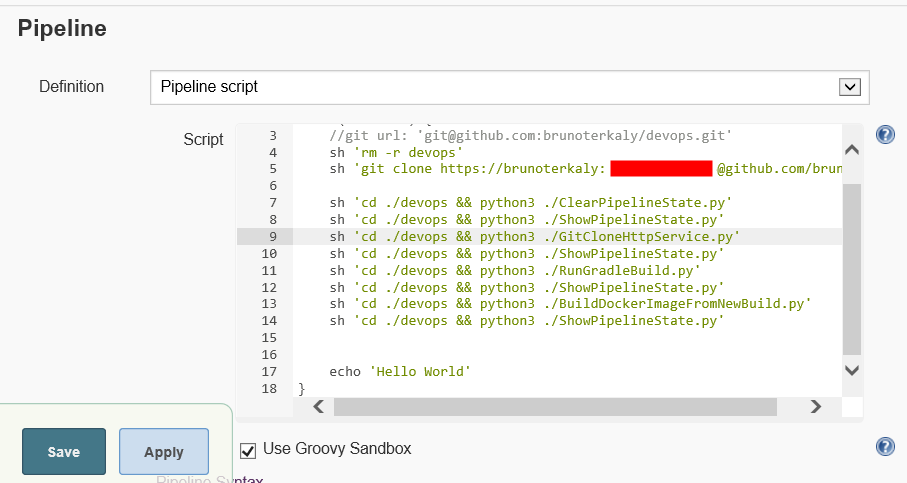
Figure 2: How state management is maintained from within steps in the pipeline
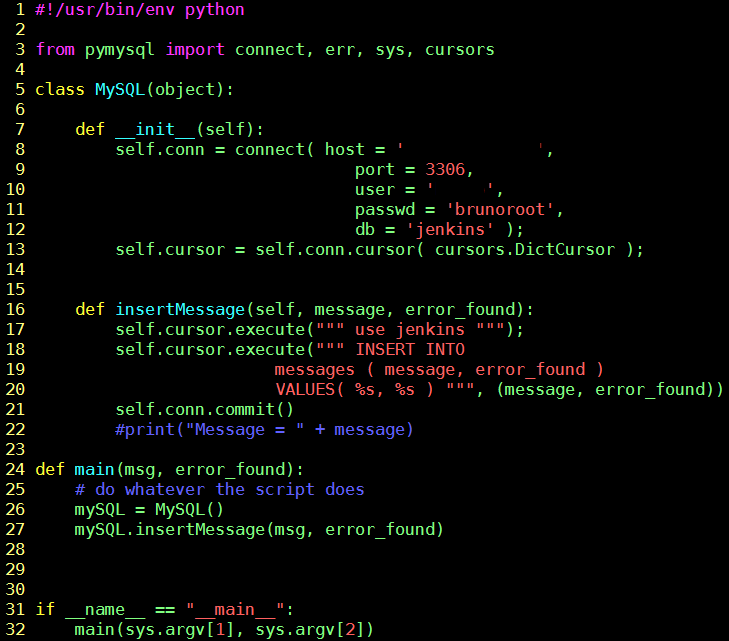
There should be little mystery about what the code does below. We simply passing in a message on the boolean that represents whether or not we found an error.
InsertPipelineState.py
Figure 3: InsertPipelineState.py - code that inserts pipeline execution state into a persistent store
Conclusion
So congratulations to make it all the way up to Step 3 in Figure 1. Subsequent steps will not take as long because we have already laid out the groundwork in this post and the previous one to illustrate how we would store persistent state as the pipeline executes.

