Appliquer Mica avec WinUI 2 pour UWP
Cet article explique comment appliquer Mica comme couche de base de votre application UWP à l’aide de WinUI 2, en hiérarchisant l’application et la visibilité dans la zone de barre de titre. Pour plus d’informations sur les couches d’application avec Mica, consultez Matériau Mica.
Mica est un matériau opaque qui incorpore le thème de l’utilisateur et le papier peint du Bureau pour créer une apparence très personnalisée. Lorsque l’utilisateur déplace la fenêtre sur l’écran, le matériau Mica s’adapte dynamiquement pour créer une visualisation enrichie à l’aide du papier peint sous l’application. En outre, le matériau aide les utilisateurs à se concentrer sur la tâche actuelle en revenant à une couleur neutre lorsque l’application est inactive.
Mica est disponible pour les applications UWP qui utilisent WinUI 2 lors de l’exécution sur Windows 11 version 22000 ou ultérieure. Sur Windows 10, l’arrière-plan revient à une couleur unie.
Prérequis
- Package NuGet WinUI 2 (voir Prise en main de WinUI 2)
- Connaissance du matériel Mica.
- Connaissance de la personnalisation de la barre de titre
Utiliser Mica avec WinUI 2 pour UWP
API importantes : classe BackdropMaterial
Pour appliquer Mica dans une application UWP, vous utilisez la classe BackdropMaterial de WinUI 2. Nous vous recommandons de définir la propriété jointe BackdropMaterial.ApplyToRootOrPageBackground sur un élément XAML qui est la racine de votre contenu XAML, car il s’applique à l’ensemble de la région de contenu (par exemple, une fenêtre). Si votre application a un frame qui navigue sur plusieurs pages, vous devez définir cette propriété sur frame. Sinon, vous devez définir cette propriété sur la page principale de votre application.
xmlns:muxc="using:Microsoft.UI.Xaml.Controls"

<Page muxc:BackdropMaterial.ApplyToRootOrPageBackground="True">
    <TextBlock>Hello world</TextBlock>
</Page>
Les exemples suivants montrent comment implémenter les modèles de superposition standard présentés dans la vue d’ensemble des matériaux Mica. Chacun de ces exemples utilise et nécessite le même code-behind de barre de titre, qui est illustré dans le dernier exemple.
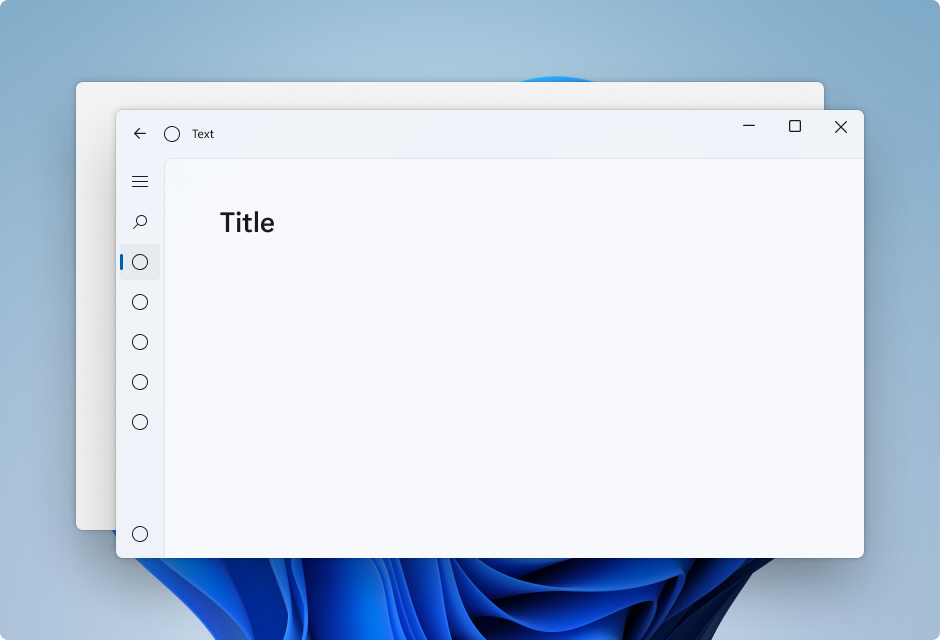
Exemple : Modèle Standard dans NavigationView - Gauche
Par défaut, NavigationView en mode gauche inclut la couche de contenu dans sa zone de contenu. Cet exemple étend Mica dans la zone de la barre de titre et crée une barre de titre personnalisée.

<Page
    x:Class="LeftNavView.MainPage"
    xmlns="http://schemas.microsoft.com/winfx/2006/xaml/presentation"
    xmlns:x="http://schemas.microsoft.com/winfx/2006/xaml"
    xmlns:local="using:LeftNavView"
    xmlns:d="http://schemas.microsoft.com/expression/blend/2008"
    xmlns:mc="http://schemas.openxmlformats.org/markup-compatibility/2006"
    xmlns:muxc="using:Microsoft.UI.Xaml.Controls"
    mc:Ignorable="d"
    muxc:BackdropMaterial.ApplyToRootOrPageBackground="True">
    <Page.Resources>
        <!--This top margin is the height of the custom TitleBar-->
        <Thickness x:Key="NavigationViewContentMargin">0,48,0,0</Thickness>
    </Page.Resources>
    <Grid>
        <Border x:Name="AppTitleBar"
                IsHitTestVisible="True"
                VerticalAlignment="Top"
                Background="Transparent"
                Height="48"
                Canvas.ZIndex="1"
                Margin="48,0,0,0">
            <StackPanel Orientation="Horizontal">
                <Image x:Name="AppFontIcon"
                    HorizontalAlignment="Left"
                    VerticalAlignment="Center"
                    Source="Assets/Square44x44Logo.png"
                    Width="16"
                    Height="16"/>
                <TextBlock x:Name="AppTitle"
                    Text="Test App Title"
                    VerticalAlignment="Center"
                    Margin="12, 0, 0, 0"
                    Style="{StaticResource CaptionTextBlockStyle}" />
            </StackPanel>
        </Border>
        <muxc:NavigationView x:Name="NavigationViewControl"
            IsTitleBarAutoPaddingEnabled="False"
            IsBackButtonVisible="Visible"
            Header="Title"
            DisplayModeChanged="NavigationViewControl_DisplayModeChanged"
            Canvas.ZIndex="0">
            <muxc:NavigationView.MenuItems>
                <muxc:NavigationViewItem Icon="Target" Content="Text"/>
                <muxc:NavigationViewItem Icon="Target" Content="Text"/>
                <muxc:NavigationViewItem Icon="Target" Content="Text"/>
                <muxc:NavigationViewItem Icon="Target" Content="Text"/>
                <muxc:NavigationViewItem Icon="Target" Content="Text"/>
            </muxc:NavigationView.MenuItems>
            <Grid>
                <Frame x:Name="contentFrame">
                    <Grid>
                        <TextBlock Padding="56,16,0,0">Page content!</TextBlock>
                    </Grid>
                </Frame>
            </Grid>
        </muxc:NavigationView>
    </Grid>
</Page>
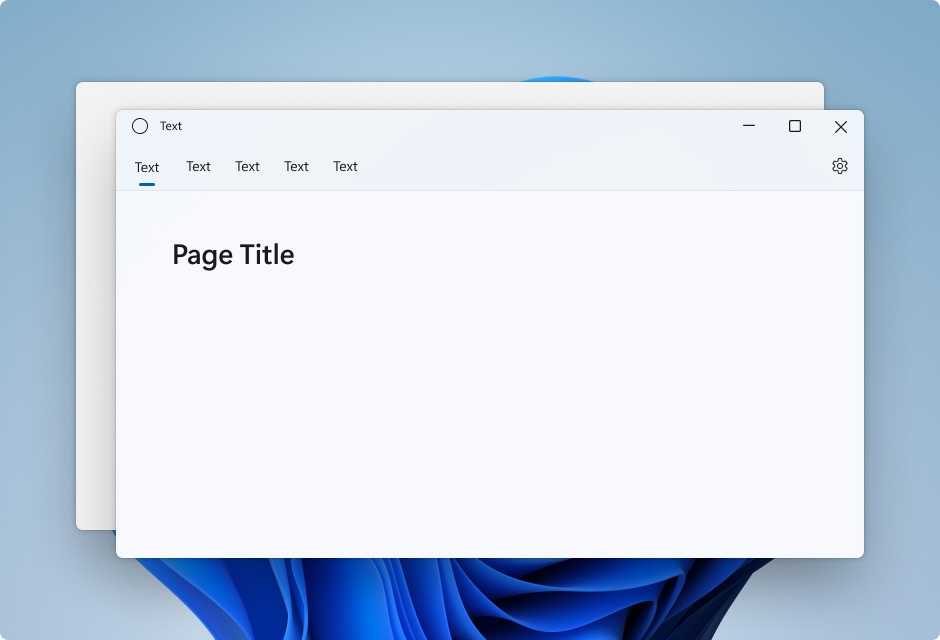
Exemple : Modèle Standard dans NavigationView - Haut
Par défaut, NavigationView en mode Top inclut la couche de contenu dans sa zone de contenu. Cet exemple étend Mica dans la zone de la barre de titre et crée une barre de titre personnalisée.

<Page
    x:Class="TopNavView.MainPage"
    xmlns="http://schemas.microsoft.com/winfx/2006/xaml/presentation"
    xmlns:x="http://schemas.microsoft.com/winfx/2006/xaml"
    xmlns:local="using:TopNavView"
    xmlns:d="http://schemas.microsoft.com/expression/blend/2008"
    xmlns:mc="http://schemas.openxmlformats.org/markup-compatibility/2006"
    xmlns:muxc="using:Microsoft.UI.Xaml.Controls"
    mc:Ignorable="d"
    muxc:BackdropMaterial.ApplyToRootOrPageBackground="True">
    <Page.Resources>
        <CornerRadius x:Key="NavigationViewContentGridCornerRadius">0</CornerRadius>
    </Page.Resources>
    <Grid>
        <Border x:Name="AppTitleBar"
                IsHitTestVisible="True"
                VerticalAlignment="Top"
                Background="Transparent"
                Height="32"
                Margin="48,0,0,0">
            <StackPanel Orientation="Horizontal">
                <Image x:Name="AppFontIcon"
                    HorizontalAlignment="Left"
                    VerticalAlignment="Center"
                    Source="Assets/Square44x44Logo.png"
                    Width="16"
                    Height="16"/>
                <TextBlock x:Name="AppTitle"
                    Text="Test App Title"
                    VerticalAlignment="Center"
                    Margin="12,0,0,0"
                    Style="{StaticResource CaptionTextBlockStyle}" />
            </StackPanel>
        </Border>
            <muxc:NavigationView x:Name="NavigationViewControl"
            Header="Page Title"
            DisplayModeChanged="NavigationViewControl_DisplayModeChanged"
            PaneDisplayMode="Top">
                <muxc:NavigationView.MenuItems>
                    <muxc:NavigationViewItem Content="Text"/>
                    <muxc:NavigationViewItem Content="Text"/>
                    <muxc:NavigationViewItem Content="Text"/>
                    <muxc:NavigationViewItem Content="Text"/>
                    <muxc:NavigationViewItem Content="Text"/>
            </muxc:NavigationView.MenuItems>
                <Grid>
                    <Frame x:Name="contentFrame">
                        <Grid>
                            <TextBlock Padding="56,16,0,0">Page content!</TextBlock>
                        </Grid>
                    </Frame>
                </Grid>
            </muxc:NavigationView>
    </Grid>
</Page>
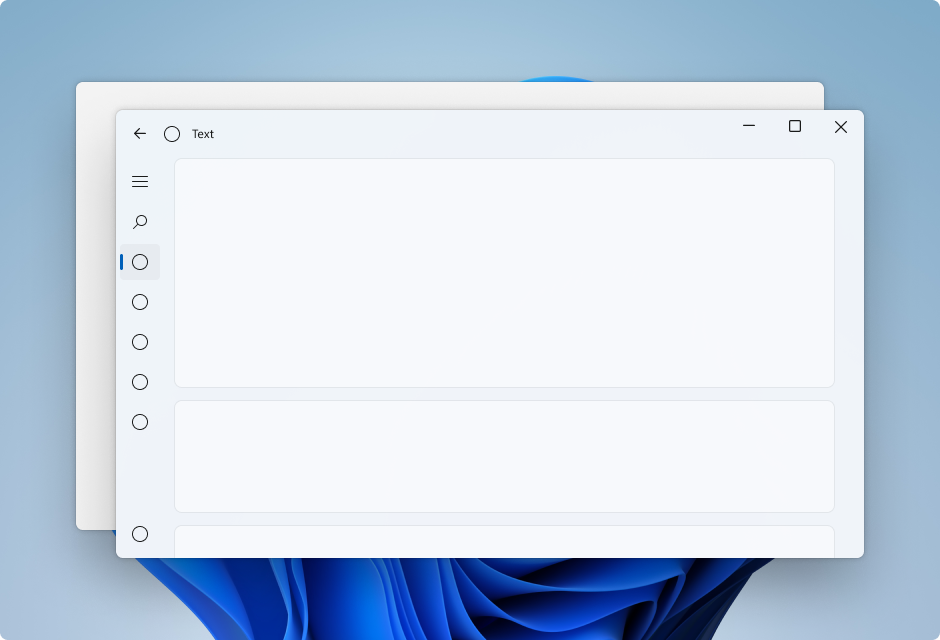
Exemple : Modèle Carte dans NavigationView - Gauche
Pour suivre le modèle de carte à l’aide d’un NavigationView , vous devez supprimer la couche de contenu par défaut en remplaçant les ressources de thème d’arrière-plan et de bordure. Ensuite, vous pouvez créer les cartes dans la zone de contenu du contrôle. Cet exemple crée plusieurs cartes, étend Mica dans la zone de la barre de titre et crée une barre de titre personnalisée. Pour plus d’informations sur l’interface utilisateur de carte, consultez les instructions de Superposition et élévation.

<Page
x:Class="CardLayout.MainPage"
xmlns="http://schemas.microsoft.com/winfx/2006/xaml/presentation"
xmlns:x="http://schemas.microsoft.com/winfx/2006/xaml"
xmlns:local="using:CardLayout"
xmlns:d="http://schemas.microsoft.com/expression/blend/2008"
xmlns:mc="http://schemas.openxmlformats.org/markup-compatibility/2006"
xmlns:muxc="using:Microsoft.UI.Xaml.Controls"
mc:Ignorable="d"
muxc:BackdropMaterial.ApplyToRootOrPageBackground="True">
<Page.Resources>
<!--This top margin is the height of the custom TitleBar-->
<Thickness x:Key="NavigationViewContentMargin">0,48,0,0</Thickness>
<Thickness x:Key="NavigationViewContentGridBorderThickness">0</Thickness>
<SolidColorBrush x:Key="NavigationViewContentBackground" Color="Transparent"></SolidColorBrush>
</Page.Resources>
<Grid>
<Border x:Name="AppTitleBar"
IsHitTestVisible="True"
VerticalAlignment="Top"
Background="Transparent"
Height="48"
Canvas.ZIndex="1"
Margin="48,0,0,0">
<StackPanel Orientation="Horizontal">
<Image x:Name="AppFontIcon"
HorizontalAlignment="Left"
VerticalAlignment="Center"
Source="Assets/Square44x44Logo.png"
Width="16"
Height="16"/>
<TextBlock x:Name="AppTitle"
Text="Test App Title"
VerticalAlignment="Center"
Margin="12,0,0,0"
Style="{StaticResource CaptionTextBlockStyle}" />
</StackPanel>
</Border>
<muxc:NavigationView x:Name="NavigationViewControl"
IsTitleBarAutoPaddingEnabled="False"
IsBackButtonVisible="Visible"
Header="Title"
DisplayModeChanged="NavigationViewControl_DisplayModeChanged"
Canvas.ZIndex="0">
<muxc:NavigationView.MenuItems>
<muxc:NavigationViewItem Icon="Target" Content="Text"/>
<muxc:NavigationViewItem Icon="Target" Content="Text"/>
<muxc:NavigationViewItem Icon="Target" Content="Text"/>
<muxc:NavigationViewItem Icon="Target" Content="Text"/>
<muxc:NavigationViewItem Icon="Target" Content="Text"/>
</muxc:NavigationView.MenuItems>
<Grid>
<Frame x:Name="contentFrame">
<StackPanel Orientation="Vertical" Margin="40,16,0,0">
<Border Width="600" Height="200" Background="{ThemeResource LayerFillColorDefaultBrush}"
VerticalAlignment="Top"
HorizontalAlignment="Left"
Margin="16"
CornerRadius="8"
BorderThickness="1"
BorderBrush="{ThemeResource CardStrokeColorDefaultBrush}">
<TextBlock VerticalAlignment="Center" HorizontalAlignment="Center">Content here!</TextBlock>
</Border>
</StackPanel>
</Frame>
</Grid>
</muxc:NavigationView>
</Grid>
</Page>
Code-behind de la barre de titre
Les trois pages XAML de disposition d’application précédentes utilisent ce code-behind pour créer une barre de titre personnalisée adaptative à l’état et à la visibilité de l’application.
Pour plus d’informations, consultez Personnalisation de la barre de titre.
public MainPage()
{
    this.InitializeComponent();
    var titleBar = ApplicationView.GetForCurrentView().TitleBar;

    titleBar.ButtonBackgroundColor = Colors.Transparent;
    titleBar.ButtonInactiveBackgroundColor = Colors.Transparent;

    // Hide default title bar.
    var coreTitleBar = CoreApplication.GetCurrentView().TitleBar;
    coreTitleBar.ExtendViewIntoTitleBar = true;
    UpdateTitleBarLayout(coreTitleBar);

    // Set XAML element as a draggable region.
    Window.Current.SetTitleBar(AppTitleBar);

    // Register a handler for when the size of the overlaid caption control changes.
    // For example, when the app moves to a screen with a different DPI.
    coreTitleBar.LayoutMetricsChanged += CoreTitleBar_LayoutMetricsChanged;

    // Register a handler for when the title bar visibility changes.
    // For example, when the title bar is invoked in full screen mode.
    coreTitleBar.IsVisibleChanged += CoreTitleBar_IsVisibleChanged;

    //Register a handler for when the window changes focus
    Window.Current.Activated += Current_Activated;
}

private void CoreTitleBar_LayoutMetricsChanged(CoreApplicationViewTitleBar sender, object args)
{
    UpdateTitleBarLayout(sender);
}

private void UpdateTitleBarLayout(CoreApplicationViewTitleBar coreTitleBar)
{
    // Update title bar control size as needed to account for system size changes.
    AppTitleBar.Height = coreTitleBar.Height;

    // Ensure the custom title bar does not overlap window caption controls
    Thickness currMargin = AppTitleBar.Margin;
    AppTitleBar.Margin = new Thickness(currMargin.Left, currMargin.Top, coreTitleBar.SystemOverlayRightInset, currMargin.Bottom);
}

private void CoreTitleBar_IsVisibleChanged(CoreApplicationViewTitleBar sender, object args)
{
    if (sender.IsVisible)
    {
        AppTitleBar.Visibility = Visibility.Visible;
    }
    else
    {
        AppTitleBar.Visibility = Visibility.Collapsed;
    }
}

// Update the TitleBar based on the inactive/active state of the app
private void Current_Activated(object sender, Windows.UI.Core.WindowActivatedEventArgs e)
{
    SolidColorBrush defaultForegroundBrush = (SolidColorBrush)Application.Current.Resources["TextFillColorPrimaryBrush"];
    SolidColorBrush inactiveForegroundBrush = (SolidColorBrush)Application.Current.Resources["TextFillColorDisabledBrush"];

    if (e.WindowActivationState == Windows.UI.Core.CoreWindowActivationState.Deactivated)
    {
        AppTitle.Foreground = inactiveForegroundBrush;
    }
    else
    {
        AppTitle.Foreground = defaultForegroundBrush;
    }
}

// Update the TitleBar content layout depending on NavigationView DisplayMode
private void NavigationViewControl_DisplayModeChanged(Microsoft.UI.Xaml.Controls.NavigationView sender, Microsoft.UI.Xaml.Controls.NavigationViewDisplayModeChangedEventArgs args)
{
    const int topIndent = 16;
    const int expandedIndent = 48;
    int minimalIndent = 104;

    // If the back button is not visible, reduce the TitleBar content indent.
    if (NavigationViewControl.IsBackButtonVisible.Equals(Microsoft.UI.Xaml.Controls.NavigationViewBackButtonVisible.Collapsed))
    {
        minimalIndent = 48;
    }

    Thickness currMargin = AppTitleBar.Margin;

    // Set the TitleBar margin dependent on NavigationView display mode
    if (sender.PaneDisplayMode == Microsoft.UI.Xaml.Controls.NavigationViewPaneDisplayMode.Top)
    {
        AppTitleBar.Margin = new Thickness(topIndent, currMargin.Top, currMargin.Right, currMargin.Bottom);
    }
    else if (sender.DisplayMode == Microsoft.UI.Xaml.Controls.NavigationViewDisplayMode.Minimal)
    {
        AppTitleBar.Margin = new Thickness(minimalIndent, currMargin.Top, currMargin.Right, currMargin.Bottom);
    }
    else
    {
        AppTitleBar.Margin = new Thickness(expandedIndent, currMargin.Top, currMargin.Right, currMargin.Bottom);
    }
}