Déployer votre modèle TensorFlow dans une application Windows avec les API Windows Machine Learning
Cette dernière section explique comment créer une application UWP simple avec une interface graphique pour diffuser la webcam et détecter des objets en évaluant notre modèle YOLO avec Windows ML.
Créer une application UWP dans Visual Studio
- Ouvrez Visual Studio et sélectionnez
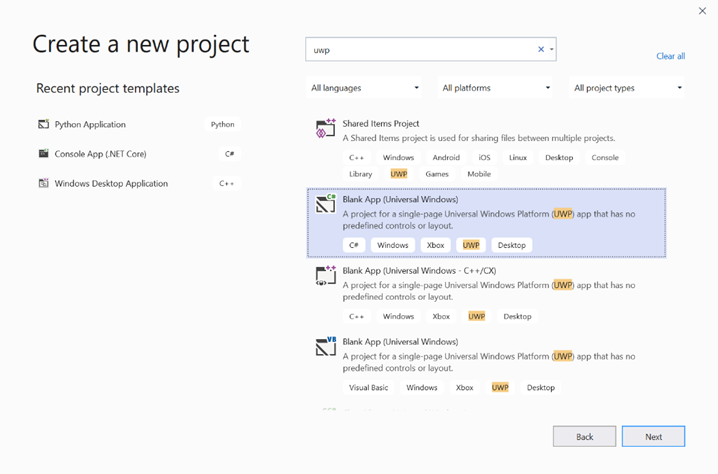
Create a new project.Rechercher UWP, puis sélectionnezBlank App (Universal Windows).

- Sur la page suivante, configurez les paramètres de votre projet en lui donnant un nom et un emplacement. Sélectionnez ensuite une version du système d’exploitation cible et minimale de votre application. Pour utiliser les API Windows ML, vous devez utiliser X ou vous pouvez choisir le package NuGet pour prendre en charge jusqu’à X. Si vous choisissez d’utiliser le package NuGet, suivez ces instructions [lien].
Appeler les API Windows ML pour évaluer le modèle
Étape 1 : utiliser le générateur de code Machine Learning pour générer des classes wrapper pour les AP Windows ML.
Étape 2 : modifier le code généré dans le fichier. cs généré. Le fichier final se présente ainsi :
using System;
using System.Collections.Generic;
using System.Threading.Tasks;
using Windows.Media;
using Windows.Storage;
using Windows.Storage.Streams;
using Windows.AI.MachineLearning;
namespace yolodemo
{

    public sealed class YoloInput
    {
        public TensorFloat input_100; // shape(-1,3,416,416)
    }

    public sealed class YoloOutput
    {
        public TensorFloat concat_1600; // shape(-1,-1,-1)
    }

    public sealed class YoloModel
    {
        private LearningModel model;
        private LearningModelSession session;
        private LearningModelBinding binding;
        public static async Task<YoloModel> CreateFromStreamAsync(IRandomAccessStreamReference stream)
        {
            YoloModel learningModel = new YoloModel();
            learningModel.model = await LearningModel.LoadFromStreamAsync(stream);
            learningModel.session = new LearningModelSession(learningModel.model);
            learningModel.binding = new LearningModelBinding(learningModel.session);
            return learningModel;
        }
        public async Task<YoloOutput> EvaluateAsync(YoloInput input)
        {
            binding.Bind("input_1:0", input.input_100);
            var result = await session.EvaluateAsync(binding, "0");
            var output = new YoloOutput();
            output.concat_1600 = result.Outputs["concat_16:0"] as TensorFloat;
            return output;
        }
    }
}
Évaluez chaque image vidéo pour détecter des objets et dessiner des zones englobantes.
- Ajoutez les bibliothèques suivantes à mainPage.xaml.cs.
using System.Threading.Tasks;
using Windows.Devices.Enumeration;
using Windows.Media;
using Windows.Media.Capture;
using Windows.Storage;
using Windows.UI;
using Windows.UI.Xaml.Media.Imaging;
using Windows.UI.Xaml.Shapes;
using Windows.AI.MachineLearning;
- Ajoutez les variables suivantes dans
public sealed partial class MainPage : Page.
private MediaCapture _media_capture;
private LearningModel _model;
private LearningModelSession _session;
private LearningModelBinding _binding;
private readonly SolidColorBrush _fill_brush = new SolidColorBrush(Colors.Transparent);
private readonly SolidColorBrush _line_brush = new SolidColorBrush(Colors.DarkGreen);
private readonly double _line_thickness = 2.0;
        private readonly string[] _labels =
            {
                "<list of labels>"
        };
- Créez une structure pour la mise en forme des résultats de la détection.
        internal struct DetectionResult
        {
            public string label;
            public List<float> bbox;
            public double prob;
        }
- Créez un objet Comparer qui compare deux objets de type Box. Cette classe permet de dessiner des zones englobantes autour des objets détectés.
        class Comparer : IComparer<DetectionResult>
        {
            public int Compare(DetectionResult x, DetectionResult y)
            {
                return y.prob.CompareTo(x.prob);
            }
        }
- Ajoutez la méthode suivante pour initialiser le flux de la webcam de l’appareil et commencer à traiter chaque image en vue de la détection des objets.
        private async Task InitCameraAsync()
        {
            if (_media_capture == null || _media_capture.CameraStreamState == Windows.Media.Devices.CameraStreamState.Shutdown || _media_capture.CameraStreamState == Windows.Media.Devices.CameraStreamState.NotStreaming)
            {
                if (_media_capture != null)
                {
                    _media_capture.Dispose();
                }

                MediaCaptureInitializationSettings settings = new MediaCaptureInitializationSettings();
                var cameras = await DeviceInformation.FindAllAsync(DeviceClass.VideoCapture);
                var camera = cameras.FirstOrDefault();
                settings.VideoDeviceId = camera.Id;

                _media_capture = new MediaCapture();
                await _media_capture.InitializeAsync(settings);
                WebCam.Source = _media_capture;
            }

            if (_media_capture.CameraStreamState == Windows.Media.Devices.CameraStreamState.NotStreaming)
            {
                await _media_capture.StartPreviewAsync();
                WebCam.Visibility = Visibility.Visible;
            }

            ProcessFrame();
        }
- Ajoutez la méthode suivante pour traiter chaque trame. Cette méthode appelle EvaluateFrame et DrawBoxes, que nous allons implémenter ultérieurement.
        private async Task ProcessFrame()
        {
            var frame = new VideoFrame(Windows.Graphics.Imaging.BitmapPixelFormat.Bgra8, (int)WebCam.Width, (int)WebCam.Height);
            await _media_capture.GetPreviewFrameAsync(frame);
            var results = await EvaluateFrame(frame);
            await DrawBoxes(results.ToArray(), frame);
            ProcessFrame();
        }
- Créer un nouveau type float Sigmoid
        private float Sigmoid(float val)
        {
            var x = (float)Math.Exp(val);
            return x / (1.0f + x);
        }
- Créez un seuil pour la détection correcte des objets.
        private float ComputeIOU(DetectionResult DRa, DetectionResult DRb)
        {
            float ay1 = DRa.bbox[0];
            float ax1 = DRa.bbox[1];
            float ay2 = DRa.bbox[2];
            float ax2 = DRa.bbox[3];
            float by1 = DRb.bbox[0];
            float bx1 = DRb.bbox[1];
            float by2 = DRb.bbox[2];
            float bx2 = DRb.bbox[3];

            Debug.Assert(ay1 < ay2);
            Debug.Assert(ax1 < ax2);
            Debug.Assert(by1 < by2);
            Debug.Assert(bx1 < bx2);

            // determine the coordinates of the intersection rectangle
            float x_left = Math.Max(ax1, bx1);
            float y_top = Math.Max(ay1, by1);
            float x_right = Math.Min(ax2, bx2);
            float y_bottom = Math.Min(ay2, by2);

            if (x_right < x_left || y_bottom < y_top)
                return 0;
            float intersection_area = (x_right - x_left) * (y_bottom - y_top);
            float bb1_area = (ax2 - ax1) * (ay2 - ay1);
            float bb2_area = (bx2 - bx1) * (by2 - by1);
            float iou = intersection_area / (bb1_area + bb2_area - intersection_area);

            Debug.Assert(iou >= 0 && iou <= 1);
            return iou;
        }
- Implémentez la liste suivante pour suivre les objets en cours détectés dans l’image.
        private List<DetectionResult> NMS(IReadOnlyList<DetectionResult> detections,
            float IOU_threshold = 0.45f,
            float score_threshold=0.3f)
        {
            List<DetectionResult> final_detections = new List<DetectionResult>();
            for (int i = 0; i < detections.Count; i++)
            {
                int j = 0;
                for (j = 0; j < final_detections.Count; j++)
                {
                    if (ComputeIOU(final_detections[j], detections[i]) > IOU_threshold)
                    {
                        break;
                    }
                }
                if (j==final_detections.Count)
                {
                    final_detections.Add(detections[i]);
                }
            }
            return final_detections;
        }
- Implémentez la méthode suivante.
        private List<DetectionResult> ParseResult(float[] results)
        {
            int c_values = 84;
            int c_boxes = results.Length / c_values;
            float confidence_threshold = 0.5f;
            List<DetectionResult> detections = new List<DetectionResult>();
            this.OverlayCanvas.Children.Clear();
            for (int i_box = 0; i_box < c_boxes; i_box++)
            {
                float max_prob = 0.0f;
                int label_index = -1;
                for (int j_confidence = 4; j_confidence < c_values; j_confidence++)
                {
                    int index = i_box * c_values + j_confidence;
                    if (results[index] > max_prob)
                    {
                        max_prob = results[index];
                        label_index = j_confidence - 4;
                    }
                }
                if (max_prob > confidence_threshold)
                {
                    List<float> bbox = new List<float>();
                    bbox.Add(results[i_box * c_values + 0]);
                    bbox.Add(results[i_box * c_values + 1]);
                    bbox.Add(results[i_box * c_values + 2]);
                    bbox.Add(results[i_box * c_values + 3]);

                    detections.Add(new DetectionResult()
                    {
                        label = _labels[label_index],
                        bbox = bbox,
                        prob = max_prob
                    });
                }
            }
            return detections;
        }
- Ajoutez la méthode suivante pour dessiner les zones autour des objets détectés dans la trame.
private async Task DrawBoxes(float[] results, VideoFrame frame)
        {
            List<DetectionResult> detections = ParseResult(results);
            Comparer cp = new Comparer();
            detections.Sort(cp);
            IReadOnlyList<DetectionResult> final_detetions = NMS(detections);

            for (int i=0; i < final_detetions.Count; ++i)
            {
                int top = (int)(final_detetions[i].bbox[0] * WebCam.Height);
                int left = (int)(final_detetions[i].bbox[1] * WebCam.Width);
                int bottom = (int)(final_detetions[i].bbox[2] * WebCam.Height);
                int right = (int)(final_detetions[i].bbox[3] * WebCam.Width);

                var brush = new ImageBrush();
                var bitmap_source = new SoftwareBitmapSource();
                await bitmap_source.SetBitmapAsync(frame.SoftwareBitmap);

                brush.ImageSource = bitmap_source;
                // brush.Stretch = Stretch.Fill;

                this.OverlayCanvas.Background = brush;

                var r = new Rectangle();
                r.Tag = i;
                r.Width = right - left;
                r.Height = bottom - top;
                r.Fill = this._fill_brush;
                r.Stroke = this._line_brush;
                r.StrokeThickness = this._line_thickness;
                r.Margin = new Thickness(left, top, 0, 0);

                this.OverlayCanvas.Children.Add(r);
                // Default configuration for border
                // Render text label


                var border = new Border();
                var backgroundColorBrush = new SolidColorBrush(Colors.Black);
                var foregroundColorBrush = new SolidColorBrush(Colors.SpringGreen);
                var textBlock = new TextBlock();
                textBlock.Foreground = foregroundColorBrush;
                textBlock.FontSize = 18;

                textBlock.Text = final_detetions[i].label;
                // Hide
                textBlock.Visibility = Visibility.Collapsed;
                border.Background = backgroundColorBrush;
                border.Child = textBlock;

                Canvas.SetLeft(border, final_detetions[i].bbox[1] * 416 + 2);
                Canvas.SetTop(border, final_detetions[i].bbox[0] * 416 + 2);
                textBlock.Visibility = Visibility.Visible;
                // Add to canvas
                this.OverlayCanvas.Children.Add(border);
            }
        }
- Maintenant que nous avons géré l'infrastructure nécessaire, il est temps d'intégrer l'évaluation elle-même. Cette méthode évalue le modèle par rapport à l’image actuelle pour détecter des objets.
        private async Task<List<float>> EvaluateFrame(VideoFrame frame)
        {
            _binding.Clear();
            _binding.Bind("input_1:0", frame);
            var results = await _session.EvaluateAsync(_binding, "");
            Debug.Print("output done\n");

            TensorFloat result = results.Outputs["Identity:0"] as TensorFloat;
            var shape = result.Shape;
            var data = result.GetAsVectorView();

            return data.ToList<float>();
        }
- Notre application doit commencer par une certaine valeur. Ajoutez une méthode qui démarre le flux de la webcam et l’évaluation du modèle lorsque l’utilisateur appuie sur le bouton
Go.
        private void button_go_Click(object sender, RoutedEventArgs e)
        {
            InitModelAsync();
            InitCameraAsync();
        }
- Ajoutez une méthode pour appeler les API Windows ML d’évaluation du modèle. Tout d’abord, le modèle est chargé à partir du stockage, puis une session est créée et liée à la mémoire.
        private async Task InitModelAsync()
        {
            var model_file = await StorageFile.GetFileFromApplicationUriAsync(new Uri("ms-appx:///Assets//Yolo.onnx"));
            _model = await LearningModel.LoadFromStorageFileAsync(model_file);
            var device = new LearningModelDevice(LearningModelDeviceKind.Cpu);
            _session = new LearningModelSession(_model, device);
            _binding = new LearningModelBinding(_session);
        }
Lancer l’application
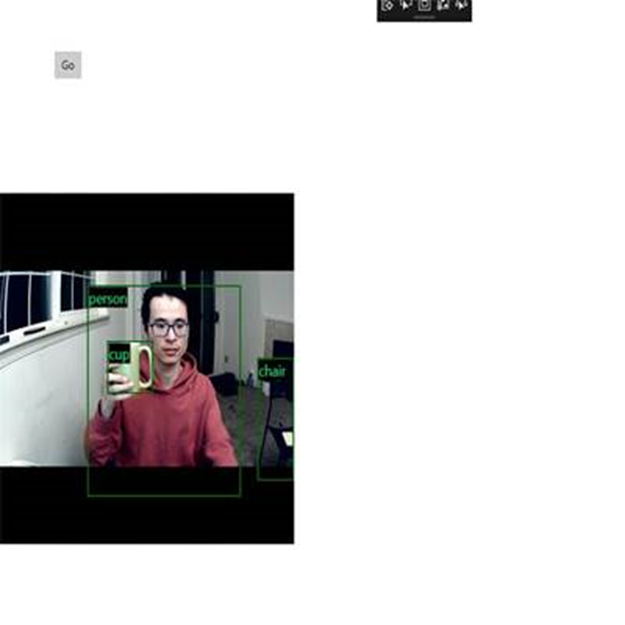
Vous avez maintenant créé une application de détection d’objets en temps réel ! Sélectionnez le bouton Run dans la barre supérieure de Visual Studio pour lancer l’application. L’application doit ressembler à ceci.

Ressources complémentaires
Pour en savoir plus sur les rubriques mentionnées dans ce tutoriel, consultez les ressources suivantes :
- Outils Windows ML : en savoir plus sur les outils tels que le tableau de bord Windows ML, WinMLRunner et le générateur de code Windows ML mglen.
- Modèle ONNX : en savoir plus sur le format ONNX.
- Performances et mémoire Windows ML : découvrez plus d’informations sur la gestion des performances des applications avec Windows ML.
- Informations de référence sur l’API Windows Machine Learning : en savoir plus sur trois domaines des API Windows ML.