Utiliser l’API de mise en forme dans un composant Power Apps
Power Apps Component Framework expose une API de mise en forme qui peut être particulièrement utile lorsque vous devez mettre en forme diverses valeurs dans votre application. Cette unité montre comment utiliser cette API en produisant une table HTML illustrant diverses méthodes utilisables.
Initialiser votre projet de composant
Pour initialiser votre projet de composant, procédez comme suit :
Lancez Visual Studio Code.
Cliquez sur Terminal, puis sur Nouveau terminal.
Redéfinissez le répertoire sur votre dossier source.
cd sourceÀ partir de votre répertoire source, créez un répertoire nommé Formatting-API.
md Formatting-APIExécutez la commande suivante pour basculer vers le nouveau répertoire :
cd Formatting-APIInitialisez le projet en exécutant la commande suivante :
pac pcf init --namespace SampleNamespace --name FormattingAPI --template fieldExécutez npm install pour charger les bibliothèques dépendantes dans votre projet.
npm installOuvrez le projet dans Visual Studio Code en exécutant la commande suivante :
code -a .
Implémenter la logique de votre composant de code
Pour implémenter la logique de votre composant de code, procédez comme suit :
Développez le dossier FormattingAPI, puis ouvrez le fichier ControlManifest.Input.xml.
Remplacez tout le manifeste par le code XML suivant :
<?xml version="1.0" encoding="utf-8" ?>
<manifest>
  <control namespace="SampleNamespace" constructor="FormattingAPI" version="1.1.0" display-name-key="TS_FormattingAPI_Display_Key" description-key="TS_FormattingAPI_Desc_Key" control-type="standard">
    <property name="controlValue" display-name-key="controlValue_Display_Key" description-key="controlValue_Desc_Key" of-type="SingleLine.Text" usage="bound" required="true" />
    <resources>
      <code path="index.ts" order="1" />
      <css path="css/TS_FormattingAPI.css" order="2" />
    </resources>
  </control>
</manifest>
Vous ajouterez ultérieurement les fichiers de support qui se trouvent dans ce manifeste.
Ouvrez le fichier Index.ts.
Au-dessus de la méthode constructor, insérez les variables privées suivantes :
// PCF framework delegate that will be assigned to this object that would be called whenever any update happens.
private _notifyOutputChanged: () => void;

// Reference to the div element that holds together all the HTML elements that you are creating as part of this control
private divElement: HTMLDivElement;

// Reference to HTMLTableElement rendered by control
private _tableElement: HTMLTableElement;

// Reference to the control container HTMLDivElement
// This element contains all elements of your custom control example
private _container: HTMLDivElement;

// Reference to ComponentFramework Context object
private _context: ComponentFramework.Context<IInputs>;

// Flag if control view has been rendered
private _controlViewRendered: Boolean;
Placez la logique suivante dans la méthode init :
this._notifyOutputChanged = notifyOutputChanged;
this._controlViewRendered = false;
this._context = context;

this._container = document.createElement("div");
this._container.classList.add("TSFormatting_Container");
container.appendChild(this._container);
Ajoutez la logique suivante à la méthode updateView :
if (!this._controlViewRendered)
{
    // Render and add HTMLTable to the custom control container element
    let tableElement: HTMLTableElement = this.createHTMLTableElement();
    this._container.appendChild(tableElement);

    this._controlViewRendered = true;
}
Ajoutez les méthodes d’assistance suivantes pour générer votre table HTML qui affichera les valeurs mises en forme après la méthode destroy :
/**
* Helper method to create an HTML Table Row Element
* @param key : string value to show in left column cell
* @param value : string value to show in right column cell
* @param isHeaderRow : true if method should generate a header row
*/
private createHTMLTableRowElement(key: string, value: string, isHeaderRow: boolean): HTMLTableRowElement
{
    let keyCell: HTMLTableCellElement = this.createHTMLTableCellElement(key, "FormattingControlSampleHtmlTable_HtmlCell_Key", isHeaderRow);
    let valueCell: HTMLTableCellElement = this.createHTMLTableCellElement(value, "FormattingControlSampleHtmlTable_HtmlCell_Value", isHeaderRow);

    let rowElement: HTMLTableRowElement = document.createElement("tr");
    rowElement.setAttribute("class", "FormattingControlSampleHtmlTable_HtmlRow");
    rowElement.appendChild(keyCell);
    rowElement.appendChild(valueCell);

    return rowElement;
}

/**
* Helper method to create an HTML Table Cell Element
* @param cellValue : string value to inject in the cell
* @param className : class name for the cell
* @param isHeaderRow : true if method should generate a header row cell
*/
private createHTMLTableCellElement(cellValue: string, className: string, isHeaderRow: boolean): HTMLTableCellElement
{
    let cellElement: HTMLTableCellElement;

    if (isHeaderRow)
    {
        cellElement = document.createElement("th");
        cellElement.setAttribute("class", "FormattingControlSampleHtmlTable_HtmlHeaderCell " + className);
        let textElement: Text = document.createTextNode(cellValue);
        cellElement.appendChild(textElement);
    }
    else
    {
        cellElement = document.createElement("td");
        cellElement.setAttribute("class", "FormattingControlSampleHtmlTable_HtmlCell " + className);
        let textElement: Text = document.createTextNode(cellValue);
        cellElement.appendChild(textElement);
    }
    return cellElement;
}
Ajoutez la méthode suivante, qui comporte des exemples d’utilisation de l’API de mise en forme, en les enregistrant en tant que cellules de table après les méthodes d’assistance :
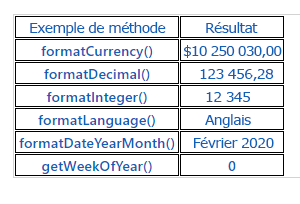
/**
* Creates an HTML Table that showcases examples of basic methods available to the custom control
* The left column of the table shows the method name or property that is being used
* The right column of the table shows the result of that method name or property
*/
private createHTMLTableElement(): HTMLTableElement
{
    // Create HTML Table Element
    let tableElement: HTMLTableElement = document.createElement("table");
    tableElement.setAttribute("class", "FormattingControlSampleHtmlTable_HtmlTable");

    // Create header row for table
    let key: string = "Example Method";
    let value: string = "Result";
    tableElement.appendChild(this.createHTMLTableRowElement(key, value, true));

    // Example use of formatCurrency() method
    // Change the default currency and the precision or pass in the precision and currency as additional parameters.
    key = "formatCurrency()";
    value = this._context.formatting.formatCurrency(10250030);
    tableElement.appendChild(this.createHTMLTableRowElement(key, value, false));

    // Example use of formatDecimal() method
    // Change the settings from user settings to see the output change its format accordingly
    key = "formatDecimal()";
    value = this._context.formatting.formatDecimal(123456.2782);
    tableElement.appendChild(this.createHTMLTableRowElement(key, value, false));

    // Example use of formatInteger() method
    // change the settings from user settings to see the output change its format accordingly.
    key = "formatInteger()";
    value = this._context.formatting.formatInteger(12345);
    tableElement.appendChild(this.createHTMLTableRowElement(key, value, false));

    // Example use of formatLanguage() method
    // Install additional languages and pass in the corresponding language code to see its string value
    key = "formatLanguage()";
    value = this._context.formatting.formatLanguage(1033);
    tableElement.appendChild(this.createHTMLTableRowElement(key, value, false));

    // Example of formatDateYearMonth() method
    // Pass a JavaScript Data object set to the current time into formatDateYearMonth method to format the data
    // and get the return in Year, Month format
    key = "formatDateYearMonth()";
    value = this._context.formatting.formatDateYearMonth(new Date());
    tableElement.appendChild(this.createHTMLTableRowElement(key, value, false));

    // Example of getWeekOfYear() method
    // Pass a JavaScript Data object set to the current time into getWeekOfYear method to get the value for week of the year
    key = "getWeekOfYear()";
    value = this._context.formatting.getWeekOfYear(new Date()).toString();
    tableElement.appendChild(this.createHTMLTableRowElement(key, value, false));

    return tableElement;
}
Cliquez sur Fichier et Enregistrer tout pour enregistrer vos modifications.
Une fois les mises à jour effectuées, votre classe terminée devrait ressembler à l’exemple suivant :
import {IInputs, IOutputs} from "./generated/ManifestTypes";

export class FormattingAPI implements ComponentFramework.StandardControl<IInputs, IOutputs> {

    // PCF framework delegate that will be assigned to this object that would be called whenever any update happens.
    private _notifyOutputChanged: () => void;

    // Reference to the div element that holds together all the HTML elements that you are creating as part of this control
    private divElement: HTMLDivElement;

    // Reference to HTMLTableElement rendered by control
    private _tableElement: HTMLTableElement;

    // Reference to the control container HTMLDivElement
    // This element contains all elements of your custom control example
    private _container: HTMLDivElement;

    // Reference to ComponentFramework Context object
    private _context: ComponentFramework.Context<IInputs>;

    // Flag if control view has been rendered
    private _controlViewRendered: Boolean;

    /**
    * Used to initialize the control instance. Controls can kick off remote server calls and other initialization actions here.
    * Dataset values are not initialized here, use updateView.
    * @param context The entire property bag is available to control through the Context Object; It contains values as set up by the customizer and mapped to property names that are defined in the manifest and to utility functions.
    * @param notifyOutputChanged A callback method to alert the framework that the control has new outputs ready to be retrieved asynchronously.
    * @param state A piece of data that persists in one session for a single user. Can be set at any point in a control's life cycle by calling 'setControlState' in the Mode interface.
    * @param container If a control is marked control-type='starndard', it will receive an empty div element within which it can render its content.
    */
    public init(context: ComponentFramework.Context<IInputs>, notifyOutputChanged: () => void, state: ComponentFramework.Dictionary, container:HTMLDivElement)
    {
        this._notifyOutputChanged = notifyOutputChanged;
        this._controlViewRendered = false;
        this._context = context;

        this._container = document.createElement("div");
        this._container.classList.add("TSFormatting_Container");
        container.appendChild(this._container);
    }

    /**
    * Called when any value in the property bag has changed. This includes field values, datasets, global values such as container height and width, offline status, control metadata values such as label, visible, and so on.
    * @param context The entire property bag that is available to control through the Context Object; It contains values as set up by the customizer that are mapped to names defined in the manifest and to utility functions
    */
    public updateView(context: ComponentFramework.Context<IInputs>): void
    {
        if (!this._controlViewRendered)
        {
            // Render and add HTMLTable to the custom control container element
            let tableElement: HTMLTableElement = this.createHTMLTableElement();
            this._container.appendChild(tableElement);

            this._controlViewRendered = true;
        }
    }

    /**
    * It is called by the framework prior to a control receiving new data.
    * @returns an object based on nomenclature that is defined in the manifest, expecting object[s] for property marked as "bound" or "output"
    */
    public getOutputs(): IOutputs
    {
        return { };
    }

    /**
    * Called when the control is to be removed from the DOM tree. Controls should use this call for cleanup,
    * such as canceling any pending remote calls, removing listeners, and so on.
    */
    public destroy()
    {

    }

    /**
    * Helper method to create an HTML Table Row Element
    * @param key : string value to show in left column cell
    * @param value : string value to show in right column cell
    * @param isHeaderRow : true if method should generate a header row
    */
    private createHTMLTableRowElement(key: string, value: string, isHeaderRow: boolean): HTMLTableRowElement
    {
        let keyCell: HTMLTableCellElement = this.createHTMLTableCellElement(key, "FormattingControlSampleHtmlTable_HtmlCell_Key", isHeaderRow);
        let valueCell: HTMLTableCellElement = this.createHTMLTableCellElement(value, "FormattingControlSampleHtmlTable_HtmlCell_Value", isHeaderRow);

        let rowElement: HTMLTableRowElement = document.createElement("tr");
        rowElement.setAttribute("class", "FormattingControlSampleHtmlTable_HtmlRow");
        rowElement.appendChild(keyCell);
        rowElement.appendChild(valueCell);

        return rowElement;
    }

    /**
    * Helper method to create an HTML Table Cell Element
    * @param cellValue : string value to inject in the cell
    * @param className : class name for the cell
    * @param isHeaderRow : true if method should generate a header row cell
    */
    private createHTMLTableCellElement(cellValue: string, className: string, isHeaderRow: boolean): HTMLTableCellElement
    {
        let cellElement: HTMLTableCellElement;

        if (isHeaderRow)
        {
            cellElement = document.createElement("th");
            cellElement.setAttribute("class", "FormattingControlSampleHtmlTable_HtmlHeaderCell " + className);
            let textElement: Text = document.createTextNode(cellValue);
            cellElement.appendChild(textElement);
        }
        else
        {
            cellElement = document.createElement("td");
            cellElement.setAttribute("class", "FormattingControlSampleHtmlTable_HtmlCell " + className);
            let textElement: Text = document.createTextNode(cellValue);
            cellElement.appendChild(textElement);
        }
        return cellElement;
    }

    /**
    * Creates an HTML Table that showcases examples of basic methods that are available to the custom control
    * The left column of the table shows the method name or property that is being used
    * The right column of the table shows the result of that method name or property
    */
    private createHTMLTableElement(): HTMLTableElement
    {
        // Create HTML Table Element
        let tableElement: HTMLTableElement = document.createElement("table");
        tableElement.setAttribute("class", "FormattingControlSampleHtmlTable_HtmlTable");

        // Create header row for table
        let key: string = "Example Method";
        let value: string = "Result";
        tableElement.appendChild(this.createHTMLTableRowElement(key, value, true));

        // Example use of formatCurrency() method
        // Change the default currency and the precision or pass in the precision and currency as additional parameters.
        key = "formatCurrency()";
        value = this._context.formatting.formatCurrency(10250030);
        tableElement.appendChild(this.createHTMLTableRowElement(key, value, false));

        // Example use of formatDecimal() method
        // Change the settings from user settings to see the output change its format accordingly
        key = "formatDecimal()";
        value = this._context.formatting.formatDecimal(123456.2782);
        tableElement.appendChild(this.createHTMLTableRowElement(key, value, false));

        // Example use of formatInteger() method
        // change the settings from user settings to see the output change its format accordingly.
        key = "formatInteger()";
        value = this._context.formatting.formatInteger(12345);
        tableElement.appendChild(this.createHTMLTableRowElement(key, value, false));

        // Example use of formatLanguage() method
        // Install additional languages and pass in the corresponding language code to see its string value
        key = "formatLanguage()";
        value = this._context.formatting.formatLanguage(1033);
        tableElement.appendChild(this.createHTMLTableRowElement(key, value, false));

        // Example of formatDateYearMonth() method
        // Pass a JavaScript Data object set to the current time into formatDateYearMonth method to format the data
        // and get the return in Year, Month format
        key = "formatDateYearMonth()";
        value = this._context.formatting.formatDateYearMonth(new Date());
        tableElement.appendChild(this.createHTMLTableRowElement(key, value, false));

        // Example of getWeekOfYear() method
        // Pass a JavaScript Data object set to the current time into getWeekOfYear method to get the value for week of the year
        key = "getWeekOfYear()";
        value = this._context.formatting.getWeekOfYear(new Date()).toString();
        tableElement.appendChild(this.createHTMLTableRowElement(key, value, false));

        return tableElement;
    }

}
Ajouter un style à votre composant de code
Pour ajouter un style à votre composant de code, procédez comme suit :
Créez un sous-dossier css sous le dossier FormattingAPI.
Créez un fichier TS_FormattingAPI.css dans le sous-dossier CSS.
Ajoutez le contenu de style suivant au fichier TS_FormattingAPI.css :
.SampleNamespace\.FormattingAPI
{
    font-family: 'SegoeUI-Semibold', 'Segoe UI Semibold', 'Segoe UI Regular', 'Segoe UI';
}

.SampleNamespace\.FormattingAPI .TSFormatting_Container
{
    overflow-x: auto;
}

.SampleNamespace\.FormattingAPI .FormattingControlSampleHtmlTable_HtmlRow
{
    background-color: #FFFFFF;
}

.SampleNamespace\.FormattingAPI .FormattingControlSampleHtmlTable_HtmlHeaderCell
{
    text-align: center;
}

.SampleNamespace\.FormattingAPI .FormattingControlSampleHtmlTable_HtmlCell,
.SampleNamespace\.FormattingAPI .FormattingControlSampleHtmlTable_HtmlHeaderCell
{
    border: 1px solid black;
    padding-left: 3px;
    padding-right: 3px;
}

.SampleNamespace\.FormattingAPI .FormattingControlSampleHtmlTable_HtmlInputTextCell
{
    border: 1px solid black;
    padding: 0px;
}

.SampleNamespace\.FormattingAPI .FormattingControlSampleHtmlTable_HtmlHeaderCell
{
    font-weight: bold;
    font-size: 16px;
}

.SampleNamespace\.FormattingAPI .FormattingControlSampleHtmlTable_HtmlCell_Key
{
    color: #1160B7;
}

.SampleNamespace\.FormattingAPI .FormattingControlSampleHtmlTable_HtmlCell_Value
{
    color: #1160B7;
    text-align: center;
}
Cliquez sur Fichier et Enregistrer tout pour enregistrer vos modifications.
Créer et exécuter votre composant
Pour créer et exécuter votre composant, procédez comme suit :
Créez votre solution en exécutant la commande suivante :
npm run buildUne fois la création réussie, vous pouvez tester votre nouveau composant d’API de mise en forme en exécutant npm start.
npm startFermez la fenêtre de navigateur de l’atelier de test.
Revenez au terminal et arrêtez le Watcher en appuyant longuement sur [CTRL] + C.
Tapez Y, puis appuyez sur [ENTRÉE].
Pour en savoir plus, consultez Implémentation d’un composant d’API de mise en forme.