Notifications locales dans Xamarin.Forms
Les notifications locales sont des alertes envoyées par les applications installées sur un appareil mobile. Les notifications locales sont souvent utilisées pour les fonctionnalités telles que :
- Événements de calendrier
- Relances
- Déclencheurs basés sur l’emplacement
Chaque plateforme gère la création, l’affichage et la consommation de notifications locales différemment. Cet article explique comment créer une abstraction multiplateforme pour envoyer, planifier et recevoir des notifications locales avec Xamarin.Forms.
Créer une interface multiplateforme
L’application Xamarin.Forms doit créer et consommer des notifications sans souci pour les implémentations de plateforme sous-jacentes. L’interface suivante INotificationManager est implémentée dans la bibliothèque de code partagée et définit une API multiplateforme que l’application peut utiliser pour interagir avec les notifications :
public interface INotificationManager
{
    event EventHandler NotificationReceived;
    void Initialize();
    void SendNotification(string title, string message, DateTime? notifyTime = null);
    void ReceiveNotification(string title, string message);
}
Cette interface sera implémentée dans chaque projet de plateforme. L’événement NotificationReceived permet à l’application de gérer les notifications entrantes. La Initialize méthode doit effectuer toute logique de plateforme native nécessaire pour préparer le système de notification. La SendNotification méthode doit envoyer une notification, à un paramètre facultatif DateTime. La ReceiveNotification méthode doit être appelée par la plateforme sous-jacente lorsqu’un message est reçu.
Utiliser l’interface dans Xamarin.Forms
Une fois qu’une interface a été créée, elle peut être consommée dans le projet partagé Xamarin.Forms même si les implémentations de plateforme n’ont pas encore été créées. L’exemple d’application contient un ContentPage appelé MainPage.xaml avec le contenu suivant :
<StackLayout Margin="0,35,0,0"
             x:Name="stackLayout">
    <Label Text="Click the button below to create a local notification."
           TextColor="Red"
           HorizontalOptions="Center"
           VerticalOptions="Start" />
    <Button Text="Create Notification"
            HorizontalOptions="Center"
            VerticalOptions="Start"
            Clicked="OnSendClick" />
    <Label Text="Click the button below to schedule a local notification for in 10 seconds time."
           TextColor="Red"
           HorizontalOptions="Center"
           VerticalOptions="Start" />
    <Button Text="Create Notification"
            HorizontalOptions="Center"
            VerticalOptions="Start"
            Clicked="OnScheduleClick" />
</StackLayout>
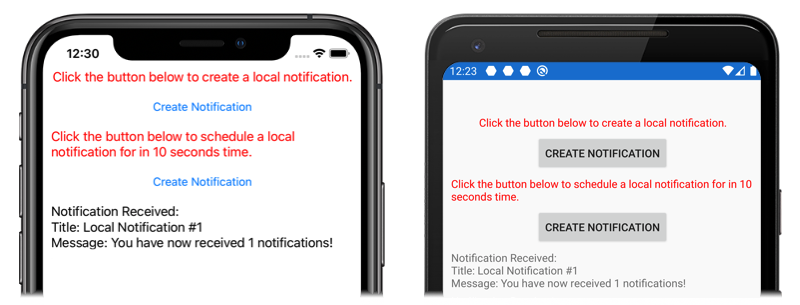
La disposition contient des Label éléments qui expliquent des instructions et Button des éléments qui envoient ou planifient une notification lorsque vous appuyez dessus.
Le MainPage code-behind de la classe gère l’envoi et la réception de notifications :
public partial class MainPage : ContentPage
{
    INotificationManager notificationManager;
    int notificationNumber = 0;

    public MainPage()
    {
        InitializeComponent();

        notificationManager = DependencyService.Get<INotificationManager>();
        notificationManager.NotificationReceived += (sender, eventArgs) =>
        {
            var evtData = (NotificationEventArgs)eventArgs;
            ShowNotification(evtData.Title, evtData.Message);
        };
    }

    void OnSendClick(object sender, EventArgs e)
    {
        notificationNumber++;
        string title = $"Local Notification #{notificationNumber}";
        string message = $"You have now received {notificationNumber} notifications!";
        notificationManager.SendNotification(title, message);
    }

    void OnScheduleClick(object sender, EventArgs e)
    {
        notificationNumber++;
        string title = $"Local Notification #{notificationNumber}";
        string message = $"You have now received {notificationNumber} notifications!";
        notificationManager.SendNotification(title, message, DateTime.Now.AddSeconds(10));
    }

    void ShowNotification(string title, string message)
    {
        Device.BeginInvokeOnMainThread(() =>
        {
            var msg = new Label()
            {
                Text = $"Notification Received:\nTitle: {title}\nMessage: {message}"
            };
            stackLayout.Children.Add(msg);
        });
    }
}
Le MainPage constructeur de classe utilise la Xamarin.FormsDependencyService méthode pour récupérer une instance spécifique à la plateforme du INotificationManager. Les OnSendClick méthodes et OnScheduleClicked les méthodes utilisent l’instance INotificationManager pour envoyer et planifier de nouvelles notifications. La ShowNotification méthode est appelée à partir du gestionnaire d’événements attaché à l’événement NotificationReceived et insère un nouveau Label dans la page lorsque l’événement est appelé.
Le NotificationReceived gestionnaire d’événements convertit ses arguments d’événement en NotificationEventArgs. Ce type est défini dans le projet partagé Xamarin.Forms :
public class NotificationEventArgs : EventArgs
{
    public string Title { get; set; }
    public string Message { get; set; }
}
Pour plus d’informations sur l’objet Xamarin.FormsDependencyServiceDependencyService, voirXamarin.Forms DependencyService.
Créer l’implémentation de l’interface Android
Pour que l’application Xamarin.Forms envoie et reçoit des notifications sur Android, l’application doit fournir une implémentation de l’interface INotificationManager .
Créer la classe AndroidNotificationManager
La AndroidNotificationManager classe implémente l’interface INotificationManager :
using System;
using Android.App;
using Android.Content;
using Android.Graphics;
using Android.OS;
using AndroidX.Core.App;
using Xamarin.Forms;
using AndroidApp = Android.App.Application;

[assembly: Dependency(typeof(LocalNotifications.Droid.AndroidNotificationManager))]
namespace LocalNotifications.Droid
{
    public class AndroidNotificationManager : INotificationManager
    {
        const string channelId = "default";
        const string channelName = "Default";
        const string channelDescription = "The default channel for notifications.";

        public const string TitleKey = "title";
        public const string MessageKey = "message";

        bool channelInitialized = false;
        int messageId = 0;
        int pendingIntentId = 0;

        NotificationManager manager;

        public event EventHandler NotificationReceived;

        public static AndroidNotificationManager Instance { get; private set; }

        public AndroidNotificationManager() => Initialize();

        public void Initialize()
        {
            if (Instance == null)
            {
                CreateNotificationChannel();
                Instance = this;
            }
        }

        public void SendNotification(string title, string message, DateTime? notifyTime = null)
        {
            if (!channelInitialized)
            {
                CreateNotificationChannel();
            }

            if (notifyTime != null)
            {
                Intent intent = new Intent(AndroidApp.Context, typeof(AlarmHandler));
                intent.PutExtra(TitleKey, title);
                intent.PutExtra(MessageKey, message);

                PendingIntent pendingIntent = PendingIntent.GetBroadcast(AndroidApp.Context, pendingIntentId++, intent, PendingIntentFlags.CancelCurrent);
                long triggerTime = GetNotifyTime(notifyTime.Value);
                AlarmManager alarmManager = AndroidApp.Context.GetSystemService(Context.AlarmService) as AlarmManager;
                alarmManager.Set(AlarmType.RtcWakeup, triggerTime, pendingIntent);
            }
            else
            {
                Show(title, message);
            }
        }

        public void ReceiveNotification(string title, string message)
        {
            var args = new NotificationEventArgs()
            {
                Title = title,
                Message = message,
            };
            NotificationReceived?.Invoke(null, args);
        }

        public void Show(string title, string message)
        {
            Intent intent = new Intent(AndroidApp.Context, typeof(MainActivity));
            intent.PutExtra(TitleKey, title);
            intent.PutExtra(MessageKey, message);

            PendingIntent pendingIntent = PendingIntent.GetActivity(AndroidApp.Context, pendingIntentId++, intent, PendingIntentFlags.UpdateCurrent);

            NotificationCompat.Builder builder = new NotificationCompat.Builder(AndroidApp.Context, channelId)
                .SetContentIntent(pendingIntent)
                .SetContentTitle(title)
                .SetContentText(message)
                .SetLargeIcon(BitmapFactory.DecodeResource(AndroidApp.Context.Resources, Resource.Drawable.xamagonBlue))
                .SetSmallIcon(Resource.Drawable.xamagonBlue)
                .SetDefaults((int)NotificationDefaults.Sound | (int)NotificationDefaults.Vibrate);

            Notification notification = builder.Build();
            manager.Notify(messageId++, notification);
        }

        void CreateNotificationChannel()
        {
            manager = (NotificationManager)AndroidApp.Context.GetSystemService(AndroidApp.NotificationService);

            if (Build.VERSION.SdkInt >= BuildVersionCodes.O)
            {
                var channelNameJava = new Java.Lang.String(channelName);
                var channel = new NotificationChannel(channelId, channelNameJava, NotificationImportance.Default)
                {
                    Description = channelDescription
                };
                manager.CreateNotificationChannel(channel);
            }

            channelInitialized = true;
        }

        long GetNotifyTime(DateTime notifyTime)
        {
            DateTime utcTime = TimeZoneInfo.ConvertTimeToUtc(notifyTime);
            double epochDiff = (new DateTime(1970, 1, 1) - DateTime.MinValue).TotalSeconds;
            long utcAlarmTime = utcTime.AddSeconds(-epochDiff).Ticks / 10000;
            return utcAlarmTime; // milliseconds
        }
    }
}
L’attribut assembly au-dessus de l’espace de noms inscrit l’implémentation de l’interface INotificationManager avec le DependencyService.
Android permet aux applications de définir plusieurs canaux pour les notifications. La Initialize méthode crée un canal de base utilisé par l’exemple d’application pour envoyer des notifications. La SendNotification méthode définit la logique spécifique à la plateforme requise pour créer et envoyer une notification. La ReceiveNotification méthode est appelée par le système d’exploitation Android lorsqu’un message est reçu et appelle le gestionnaire d’événements.
La SendNotification méthode crée immédiatement une notification locale, ou exactement DateTime. Une notification peut être planifiée pour une utilisation exacte DateTime de la AlarmManager classe, et la notification sera reçue par un objet dérivé de la BroadcastReceiver classe :
[BroadcastReceiver(Enabled = true, Label = "Local Notifications Broadcast Receiver")]
public class AlarmHandler : BroadcastReceiver
{
    public override void OnReceive(Context context, Intent intent)
    {
        if (intent?.Extras != null)
        {
            string title = intent.GetStringExtra(AndroidNotificationManager.TitleKey);
            string message = intent.GetStringExtra(AndroidNotificationManager.MessageKey);

            AndroidNotificationManager manager = AndroidNotificationManager.Instance ?? new AndroidNotificationManager();
            manager.Show(title, message);
        }
    }
}
Important
Par défaut, les notifications planifiées à l’aide de la classe ne survivent pas au redémarrage de l’appareil AlarmManager . Toutefois, vous pouvez concevoir votre application pour replanifier automatiquement les notifications si l’appareil est redémarré. Pour plus d’informations, consultez Démarrer une alarme lorsque l’appareil redémarre dans Planification des alarmes répétées sur developer.android.com. Pour plus d’informations sur le traitement en arrière-plan sur Android, consultez Guide de traitement en arrière-plan sur developer.android.com.
Pour plus d’informations sur les récepteurs de diffusion, consultez Récepteurs de diffusion dans Xamarin.Android.
Gérer les notifications entrantes sur Android
La MainActivity classe doit détecter les notifications entrantes et notifier l’instance AndroidNotificationManager . L’attribut Activity de la MainActivity classe doit spécifier une LaunchMode valeur de LaunchMode.SingleTop:
[Activity(
        //...
        LaunchMode = LaunchMode.SingleTop]
    public class MainActivity : global::Xamarin.Forms.Platform.Android.FormsAppCompatActivity
    {
        // ...
    }
Le SingleTop mode empêche le démarrage de Activity plusieurs instances pendant que l’application est au premier plan. Cela LaunchMode peut ne pas convenir aux applications qui lancent plusieurs activités dans des scénarios de notification plus complexes. Pour plus d’informations sur les valeurs d’énumération LaunchMode , consultez LaunchMode d’activité Android.
Dans la MainActivity classe est modifiée pour recevoir des notifications entrantes :
protected override void OnCreate(Bundle savedInstanceState)
{
    // ...

    global::Xamarin.Forms.Forms.Init(this, savedInstanceState);
    LoadApplication(new App());
    CreateNotificationFromIntent(Intent);
}

protected override void OnNewIntent(Intent intent)
{
    CreateNotificationFromIntent(intent);
}

void CreateNotificationFromIntent(Intent intent)
{
    if (intent?.Extras != null)
    {
        string title = intent.GetStringExtra(AndroidNotificationManager.TitleKey);
        string message = intent.GetStringExtra(AndroidNotificationManager.MessageKey);
        DependencyService.Get<INotificationManager>().ReceiveNotification(title, message);
    }
}
La CreateNotificationFromIntent méthode extrait les données de notification de l’argument intent et les fournit à l’aide AndroidNotificationManager de la ReceiveNotification méthode. La CreateNotificationFromIntent méthode est appelée à partir de la OnCreate méthode et de la OnNewIntent méthode :
- Lorsque l’application est démarrée par des données de notification, les
Intentdonnées sont transmises à laOnCreateméthode. - Si l’application est déjà au premier plan, les
Intentdonnées sont transmises à laOnNewIntentméthode.
Android propose de nombreuses options avancées pour les notifications. Pour plus d’informations, consultez Notifications dans Xamarin.Android.
Créer l’implémentation de l’interface iOS
Pour que l’application Xamarin.Forms envoie et reçoit des notifications sur iOS, l’application doit fournir une implémentation du INotificationManagerfichier .
Créer la classe iOSNotificationManager
La iOSNotificationManager classe implémente l’interface INotificationManager :
using System;
using Foundation;
using UserNotifications;
using Xamarin.Forms;

[assembly: Dependency(typeof(LocalNotifications.iOS.iOSNotificationManager))]
namespace LocalNotifications.iOS
{
    public class iOSNotificationManager : INotificationManager
    {
        int messageId = 0;
        bool hasNotificationsPermission;
        public event EventHandler NotificationReceived;

        public void Initialize()
        {
            // request the permission to use local notifications
            UNUserNotificationCenter.Current.RequestAuthorization(UNAuthorizationOptions.Alert, (approved, err) =>
            {
                hasNotificationsPermission = approved;
            });
        }

        public void SendNotification(string title, string message, DateTime? notifyTime = null)
        {
            // EARLY OUT: app doesn't have permissions
            if (!hasNotificationsPermission)
            {
                return;
            }

            messageId++;

            var content = new UNMutableNotificationContent()
            {
                Title = title,
                Subtitle = "",
                Body = message,
                Badge = 1
            };

            UNNotificationTrigger trigger;
            if (notifyTime != null)
            {
                // Create a calendar-based trigger.
                trigger = UNCalendarNotificationTrigger.CreateTrigger(GetNSDateComponents(notifyTime.Value), false);
            }
            else
            {
                // Create a time-based trigger, interval is in seconds and must be greater than 0.
                trigger = UNTimeIntervalNotificationTrigger.CreateTrigger(0.25, false);
            }

            var request = UNNotificationRequest.FromIdentifier(messageId.ToString(), content, trigger);
            UNUserNotificationCenter.Current.AddNotificationRequest(request, (err) =>
            {
                if (err != null)
                {
                    throw new Exception($"Failed to schedule notification: {err}");
                }
            });
        }

        public void ReceiveNotification(string title, string message)
        {
            var args = new NotificationEventArgs()
            {
                Title = title,
                Message = message
            };
            NotificationReceived?.Invoke(null, args);
        }

        NSDateComponents GetNSDateComponents(DateTime dateTime)
        {
            return new NSDateComponents
            {
                Month = dateTime.Month,
                Day = dateTime.Day,
                Year = dateTime.Year,
                Hour = dateTime.Hour,
                Minute = dateTime.Minute,
                Second = dateTime.Second
            };
        }
    }
}
L’attribut assembly au-dessus de l’espace de noms inscrit l’implémentation de l’interface INotificationManager avec le DependencyService.
Sur iOS, vous devez demander l’autorisation d’utiliser des notifications avant de tenter de planifier une notification. La Initialize méthode demande l’autorisation d’utiliser des notifications locales. La SendNotification méthode définit la logique requise pour créer et envoyer une notification. La ReceiveNotification méthode est appelée par iOS lorsqu’un message est reçu et appelle le gestionnaire d’événements.
Remarque
La SendNotification méthode crée immédiatement une notification locale, à l’aide d’un UNTimeIntervalNotificationTrigger objet ou exactement DateTime à l’aide d’un UNCalendarNotificationTrigger objet.
Gérer les notifications entrantes sur iOS
Sur iOS, vous devez créer un délégué qui sous-classe pour gérer les messages entrants UNUserNotificationCenterDelegate . L’exemple d’application définit une iOSNotificationReceiver classe :
public class iOSNotificationReceiver : UNUserNotificationCenterDelegate
{
    public override void WillPresentNotification(UNUserNotificationCenter center, UNNotification notification, Action<UNNotificationPresentationOptions> completionHandler)
    {
        ProcessNotification(notification);
        completionHandler(UNNotificationPresentationOptions.Alert);
    }

    void ProcessNotification(UNNotification notification)
    {
        string title = notification.Request.Content.Title;
        string message = notification.Request.Content.Body;

        DependencyService.Get<INotificationManager>().ReceiveNotification(title, message);
    }
}
Cette classe utilise la DependencyService méthode pour obtenir une instance de la iOSNotificationManager classe et fournit des données de notification entrantes à la ReceiveNotification méthode.
La AppDelegate classe doit spécifier un iOSNotificationReceiver objet comme délégué pendant le démarrage de l’application UNUserNotificationCenter . Cela se produit dans la FinishedLaunching méthode :
public override bool FinishedLaunching(UIApplication app, NSDictionary options)
{
    global::Xamarin.Forms.Forms.Init();

    UNUserNotificationCenter.Current.Delegate = new iOSNotificationReceiver();

    LoadApplication(new App());
    return base.FinishedLaunching(app, options);
}
iOS offre de nombreuses options avancées pour les notifications. Pour plus d’informations, consultez Notifications dans Xamarin.iOS.
Tester l’application
Une fois que les projets de plateforme contiennent une implémentation inscrite de l’interface INotificationManager , l’application peut être testée sur les deux plateformes. Exécutez l’application et cliquez sur l’un des boutons Créer une notification pour créer une notification.
Sur Android, les notifications s’affichent dans la zone de notification. Lorsque la notification est tapée, l’application reçoit la notification et affiche un message :

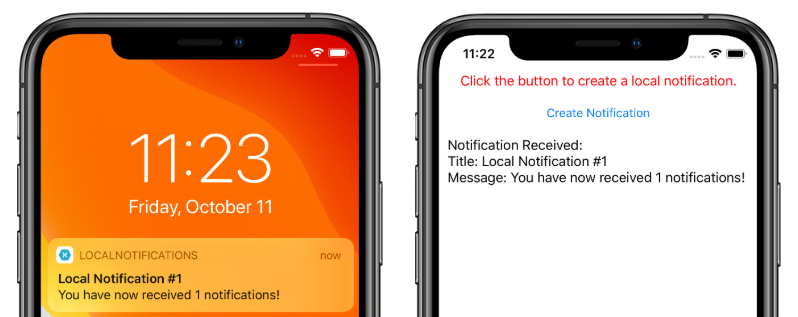
Sur iOS, les notifications entrantes sont automatiquement reçues par l’application sans avoir besoin d’une entrée utilisateur. L’application reçoit la notification et affiche un message :

