Create a task sequence with Configuration Manager and MDT
Applies to:
- Windows 10
In this article, you'll learn how to create a Configuration Manager task sequence with Microsoft Deployment Toolkit (MDT) integration using the MDT wizard. Creating task sequences in Configuration Manager requires many more steps than creating task sequences for MDT Lite Touch installation. Luckily, the MDT wizard helps you through the process and also guides you through creating the needed packages.
For the purposes of this guide, we'll use one server computer: CM01.
- CM01 is a domain member server and Configuration Manager software distribution point. In this guide, CM01 is a standalone primary site server. CM01 is running Windows Server 2019. However, an earlier, supported version of Windows Server can also be used.
An existing Configuration Manager infrastructure that is integrated with MDT is used for the following procedures. For more information about the setup for this article, see Prepare for Zero Touch Installation of Windows 10 with Configuration Manager. Note: Active Directory permissions for the CM_JD account are required for the task sequence to work properly.
Create a task sequence using the MDT Integration Wizard
This section walks you through the process of creating a Configuration Manager task sequence for production use.
On CM01:
Using the Configuration Manager Console, in the Software Library workspace, expand Operating Systems, right-click Task Sequences, and select Create MDT Task Sequence.
On the Choose Template page, select the Client Task Sequence template and select Next.
On the General page, assign the following settings and then select Next:
- Task sequence name: Windows 10 Enterprise x64 RTM
- Task sequence comments: Production image with Office 365 Pro Plus x64
On the Details page, assign the following settings and then select Next:
- Join a Domain
- Domain: contoso.com
- Account: contoso\CM_JD
- Password: pass@word1
- Windows Settings
- User name: Contoso
- Organization name: Contoso
- Product key: <blank>
On the Capture Settings page, accept the default settings, and select Next.
On the Boot Image page, browse and select the Zero Touch WinPE x64 boot image package. Then select Next.
On the MDT Package page, select Create a new Microsoft Deployment Toolkit Files package, and in the Package source folder to be created (UNC Path): text box, enter
\\CM01\Sources$\OSD\MDT\MDT. Then select Next.On the MDT Details page, assign the name MDT and select Next.
On the OS Image page, browse and select the Windows 10 Enterprise x64 RTM package. Then select Next.
On the Deployment Method page, accept the default settings (Zero Touch installation) and select Next.
On the Client Package page, browse and select the Microsoft Corporation Configuration Manager Client Package and select Next.
On the USMT Package page, browse and select the Microsoft Corporation User State Migration Tool for Windows package and select Next.
On the Settings Package page, select the Create a new settings package option, and in the Package source folder to be created (UNC Path): text box, enter
\\CM01\Sources$\OSD\Settings\Windows 10 x64 Settingsand select Next.On the Settings Details page, assign the name Windows 10 x64 Settings and select Next.
On the Sysprep Package page, select Next twice.
On the Confirmation page, select Finish.
Edit the task sequence
After you create the task sequence, we recommend that you configure the task sequence for an optimal deployment experience. The configurations include enabling support for Unified Extensible Firmware Interface (UEFI), dynamic organizational unit (OU) allocation, computer replace scenarios, and more.
On CM01:
Using the Configuration Manager Console, in the Software Library workspace, expand Operating Systems, select Task Sequences, right-click the Windows 10 Enterprise x64 RTM task sequence, and select Edit.
In the Post Install group, select Apply Network Settings, and configure the Domain OU value to use the Contoso / Computers / Workstations OU (browse for values).
In the Post Install group, disable the Auto Apply Drivers action. (Disabling is done by selecting the action and, in the Options tab, selecting the Disable this step check box.)
After the disabled Post Install / Auto Apply Drivers action, add a new group name: Drivers.
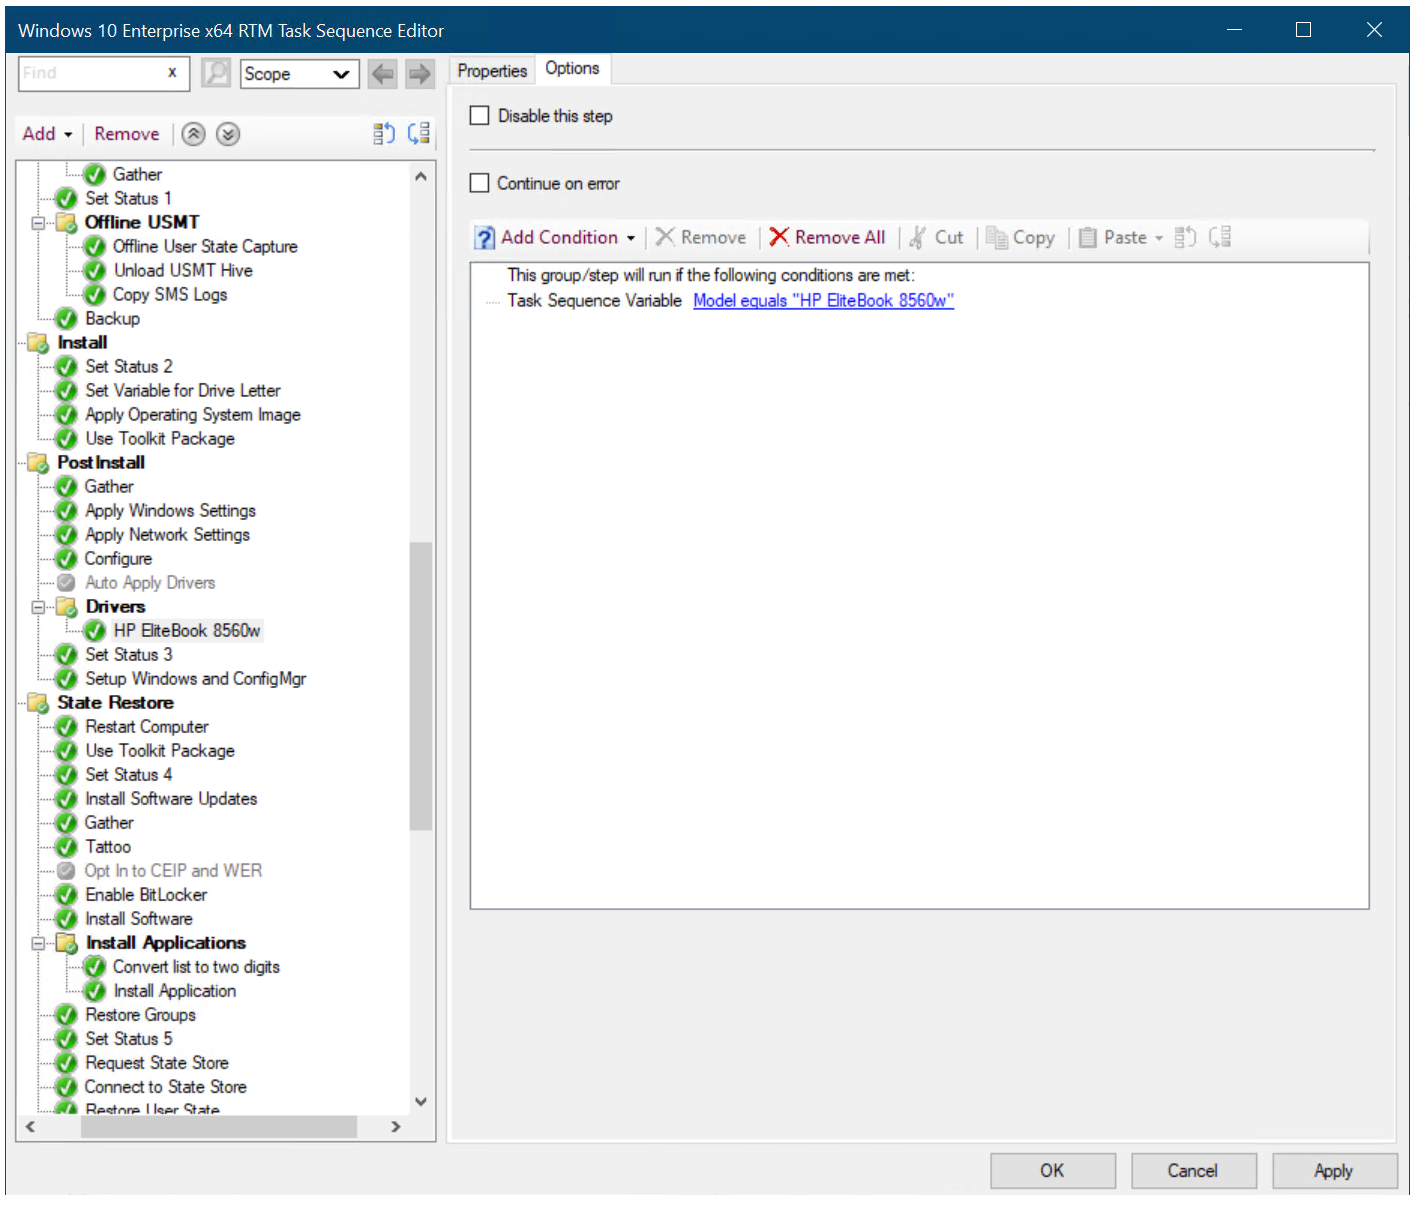
After the Post Install / Drivers group, add an Apply Driver Package action with the following settings:
- Name: HP EliteBook 8560w
- Driver Package: Windows 10 x64 - HP EliteBook 8560w
- Options tab - Add Condition: Task Sequence Variable: Model equals HP EliteBook 8560w
Note
You also can add a Query WMI condition with the following query: SELECT * FROM Win32_ComputerSystem WHERE Model LIKE '%HP EliteBook 8560w%'

The driver package options
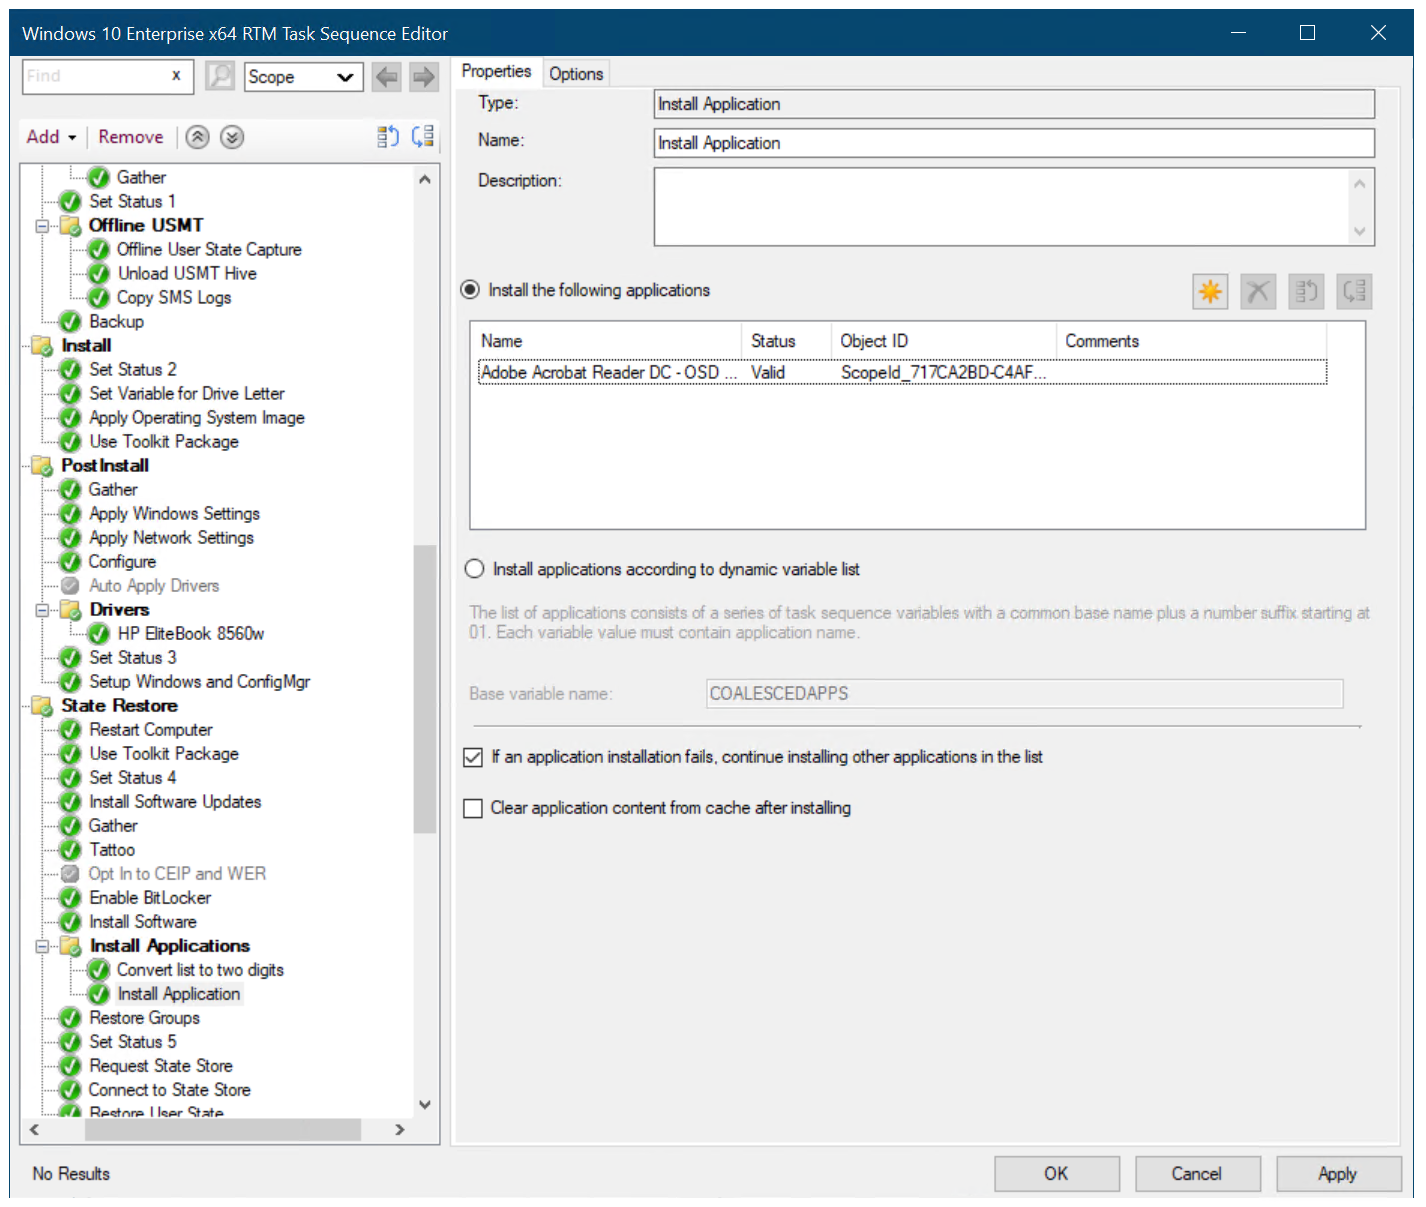
In the State Restore / Install Applications group, select the Install Application action.
Select the Install the following applications radio button, and add the OSD / Adobe Reader DC - OSD Install application to the list.

Add an application to the Configuration Manager task sequence
Note
In recent versions of Configuration Manager the Request State Store and Release State Store actions described below are present by default. These actions are used for common computer replace scenarios. There's also the additional condition on the options tab: USMTOfflineMigration not equals TRUE. If these actions are not present, try updating to the latest Configuration Manager current branch release.
In the State Restore group, after the Set Status 5 action, verify there's a User State \ Request State Store action with the following settings:
- Request state storage location to: Restore state from another computer
- If computer account fails to connect to state store, use the Network Access account: selected
- Options: Continue on error
- Options / Add Condition:
- Task Sequence Variable
- USMTLOCAL not equals True
In the State Restore group, after the Restore User State action, verify there's a Release State Store action with the following settings:
- Options: Continue on error
- Options / Condition:
- Task Sequence Variable
- USMTLOCAL not equals True
Select OK.
Organize your packages (optional)
If desired, you can create a folder structure for packages. This folder structure is purely for organizational purposes and is useful if you need to manage a large number of packages.
To create a folder for packages:
On CM01:
Using the Configuration Manager Console, in the Software Library workspace, expand Application Management, and then select Packages.
Right-click Packages, point to Folder, select Create Folder and create the OSD folder. This process will create the Root \ OSD folder structure.
Select the MDT, User State Migration Tool for Windows, and Windows 10 x64 Settings packages, right-click and select Move.
In the Move Selected Items dialog box, select the OSD folder, and select OK.
Next, see Finalize the operating system configuration for Windows 10 deployment with Configuration Manager.
Related articles
Prepare for Zero Touch Installation of Windows 10 with Configuration Manager
Create a custom Windows PE boot image with Configuration Manager
Add a Windows 10 operating system image using Configuration Manager
Create an application to deploy with Windows 10 using Configuration Manager
Add drivers to a Windows 10 deployment with Windows PE using Configuration Manager
Deploy Windows 10 using PXE and Configuration Manager
Refresh a Windows 7 SP1 client with Windows 10 using Configuration Manager
Replace a Windows 7 SP1 client with Windows 10 using Configuration Manager