Set up HTTPS with Secure Sockets Layer (SSL) for Azure DevOps on-premises
TFS 2017
You can strengthen the security of your deployment of Azure DevOps Server by configuring it to use Hypertext Transfer Protocol Secure (HTTPS) with Secure Sockets Layer (SSL). You can choose either to require this protocol, which maximizes the security of your deployment, or you can choose to support HTTPS with SSL in addition to the default protocol, HTTP.
Before you choose a configuration, review the advantages and disadvantages described here. After you identify the configuration that best meets the security needs of your organization, follow the steps in this topic to configure your deployment.
In this topic
Conceptual information
Server configuration
Optional configuration tasks
Build configuration
Client configuration
Git repository configuration
Advantages of Supporting HTTPS with SSL in Addition to HTTP
If you configure your deployment of Azure DevOps Server to support both protocols, users whose computers have been configured for HTTPS with SSL will connect by using that protocol, which makes your deployment more secure. In addition, users whose computers are configured for HTTP only can still connect to your deployment. Although you should not deploy this configuration over public networks, you can gain the following advantages by continuing to support HTTP connections in a controlled network environment:
You can increase the security of your deployment over time by configuring client computers for HTTPS with SSL as your schedule permits. If you take a phased approach, you do not need to upgrade all computers at the same time, and users whose computers have not yet been upgraded can still connect to the deployment.
You can more easily configure and maintain Azure DevOps Server.
Calls from one Web service to another are faster over HTTP than over HTTPS with SSL. Therefore, you can continue to support HTTP connections from client computers for which the performance requirements outweigh the security risks.
Advantages of Requiring HTTPS with SSL for All Connections
If you require HTTPS with SSL for all connections, you gain the following advantages:
All web connections between the application tier, the data tier, and the client tier for Azure DevOps are more secure because they require certificates.
You can control access more easily by configuring certificates to expire when a project phase is expected to end.
Disadvantages of Supporting or Requiring HTTPS with SSL
Before you configure Azure DevOps Server to support or require HTTPS with SSL, you should consider the following disadvantages:
You might complicate ongoing administration tasks. For example, you might have to reconfigure your deployment to stop supporting HTTPS with SSL before you can apply service packs or other updates.
You must not only configure but also manage a certification authority (CA) and certificate trusts. You can use Certificate Services in Windows Server 2003 and Windows Server 2008, but you might not want to invest the time and resources that deploying a secure public key infrastructure (PKI) requires.
You must spend significant time setting up and testing either of these configurations, and troubleshooting your deployment will become more difficult.
If you continue to support both protocols, external connections might not be encrypted if the application tier for Azure DevOps is not appropriately secured.
If you require HTTPS with SSL, your deployment's performance will be slower.
Configuring Your Deployment to Support or Require HTTPS with SSL
The procedures in this topic describe one process for requesting, issuing, and assigning certificates that are required for SSL connections in Azure DevOps Server. If you are using different software than what this topic describes, you might need to perform different steps. To support external connections to your Azure DevOps Server deployment, you must also enable Basic authentication, Digest authentication, or both in Internet Information Services (IIS).
By following the procedures in this topic, you will accomplish the following tasks:
- Obtain certificates for your deployment of Azure DevOps Server and the websites that it uses.
- Install and assign the certificates.
- Configure Azure DevOps Server.
- Configure Team Foundation Build.
- Configure client computers.
Prerequisites
To perform the procedures in this topic, you must first meet the following requirements:
The logical components in the data and application tiers of Azure DevOps must be installed, although in the case of Azure DevOps Server itself, not necessarily configured. These tiers include IIS, SQL Server, and any additional components you might have integrated, such as SharePoint Products, Team Foundation Build, and SQL Server Reporting Services.
The procedures in this topic refer to the server or servers that are running the logical components in the application and data tiers for Azure DevOps. The application and data tiers might be running on the same server or multiple servers, as described in Azure DevOps Server install guide.
You must have a certification authority (CA) from which you can issue certificates, or have subscribed to a third-party certifying authority with a trusted chain. This topic assumes that you are using Certificate Services as your CA, but you can use any CA that you have configured for your deployment, or certificates from a trusted third-party certification authority. If you do not have a certification authority, you can install Certificate Services and configure one. For more information, see the one of the following sets of documentation on the Microsoft website:
For Windows Server 2012: Active Directory Certificate Services
For Windows Server 2008: Active Directory Certificate Services and Public Key Management
You need to be an administrator to configure all the components of your deployment for HTTPS and SSL. If you work in a distributed deployment where different people have administrative permissions for individual components, such as SharePoint, you'll need to coordinate with those people to complete configuration.
Specifically, you must belong to the Team Foundation Administrators group, and you must belong to the Administrators group on the application-tier, data-tier, and Azure DevOps Proxy Server or servers for Team Foundation.
To configure a build server, you must belong to the Administrators group on that server.
If your deployment uses SharePoint Products, you must belong to the Administrators group on the server that hosts SharePoint Central Administration. You must also belong to the Farm Administrators group.
If your deployment uses reporting, you must be a member of an administrative security group or have equivalent permissions individually set for configuring reporting services.
For more information about permissions, see Permission reference for Azure DevOps Server.
Assumptions
The procedures in this topic assume that the following conditions are true:
The data-tier and application-tier server or servers have been installed and deployed in a secure environment and configured according to security best practices.
You are familiar with how to configure and manage PKIs and requesting, issuing, and assigning certificates.
You have a working knowledge of the network topology of the development environment, and you are familiar with configuring network settings, IIS, and SQL Server.
Obtaining a certificate
Before you configure Azure DevOps Server to use HTTPS with SSL, you must obtain and install a server certificate for the servers in your deployment. To obtain a server certificate, you must install and configure your own certification authority, or you must use a certification authority from an external organization that you trust (third-party certificates).
For more information about how to install a certification authority, see the following topics on the Microsoft website:
For Windows Server 2012: Deploying an AD CS Two-Tier PKI Hierarchy
For Windows Server 2008: Active Directory Certificate Services and Public Key Management
Requesting, installing, and configuring websites with a certificate
After you enlist in a certification authority, you must either request a certificate by using IIS Manager, or you must manually install the certificate on each of the following servers in your deployment:
Each application-tier server.
Each server that is running Azure DevOps Proxy Server, if any are configured for your deployment.
Each server that is running Team Foundation Build Service as either a build controller or a build agent, if any are configured for your deployment.
Each server that is running SharePoint Products, if SharePoint Products is configured for your deployment.
Note
Configuring a SharePoint site to use HTTPS and certificates often requires additional steps, such as configuring alternate access mappings and configuring authentication infrastructure. For more information, consult the latest SharePoint documentation for your version of the product.
The server that is running Reporting Services, if one is configured for your deployment.
In addition, the client computers in your deployment will need to be enrolled in the certificate chain and request the needed certificate. If one or more of your projects uses Git for version control, users in those projects will also have to configure Git on their computers to recognize and use the client certificate. For information about how to request a client certificate from a specific CA, see the documentation for that certification authority.
¹ Clients and servers are called out separately here, but that’s just a convention of this document. Any computer running the deployment agent needs the certificate installed.
Open Internet Information Services (IIS) Manager.
Expand your server, navigate to Server Certificates, and create and complete your certificate request.
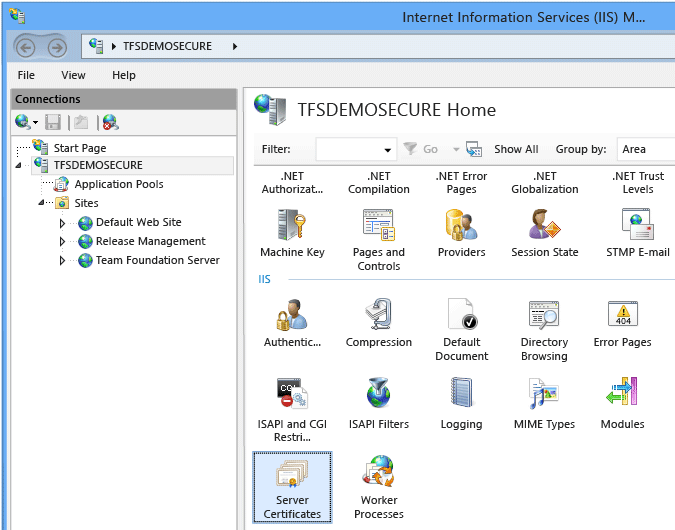
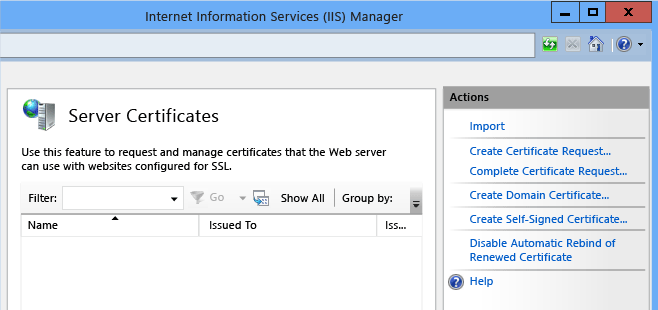
For more information, see Configuring Server Certificates in IIS.
Import the certificate.
Now you need to configure each website that will require this certificate with the appropriate settings. Specifically, you'll need to do this for each of the following websites:
Default Website
Azure DevOps Server
Azure DevOps Server Proxy (if your deployment uses it)
SharePoint Central Administration (if your deployment uses SharePoint)
On each server that hosts a website that you want to configure, open Internet Information Services (IIS) Manager.
Expand ComputerName, expand Sites, open the submenu for the website that you want to configure (for example, Azure DevOps Server), and then choose Bindings from the Actions pane.
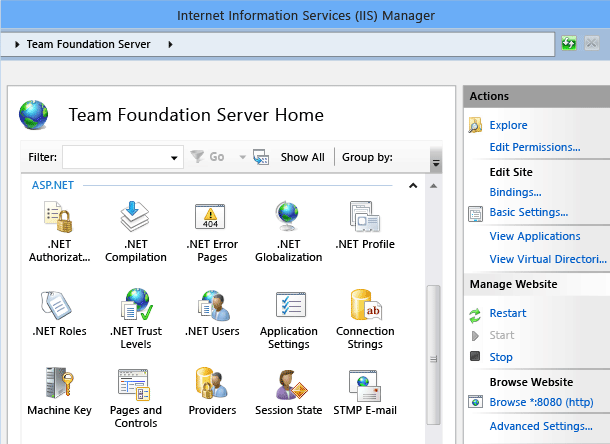
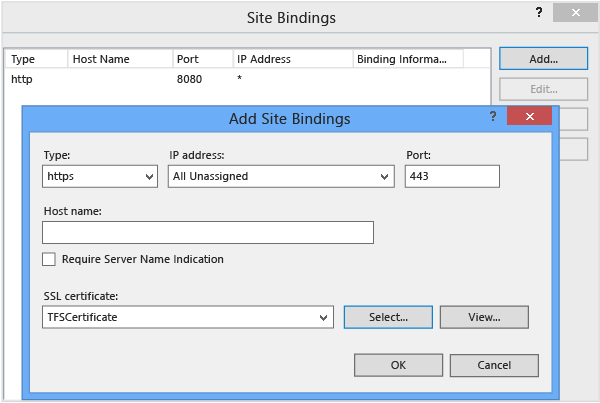
In Site Bindings, choose Add.
The Add Site Binding dialog box appears.
In the Type list, choose https.
In Port, type a different port number.
Important
The default port number for SSL connections is 443, but you must assign a unique port number for each of the following sites: Default Website, Azure DevOps Server, Azure DevOps Server Proxy (if your deployment uses it), and SharePoint Central Administration (if your deployment uses SharePoint).
You should record the SSL port number for each website that you configure. You will need to specify these numbers in the administration console for Azure DevOps.
In SSL Certificate, choose the certificate that you imported, and then choose OK and close the Bindings page.
On the Home page for the website that you are configuring, open the Features view.
Under IIS, choose Authentication.
Choose an authentication method that you want to configure, open its submenu, and then enable, disable, or perform additional configuration on the method, as best meets your security needs. For example, if you wanted to disable anonymous authentication, you would choose the Anonymous Authentication method and the choose Disable from the Actions menu.
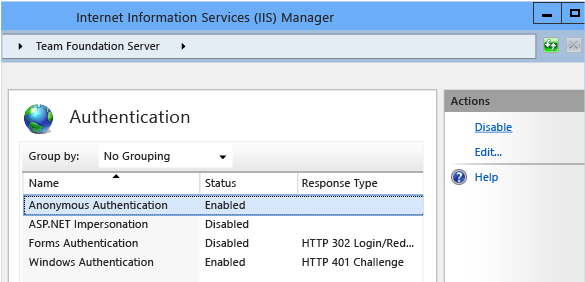
Once you have finished configuration, restart web services.
Configuring Your Firewall
You must configure your firewall to allow traffic through the SSL ports that you just specified in IIS. For more information, see the documentation for your firewall.
Important
Make sure to test traffic on the ports you specified from another computer. If you cannot access the default website or web portal, double-check the port settings you specified for these websites in IIS, and make sure that the firewall is configured appropriately to allow traffic on those ports.
Configure SQL Server Reporting Services
If your deployment uses reporting, you must configure SQL Server Reporting Services to support HTTPS with SSL and to use the port that you specified in IIS for Azure DevOps Server. Otherwise, the report server will not function correctly for your deployment. For more information, see Configuring a Report Server for Secure Sockets Layer (SSL) Connections.
Tip
If your deployment does not use reporting, you can skip this procedure.
Configuring HTTPS for Azure DevOps Server
Follow these steps to configure your Azure DevOps Server deployment with the HTTPS ports and values that you configured in IIS for the default and Azure DevOps Server websites.
To reconfigure Azure DevOps Server to use or require HTTPS
Open the administration console for Azure DevOps and browse to the application tier node.
In Application Tier Summary, choose Change URLs.
The Change URLs window opens.
In Notification URL, type the HTTPS URL that you configured for the Azure DevOps Server website in IIS.
For example, you might have configured the website to use port 444. In this case, you type https://ServerName:444/tfs. Make sure that you use the fully qualified domain name of the server instead of localhost.
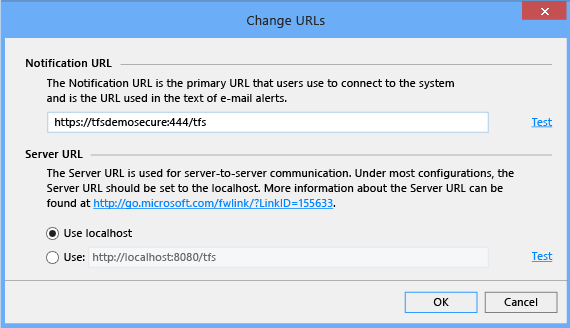
Choose Test. Don't choose OK if the test doesn't pass. Go back and make sure that you entered the correct URL and port information, that all firewalls are configured to allow traffic on those ports, and that the site is available and running in IIS Manager.
To require HTTPS, choose Use in Server URL, and then type the HTTPS URL that you configured for the Azure DevOps Server website.
Make sure that you use the fully qualified domain name of the server instead of localhost.
Choose Test, and then choose OK if the test passes.
If your deployment uses SharePoint Products, choose SharePoint Web Applications in the administration console. Otherwise, skip the next six steps.
In SharePoint Web Applications, in the Name list, choose a web application, and then choose Change.
The SharePoint Web Application Settings page opens.
In Web Application URL, change the URL to the HTTPS value for the application.
In Central Administration URL, change the URL to the HTTPS value for the Central Administration website.
(Optional) In Friendly Name, change the value to reflect the HTTPS address of this application.
Choose OK.
Repeat the previous five steps for every SharePoint web application in your deployment.
If your deployment uses Reporting Services, in the administration console, choose Reporting. Otherwise, skip the rest of this procedure.
In Reporting, choose Edit.
If the Take Offline dialog box opens, choose OK.
The Reporting window opens.
Choose the Reports tab. In URLs for Report Server, type the HTTPS URLs for Web Service and Report Manager, and then choose OK.
Test Access to Your Deployment
You should test whether your changes are functioning as you expect. This step is optional but strongly recommended.
To test access to your deployment
On a computer that does not host the application tier, open a web browser and navigate to a team home page.
Verify whether you can access your teams and projects from the web portal, including the administration pages.
If you cannot access your deployment through the web portal, review the steps that you just completed, and make sure that you have made all configuration changes correctly.
Configuring Your Deployment to Require HTTPS with SSL (Optional)
You can require all connections to the Azure DevOps Server application tier to use HTTPS with SSL. This additional security is optional but recommended.
To require SSL connections
On the server that hosts the website that you want to configure, choose Start, choose Administrative Tools, and then choose Internet Information Services (IIS) Manager.
Follow the appropriate steps for your version of IIS:
For deployments that use IIS 7.0:
Expand ComputerName, expand Web Sites, and then choose the website that you want to configure.
On the home page for that website, choose SSL Settings.
In the SSL Settings pane, select the Require SSL check box.
(Optional) Select the Require 128-bit SSL check box.
In Client Certificates, choose Ignore, Accept, or Require, depending on the security requirements of your deployment.
In Actions, choose Apply.
Repeat these steps for each website for which you want to require SSL.
Installing the Certificate on Build Servers
If you installed Team Foundation Build Service on one or more servers, you must install the certificate in the Trusted Root Certification Authorities store of each server. For more information, see Obtaining a Certificate and Requesting, installing, and configuring websites with a certificate earlier in this topic. Both the controller and the agent require a certificate with a private key with which to identify themselves in HTTPS connections.
Note
To perform builds over SSL, the certificate must be installed in the trusted root store on both the build controller and the build agent.
Updating Build Configurations
To configure Team Foundation Build for SSL connections, you must configure the build service to use the HTTPS URL that you configured for the application tier and the collection that the build configuration supports. You must configure this URL for each build configuration in your deployment.
To change a build configuration to use HTTPS
On the server that hosts the build configuration that you want to configure, open the administration console for Team Foundation.
Under Team Foundation, expand the name of the server, and then choose Build Configuration.
The Build Configuration pane appears.
Under the service configuration, choose Stop, and then choose Properties.
The Build Service Properties dialog box opens.
In Communications, make sure that the URL for the project collection is using the correct HTTPS address and full server name.
In Local Build Service Endpoint (incoming), choose Change.
The Build Service Endpoint dialog box opens.
In Endpoint Details, verify that the port number matches your configuration details.
In Protocol, choose HTTPS.
In the SSL Certificates list, choose the certificate that you installed and configured for use with this deployment, and then choose OK.
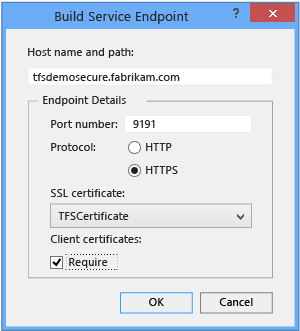
In the Build Service Properties dialog box, choose Start.
Configuring Client Computers
On every client computer from which users access Azure DevOps, you must install the certificate locally and clear the client cache for any user who has accessed Azure DevOps from that computer. Otherwise, users will not be able to connect to Azure DevOps from that computer. For more information, see Manage Trusted Root Certificates.
Important
Do not follow this procedure for computers that are running both Azure DevOps Server and one or more clients of Azure DevOps.
To install the certificate on a client computer
Log on to the computer by using an account that belongs to the Administrators group on that computer.
Install the certificate into the Trusted Root Certification Authorities folder for the local computer.
To clear the cache on a client computer
Log on to the computer by using the credentials of the user whose cache you want to clear.
Close any open instances of Visual Studio.
In a browser window, open the following folder:
Drive :\Users\ UserName \AppData\Local\Microsoft\Team Foundation\4.0\Cache
Delete the contents of the Cache directory. Make sure that you delete all subfolders.
Choose Start, choose Run, type devenv /resetuserdata, and then choose OK.
Repeat these steps for the account of every user who has accessed Team Foundation from that computer.
Note
You might want to distribute instructions for clearing the cache to all of your Azure DevOps users so that they can clear the caches for themselves.
To connect client computers to the reconfigured deployment
In Visual Studio, connect to Azure DevOps Server by using the new HTTPS URL.
For more information, see Connect to projects in Azure DevOps Server.
Configuring Git
By default, projects that use Git for version control will fail to validate the SSL certificate you have configured for Azure DevOps Server. This is because unlike Azure DevOps Server and Visual Studio, Git does not recognize the Windows certificate store. Instead, it uses OpenSSL for its certificate store. In order to use a Git repository for projects configured with SSL, you'll need to configure Git with the certificate at the root of the certification chain for your TFS 2013 deployment. This is a client configuration task that only applies to Git repository projects.
For more information about how Git network operations work in Visual Studio 2013, see this blog post.
Tip
For other Git credential management tasks, such as Windows authentication, consider downloading and installing Windows Credential Store for Git.
To configure the certificate store for Git
Log on to the computer by using an account that belongs to the Administrators group on that computer.
Make sure that the required certificate has been installed and configured on the computer, as per above.
In your supported web browser, extract the Azure DevOps Server root certificate as a base64-encoded X.509 CER/PEM file.
Create a private copy of the Git root certificate store and add that to your private user copy of the store.