Add cloud to your app with Windows Azure Mobile Services
Great Windows Store apps are connected. They use live tiles, authenticate users with single sign-on and share data between devices and users. To get all these great benefits of being connected, your app needs to use services in the cloud.
Building cloud services is hard. Most cloud platforms offer general purpose capabilities to store data and execute code, but you have to author reams of infrastructure code to glue these capabilities together. I’m sure you are up for the challenge, but I bet backend infrastructure code is not your first priority. You want to focus on realizing your awesome app idea.
Addressing this difficulty, earlier this week we announced a preview of the new service in Windows Azure: Mobile Services. Let me show you how you can add the cloud services you need to your app in minutes, using Mobile Services.
To get started, sign up for the free trial of Windows Azure. You’ll get 10 Mobile Services for free. Let’s use one of them to build a simple todo list app.
Create a new Mobile Service
After you’ve signed up, go to https://manage.windowsazure.com log in using your Microsoft account. Create a new Mobile Service by clicking on the +NEW button at the bottom of the navigation pane.
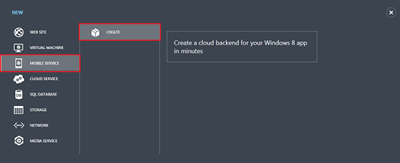
Select Mobile Service and click Create. You will see a screen like this:
Figure 1. Create drawer in the management portal.
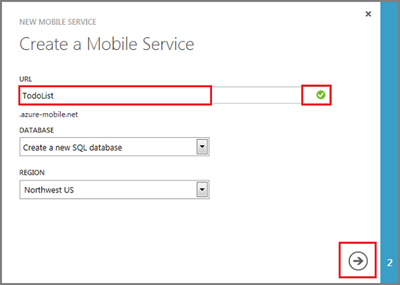
In the New Mobile Service wizard, type a name of your app. This forms part of the URL for your new service.
Figure 2 Create Mobile Service wizard, first screen.
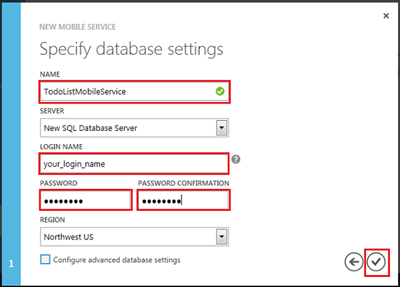
When you create a Windows Azure Mobile Service, we automatically associate it with a SQL database inside Windows Azure. The Windows Azure Mobile Service backend then provides built-in support for enabling remote apps to securely store and retrieve data from it, without you having to write or deploy any custom server code. Type the name of the new database, and enter a Login name and password for your new SQL Server. Remember these credentials if you want to reuse this database server for other Mobile Services. If you signed up for a 90 days free trial, you are entitled for one 1GB database for free.
Figure 3. Create Mobile Service wizard, second screen.
Click the tick button to complete the process. In just a few seconds you’ll have a Mobile Service – a backend that you can use to store data, send push notifications and authenticate users. Let’s try it out from an app.
Create a new Windows Store app
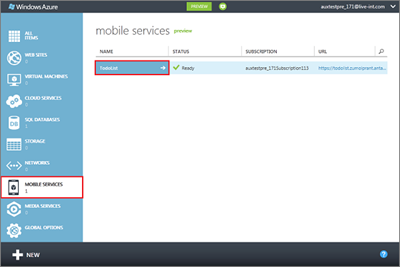
Click the name of your newly created mobile service.
Figure 4. Your newly created mobile service.
You now have two choices: to create a new app, or to connect an existing app to your Mobile Service. Let’s pick the first option and create a simple todo list that stores todo items in your SQL database. Follow the steps on the screen:
Figure 5. Creating a Mobile Services app.
Install the Visual Studio 2012 and Mobile Services SDK, if you haven't already done so.
To store todo items, you need to create a table. You don’t need to predefine the schema for your table; Mobile Services will automatically add columns as needed to store your data.
Next, select your favorite language, C# or JavaScript, and click Download. This downloads a personalized project that has been pre-configured to connect to your new Mobile Service. Save the compressed project file to your local computer.
Browse to the location where you saved the compressed project files, expand the files on your computer, and open the solution in Visual Studio 2012 Express for Windows 8.
Press F5 to launch the app.
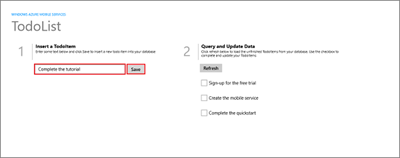
In the app, type a todo item in the textbox on the left and click Save. This sends an HTTP request to the new Mobile Service hosted in Windows Azure. This data is then safely stored in your TodoItem table. You receive an acknowledgement from the Mobile Service and your data is displayed in the list on the right.
Figure 6. Completed app.
Let us take a look at the code inside the app that saves your data. Stop the todo list app and double-click on App.xaml.cs. Notice the lines:
 public static MobileServiceClient MobileService = new MobileServiceClient(
       "https://todolist.azure-mobile.net/",
       "xPwJLJqYTMsAiBsHBHDhDEamZdtUGw75"
);
This is the only code you need to connect your app to your Mobile Service. If you are connecting an existing app to your Mobile Service, you can copy this code from the quick start “Connect your existing app” option. Now, open MainPage.xaml.cs and take a look at the next code that inserts data into the Mobile Service:
 private IMobileServiceTable<TodoItem> todoTable = App.MobileService.GetTable<TodoItem>();
private async void InsertTodoItem(TodoItem todoItem)
{
    await todoTable.InsertAsync(todoItem);
    items.Add(todoItem);
}
This is all that’s needed to store data in your cloud backend. Here is an equivalent code in JavaScript:
 var client = new Microsoft.WindowsAzure.MobileServices.MobileServiceClient(
    "https://todolist.azure-mobile.net/",
    "xPwJLJqYTMsAiBsHBHDhDEamZdtUGw75"
);
var todoTable = client.getTable('TodoItem');

var insertTodoItem = function (todoItem) {
    todoTable.insert(todoItem).done(function (item) {
        todoItems.push(item);
    });
};
Manage and monitor your Mobile Service
Go back to the Windows Azure Management Portal, click the Dashboard tab to see real-time monitoring and usage info for your new Mobile Service.
Figure 7. Mobile Services dashboard.
Click the Data tab and then click on the TodoItems table.
Figure 8. Data tab.
From here you can browse the data that the app inserted into the table.
Figure 9. Browse data.
Conclusion
In this brief overview we’ve looked at how easy it is to add the power of Windows Azure to your app without the drag that comes with authoring, managing and deploying a complex backend project. We’ve only scraped the surface of what you can do with Mobile Services. Here’s a teaser of some of the other features that are ready for you to explore.
- Authenticate your users with Mobile Services and Microsoft account.
- Validate and authorize access to data using scripts that execute securely, on the server.
- Send toast notifications and update live tiles in just a few lines of code.
Learn more about Mobile Services at https://www.windowsazure.com/mobile.
--Kirill Gavrylyuk,, Lead Program Manager, Windows Azure
Comments
Anonymous
August 29, 2012
C# > JavaScript XAML > HTML && CSSAnonymous
August 29, 2012
The comment has been removedAnonymous
August 30, 2012
the windows8 is better than windows7,when i surfing on the internet,i even fell the speed of the windows8,thank you very much for Microsoft!

