MSC2011 D3-303 “Windows Phone/iOS/Android から Windows Azure を利用する” session follow up - Part 3 : スクラッチでのソリューション開発 - 4 Tables/Blobs/Queues/SQL Azure
Tables、Blobs 及び Queues の利用
新規 Windows Phone Cloud Application の作成の箇所で、Windows Azure Storage のサポートにチェックを入れた場合、Windows Azure に格納されている、Tables、Blobs、Queues、にアクセスすることができます。そのためのステップは以下の通りです。
フリックまたはパンで、画面を左側に移動して、Tables Pivot アイテムに遷移します。そうすると、Windows Azure Storage の中で、利用可能な Table がわかります。 アプリケーションバーの中にあるプラスボタン ( ) をクリックすると、新テーブルが追加でき、また、Table 名の隣にある削除ボタン(
 )をクリックすると、 当該 Table を削除できます。
ここのソースコードを見てみましょう。Pivot アプリケーションで、MVVM を採用して開発されているため、処理はおもに ViewModel フォルダにまとまっています。この中では、上記のボタンの動き、NewTable()、DeleteTable()、あたりのメソッドを確認しておいてください。
    1: namespace WPCloudApp5.Phone.ViewModel
    2: {
    3:     using System;
    4:     using System.Globalization;
    5:     using System.Linq;
    6:     using System.Windows;
    7:     using System.Windows.Threading;
    8:     using Microsoft.Phone.Shell;
    9:     using Microsoft.Samples.WindowsPhoneCloud.StorageClient;
   10:
   11:     internal enum TableAction
   12:     {
   13:         None = 0,
   14:         Create = 1,
   15:         Delete = 2
   16:     }
   17:
   18:     public class TablesPageViewModel : TableBaseViewModel<TableServiceSchema>
   19:     {
   20:         private const string IconsRootUri = "/Toolkit.Content/";
   21:
   22:         private TableAction action = TableAction.None;
   23:         private TableServiceSchema currentTable = null;
   24:
   25:         public TablesPageViewModel()
   26:             : this(App.CloudClientFactory, Deployment.Current.Dispatcher)
   27:         {
   28:         }
   29:
   30:         public TablesPageViewModel(ICloudClientFactory cloudClientFactory, Dispatcher dispatcher)
   31:             : base(cloudClientFactory, dispatcher)
   32:         {
   33:         }
   34:
   35:         public override string TableName
   36:         {
   37:             get { return "Tables"; }
   38:         }
   39:
   40:         public void NewTable()
   41:         {
   42:             var newTableName = string.Format(CultureInfo.InvariantCulture, "Table{0}", DateTime.Now.ToString("yyyyMMddTHHmmss", CultureInfo.InvariantCulture));
   43:             this.currentTable = new TableServiceSchema(newTableName);
   44:             this.action = TableAction.Create;
   45:
   46:             this.Message = "Creating new table...";
   47:             this.IsLoading = true;
   48:
   49:             try
   50:             {
   51:                 this.Context.AddTable(this.currentTable);
   52:                 this.Context.BeginSaveChanges(this.OnBeginSaveChanges, null);
   53:             }
   54:             catch (Exception exception)
   55:             {
   56:                 var errorMessage = StorageClientExceptionParser.ParseDataServiceException(exception).Message;
   57:
   58:                 this.IsLoading = false;
   59:                 this.Message = string.Format(CultureInfo.InvariantCulture, "Error: {0}", errorMessage);
   60:             }
   61:         }
   62:
   63:         public void DeleteTable(TableServiceSchema table)
   64:         {
   65:             this.currentTable = table;
   66:             this.action = TableAction.Delete;
   67:
   68:             this.Message = "Deleting table...";
   69:             this.IsLoading = true;
   70:
   71:             try
   72:             {
   73:                 // In the case the table was previously detached in a failed operation.
   74:                 if (!this.Context.Entities.Any(e => e.Entity == this.currentTable))
   75:                 {
   76:                     this.Context.AttachTo("Tables", this.currentTable);
   77:                 }
   78:
   79:                 this.Context.DeleteObject(this.currentTable);
   80:                 this.Context.BeginSaveChanges(this.OnBeginSaveChanges, null);
   81:             }
   82:             catch (Exception exception)
   83:             {
   84:                 var errorMessage = StorageClientExceptionParser.ParseDataServiceException(exception).Message;
   85:
   86:                 this.IsLoading = false;
   87:                 this.Message = string.Format(CultureInfo.InvariantCulture, "Error: {0}", errorMessage);
   88:             }
   89:         }
   90:
   91:         public void OnBeginSaveChanges(IAsyncResult asyncResult)
   92:         {
   93:             this.Dispatcher.BeginInvoke(
   94:                 () =>
   95:                 {
   96:                     try
   97:                     {
   98:                         this.Context.EndSaveChanges(asyncResult);
   99:
  100:                         // Update the Table collection that is binded in the page.
  101:                         if (this.action == TableAction.Create)
  102:                         {
  103:                             this.Table.Add(this.currentTable);
  104:                         }
  105:                         else if (this.action == TableAction.Delete)
  106:                         {
  107:                             this.Table.Remove(this.currentTable);
  108:                         }
  109:
  110:                         this.Message = "Changes saved successfully.";
  111:                     }
  112:                     catch (Exception exception)
  113:                     {
  114:                         this.Message = string.Format(
  115:                             CultureInfo.InvariantCulture,
  116:                             "Error: {0}",
  117:                             StorageClientExceptionParser.ParseDataServiceException(exception).Message);
  118:
  119:                         // Detach from the Context the table that produced the failed operation.
  120:                         this.Context.Detach(this.currentTable);
  121:                     }
  122:                     finally
  123:                     {
  124:                         this.IsLoading = false;
  125:                     }
  126:                 });
  127:         }
  128:
  129:         protected override void PopulateApplicationBarButtons(IApplicationBar applicationBar)
  130:         {
  131:             var refreshButton = new ApplicationBarIconButton(new Uri(string.Format(CultureInfo.InvariantCulture, "{0}{1}", IconsRootUri, "appbar.refresh.rest.png"), UriKind.Relative)) { Text = "refresh" };
  132:             refreshButton.Click += (s, e) => this.LoadTable();
  133:
  134:             var addButton = new ApplicationBarIconButton(new Uri(string.Format(CultureInfo.InvariantCulture, "{0}{1}", IconsRootUri, "appbar.add.rest.png"), UriKind.Relative)) { Text = "add table" };
  135:             addButton.Click += (s, e) => this.NewTable();
  136:
  137:             applicationBar.Buttons.Add(refreshButton);
  138:             applicationBar.Buttons.Add(addButton);
  139:         }
  140:     }
  141: }
注意 : PushUserEndpoints、 secMembership、UserPrivileges 及び secRole の各 Tableは、(この前の投稿でも中身を見た通り)、Toolkit サービスが内部的に使っているものです。したがって、それらのどれかをもし削除しようとすると、権限がないというメッセージとともに、エラーが発生します。
次に、フリックまたはパンで、画面を左側に移動して、Sample Data Pivot アイテムに遷移します。SampleData Table で、行が使用可能なのがわかります。もしこのテーブルが、それまでAzure Table ストレージに存在していなかった場合には、今回初めて(新規アプリケーションの作成により)生成されたものです。
Sample data Pivot アイテムの中で、アプリケーションバーの中にあるプラスボタン ( ) をクリックして、新しい行を追加します。もちろん、既に入っている行を編集したり、削除したりもできます。
ここで、サンプルコードを見てみましょう。SampleDataDetailsPageViewModel.cs に処理が書いてあります。まずは、SampleDataTablePageViewModel.cs の LoadTable() の処理です。
    1: public override void LoadTable()
    2:         {
    3:             if (!sampleDataTableCreated)
    4:             {
    5:                 try
    6:                 {
    7:                     this.cloudTableClient.CreateTableIfNotExist(
    8:                         this.TableName,
    9:                         r =>
   10:                         {
   11:                             if (this.Dispatcher != null)
   12:                             {
   13:                                 this.Dispatcher.BeginInvoke(() => this.HandleTableCreationResponse(r));
   14:                             }
   15:                             else
   16:                             {
   17:                                 this.HandleTableCreationResponse(r);
   18:                             }
   19:                         });
   20:                 }
   21:                 catch (Exception exception)
   22:                 {
   23:                     var errorMessage = StorageClientExceptionParser.ParseDataServiceException(exception).Message;
   24:
   25:                     this.IsLoading = false;
   26:                     this.Message = string.Format(CultureInfo.InvariantCulture, "Error: {0}", errorMessage);
   27:                 }
   28:             }
   29:             else
   30:             {
   31:                 base.LoadTable();
   32:             }
   33:         }
続いて、SampleDataDetailsPageViewModel.cs の DeleteSampleData()メソッドの処理を見てみてください。こちらも、Microsoft.Samples.WindowsPhoneCloud.StorageClient のインターフェースである ITableServiceContext を実装したオブジェクトである Context を使ってCRUD操作をしています。上記と同じ動きですね。
    1: public void DeleteSampleData()
    2:         {
    3:             this.Message = "Deleting...";
    4:             this.IsSaving = true;
    5:
    6:             this.SampleData.PropertyChanged -= this.OnUpdateSampleData;
    7:
    8:             try
    9:             {
   10:                 this.context.DeleteObject(this.SampleData);
   11:                 this.context.BeginSaveChanges(this.OnBeginSaveChanges, null);
   12:             }
   13:             catch (Exception exception)
   14:             {
   15:                 var errorMessage = StorageClientExceptionParser.ParseDataServiceException(exception).Message;
   16:
   17:                 this.IsSaving = false;
   18:                 this.Message = string.Format(CultureInfo.InvariantCulture, "Error: {0}", errorMessage);
   19:             }
   20:         }
こちらも、Microsoft.Samples.WindowsPhoneCloud.StorageClient のICloudTableClientインターフェースを実装したオブジェクトを使って操作を行っています。これにより、各メソッドでの操作を抽象化し、単純化させることができます。要は、最初の新規作成~Wizardの中で、ストレージ名と、キーだけ渡しておけば、あとはCRUD 操作ができるわけです。
次に、フリックまたはパンで、画面を左側に移動して、List Blobs Pivot アイテムに遷移します。そして、アプリケーションバーの中にある、カメラボタン( ) をクリックします。Windows Phone のカメラが起動します。スクリーン右上にあるボタンをクリックして、写真を撮り、決定ボタンを押します。これにより、Upload Picture ページに遷移します。
Upload Picture ページの中で、Blobに名前を付けて、Upload を行います。 もし、期待通りにすべて動いてくれれば、メッセージボックスが出現し、”Image was successfully uploaded”と出るでしょう。OK を押して、メイン Pivot ページに遷移します。
ここの部分のソースコードを見てみましょう。UploadPhotoPageViewModel.csから、UploadPhoto() メソッドをご覧ください。
    1: public void UploadPhoto(Action<string> successCallback, Action<string> failureCallback)
    2:         {
    3:             this.IsUploading = true;
    4:             this.blobClient.Upload(
    5:                 this.BlobName,
    6:                 this.PhotoStream,
    7:                 r => this.dispatcher.BeginInvoke(
    8:                         () =>
    9:                         {
   10:                             this.IsUploading = false;
   11:
   12:                             if (r.Exception == null)
   13:                             {
   14:                                 if (successCallback != null)
   15:                                 {
   16:                                     successCallback.Invoke(string.Format(CultureInfo.InvariantCulture, "Image file {0} successfully uploaded!", this.BlobName));
   17:                                 }
   18:                             }
   19:                             else
   20:                             {
   21:                                 if (failureCallback != null)
   22:                                 {
   23:                                     failureCallback.Invoke(string.Format(CultureInfo.InvariantCulture, "Error: {0}", r.Exception.Message));
   24:                                 }
   25:                             }
   26:                         }));
   27:         }
ここでも、blobClient というオブジェクトを使って、そのメソッドのUpload を使って処理が行われています。このblobClient も、Microsoft.Samples.WindowsPhoneCloud.StorageClient のICloudTableClientインターフェースを実装したオブジェクトです。これにより、各メソッドでの操作を抽象化し、単純化させることができます。こちらも、最初の新規作成~Wizardの中で、ストレージ名と、アクセスキーだけ渡しておけば、あとは操作ができるというわけです。
続いて、List Blobs Pivot ページの中で、リスト表示をするために、list blobs ボタンを押し、リスティングします (prefix を入力するとフィルタリングができます)。先ほど、撮影し Upload した画像のサムネールを、Blob へのリンクの形で見ることができます。このリンクをクリックすると、IE9 が起動し、画像を表示します。
ここでソースコードを見てみます。ListBlobsPageViewModel.cs の中の、ListBlobs() ですね。
    1: public void ListBlobs()
    2:         {
    3:             this.IsListing = true;
    4:             this.Message = "Listing blobs...";
    5:
    6:             try
    7:             {
    8:                 this.blobClient.ListBlobsWithPrefix(
    9:                     this.Prefix,
   10:                     this.UseFlatBlobListing,
   11:                     r =>
   12:                     {
   13:                         if (this.dispatcher != null)
   14:                         {
   15:                             this.dispatcher.BeginInvoke(() => this.UpdateListBlobs(r));
   16:                         }
   17:                         else
   18:                         {
   19:                             this.UpdateListBlobs(r);
   20:                         }
   21:                     });
   22:             }
   23:             catch (Exception exception)
   24:             {
   25:                 var errorMessage = StorageClientExceptionParser.ParseDataServiceException(exception).Message;
   26:
   27:                 this.IsListing = false;
   28:                 this.Message = string.Format(CultureInfo.InvariantCulture, "Error: {0}", errorMessage);
   29:             }
   30:         }
ここでも、blobClient は、Microsoft.Samples.WindowsPhoneCloud.StorageClient のICloudTableClientインターフェースを実装したオブジェクトです。こちらも、各メソッドでの操作を抽象化し、単純化させることができます。
左向きの矢印 ( ).を使って、アプリケーションに戻ります。続いて Queues Pivot ページの中で、リスト表示をするために、list queus ボタンを押し、Windows Azure ストレージにある 利用可能な queues をリスティングします (prefix を入力するとフィルタリングができます)。
Queues Pivot アイテムの中で、アプリケーションバーの中にあるプラスボタン ( ) をクリックし、新しい Queue を追加します ( Queue 名の隣にある削除ボタン(
 )も利用可能です)。
それぞれのソースコードを見てみましょう。ListQueuesPageViewModel.cs にある、NewQueue() 、および、DeleteQueue()、がそれです。
NewQueue()
    1: public void NewQueue()
    2: {
    3:     var newQueueName = string.Format(CultureInfo.InvariantCulture, "Queue{0}", DateTime.Now.ToString("yyyyMMddTHHmmss", CultureInfo.InvariantCulture)).ToLowerInvariant();
    4:
    5:     this.Message = "Creating new queue...";
    6:     this.IsLoading = true;
    7:
    8:     try
    9:     {
   10:         var currentQueue = this.queueClient.GetQueueReference(newQueueName);
   11:         currentQueue.Create(
   12:             creationResult =>
   13:             {
   14:                 if (this.dispatcher != null)
   15:                 {
   16:                     this.dispatcher.BeginInvoke(() => this.HandleQueueCreationResult(currentQueue, creationResult));
   17:                 }
   18:                 else
   19:                 {
   20:                     this.HandleQueueCreationResult(currentQueue, creationResult);
   21:                 }
   22:             });
   23:     }
   24:     catch (Exception exception)
   25:     {
   26:         this.IsLoading = false;
   27:         this.Message = string.Format(CultureInfo.InvariantCulture, "Error: {0}", exception.Message);
   28:     }
   29: }
DeleteQueue()
    1: public void DeleteQueue(ICloudQueue queue)
    2: {
    3:     this.Message = "Deleting queue...";
    4:     this.IsLoading = true;
    5:
    6:     try
    7:     {
    8:         var currentQueue = this.queueClient.GetQueueReference(queue.Name);
    9:         currentQueue.Delete(
   10:             deletionResult =>
   11:             {
   12:                 if (this.dispatcher != null)
   13:                 {
   14:                     this.dispatcher.BeginInvoke(() => this.HandleQueueDeletionResult(currentQueue, deletionResult));
   15:                 }
   16:                 else
   17:                 {
   18:                     this.HandleQueueDeletionResult(currentQueue, deletionResult);
   19:                 }
   20:             });
   21:     }
   22:     catch (Exception exception)
   23:     {
   24:         this.IsLoading = false;
   25:         this.Message = string.Format(CultureInfo.InvariantCulture, "Error: {0}", exception.Message);
   26:     }
   27: }
ここでもやはり、Microsoft.Samples.WindowsPhoneCloud.StorageClient にある、ICloudQueue インターフェースを実装した queueClient オブジェクトのメソッドにより、簡単に Queue に対するCRUDを行っています。
次に、前のステップで作成したばかりのQueue の名前をクリックして、Queue details ページに遷移します。Queue details ページの中で、テキストボックスに、”message 1” と入力し Queue をクリックします。続いて、テキストボックスに、”message 2” と入力し Queue を再度クリックします。そうすると、Queueにメッセージを入れることができます。
続いて、Dequeue ボタンを2回クリックすることにより、Queue に入れたメッセージを正しい順序で取り出すことができます。
ここで当該部分のソースコードを見てみましょう。同じく QueueDetailsPageViewModel.cs の QueueMessage() メソッド及び DequeMessage() メソッドの箇所になります。
QueueMessage()
    1: public void QueueMessage()
    2: {
    3:     this.Message = "Queing message...";
    4:     this.IsBusy = true;
    5:     try
    6:     {
    7:         this.Queue.AddMessage(
    8:             new CloudQueueMessage { AsBytes = Encoding.UTF8.GetBytes(this.QueueMessageContent) },
    9:             r => this.dispatcher.BeginInvoke(
   10:                 () =>
   11:                 {
   12:                     this.Message = r.Exception == null
   13:                         ? "Message successfully queued!"
   14:                         : string.Format(CultureInfo.InvariantCulture, "Error: {0}", r.Exception.Message);
   15:
   16:                     this.IsBusy = false;
   17:                 }));
   18:     }
   19:     catch (Exception exception)
   20:     {
   21:         var errorMessage = StorageClientExceptionParser.ParseDataServiceException(exception).Message;
   22:
   23:         this.IsBusy = false;
   24:         this.Message = string.Format(CultureInfo.InvariantCulture, "Error: {0}", errorMessage);
   25:     }
   26: }
DequeueMessage()
    1: public void DequeueMessage()
    2: {
    3:     this.Message = "Dequeing message...";
    4:     this.IsBusy = true;
    5:     try
    6:     {
    7:         this.Queue.GetMessage(
    8:             s =>
    9:             {
   10:                 if (s.Exception == null)
   11:                 {
   12:                     if (s.Response == null)
   13:                     {
   14:                         this.dispatcher.BeginInvoke(
   15:                             () =>
   16:                             {
   17:                                 this.Message = "Queue is empty";
   18:                                 this.IsBusy = false;
   19:                             });
   20:                     }
   21:                     else
   22:                     {
   23:                         this.Queue.DeleteMessage(
   24:                             s.Response,
   25:                             r => this.dispatcher.BeginInvoke(
   26:                                 () =>
   27:                                 {
   28:                                     if (r.Exception == null)
   29:                                     {
   30:                                         this.CloudQueueMessages.Add(s.Response);
   31:                                         this.Message = "Message successfully dequeued!";
   32:                                     }
   33:                                     else
   34:                                     {
   35:                                         this.Message = string.Format(CultureInfo.InvariantCulture, "Error: {0}", r.Exception.Message);
   36:                                     }
   37:
   38:                                     this.IsBusy = false;
   39:                                 }));
   40:                     }
   41:                 }
   42:                 else
   43:                 {
   44:                     this.dispatcher.BeginInvoke(
   45:                         () =>
   46:                         {
   47:                             this.Message = string.Format(CultureInfo.InvariantCulture, "Error: {0}", s.Exception.Message);
   48:                             this.IsBusy = false;
   49:                         });
   50:                 }
   51:             });
   52:     }
   53:     catch (Exception exception)
   54:     {
   55:         var errorMessage = StorageClientExceptionParser.ParseDataServiceException(exception).Message;
   56:
   57:         this.IsBusy = false;
   58:         this.Message = string.Format(CultureInfo.InvariantCulture, "Error: {0}", errorMessage);
   59:     }
   60: }
ここでも、Microsoft.Samples.WindowsPhoneCloud.StorageClient にある、ICloudQueue インターフェースを実装した Queue オブジェクトのメソッドにより、簡単に Queue に対するCRUDを行っています。
Windows Phone Emulator のWindows ボタン( ) をクリックして、Start メニューに戻ります。
ユーザーメニュー及び権限管理について
ここはセッション内でデモをしていませんが、追加でご紹介しておきます。Web ブラウザーの方に戻り、User メニューオプションをクリックして開きます。新しいユーザー(ACSで認証した際にRegisiter したユーザー)が作成されており、デフォルトで、Tables、Blobs、 Queues および SQL Azure に対する権限が付与されていることがわかります。
注意 : このWeb サイトの administrator ユーザー (admin) は、このWindows Azure Mobile Cloud アプリケーションが、ASP.NET Membership 認証を使う場合だけ、表示されます。この場合には、当該 admin ユーザーもまた有効なアプリケーションユーザーとなります。また、SQL のカラムが表示されるのは、このアプリケーションが、SQL Azure データベースを使用すると構成された場合だけです。
ここで、追加されたユーザーの、Tables、Blobs、と Queues のチェックボックスを外してみましょう。
次に、Tables メニューのオプションをクリックします。このページでは、Windows Azure Tables ストレージに入っている Table につき、個別のユーザーに、権限をあたえることができます。
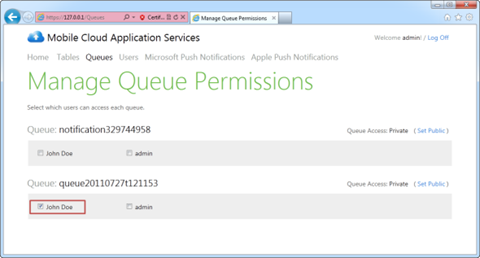
次に、Queues メニューのオプションをクリックします。このページでは、Windows Azure Tables ストレージに入っている Queue につき、個別のユーザーに、権限をあたえることができます。
Windows Phone Emulator に戻り、WAT Windows Phone アイコンをクリックして、再度アプリケーションを開きます。フリックまたはパンにより左側に遷移して、tables Pivot アイテムに遷移し、次いで、sample data Pivot アイテムに遷移します。そうすると、エラーメッセージが出ているのがわかります。いずれも、Table 使用権限がありません、という内容です。
続いて、フリックまたはパンにより左側に遷移して、list blobs Pivot アイテムに遷移し、次いで、list blobs をクリックします。そうすると、エラーメッセージが出ているのがわかります。Blob 使用権限がありません、という内容です。
これまた同様に、フリックまたはパンにより左側に遷移して、queues Pivot アイテムに遷移し、次いで、list queues をクリックします。そうすると、エラーメッセージが出ているのがわかります。Queue 使用権限がありません、という内容です。
SQL Azure データベースの利用
この点も、セッション内ではデモをしていませんが、追加でご説明しておきます。もし、このアプリケーションを作成する際に、Creating a New Windows Phone Cloud Application Wizard のセクションで、SQL Azure データベースをサポートするように構成した場合、SQL Azure データベースの上に配置されている OData サービスにアクセスすることができます。下記のステップに従って、この特徴を見てみましょう。
注意 : このアプリケーションは、Entity Framework 4.1 Code First を使用して、必要なテーブルを作成するように設定されています。デフォルトでは、一つのデータベースが SQL Azure の中に作成され、その名前は、テンプレートのWizardが作成している場合は、ベースとなるプロジェクトと同じ名前になります。そこで、モデルが変更された際に、Entity Framework 4.1 Code First を使用して、必要なデータベースを再作成するには、必要となってくるのが、Persist Security Info=True を、当該データベースへの connection string に追加することです。この設定は、必ずしもプロダクション環境にそぐわないので、アプリケーションの配布の際には削除を検討してください。
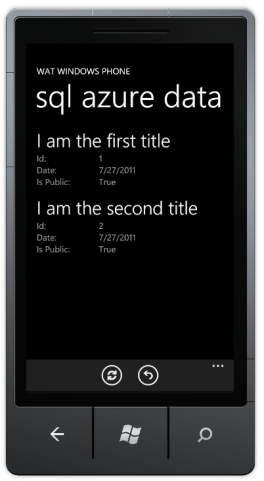
フリックまたはパンにより左側に遷移して、sql azure data Pivot アイテムに遷移します。そうすると、SqlSampleData Table が確認できます。
Windows Phone Emulator の Windows ボタン( ) をクリックして、Start メニューに遷移します。Web ブラウザーに切り替えて、User メニューをクリックします。
このアプリケーションユーザーの SQL チェックボックスのチェックを外します。
Windows Phone Emulator に切り替え、WAT Windows Phone アイコンをクリックして、再びアプリケーションを開きます。フリックまたはパンにより左側に遷移して、sql azure data Pivot アイテムに遷移します。そうすると、エラーメッセージが出ているのがわかります。SQL Azure 使用権限がありません、という内容です。
以上で、セッションでご紹介した、スクラッチからのWindows Azure Toolkit for Windows Phone 開発編は完了です。
いかがでしたでしょうか?このようにデフォルトでも、かなりのことができるテンプレートに仕上がっていますので、ぜひこれをうまく利用して、皆様の Windows Phone x Windows Azure ソリューションを迅速に開発して戴ければ!と思う次第です。
次のエントリーは、Windows Azure への展開について、注意点を簡単に纏めます。
その次のエントリーでは、Windows Azure Toolkit for iOS による開発について書く予定です。
鈴木 章太郎


