Getting started with Windows Azure
Is this your first ever interaction with Windows Azure as a Modern application developer? If so, you’ve arrived at the right place. In this and two subsequent blog posts (Getting started with Windows Azure - part 2 [Cloud Services], Getting started with Windows Azure - part 3 [Consuming Cloud Service in Win Store or Phone app]), I’ll provide a step-by-step guide on how to,
a- Create a SQL Database on Windows Azure
b- Modify database starter project and publish changes back on Azure
This will be covered in this blog post.
c- Create a Windows Azure Cloud Service that interacts with Azure Database created above using LINQ to SQL
d- Publish the Azure Cloud Service on Azure
These are discussed in brief in following blog post
e- Create test clients in Windows Store (8), Windows Phone, Desktop and a Web app that connects with Windows Azure Cloud Service created above
The third and concluding blog post to get you started with Windows Azure
To keep it simple, you’ll find a lot of snapshots in the post. Also you might need to install additional tools and SDKs and I’ll introduce them as we’ll walk through the post. Lastly, I’m assuming you already have a Windows Azure account however just in case you don’t, try https://windowsazurepass.com/
Create and Manage an SQL Database on Azure
So let’s get started; first let’s create an SQL Database on Azure. Go to SQL Databases and select New, specify a database name and select “New SQL database server” from server drop down. Given that it’s a new server, the wizard will require credentials for database server. Keep the check mark as it is and that’s it, your first database will be created within less than 30 seconds.
Click on database name and you’ll presented with Quick Start screen. From this page select, “Download a starter project for your SQL Database”. This will download a Visual Studio Database Project on your machine within which you’ll make changes (introduce tables, constraints, views, etc.) and with just a single click will be able to publish the database back on Azure however bear in mind that before you make use of this starter project you must have “Microsoft SQL Server Data Tools” installed on your system. You can download that right from the Quick Start Screen or here.
Now let’s open the starter project in Visual Studio. I’m going to introduce a new table. For that right click on the project > Add > Table, give it any name and define schema as per your needs.
For simplicity of this post I’m going to keep the table design simple with just addition of a new nvarchar column (nvarchar to ensure the table supports Unicode characters)
Please note that I’ve marked the primary key column as Identity by setting the (Is Identity) to True in the column properties window.
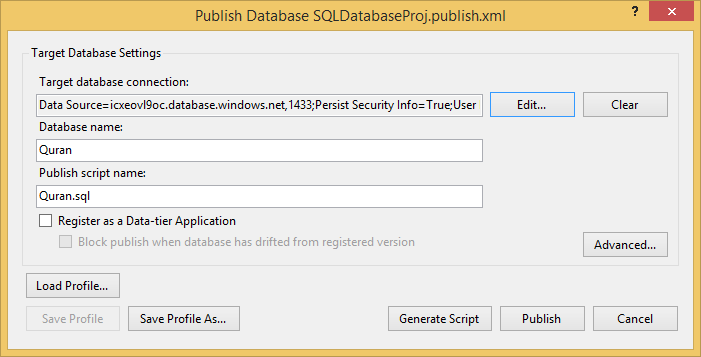
That’s it, right click on your Project and select publish. A publish dialog box will appear with all the required settings to publish the database pre-populated. That’s the advantage of making use of the starter project such that Azure has already done the tedious job for you.
In the dialog box click Edit and make sure you specify password that you specified during server creation and click Test Connection.
If you have followed the steps as it is, an error dialog will appear detailing that your client IP is not allowed to access the server.
Go back to Windows Azure portal and notice that on database quick start screen we have an option to allow current IP to list an exception to Firewall rules. Click yes and upon confirmation press ‘Yes’.
Switch back to Visual Studio and given your internet is working fine, the test connection should succeed this time. Press Ok and publish the modified database. Visual Studio will generate the script files and publish your changes on Azure database.
Summary
I hope this will post would have provided the beginners a starting pointer on how to manage a Windows Azure database. In next blog posts we’ll work on creating a Windows Azure Cloud Service that makes use of this published database on Azure. In final blog posts of this series we’ll create two test clients in Windows Phone and Windows Store to interact with Azure cloud service.
Comments
Anonymous
October 28, 2013
Thanks sirAnonymous
November 10, 2013
I am trying to learn more about azure, The 3 part data you did is very helpful. Thanks!Anonymous
November 10, 2013
thanks (y)Anonymous
January 24, 2014
very helpful jazakAllah (Y)Anonymous
February 21, 2014
:)Anonymous
March 28, 2014
i already have a DB in mysql , how do I import that in windows azure ?Anonymous
June 18, 2014
the database is published successfully on Azure,but the tables are not shown when click on db name.Anonymous
November 18, 2014
Done... Thanks Sir.Anonymous
December 02, 2014
(Y) Helpful :)


