Set up your Office 365 and Azure AD tenant
Greetings from Sharad and Diane. We've recently been setting up developer environments to use the OneNote API with Office 365 notebooks (in Preview). It can get pretty complicated because there are different ways to do it, so we're hoping this post will help streamline the process for you. We focus on a couple likely scenarios, but also included links to other docs that can provide more detailed information about the various procedures.
So, OneNote apps that access Office 365 notebooks use Microsoft Azure Active Directory (Azure AD) to handle sign-on, authentication, and authorization. To set up this framework, you need an Azure AD tenant that's associated with an Office 365 subscription. After you're set up, you can then register an application on Azure AD, and specify OneNote permissions for the application.
You can get free trial subscriptions to set up a test environment.
This is what you need to do to get set up:
- Get an Office 365 subscription
- Sign into OneNote Online to provision OneDrive for Business
- Associate your Office 365 subscription with Azure AD using a new or existing Azure subscription
We recommend using a private or incognito browser session to avoid sign-in problems during the setup process.
If you're a new OneNote developer, you can use our interactive API console to try out some API calls. The console targets consumer APIs using Microsoft account (Live ID), but the requests and responses are essentially the same for enterprise APIs. You can also try out the consumer API sample apps, whose host environment is easier to set up. But to use the updated Windows Universal sample app with Office 365 notebooks, you'll need the configuration described in this post.
The workflow you might need to complete before you can start using the OneNote API for Office 365 depends on your scenario. You'll most likely fall into one of the following:
- You don’t have an Office 365 subscription, and you want to create a new app.
- You have an Office 365 subscription, and you want to create a new app.
- You have an Office 365 subscription, and you want to add OneNote support to an existing Office 365 app.
Get an Office 365 subscription
An Office 365 subscription lets you access OneNote notebooks on Office 365.
MSDN subscribers: You may be eligible for a free Office 365 Developer subscription. Check your benefits on your MSDN subscriptions page.
You can buy an Office 365 Developer subscription, or subscribe to a qualifying plan. (This article lists the plans that qualify.) You'll need an account that has global administrator permissions, which you get by default when you sign up for a new subscription.
Or, follow these steps to get a free trial Office 365 Developer subscription:
Open the Sign up page for the trial Office 365 Developer subscription.
Choose your country/region and enter your contact information. Click Next.
Create a user name and password. Replace the Yourcompany placeholder with a unique name for your new Office 365 tenant. Click Next.
Get a verification code via text or phone call. Enter the code on the sign up page, and then click Create my account.
Save the account information and bookmark the sign-in page. Click You're ready to go.
It can take several minutes for the tenant to be provisioned and Office 365 services to show up.
Sign into OneNote Online to provision OneDrive for Business
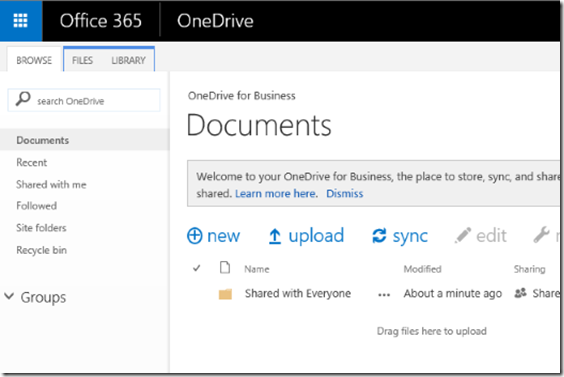
This step makes OneNote entities accessible using the OneNote APIs. All you have to do is sign into onenote.com for the first time and click a couple of links.
Sign into https://www.onenote.com with your Office 365 credentials (a work or school account like someone@example.com or someone@example.onmicrosoft.com).
If your OneNote Online site hasn't been provisioned, you'll see "Sorry, we can't seem to get your notebooks right now. Please finish setting up your account and try again" . Click Go to my account.
If your site is already provisioned, OneNote Online will open and display your notebooks. You can skip the next two steps.
Important! You and your app users must have an Office 365 account with a valid Office 365 license. User accounts without licenses won’t be able to see or access any notebooks on OneNote Online. Office 365 admins can check status and assign licenses in the admin center, as described in Assign or unassign licenses for Office 365 for business.
- On the Welcome to OneDrive for Business page that opens, click Next. This starts the provisioning process, which may take several minutes. When this step is complete, the page loads your Documents library.
- Return to the OneNote Online page and refresh it. This completes the provisioning process.
Your users will need to sign to onenote.com at least once, too. If they don't, calls to their OneNote content will return an error. When they do sign in, they'll be guided through the same UI described above.
Associate your Office 365 subscription with Azure AD
To register and manage applications that use Office 365 data, APIs, and permissions, you need to associate an Office 365 subscription with Azure AD. This requires an Azure account with service administrator or co-administrator permissions and an Office 365 account with global administrator permissions.
- If you don't have an Azure subscription, sign up for one using your Office 365 credentials
- If you have an Azure subscription, associate it with your Office 365 subscription
MSDN subscribers: You may be eligible for added savings when you activate your Azure benefit.
Sign up for an Azure subscription using your Office 365 credentials
If you don't have an Azure subscription, follow these steps to sign up for an Azure account that uses your Office 365 credentials. Starting the process from the Office 365 admin center automatically associates the subscriptions.
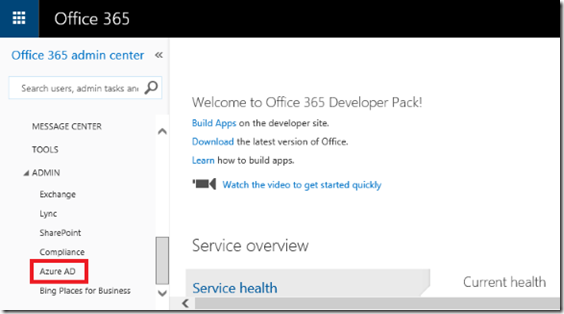
Sign into the Office 365 admin center as an Office 365 global administrator (using a work or school account like someone@example.com or someone@example.onmicrosoft.com).
In the navigation pane, scroll down to the Admin node and click Azure AD.
This opens the Sign up page for Azure. If prompted, sign in using your Office 365 global admin credentials. What you see depends on whether you have a trial or paid subscription.
-
- If you have a trial Office 365 subscription, you'll see "Access to Azure Active Directory is not available. Automatic access to Azure Active Directory is limited to customers with paid services. To access your Azure Active Directory you will need to activate an Azure subscription." Click Azure subscription. This opens the Free Trial page.
Enter your information, including payment information. You won't be charged unless you change to a paid subscription during the trial period.
If you agree to the subscription agreement, offer details, and privacy statement, check the box and click Purchase. The Subscriptions page for your new Azure account opens. Trial subscriptions are issued a $200.00 credit that can be used within 30 days. You can cancel the subscription from this page at any time.
-
- If you have a paid Office 365 subscription, enter your contact information and then click Sign up. After your subscription is created, click Start managing my service to open the Azure Management Portal.
The association is complete and you can register your application in Azure AD.
Associate an Azure subscription with your Office 365 subscription
If you have an existing Azure subscription, you need to associate it with your Office 365 subscription. You can only do this with an Azure subscription for a Microsoft account (Live ID). This process makes the Live ID account a global administrator of the Office 365 tenant. Learn more here.
- Sign into the Azure Management Portal with your Live ID credentials (such as someone@live.com).
- In the drawer, click New. Select App services > Active Directory > Directory > Custom Create.
- In the Add directory window, select Use existing directory for the directory.
- Check I am ready to be signed out now, and click the check mark. This signs you out of the portal.
- Sign back in using global administrator credentials for the Office 365 tenant that you want to associate (a work or school account like someone@example.com or someone@example.onmicrosoft.com.)
- When asked whether to use the directory with Azure, click continue, and then click Sign out now.
- Close the browser and reopen the portal.
- Sign in again with your Live ID, and click the Active Directory node. Your Office 365 directory should be listed on the Directory tab.
The association is complete and you can register your application in Azure AD.
Edit 5/26/15: Added note to provisioning step that user accounts must also be licensed.
Need help?
Contact us on twitter @onenotedev, or ask a question tagged onenote on Stack Overflow.
See also
Set up your Office 365 development environment
Manage Azure AD using Windows PowerShell
Comments
Anonymous
August 02, 2015
Thanks for explaining! Easy implementation when you know how it's done!Anonymous
May 15, 2017
"Associate an Azure subscription with your Office 365 subscription" topic is not valid anymore. App Service menu item is not available in azure portal. does it have a new name?


