Troubleshooting Windows AutoPilot (level 100/200)
If you’ve watched the Microsoft Mechanics video or Ignite sessions (presented by Sidd or me) on Windows AutoPilot, you’ve seen what is supposed to happen:
- Manually choose language, region, keyboard
- Connect to a network (if not wired)
- Azure AD authentication using custom branding (org name, icons, etc.)
- The device is joined to Azure AD
- Automatic MDM enrollment (as configured in Azure AD)
- Automatic logon as the specified Azure AD user
- MDM configuration is applied (with progress display if configured)
But what if that isn’t what actually happens? The following sections provide some troubleshooting suggestions.
Manually choose language, region, keyboard
If you don’t see these standard out-of-box experience (OOBE) screens, there is either something wrong with your OS image, an unexpected unattend.xml being used, or OOBE was partially completed before the computer restarted. Either start from scratch with a good image, or complete OOBE the rest of the way creating a local account, then reset the OS from the Settings app to start over.
A tip: If you are using a Hyper-V virtual machine, configure the VM to create standard (not production checkpoints). Create a checkpoint before the VM is powered on for the first time. Then start the VM and let it get to the first OOBE screen to choose a language before creating a second checkpoint. These checkpoints give you an easy way to repeatedly test the process. (The first one gives the full experience; the second just saves little time.)
Another tip (as covered in my Ignite session): You can capture the hardware hash from the machine after it gets to the language screen in OOBE. Press Shift-F10 to open a command prompt, then run PowerShell.exe. From there, you can set the execution policy to a reasonable level (RemoteSigned or Bypass) and then install and run the Get-WindowsAutoPilotInfo.ps1 script to create a CSV file with the hardware details. Copy that CSV file to a network location or USB key, then import it into the Microsoft Store for Business. The machine is still early enough in the process that it hasn’t yet checked to see if it is known to AutoPilot. Just exit out of PowerShell and the command prompt after you’ve uploaded the machine. (See https://blogs.technet.microsoft.com/mniehaus/2017/12/12/gathering-windows-autopilot-hardware-details-from-existing-machines/ for more on Get-WindowsAutoPilotInfo.)
Connect to a network (if not wired)
If the machine doesn’t have a wired connection and it has a wireless adapter, you should be prompted to connect to an available wireless network. If you don’t have any wired or wireless adapters, nothing is going to help – OOBE is going to short-circuit and end up creating a local account. Assuming you have an wireless adapter, you should be able to connect to a wireless network, even if it requires a captive portal – if it does, you should see a browser window open.
So what can go wrong here? Proxy servers can cause challenges if they aren’t automatically discoverable (e.g. WPAD) or if they require user authentication (there’s no user yet). Wireless networks that require certificates likely won’t work as there will not yet be any certificates. Firewalls might make Windows think that there isn’t a path to the internet.
We’re talking about basic network troubleshooting here, so you may want to use Shift-F10 to open a command prompt for further troubleshooting (IPCONFIG, NSLOOKUP, PING, etc.).
Azure AD authentication using custom branding (org name, icons, etc.)
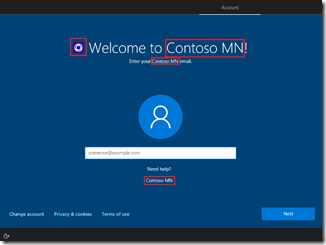
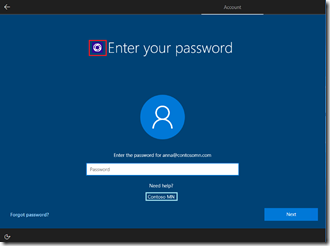
After the network connection is in place, Windows will check with the AutoPilot deployment service (in the cloud) to see if the device is known. If it is, then the customized branding can be displayed with the org name and logo. The customizations you should see are highlighted in red:
If the device isn’t configured to AutoPilot, then you get standard choices (personal vs. work/school if running Windows 10 Pro, a generic Azure AD sign-in screen with Windows 10 Enterprise, OneDrive, Cortana, privacy, etc.). What if you don’t get what you expect? There are a few possible causes:
- The device really isn’t defined to AutoPilot. A simple way to verify is to gather the hardware details again, then either search for the same machine in the existing list or just try to upload it again to see if you get an error about it being a duplicate. (Note that significant changes to the hardware, e.g. swapping out the motherboard, can change the hardware hash. Also, make sure that your device has a serial number, as the script expects that. Some devices, e.g. Intel NUCs, don’t have a serial number by default. See https://amicasto.com/2017/11/22/customizing-intel-nuc-bios-with-intel-integrator-toolkit/ for details.)
- The Azure AD tenant doesn’t have an Azure AD Premium license (or an equivalent suite license such as EM+S E3). That’s required for customized branding. (Interestingly, the license doesn’t have to be assigned to the user – at least not for this piece. That’s required in the next step though.)
- You haven’t configured the company branding settings in Azure AD. See the Azure AD documentation for information about that.
Assuming you type in a valid username (UPN, e.g. user@contoso.com) and password, you should continue to the next step.
Azure AD Join
Now that the credentials have been validated, the next step is to join the device into Azure AD. This is usually the easy piece, but there are some gotchas that can get in the way:
- Have you enabled the user to join devices to Azure AD? That is an obvious requirement – in order for AutoPilot to be used by end users, all of them need to be able to join devices to Azure AD. The steps to enable that are covered at https://docs.microsoft.com/en-us/azure/active-directory/device-management-azure-portal#configure-device-settings. If the user doesn’t have rights, you’ll get error 801C0003 (“Something went wrong”):
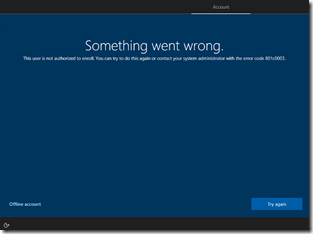
- Has the user reached the maximum number of devices that they can join? There can be a limit, but if you configure it to “unlimited” then you don’t need to worry about this one. If you do set a limit and the user reaches the limit, you’ll get the same 801C0003 (“Something went wrong”) error as above.
Automatic MDM enrollment
Once the Azure AD join completes, the MDM enrollment will happen. This automatic MDM enrollment is an Azure Active Directory Premium feature. If that doesn’t happen as expected, here are some things to check:
- Was automatic MDM enrollment enabled? This needs to be configured in Azure Active Directory via the Azure Portal. See https://docs.microsoft.com/en-us/intune/windows-enroll#enable-windows-10-automatic-enrollment for details. If this isn’t configured, you won’t see any errors, but the machine will not be managed by Intune.
- Is the user in the group that was configured for MDM automatic enrollment? If they aren’t, you won’t see any errors, but the machine will not be managed by Intune.
- Does the user have an Azure AD Premium license (or a suite that includes that license)? (Azure AD Premium P1 or P2 both work fine.) If not, they’ll see an 80180018 error (“Something went wrong”), indicating that the device could not be enrolled in MDM:
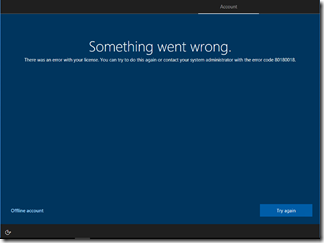
- Does the user have an Intune license (or a suite that includes that license)? If not, they’ll see the same 80180018 error (“Something went wrong”) as above.
- Has the user reached the limit of devices that they can enroll in Intune? This limit is configurable and can range from 1 to 15; see https://docs.microsoft.com/en-us/intune/enrollment-restrictions-set for more information. (Interestingly, this is an issue that I’m not presently able to duplicate. I just keep adding more and more devices…)
Automatic logon as the specified Azure AD user
This is the easy part – I’ve never seen this fail, since the credentials have already been verified and the device is already joined using the same credentials. So there’s no reason why the third usage of those credentials shouldn’t work. After the logon, you’ll see the pulsing status screen while apps are being installed, an MDM progress display (at least once that is enabled by Intune) showing what policies still need to be applied, and finally the desktop.
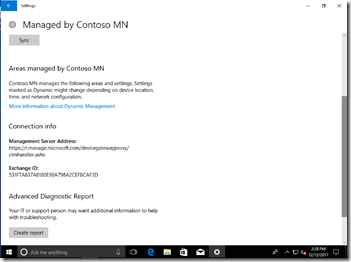
At that point, the whole AutoPilot-driven provisioning process is complete. To see that the device is indeed being managed by Intune, launch the Settings app, navigate to Accounts –> Access work or school, click the “Connected to <tenant>” entry (which indicates the device is joined to Azure AD) and then click the “Info” button to see the MDM enrollment details:
This will show you information about the policies applied, server URLs, etc. You can also generate an HTML diagnostics report from here, or manually initiate a sync with Intune.
One useful link I found while going through this process: https://docs.microsoft.com/en-us/windows/client-management/mdm/azure-active-directory-integration-with-mdm has a table that is useful to look up the error codes that you might encounter (e.g. 801C0003).
Comments
- Anonymous
December 26, 2017
Thank you for the guide!
