Using Azure Commercial AAD Authentication and Graph API in Azure Government Web App - PowerShell Automation
In a previous blog post, I showed how it is possible to use commercial/GCC Azure Active Directory (AAD) authentication for an Azure Web App deployed in Azure Government. This scenario is relevant for organizations that have a commercial/GCC AAD tenant for Microsoft Office 365 but they also have a tenant in Azure Government for cloud computing. More broadly, it applies to organizations with multiple tenants whether they be in the same or different clouds, e.g., an organization could have two tenants in Azure Commercial cloud and they would like to mix and match which tenants they use for AAD authentication in different Web Apps.
Organizations may also want to access the Microsoft Graph API to query information about users or even perform such tasks as sending emails on behalf of users, etc. If the Web App is configured with "Easy Auth" developers will be able to leverage the AAD access token to interact with the Graph API as discussed in this blog. Critically it requires:
- An AAD App Registration with appropriate delegated permissions set.
- The Web App needs to have the
/config/authsettingsset correctly. Specifically, in addition to the App registration ID and the client secret, it also needs to haveadditionalLoginParamsset to an array containing["resource=https://graph.windows.net"].
The latter point is especially tricky since there is no way of setting it directly in the Azure Portal. If the Web App is in Azure Commercial, one can use https://resources.azure.com to set it, but this tool is not available for Azure Government and consequently, the parameter needs to be set with Powershell.
I have made a couple of tools that can be used to configure all of this correctly. The tools are included in my HansenAzurePS module, which you can find in the PowerShell Gallery. This module contains a number of convenience tools such as the Get-GitHubRawPath, which was discussed in a previous blog post. In this blog post, I will demonstrate two tools:
New-AppRegForAADAuth, which is used to create the AAD App registration and enable Graph API permissions.Set-WebAppAADAuth, which is used to set AAD authentication on the Web App and configure the authsettings correctly for access to Graph API as discussed above.
Let's assume you have already set up a Web App in Azure Government and you would like to enable AAD auth and Graph access using a commercial AAD tenant, you can create the App registration with:
[ps]
$siteUri = "https://WEB-APP-NAME.azurewebsites.us"
$appreg = New-AppRegForAADAuth -SiteUri $siteUri -Environment AzureCloud
[/ps]
You will be asked for your Azure Commercial credentials. The credentials used must be able to create an App registration. If you would like to add addition Graph API permissions use the -GraphDelegatePermissions parameter. After this you can configure your Azure Government (or commercial) Web App:
[ps]
Set-WebAppAADAuth -ResourceGroupName RG-NAME -WebAppName WEB-APP-NAME `
-ClientId $appreg.ClientId -ClientSecret $appreg.ClientSecret `
-IssuerUrl $appreg.IssuerUrl -Environment AzureUSGovernment
[/ps]
You will be asked for your Azure Government credentials if you are not signed in.
To use these tools you should make sure you have installed the modules AzureRm, AzureAD, and HansenAzurePS:
[ps]
Install-Module AzureRm
Install-Module AzureAD
Install-Module HansenAzurePS
[/ps]
After this configuration, your Web App will be able to access the Graph API in Commercial Azure. As an example, this C# code snipped could be added to an ASP.NET controller (in MVC app) to get the user information:
[csharp]
public async Task Me()
{
string res = String.Empty;
string accessToken = Request.Headers["x-ms-token-aad-access-token"];
var client = new HttpClient();
client.DefaultRequestHeaders.Authorization = new AuthenticationHeaderValue("Bearer", accessToken);
var response = await client.GetAsync("https://graph.microsoft.com/v1.0/me");
var cont = await response.Content.ReadAsStringAsync();
Me me = JsonConvert.DeserializeObject(cont);
ViewData["UserPrincipalName"] = me.UserPrincipalName;
ViewData["DisplayName"] = me.DisplayName;
ViewData["Mail"] = me.Mail;
ViewData["me"] = cont;
return View();
}
[/csharp]
I have made a very simple ASP.NET Web App that implements this Graph Access in the HomeController and adds an example View. You can find the code for that application in this GitHub repository.
Putting all of this together, here is how you would a) create a new Web App (in Azure Government), b) deploy the example application, c) configure an App registration in Azure Commercial, and c) configure the auth settings of the Azure Government Web App.
[ps]
#Configure your settings
$ResourceGroupName = "MY-WEB-APP-NAME"
$webAppName = $ResourceGroupName
$aspName = "$webAppName-asp"
$GitRepoUrl = "https://github.com/hansenms/GraphAPIAspNetExample.git"
#Where do you want your Web App:
$webAppEnvironment = "AzureUSGovernment"
$Location = "usgovvirginia"
#Where do you want your AAD App registration
$appRegEnvironment = "AzureCloud"
#Will prompt you to log in
Login-AzureRmAccount -Environment $webAppEnvironment
#If you need to select subscripton
#Select-AzureRmSubscription -SubscriptionName <NAME OF SUBSCRIPTION>
$grp = Get-AzureRmResourceGroup -Name $ResourceGroupName -ErrorVariable NotPresent -ErrorAction 0
if ($NotPresent) {
$grp = New-AzureRmResourceGroup -Name $ResourceGroupName -Location $Location
}
$asp = Get-AzureRmAppServicePlan -Name $aspName -ResourceGroupName $ResourceGroupName -ErrorVariable NotPresent -ErrorAction 0
if ($NotPresent) {
$asp = New-AzureRmAppServicePlan -Name $aspName -ResourceGroupName $ResourceGroupName -Location $Location -Tier Standard
}
$app = Get-AzureRmWebApp -Name $webAppName -ResourceGroupName $ResourceGroupName -ErrorVariable NotPresent -ErrorAction 0
if ($NotPresent) {
$app = New-AzureRmWebApp -Name $webAppName -ResourceGroupName $ResourceGroupName -Location $Location -AppServicePlan $asp.Id
}
# Configure GitHub deployment from your GitHub repo and deploy once to web app.
$PropertiesObject = @{
repoUrl = "$GitRepoUrl";
branch = "master";
isManualIntegration = "true";
}
Set-AzureRmResource -PropertyObject $PropertiesObject -ResourceGroupName $ResourceGroupName -ResourceType Microsoft.Web/sites/sourcecontrols -ResourceName $webAppName/web -ApiVersion 2015-08-01 -Force
$siteUri = "https://" + $app.HostNames[0]
$appreg = New-AppRegForAADAuth -SiteUri $siteUri -Environment $appRegEnvironment
Set-WebAppAADAuth -ResourceGroupName $ResourceGroupName -WebAppName $webAppName -ClientId $appreg.ClientId -ClientSecret $appreg.ClientSecret -IssuerUrl $appreg.IssuerUrl -Environment $webAppEnvironment
#All Done
[/ps]
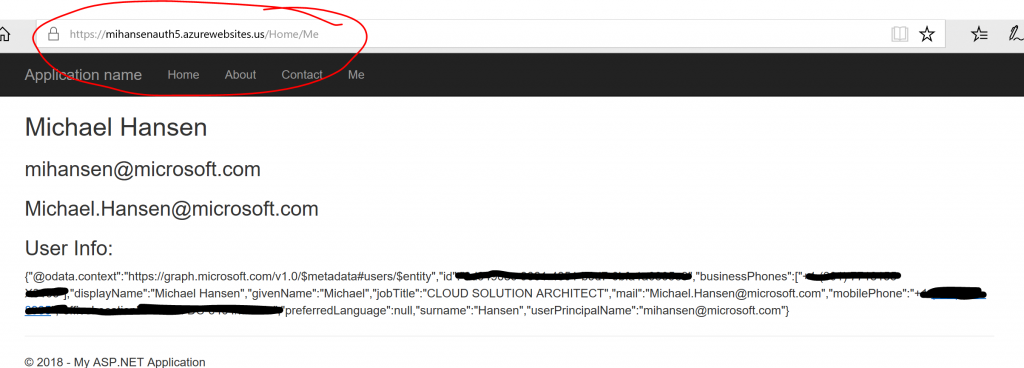
After this you can browse to the URL of your Web App and you will be prompted to log in with your credentials. The Web App has a "Me" menu item at the top of the screen. If you navigate there, you should see the information pulled about you from the Graph API:

Notice that the Web App is running in Azure Government but the authentication information and the Graph API information is coming from Azure Commercial.
And that's it. Let me know if you have comments/concerns/suggestions.
Comments
- Anonymous
February 17, 2018
great tools! thanks!