Developing your own PAW for cloud administration
In the Privileged Access Workstation guidance, we provide instructions on how to enable cloud services (it’s Phase 2, step 5, marked as optional). In that section we detail the use of the proxy.pac file, which includes a list of Microsoft Azure-related URLs. But what if you use another service, like Amazon Web Services or RackSpace? In this article, I’ll show you a very simple method to discover those URLs and add them to your own bypass list. Before I explain the method, I want to explain how we secure the system to allow access to trusted Internet sites without allowing access to untrusted ones.
Our public guidance relies on the deployment of a proxy.pac file, which includes a list of the Microsoft Azure URLs, and instructs the browser to allow the user to browse to them. Any site which does not match those patterns is redirected to 127.0.0.2:8080 – in other words, it’s redirected to a non-existent location. However, there’s another way of achieving this same goal – you can bypass the proxy by adding sites to the local Intranet zone, as documented in the TechNet article, “Using Proxy Selection and Proxy Bypass Lists” (https://technet.microsoft.com/en-us/library/dd361953.aspx). The ProxyBypassList.txt file in the PAW content download includes all of the same (Microsoft Azure) properties as the proxy.pac file, and was written to work with the UserProxySettings.adm file. [The proxy.pac and ProxyBypassList.txt files are both available for download from the TechNet Gallery at https://aka.ms/pawcontent.]
If you want to connect to a different cloud service, here’s how to generate your own ProxyBypassList.txt. Ideally you should complete all of these steps from a fully-configured PAW, but you can perform them on any system.
Close all other applications and services which may make Internet connections or queries.
Open your web browser of choice and enter the URL for your cloud property, but do not navigate to it yet.
Open an elevated command prompt and run the following command:
ipconfig /flushdnsThis will clear the DNS Resolver Cache of any existing entries
[caption id="attachment_175" align="alignnone" width="523"]
 Figure 1: Clear the DNS Resolver Cache before you connect to the cloud service.[/caption]
In your web browser, connect to your cloud service and, if necessary, provide your credentials to log into the portal.
In the command prompt, run the following command as many times as necessary (see Note below):
ipconfig /displaydns | find /v “:” | find “.” | find /v “Name does not exist.” | find /v “alpineskihouse.com” >> clouddnsnames.txtBe sure to replace alpineskihouse.com with your internal domain name (not the cloud service name, but your internal DNS domain name). Here's what the output looks like when not redirected to the text file.
[caption id="attachment_185" align="alignnone" width="668"] Figure 2: Using the IPConfig command to capture and filter the list of URLs.[/caption]
- Edit the temp.txt file to match the format in ProxyBypassList.txt (see below).
The first time you run the command in step 5, you'll generate a new clouddnsnames.txt which includes the appropriate entries from the (newly-repopulated) DNS resolver cache. This new file will include entries with periods, but not those which include a colon, the string “Name does not exist.” or your internal domain name. You will then need to edit the clouddnsnames.txt file to match the format of the ProxyBypassList.txt – remove all extra spaces, separate each entry with a semicolon, and add wildcards when appropriate to whitelist domains. Once you’ve done that, you can use the UserProxySettings.adm file to deploy your newly-generated list to all of your PAWs.
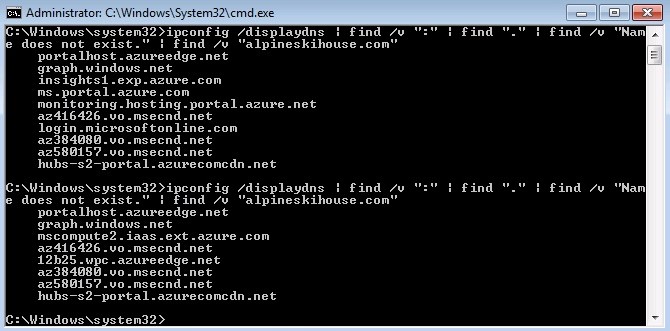
Note: As you build your list of URLs, you will most likely need to issue the command in step 5 more than once (which is why we append to temp.txt, rather than simply overwrite it). This is not only because the time-to-live (TTL) values for many cloud service DNS entries are very short, but also because different URLs are accessed from different sections of the portal. We recommend that you perform all of the typical activities for managing your cloud properties (starting virtual machines, accessing blob storage, creating users, and so on) during your session to ensure that you capture all required DNS names. As you can see below, the URLs in the DNS Resolver Cache can differ from moment to moment - the two ipconfig commands below were run within 15 seconds of one another!
[caption id="attachment_195" align="alignnone" width="670"] Figure 3: The list of URLs in the DNS Resolver Cache will vary depending on recent operations; make sure you check regularly to capture all appropriate URLs.[/caption]
By following the instructions above, you can generate a ProxyBypassList.txt for the cloud service of your choice, and deploy it to your PAWs using the UserProxySettings.adm file. Secure cloud administration awaits!
Acknowledgements: I want to thank Jared Poeppelman, who not only developed this procedure, but also provided the original ProxyBypassList.txt which we made available as part of the PAW content. I’d also like to thank Amy Hariharan Dang, who developed and contributed the UserProxySettings.adm which accompanies the ProxyBypassList. Thank you both!