Windows 8 Notifications: Using Azure for Periodic Notifications
At the end of my last post, I put in a plug for using Windows Azure to host periodic notification templates, so I’ll use this opportunity to delve into a bit more detail. If you want to follow along and don’t already have an Azure subscription, you can get a free 90-day trial account on Windows Azure in minutes.
The Big Picture
The concept of periodic notifications is a simple one: it’s a publication/subscription model. Some external application or service creates and exposes a badge or tile XML template for the Windows 8 application to consume on a regular cadence. The only insight the Windows 8 application has is the public HTTP/HTTPS endpoint that the notification provider exposes. What’s in the notification and how often it’s updated is completely within the purview of the notification provider. The Windows 8 application does need to specify the interval at which it will check for new content – selecting from a discrete set of values from 30 minutes to a day – and that should logically correspond to the frequency at which the notification content is updated, but there is no strict coupling of those two events.
 Take for instance, a Windows 8 application for Chez Contoso (right), a local trendy restaurant that displays its featured entrée on a daily basis within a Start screen tile, trying to lure you in for a scrumptious dinner. Of course the chef’s spotlight offering will vary daily, so it’s not something that can be packaged up in the application itself; furthermore, the eatery may want to have some flexibility on the style of notification it provides – mixing it up across the several dozen tile styles to keep the app’s presence on the Start screen looking fresh and alive.
Early each morning then, the restaurant management merely needs to update a public URI that returns the template with information on the daily special. The users of the restaurant’s application, which taps into that URI, will automatically see the updates, whether or not they even run the application that day.
Using Windows Azure Storage
Since the notification content that needs to be hosted is just a small snippet of XML, a simple approach is to leverage Windows Azure blob storage, which can expose all of its contents via HTTP/HTTPS GET requests to a blob endpoint URI.
In fact, if Chez Constoso owned the Windows Azure storage account, the restaurant manager could simply copy the XML file over to the cloud (using a file copy utility like CloudBerry Explorer), and with an access policy permitting public read access to the blob container, the Windows 8 application would merely need to register the URI of that blob in the call to startPeriodicUpdate (along with a polling period of a day and an initial poll time of 9 a.m.). There would be no requirement (or cost) for an explicit cloud service per se: the Windows Azure Storage service fills that need by supporting update and read operations on cloud storage.
Unfortunately, there is a catch! By default, the expiration period for a tile is three days; furthermore, if the client machine is not connected to the network at the time the poll for the update is made, that request is skipped. In the Chez Contoso scenario, this could mean that the daily dinner special for Monday might be what the user sees on his or her Start screen through Wednesday – not ideal for either the restaurant or the patron.
- The good news is that to ensure content in a tile is not stale, a expiration time can be provided via a header in the HTTP response that returns the XML template payload, and upon expiry, the tile will be replaced by the default image specified in the application manifest.
- The bad news is that you can’t set HTTP headers when using Azure blob storage alone, you need a service intermediary to serve up the XML and set the appropriate header… enter Windows Azure.
Using Windows Azure Cloud Services
A Windows Azure service for a periodic notification can be pretty lightweight – it need only read the XML file from Windows Azure storage and set the X-WNS-Expires header that specifies when the notification expires. Truth be told, you may not need a cloud storage account since the service could generate the XML content from some other data source. In fact, that same service could expose an interface or web form that the restaurant management uses to supply content for the tile. To keep this example simple and focused though, let’s assume that the XML template is stored directly in Windows Azure storage at a known URI location; how it got there is left to the reader :).
With Windows Azure there are three primary ways to setup a service:
Windows Azure Web Sites, a low cost and quick option for setting up simple yet scalable services.
Windows Azure Virtual Machines, an Infrastructure-as-a-Service (Iaas) offering, enabling you to build and host a Linux or Windows VM with whatever service code and infrastructure you need.
Windows Azure Cloud Services, a Platform-as-a-Service offering, through which you can deploy a Web Role as a service running within IIS.
I previously covered the provisioning of Web Sites in my blog post on storing notification images in the cloud, so this time I’ll go with the Platform-as-a-Service offering using Windows Azure Cloud Services and ASP.NET.
Getting Set Up for Azure Development
If you haven’t used Windows Azure before, now’s a great time to get a 90-day free, no-risk trial.
As far as tooling goes, you can use Visual Studio 2012, Visual Studio 2010, or Visual Web Developer Express. I’m using Visual Studio 2012 for the rest of this post, but the experience is quite similar for Visual Studio 2010 and Visual Web Developer Express.
Since the service will be developed in ASP.NET, you’ll also want to download specifically the Windows Azure SDK for .NET (via the Web Platform Installer). In fact, if you don’t have Visual Studio already installed, this will give you Visual Web Developer Express automatically.
Creating the Service
In Visual Studio, create a new Solution (File>New Project…) of type Cloud:
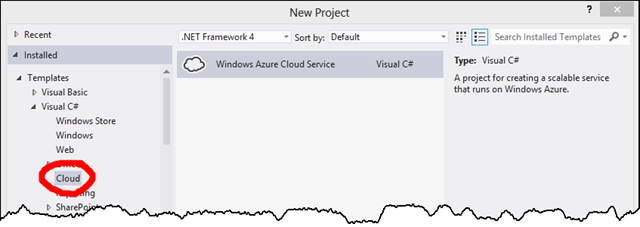
When you create a new Cloud Service, you get the option to create a number of other related projects, each corresponding to a Web or Worker Role that is deployed under the umbrella (and to the same endpoint) of that Cloud Service. Web and Worker Roles typically coordinate with other Azure services like storage and the Service Bus to provide highly scalable, decoupled, and asynchronous implementations. In this simple scenario, you need only a single Web Role, which will host a simple service.
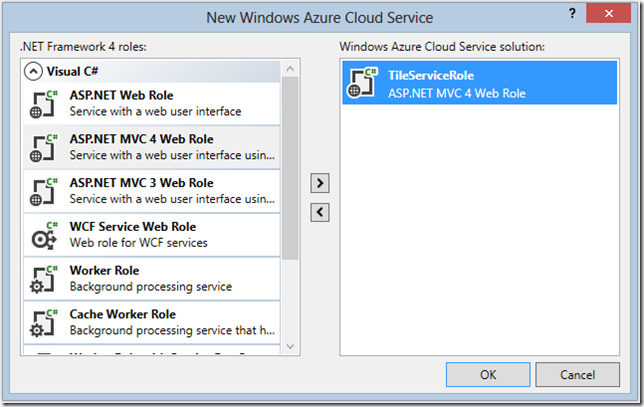
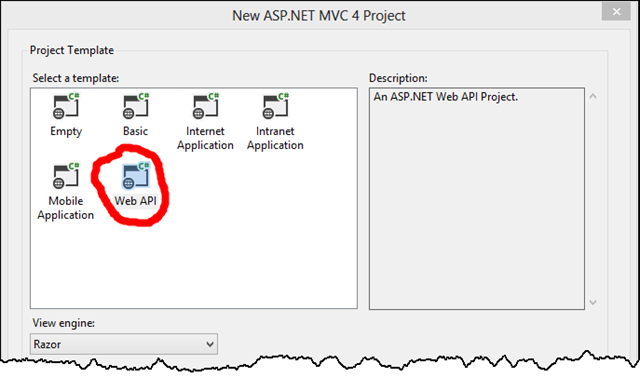
For the type of ASP.NET MVC project, select Web API, a convenient and lightweight option for building a REST-ful service:
Coding the Service
At a minimum, the service needs to do two things:
- return the tile XML content within a predetermined Windows Azure blob URI, the same one that is updated by the restaurant every morning at 9 a.m.
- set the X-WNS-Expires header to the time at which the requested tile should no longer be shown to the user. In this case, let’s assume the restaurant stops serving the special at midnight each day, and you don’t want to show the tile after that time.
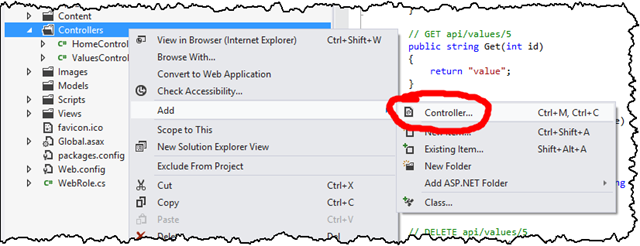
To create the API for returning the XML content, add a new empty API Controller called Tiles on the ASP.NET MVC 4 project (or you can just modify the ValuesController that gets automatically created):

In that controller, you’ll need a single Get method (corresponding to the HTTP GET request that the Windows 8 application will make on a regular basis to get the XML tile content). That Get method will access a parameter indicating the name of the blob on Windows Azure that contains the XML. For example, a URL like:
https://periodicnotifications.cloudapp.net/api/tiles/chezcontoso\_dinner
will access the blob called dinner in a Windows Azure blob storage container called chezcontoso. The api/tiles segment of the URL is controlled by the ASP.NET MVC route that is set by default in the global.asax file of the project, so it too can be modified if you like.
The complete code for that Get method follows and is also available as a Gist on GitHub for easier viewing and cutting-and-pasting. Note, you will need to supply your own storage account credentials in Line 5ff (see below for a primer on setting up your storage account).
1: // /api/tiles/<tilename>
2: public HttpResponseMessage Get(String id)
3: {
4: // set cloud storage credentials
5: var client = new Microsoft.WindowsAzure.StorageClient.CloudBlobClient(
6: "https://YOUR_STORAGE_ACCOUNT_NAME.blob.core.windows.net",
7: new Microsoft.WindowsAzure.StorageCredentialsAccountAndKey(
8: "YOUR_STORAGE_ACCOUNT_NAME",
9: "YOUR_STORAGE_ACCOUNT_KEY"
10: )
11: );
12:
13: // create HTTP response
14: var response = new HttpResponseMessage();
15: try
16: {
17: // get XML template from storage
18: var xml = client.GetBlobReference(id.Replace("_", "/")).DownloadText();
19:
20: // format response
21: response.StatusCode = System.Net.HttpStatusCode.OK;
22: response.Content = new StringContent(xml);
23: response.Content.Headers.ContentType =
24: new System.Net.Http.Headers.MediaTypeHeaderValue("text/xml");
25:
26: // set expires header to invalidate tile when content is obsolete
27: response.Content.Headers.Add("X-WNS-Expires", GetExpiryTime().ToString("R"));
28: }
29: catch (Exception e)
30: {
31: // send a 400 if there's a problem
32: response.StatusCode = System.Net.HttpStatusCode.BadRequest;
33: response.Content = new StringContent(e.Message + "\r\n" + e.StackTrace);
34: response.Content.Headers.ContentType =
35: new System.Net.Http.Headers.MediaTypeHeaderValue("text/plain");
36: }
37:
38: // return response
39: return response;
40: }
41:
42: private DateTime GetExpiryTime()
43: {
44: return DateTime.UtcNow.AddDays(1);
45: }
And now for the line-by-line examination of the code:
| Line 2 | The Get method is defined to accept a single argument (this will be of the format container_blob) which is automatically passed in by the ASP.NET MVC routing engine to the id parameter. This leverages the default route for APIs as defined in the App_Start/WebApiConfig.cs of the ASP.NET MVC project, but you do have full control over the specific path and format of the URL. |
| Lines 5-11 | This instantiates the StorageClient class wrapper for interacting with Windows Azure blob storage. For simplicity, the credentials are hard-coded into this method. As a best practice, you should include your credentials in the role configuration (see the Configuring a Connection String to a Storage Account in Configuring a Windows Azure Project) and then reference that setting in code via RoleEnvironment.GetConfigurationSettingValue. |
| Line 14 | A new HTTP response object is created, details for which are filled by the rest of the code in the method. |
| Line 18 | The blob resource in Windows Azure is downloaded using the account set in Line 5ff. The id parameter is assumed to be of the format container_blob, with the underscore character separating the distinct Windows Azure blob construct references. Since references to containers and blobs in Windows Azure require the / separator, the underscore in the parameter value is replaced before the call is made to download the content. You could alternatively create a new MVC routing rule that accepted two parameters to the Get method, container and blob, and then concatenate those values here. I opted for the implementation here so as not to require additional modifications in other parts of the ASP.NET MVC project. |
| Line 21 | A success code is set for the HTTP response, since an exception would have occurred if the tile content were not found. It’s still possible that the content is not valid, but the notification engine in Windows 8 will handle that silently and transparently and simply not attempt to update the tile. |
| Line 22 | The content payload for the tile, which should be just a snippet of XML subscribing to the Tile schema, is added to the HTTP response. |
| Line 23 | The content type is, of course, XML. |
| Line 27 | To guard against stale content, the X-WNS-Expires header is set to the time at which the tile should no longer be displayed on the user’s Start screen, and instead the default defined in the application’s manifest should be used. Here the time calculation is refactored into a separate method which just adds a day to the current time. That’s actually not the best implementation, but we’ll refine that a bit later in the post. Note that the time is formatted using the “R” specifier, which applies the RFC1123 format required for HTTP dates. |
| Lines 31-35 | The exception handling code is fairly simplistic but sufficient for the example. If there’s any problem in accessing the blob content, a HTTP 400 status code is returned. The notification processing component of Windows 8 will realize there’s a problem and not attempt to modify the tile. The additional information provided (message and stack trace) is there for diagnostic purposes; it would never be visible to the user of the Windows 8 application. |
| Line 39 | The HTTP response is returned as the result of the service request. |
| Line 42-45 | GetExpiryTime calculates when the tile should expire and the default tile defined in the application’s manifest should be reinstated. In the code embedded above, the tile will expire one day after the content was polled versus the default of three days. The Gist includes an updated version of that calculation that I’ll discuss a bit later in the post. |
Testing the Service
The Windows Azure SDK includes an emulator that allows you to run a Windows Azure service on your local machine for testing. You can invoke the emulator when running Visual Studio (as an administrator) by hitting F5 (or Ctrl+F5). For the service application we’re working with, that will open a browser to the default page for the site. That page isn’t the one you want, of course, but since the tile is available via an HTTP GET request, simply supplying the appropriately formatted URI should bring up the XML content in the browser.
After confirming the service works, it’s time to give it shot with a real Windows 8 application that leverages periodic notifications. If you’ve got one coded already, then all you need to do is provide the full URI to startPeriodicUpdate. If you haven’t written your app yet, the Push and periodic notifications client-side sample offers a quick way to test.
When you run that sample, select the fourth scenario (Polling for tile updates) and enter the URL for the service you just created. Then press the Start periodic updates button.

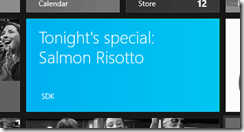 As for all periodic updates, when startPeriodicUpdate is called, the endpoint is polled immediately, so you should see the tile updated on your Start Screen along the lines of what is shown to the left. If you were to manually update the tile XML in blob storage, you should see the new content reflected in about a half-hour, since that’s the default recurrence period specified in the sample application. For the actual application, a recurrence period of one day makes more sense; additionally, you’d set the startTime parameter in the call to startPeriodicUpdate to 9 a.m. or slightly after to be sure that the poll picks up the daily refreshed content.
Deploying the Service
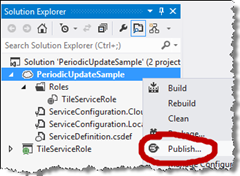 When you’re satisfied the application is working with the local service, you’re ready to deploy it to the cloud with your 90-day free Windows Azure account (or any other account you may have). You can deploy the ASP.NET site to Windows Azure directly from Visual Studio by selecting the Publish option from the Cloud Service project (right).
If this is the first time you’ve published to Windows Azure from Visual Studio, you’ll need to download your publishing credentials, which you can access via the link provided on the Publish Windows Azure Application dialog below.
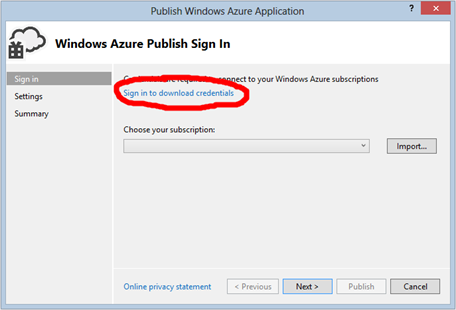
Selecting that link prompts you to login to the Windows Azure portal with your credentials and download a file with the .publishsettings extension. Save that file to your local disk and click the Import button to link Visual Studio to your Azure subscription. You only need to do this once, and you should then secure (or remove) the .publishsettings file, since it contains information that would enable others to access your account. With the subscription now in place, you can continue to the next step of the wizard.
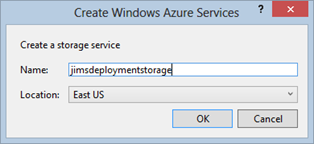 You may next be prompted to create a storage account on Windows Azure. This account is used to store your deployment package during the publication process, and it can be used by all the services you ultimately end up deploying. As a result, you need only do this once; although, you can change the default storage account used at a later stage in the wizard. To create the account enter a storage account name, which must be unique across all of Windows Azure, and indicate which of the eight data centers should house the account.
 If you have existing services deployed, you’ll have the option to update one of those with the build currently in Visual Studio, or as in this case, you can create a new Cloud Service on Windows Azure. Doing so requires supplying (1) a service name (which must be unique across Windows Azure since it becomes the third level domain name prepended to the cloudapp.net domain which all Windows Azure Cloud Services are a part of) and (2) the location of the data center where the service will run. As you can see to the left, I chose my service to reside in the East US and be addressable via periodicnotifications.cloudapp.net.
If the service name is valid and not in use, the Common Settings and Advanced Settings options will be populated automatically and allow some customization of how the service runs and what capabilities you have (e.g., remote desktop to your VM in the cloud, whether to use a production or staging slot, if Intellisense is enabled, etc.) The defaults are fine for our purposes here, but you can read more about the additional settings on the Windows Azure site.

At this point the Next button brings you to a summary screen which indicates that your choices will be saved for when you redeploy, or you can just click Publish to deploy your service to Windows Azure now. Within Visual Studio you can keep tabs on the deployment via the Windows Azure Activity log (accessible via the View->Other Windows menu option in Visual Studio) – note that it may take 10 minutes or more the first time you deploy to a new service; subsequent updates are generally much quicker.

Now that the service is fully deployed to the cloud, you can revisit the sample tile application and provide the Azure hosted URI (versus the localhost one used earlier when testing) to see the complete end-to-end process in action!
Tidying Up
Earlier on, I mentioned I’d revisit the tile timeout logic, namely the implementation of GetExpiryTime in the code sample; it’s time to clean up that loose end!
Since Chez Contoso updates its menu daily at 9 a.m., it seems quite logical to have the tile expire on a daily basis (which was the default implementation I introduced above), but that creates a less than satisfactory experience:
When users fire up the application for the first time, the URI will be polled for the tile and by default the tile will expire 24 hours from then. If a user should first access the app at 8:45 a.m. and then disconnect for the rest of the day, they will continue to see the previous day’s special on their Start screen! I’d say that if the restaurant stops serving at midnight, no one should continue to see that day’s special beyond that point.
To address that scenario, here’s an updated implementation of GetExpiryTime:
1: private DateTime GetExpiryTime()
2: {
3: Int32 TimeZoneOffset = -4; // EDT offset from UTC
4:
5: // get representation of local time for restaurant
6: var requestLocalTime = DateTime.UtcNow.AddHours(TimeZoneOffset);
7:
8: // if request is hitting before 9 a.m., information is stale
9: if (requestLocalTime.Hour <= 8)
10: return DateTime.UtcNow.AddDays(-1);
11:
12: // else, set tile to expire at midnight local time
13: else
14: {
   15:          var minutesUntilExpiry = (24 - requestLocalTime.Hour) * 60
                                                  - requestLocalTime.Minute;
16: return DateTime.UtcNow.AddMinutes(minutesUntilExpiry);
17: }
18: }
The basic algorithm here is to convert the time the request hits the server (in UTC) to the equivalent local time. Here, I’m assuming the restaurant is on the East Coast of the United States, which currently is offset by four hours from UTC (Line 3). One disadvantage of this particular approach is that the conversion to Standard Time will require a change to the algorithm. That could be alleviated by moving the offset to the services configuration file (ServiceConfiguration.cscfg), but it would still need to be updated twice a year. A more robust (and likely complex) implementation is almost certainly possible, but I’m deeming this ‘close enough’ to illustrate the concept.
Once the representation of the time local to the restaurant is obtained (Line 6), a check is made to see if the time is before or after 9 a.m., the time we’re assuming management is prompt about updating the coming evening’s special.
If it’s before 9 a.m. that day (Line 9), then the tile is set to expire before it’s even delivered, because the current contents refer to the previous day’s special entrée. This does mean that the tile is delivered unnecessarily, but the payload is small, and the Windows 8 notification mechanism will honor the expiration date. An alternative would be to return an HTTP status code of 404, which may be more correct and elegant, but require updating a bit more of the other code.
If the request arrives after 9 a.m. Chez Contoso time (Line 13ff), then the expiration time is calculated by determining how many minutes are left until midnight. Once that time hits, the tile on the user’s Start screen will be replaced with the default supplied in the application’s manifest, which would probably include a stock photo or some other generic and time insensitive text.
Final Design Considerations
Congratulations! At this point you should have a cloud service setup that can service one or many of your Windows 8 applications. Before signing off on this post though, I wanted to reiterate a few things to keep in mind about periodic notifications.
- If the machine is not connected to the internet when it’s time to poll the external URI, then that attempt is skipped and not retried until the next scheduled recurrence – which could be as long as a day away. The takeaway here is to consider expiration policies on your tiles so that stale content is removed from the user’s Start screen.
- The polling interval is not precise; there can be as much as a 15-minute delay for the notification mechanism to poll the endpoint.
- The URI is always polled immediately when a client first registers (via startPeriodicUpdate), but you can specify a start time of the next poll and then the recurrence interval for every request thereafter.
- You can leverage the notification queue by providing up to five URIs to be polled at the given interval. Each of those can have separate expiration policies and also provide different tag value (X-WNS-Tag header) to determine which tile of the set should be replaced with new content.
 This section is a primer for setting up a Windows Azure storage account in case you want to follow along with the blog post above and set up your own periodic notification endpoints in Windows Azure. If you’ve already worked with Windows Azure blob storage, you won’t miss anything by skipping this!
Getting Your Windows Azure Account
There are a number of options to quickly provision a Windows Azure account. Many of these are either free or have a free monthly allotment of services - more than enough to get your feet wet and explore how Windows Azure can enhance Windows 8 applications from a developer and an end-user perspective:
- Free 90-day trial
- MSDN subscription
- Microsoft Cloud Essentials (via Microsoft Partner Network)
- Microsoft BizSpark benefits
- Microsoft WebsiteSpark benefits
- 6-month and pay-as-you-go plans
Creating Your Storage Account
Once your subscription has been provisioned, log in to the Windows Azure Management Portal, and select the NEW option at the bottom left.
From the list of options on the left, select STORAGE and then QUICK CREATE:
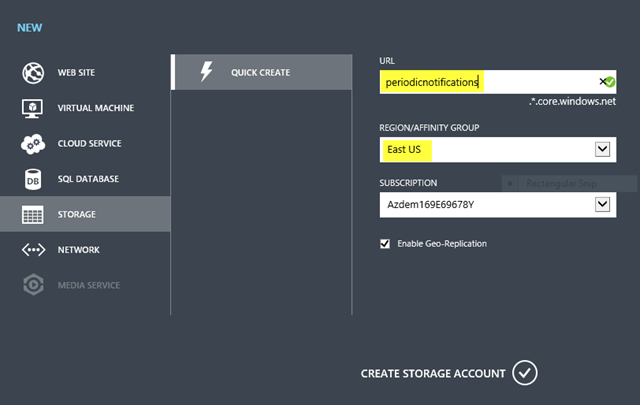
You’ll need to provide two things before clicking CREATE STORAGE ACCOUNT:
-
- a unique name for your storage account (3-24 lowercase, alphanumeric characters), which also becomes the first element of the five part hostname that you’ll used to access blobs, tables and queues within that storage account, and
- the region you’d like your data to be stored, namely one of Azure’s eight data center locations worldwide.
The geo-replication option offers the highest level of durability by copying your data asynchronously to another data center in the same region. For the purposes of a sample it’s fine to leave it checked, but do note that replication does add roughly a 33% cost to your storage.
 Once your account is created, select the account in the portal, and click the MANAGE KEYS option at the bottom center, to bring up your primary and secondary access key. You’ll ultimately need to use one of these keys (either is fine) to create items in your storage account.

Installing a Storage Account Client
The Windows Azure Management portal doesn’t provide any options for creating, retrieving or updating data within your storage account, so you’ll probably want to install one of the numerous storage client application out there. There is a wide variety of options from free to paid, from proprietary to open source. Here is a partial list of the one’s I’m aware of – I tend to favor Cloudberry Storage Explorer when working with blob storage.
- Cloudberry Explorer
- Cerebrata Cloud Storage Studio
- ClumsyLeaf CloudXplorer
- Azure Blob Studio 2011
- Azure Storage Explorer
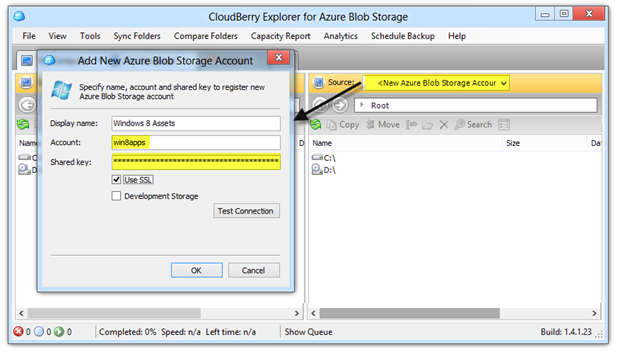
Regardless of which you use, you’ll need to setup access to your storage account by providing the storage account name and either the primary or secondary account key. Here for instance is a screen shot of how to do it Cloudberry Explorer:
Creating a Container
Windows Azure Blob storage is a two-level hierarchy of container and blobs:
- a container is somewhat like a file folder, except containers cannot be nested. This is the level at which you can define an access policy applying to the container and the blobs within it,
- a blob is simply an unstructured bit of data; think of it as a file with some metadata and a MIME-type associated with it. Blobs always reside in containers and are accessed with a URI of the format https://accountname.blob.core.windows.net/container-name/blob-name (http is also supported).
You can create a container programmatically of course, and the 3rd party notification service could do so, but it’s likely you’ll set up the container before hand and let the service simply deal with the blobs (XML files) in it. Depending on the storage client you’re using, creating a container will be very much like creating a file folder in Explorer. Here’s a snapshot of the user interface in CloudBerry Explorer.
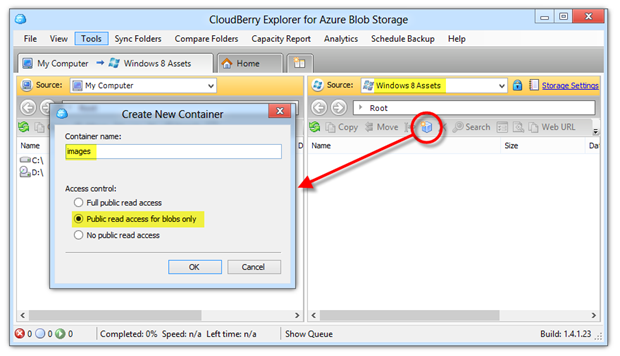
Note that I’ve set the container policy to Public read access for blobs only, which would allow the storage account to be a direct endpoint that a Windows 8 application can subscribe to for periodic notifications. That’s a supported, but less than ideal approach as the body of the blog post above explains. A service-based delivery approach would allow a more stringent access policy of “No public read access,” since the storage key could be used by and secured at the service host.