Configure Forms Based Authentication(FBA) using ASPNetMembershipProvider for Claims based web applications in SharePoint 2010
This article willl help you to configure FBA using ASPNetMembership provider on a claims based web application. Here are the steps that are needed to configure SQL for MemberShip store:
- Create SQL database
- Create SQL User in the SQL database
To Create SQL Database for the SQLMembershipProvider
1. Install and then open the Visual Studio 2008
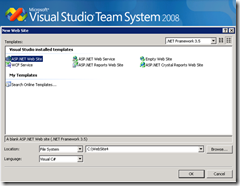
2. Select new website, select template as ASP.NET web site and select language as C#
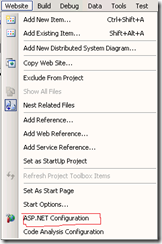
3. Once you have the website created, click on Website menu and select the ASP.NET configuration..
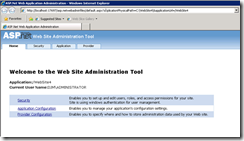
4. Once you click on it, it will take you to : \&applicationUrl=/websitename">https://localhost:53663/asp.netwebadminfiles/default.aspx?applicationPhysicalPath=C:\<website_location>\&applicationUrl=/websitename
5. Click on Providers and Click the Select a different provider for each feature (advanced)
6. Test both the Membership Provider & Role Provider and ensure that it is successful.
7. Now click on the Security tab and Select authentication type under Users
8. Select the option “From the internet" and click on Done.
9. Click on Create User and enter all the field required and click on “Create User”.
10. Once you have created the user, right on the website that we created in the VS 2008 and click on the refresh folder, you will now see the following database : ASPNETDB.MDF
11. Close the web site from VS 2008 and browse to the location where you created the web site like C:\<website_location>\App_Data
12. Copy the MDF and LDF files and rename if required and then paste it in the directory where you have the SQL server databases.
13. Attach the database to the SQL database server using SQL Management Studio with whatever name you wish you have.
OR
You can create the ASP.NET membership database using this method:
1. On the SQL server, open Windows Explorer.
2. Navigate to the path %System Drive%\Windows\Microsoft.NET\Framework\v2.0.50727.
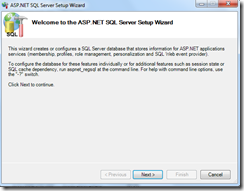
3. To start the ASP.NET SQL Server Setup Wizard, double-click aspnet_regsql.exe.
4. Start the wizard by clicking Next, and then complete the wizard :
5. Click Configure SQL Server for application services, and then click Next.
6. In the Server box, type aspnetdb for the database name, and then click Next
7. Confirm that the data you typed is correct, and then click Next
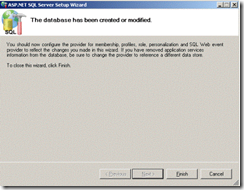
8. The database is created and the final status information is displayed. Click Finish to complete the wizard
To perform the tasks such as creating users and groups and managing passwords, you can use the tool named MembershipSeeder. The tool and source code are available on CodePlex from the MemberShipSeeder page. You can use the MembershipSeeder tool as is for simple user and role management, or you can use the source code as a base on which to create your own tool; however, Microsoft does not provide support for this tool.
Before you create users from the MembershipSeeder tool
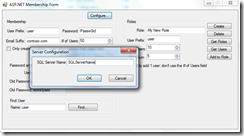
Start the MembershipSeeder tool. Click Configure.
In the dialog box that opens, type the name of the computer running SQL Server that hosts your SQL membership database.
Save your changes, and then restart MembershipSeeder so that it will use the new server name.
To create users for testing purposes
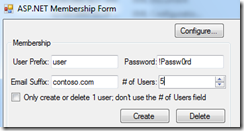
In the User Prefix field, type a value.
In the Password field, type the password you want each user to have.
In the # of Users field, select the number of users to create.
Click Create to create users where the user name is the value of the User Prefix field with an incrementing number added to the end.
You can also refer the following : https://msdn.microsoft.com/en-us/library/bb975136(office.12).aspx
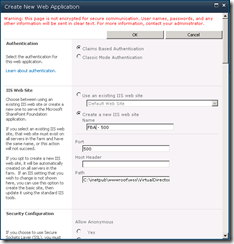
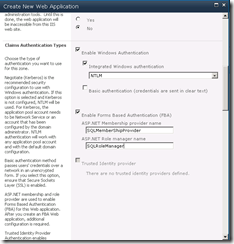
Now that we have created the users, lets create the web application by selecting the authentication as Claims Based Authentication:
Select the Claims Authentication Type as shown below, you can either use “NTLM” or “Negotiate(Kerberos or NTLM)” for Windows Authentication.I have selected NTLM in this example
Once the web application is created, we will need to edit 3 web.config files for enabling claims:
1.The web.config file of the Central Administration site.
2.The web.config file of the Web Application.
3.The web.config file of the STS (SecurityTokenService) Application. This is important because it is this service that will ensure claims tokens are being passed correctly between the SQL provider and the Central Admin and the Web Application.
Central Administration web.config changes:
Place the below snippet between </SharePoint> & <system.web> in the web.config
<!-- Connection String for FBA Start -->
<connectionStrings>
<add name="SQLConnectionString" connectionString="data source=<SQLServerName>;Integrated Security=SSPI;Initial Catalog=<SQL_DB_NAME>" />
</connectionStrings>
<!-- Connection String for FBA End –>
Place this between <machineKey validationKey… /> & </system.web>
<!-- Role Manager & Membership Provider for FBA-->
<roleManager defaultProvider="AspNetWindowsTokenRoleProvider" enabled="true" cacheRolesInCookie="false">
<providers>
<add connectionStringName="SQLConnectionString" applicationName="/" description="Stores and retrieves roles from SQL Server" name="SQLRoleManager" type="System.Web.Security.SqlRoleProvider, System.Web, Version=2.0.3600.0, Culture=neutral, PublicKeyToken=b03f5f7f11d50a3a" />
</providers>
</roleManager>
<membership defaultProvider="SQLMembershipProvider">
<providers>
<add connectionStringName="SQLConnectionString" passwordAttemptWindow="5" enablePasswordRetrieval="false" enablePasswordReset="false" requiresQuestionAndAnswer="true" applicationName="/" requiresUniqueEmail="true" passwordFormat="Hashed" description="Stores and Retrieves membership data from SQL Server" name="SQLMembershipProvider" type="System.Web.Security.SqlMembershipProvider, System.Web, Version=2.0.3600.0, Culture=neutral, PublicKeyToken=b03f5f7f11d50a3a" />
</providers>
</membership>
<!-- Role Manager & Membership Provider for FBA -->
In the Web Application web.config changes:
Place this between </SharePoint> & <system.web> in the web.config
<connectionStrings>
<add name="SQLConnectionString" connectionString="data source=<SQLServerName>;Integrated Security=SSPI;Initial Catalog=<SQL_DB_NAME>" />
</connectionStrings>
Place this between <machineKey validationKey…. /> & </system.web>
<!-- Add membership Provider and Role Manager: -->
<roleManager defaultProvider="c" enabled="true" cacheRolesInCookie="false">
<providers>
<add name="c" type="Microsoft.SharePoint.Administration.Claims.SPClaimsAuthRoleProvider, Microsoft.SharePoint, Version=14.0.0.0, Culture=neutral, PublicKeyToken=71e9bce111e9429c" />
<add connectionStringName="SQLConnectionString" applicationName="/" description="Stores and retrieves roles from SQL Server" name="SQLRoleManager" type="System.Web.Security.SqlRoleProvider, System.Web, Version=2.0.3600.0, Culture=neutral, PublicKeyToken=b03f5f7f11d50a3a" />
</providers>
</roleManager>
<membership defaultProvider="i">
<providers>
<add name="i" type="Microsoft.SharePoint.Administration.Claims.SPClaimsAuthMembershipProvider, Microsoft.SharePoint, Version=14.0.0.0, Culture=neutral, PublicKeyToken=71e9bce111e9429c" />
<add connectionStringName="SQLConnectionString" passwordAttemptWindow="5" enablePasswordRetrieval="false" enablePasswordReset="false" requiresQuestionAndAnswer="true" applicationName="/" requiresUniqueEmail="true" passwordFormat="Hashed" description="Stores and Retrieves membership data from SQL Server" name="SQLMembershipProvider" type="System.Web.Security.SqlMembershipProvider, System.Web, Version=2.0.3600.0, Culture=neutral, PublicKeyToken=b03f5f7f11d50a3a" />
</providers>
</membership>
<!-- Add membership Provider and Role Manager ends -->
In the following location : C:\Program Files\Common Files\Microsoft Shared\Web Server Extensions\14\WebServices\SecurityToken
Place the below code between : </system.net> & </configuration>
<!-- FBA configuration -->
<connectionStrings>
<add name="SQLConnectionString" connectionString="data source=<SQLServerName>;Integrated Security=SSPI;Initial Catalog=<SQL_DB_NAME>" />
</connectionStrings>
<system.web>
<roleManager defaultProvider="c" enabled="true" cacheRolesInCookie="false">
<providers>
<add name="c" type="Microsoft.SharePoint.Administration.Claims.SPClaimsAuthRoleProvider, Microsoft.SharePoint, Version=14.0.0.0, Culture=neutral, PublicKeyToken=71e9bce111e9429c" />
<add connectionStringName="SQLConnectionString" applicationName="/" description="Stores and retrieves roles from SQL Server" name="SQLRoleManager" type="System.Web.Security.SqlRoleProvider, System.Web, Version=2.0.3600.0, Culture=neutral, PublicKeyToken=b03f5f7f11d50a3a" />
</providers>
</roleManager>
<membership defaultProvider="i">
<providers>
<add name="i" type="Microsoft.SharePoint.Administration.Claims.SPClaimsAuthMembershipProvider, Microsoft.SharePoint, Version=14.0.0.0, Culture=neutral, PublicKeyToken=71e9bce111e9429c" />
<add connectionStringName="SQLConnectionString" passwordAttemptWindow="5" enablePasswordRetrieval="false" enablePasswordReset="false" requiresQuestionAndAnswer="true" applicationName="/" requiresUniqueEmail="true" passwordFormat="Hashed" description="Stores and Retrieves membership data from SQL Server" name="SQLMembershipProvider" type="System.Web.Security.SqlMembershipProvider, System.Web, Version=2.0.3600.0, Culture=neutral, PublicKeyToken=b03f5f7f11d50a3a" />
</providers>
</membership>
</system.web>
<!-- FBA CONFIG ENDS -->
NOTE: ensure that you have taken the backup of the web.config file before making changes.
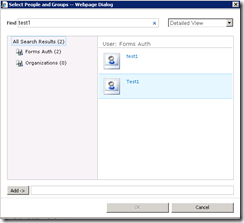
Now go ahead and add a user by going to User Policy ribbon option in the Web Applications Management page having selected the web application. Hit Add Users in the Policy for Web Application dialog. Use the Browse button in the Choose Users people picker control. You will now see sections like Active Directory, All Users, Forms Auth & Organizations. When you search for users, it would now tell you if its AD or Forms Auth as seen below.
Add the user to the site and browse to the site. You should be able to successfully login to the site.
Hope this helps!!!
Comments
Anonymous
August 09, 2010
Hi, Thanks for a good article, however i have one "small" problem after i have done the things you decribe. I can't see any of the users i have created in the SQLdb in the peoplepicker ?. do you have any suggestions ? br. LarsAnonymous
August 09, 2010
Hi Lars, I suspect you might have missed on the connection string, please check the same and also check if you are you able to add the users from the Central Admin --> Users Policy? Do you see the users when you directly query the SQLDB? If not, then there could be some other issue. Try taking a backup and restore it again and then check.Anonymous
August 09, 2010
Hi, thanks for your reply I can see the users then i open the SQL Management studio ?. is there any way i can check from sharepoint that my connection is vaild or see some kind of errormsg LarsAnonymous
August 09, 2010
Check if you are able to add user from the Central Admin site under User Policy for the FBA web application? If yes, then the connection is correctly configured. If not, the web.config file is not correctly configured.Anonymous
August 09, 2010
When i try to add users from central admin from the peoplepicker find only get 3 groups 1) All users (SqlMemberShipProvider) 2) All Authenticated uers, 3) all users (windows) but the Forms auth(0) don't include any users ?Anonymous
August 09, 2010
what happens when you try to add the user, are you able to pull the user from the SQL? if not check the permission onthe SQL db? Does the app pool running has the necessary permission?Anonymous
August 09, 2010
Hi I found a solution :) in the peoplepickerwildcards was missing <add key="SQLMembershipProvider" value="%" /> Thank you again for you input Br LarsAnonymous
August 09, 2010
thanks DhirajM, im very beginner in sharepoint. my english is bad, excuseme with these ability, Claims-Based, Can internet users inter and register new username & password? when you set configuration, When and Where users register? How do you sign in? thank you so much, im very beginner in sharepoint.Anonymous
November 17, 2010
Hi DhirajM We are using claimbased authentication for a dual zone sharepoint site. Windows in the edit zone and forms in the public zone. But we have trouble to access forms users in the windows zone. Providers and connection strings are added to the webconfig, but we are unable to select forms users in windows zone. We got the forms users working in central administration, I think this is because this is not using Claimbased Authentication. Do you have an idea what we are doing wrong? Best regards ChristianAnonymous
November 17, 2010
@ v.ash: You can have internet users register with a new username and password, but this can be done only use custom page that will write in the database and create users. Following this blogs, you will not be able to create users. You will have to create users in the database and then users from the database will be able to access the FBA site.Anonymous
November 18, 2010
@Christian: I am not quite sure i understand : Windows in the edit zone and forms in the public zone? Does it mean that you have 2 zone: windows and Forms and both uses claims. I believe that you are able to add users using Forms site, for adding users in Windows, you need to typically something like ldapmembership:username Hope that helps.Anonymous
December 08, 2010
The comment has been removedAnonymous
December 06, 2011
Hi Dhiraj, Thank you very much for a nice article. You have mentioned each and every step clearly. It was of great help and very easy to configure. Regards, VikramAnonymous
April 28, 2014
I have done all settings as you mentioned in the blog, but still i am not getting the db users in User Policy of web application in central admin. please suggestAnonymous
April 28, 2014
Hello Xyz, If you are not able to pull the users in the Policy for web application in the Central Admin site, then you might want to look at :
- the correct web.config for the web site. Check if its extended site.
- Check the settings you entered in the web.config as mentioned in the above blog. There are 2 places where you need to add the snippet provided : Place the below snippet between </SharePoint> & <system.web> in the web.config Place this between <machineKey validationKey… /> & </system.web>
- Also, not sure if you are configuring this for SPS 2010 or SPS 2013. Hope this helps!
