Getting started with Java Azure Function Apps
Introduction
I had a great opportunity to work with a partner to pilot the use of Java Azure Functions for a Java based PDF report generator. I'm more of a C#/.NET, C++, and Python dev and my partner mostly builds on LAMP bar the Java Based PDF generator, so day to day is not Java Development.
If this sounds like you and Java dev is not your core then read on as this post augments existing documentation for the preview of Java based Azure Functions and may save you time.
The beta inclusion of Java joins Azure Functions' existing support of JavaScript, C#, F#, Python, PHP, Bash, Batch, and PowerShell to the Azure Function App Serverless model.
Resources to get started
The following are useful resources to get started.
- Announcing the preview of Java support for Azure Functions
- Azure Functions Java developer guide
- Create your first function with Java and Maven (Preview)
- Microsoft Azure Functions for Java (JavaOne Demo)
What to install
Everything listed here will install cross platform – Windows, Linux and MacOS and is free of charge.
- Dot Net Core 2.0
- Zulu 8.0 (openjdk version "1.8.0_144"). Don't be tempted as I was to install version 9. It will not work.
- Azure CLI 2.0
- Azure Functions Core 2.0 Tools (npm install -g azure-functions-core-tools@core)
- Installation on my Ubuntu 16.04 system failed. After much research I ran "npm config set unsafe-perm true", then was able to successfully install the Azure Function Core 2.0 Tools
- Apache Maven, version 3.0 or above
- Node.js, version 8.6 or higher.
- Optional
Environment Variable Setup
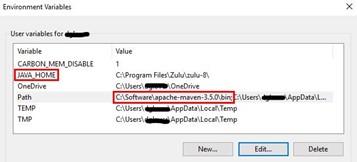
You need to add the following Environment Variables to your system
JAVA_HOME that points to your Zulu 8.0 installation
Update your Path variable to include the directory of your Apache Maven installation eg C:\Software\apache-maven-3.5.0\bin
On Windows press Start then type Environment and run "Edit System Environment Variables

On Linux, edit the /etc/environment file, update PATH and add JAVA_HOME variable and reboot.

Creating your first Project
- Create your first HTTP Triggered Function by following the example at Create your first function with Java and Maven (Preview)
- Add another Azure Function trigger with the mvn azure-functions:add command.
Run the "mvn azure-functions:add" command from your functions directory. |
|
Select the trigger type. In this case 2 for a Storage Queue Trigger |
|
Open up your Java IDE of choice in this case Visual Studio Code with the Java Expansion Pack Extension. |
|
Add the StorageQueueConnectionString to the local.settings.json |
|
Build the solution with the MVN Package. In this case I ran from the Terminal windows in Visual Studio Code. |
|
Now start up the function locally by running mvn azure-functions:run |
|
Debugging
Follow notes in the Create your first function with Java and Maven (Preview) to debug from Visual Studio Code. You can step through your Java code, inspect the state of variables etc.

Deploying to Azure
Follow notes in the Create your first function with Java and Maven (Preview)
But in summary
- Package up the app with "mvn azure-functions:package"
- Authenticate with your Azure Subscription with "az login"
- Deploy the app with "mvn azure-functions:deploy"
Useful MVN (Maven) Commands
Build Maven Package |
mvn package |
Run maven Function App |
mvn azure-functions:run |
Package ready for deployment to Azure |
mvn azure-functions:package |
Deploy Package to Azure |
az login mvn azure-functions:deploy |
Add new Azure Function App Trigger |
mvn azure-functions:add
|


