How to customize the Word 2007 backstage menu using a Shared COM Add-in – Visual Studio 2008 SP1
The new Microsoft Office Fluent user interface (UI) for Office 2007 and 2010 replaces the old 2003 interface with layered menus, toolbars, and task panes with a simpler system optimized for efficiency and discoverability. The new Fluent UI has improved context menus, Enhanced ScreenTips, a Mini toolbar, and keyboard shortcuts that help to improve user efficiency and productivity.
You can customize the Fluent UI through a combination of XML markup and any Microsoft .NET Framework–based language that is supported in Microsoft Visual Studio.
The Fluent UI can also be customized using Microsoft Visual Basic for Applications (VBA), Microsoft Visual C++ , and Microsoft Visual Basic 6.0.
Available choices for extensible markup language (XML) customization.
Because XML is plain text, you can create customization files in any text editor, which simplifies work with the Fluent UI. You can also reuse custom Fluent UI files with a minimum of adjustments because each application uses the same programming model.
You can create a custom application-level Fluent UI for Word 2007 / 2010, Excel 2007 / 2010, PowerPoint 2007 / 2010, Outlook 2007 / 2010 in the following ways:
> using COM add-ins in managed or unmanaged code:
- you can either use VSTO add-ins (Start Visual Studio > selectthe File menu> New Project > from the Project Types window, select a programming language > expand Office tree > select the application version > choose from either an application level add-in (DLL) or document level add-in (template file specific for each Office component);
-- Application level add-ins --
https://msdn.microsoft.com/en-us/library/bb386164(VS.90).aspx (Word Application-Level Add-in Development);
https://msdn.microsoft.com/en-us/library/ms165620(VS.80).aspx (Create an Application-Level Add-In to Automate Common Office Tasks);
https://msdn.microsoft.com/en-us/library/ms268878(VS.80).aspx (Getting Started Programming Application-Level Add-ins);
https://msdn.microsoft.com/en-us/library/aa942955.aspx (Walkthrough: Creating a Custom Tab by Using Ribbon XML);
https://msdn.microsoft.com/en-us/library/ms269007(VS.80).aspx (Deploying Application-Level Add-ins);
Deploying an application-level add-in created by using Visual Studio Tools for Office generally means working with the following files:
|
-- Document level add-ins --
https://msdn.microsoft.com/en-us/library/zcfbd2sk.aspx (Architecture of Document-Level Customizations);
When you use the Office developer tools in Visual Studio to build a document-level customization, you create a managed code assembly that is associated with a specific document. A document or workbook with a linked assembly is said to have managed code extensions. F When a user opens the document, the assembly is loaded by the Microsoft Office application. After the assembly is loaded, the customization can respond to events while the document is open. The customization can also call into the object model to automate and extend the application while the document is open, and it can use any of the classes in the .NET Framework. …….. Excel Excel workbook (.xlsx), Excel macro-enabled workbook (.xlsm) Excel binary workbook (.xlsb) Excel 97-2003 workbook (.xls) Excel template (.xltx) Excel macro-enabled template (.xltm) Excel 97-2003 template (.xlt) Word Word document (.docx) Word macro-enabled document (.docm) Word 97-2003 document (.doc) Word template (.dotx) Word macro-enabled template (.dotm) Word 97-2003 template (.dot) |
- or Shared COM add-ins
https://msdn.microsoft.com/en-us/library/ms165620(VS.80).aspx(Visual Studio Add-ins Versus Shared Add-ins);
A single Shared add-in can be loaded only into Microsoft Office applications such as Microsoft Word, Microsoft Publisher, Microsoft Visio, and Microsoft Excel. |
https://msdn.microsoft.com/en-us/library/aa289518(VS.71).aspx (Tips and Tricks: Building Microsoft Office Add-ins with Visual C# .NET and Visual Basic .NET – because the same .DLL file is loaded for every targeted Office application, you need to determine which one is running in that instance: read this article to learn how do it)
https://support.microsoft.com/kb/302901 (How to build an Office COM add-in by using Visual C# .NET);
> using application-specific add-ins, such as .ppam and .xlam files
> using templates (.dotm files) in Word 2007
https://msdn.microsoft.com/en-us/library/ee390805(office.11).aspx(Display and Hide Tabs, Groups, and Controls on the Microsoft Office Ribbon (Part 1 of 2));
https://msdn.microsoft.com/en-us/library/ee633442(office.11).aspx (Display and Hide Tabs, Groups, and Controls on the Microsoft Office Ribbon (Part 2 of 2));
Building a Word 2007 Shared COM add-in using Visual Studio 2008 with a custom ‘Office menu’ tab.
1. Create the add-in project
Open Visual Studio and create a new project: go to Other Project Types and find Extensibility. Select Shared Add-in type in a name and click OK.
The wizard will create the project and its setup package…
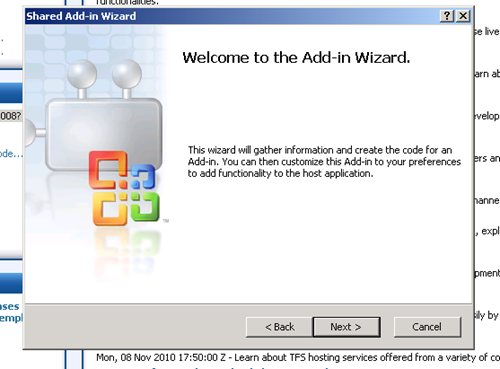
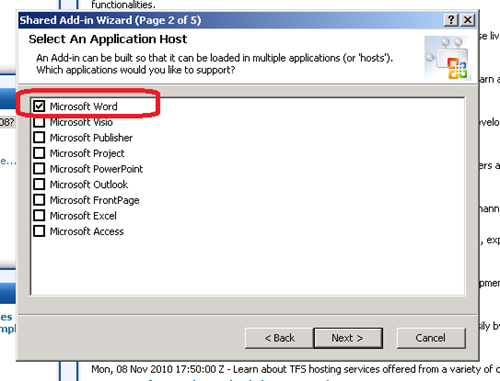
In the first screen of the Shared Add-in Wizard, click Next > select "Create an Add-in using Visual C# " , and then click Next > clear all of the selections except Microsoft Word and then click Next > type a Name and Description for the add-in, and then click Next > in the Choose Add-in Options screen, select "I would like my Add-in to load when the host application loads" and “My add-in should be available to all users… ”.
Once the completed, you will get a project structure like this one.
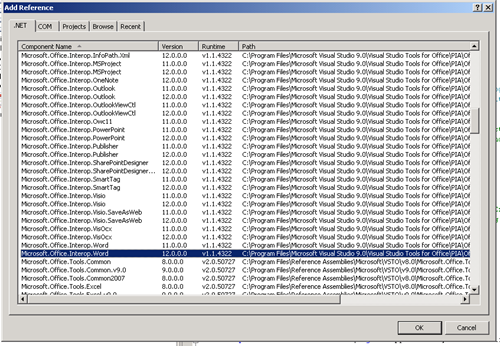
Now you need to add a reference to the Word object model: in the Solution Explorer, right-click References, and then click Add Reference (if References folder is not visible, go to the Project menu and then select Show All Files).
On the .NET tab select Microsoft.Office.Interop.Word, and then click OK.
On the .NET tab select System.Windows.Forms, and then click OK.
From the COM tab select Microsoft Office 12.0 Object Library, and then click OK.
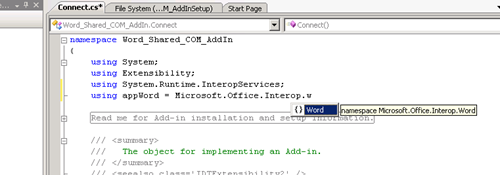
Double click the Connect.cs file from the Project explorer and add these lines:
using System.Reflection;
using Microsoft.Office.Core;
using System.IO;
using System.Xml;
using Extensibility;
using System.Runtime.InteropServices;
using appword = Microsoft.Office.Interop.Word;
using System.Windows.Forms;
Now we need to add the XML customization file as an embedded resource into our project:
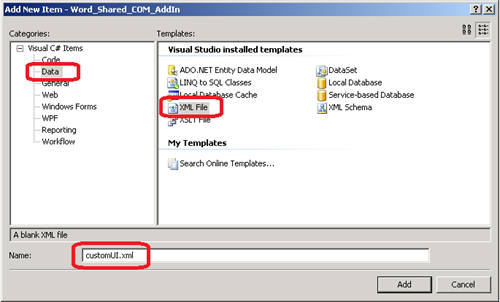
In the Solution Explorer, right-click Word_Shared_COM_AddIn, select Add from the context menu, and click New Item.
Navigate to Data > XML File > type in a name (customUI.xml for example) > click Add.
Paste this code into the customUI.xml file:
<customUI xmlns=" https://schemas.microsoft.com/office/2006/01/customui" xmlns:x="Word_Shared_COM_AddIn.Connect" onLoad="OnRibbonLoaded" loadImage="GetImage"> <ribbon> <officeMenu> <menu id="menu" label="mySampleTab" imageMso="FileOpen" insertAfterMso="FileSaveAsMenu" itemSize="large"> <button id="button" imageMso="HappyFace" label="Split Button" onAction="button1"/> <menuSeparator id="separator1"/> <button id="button1" label="Button 1" onAction="button2"/> <button id="button2" label="Button 2" onAction="button3"/> </menu> </officeMenu> </ribbon> </customUI> |
Note: as the article https://msdn.microsoft.com/en-us/library/aa722523.aspx (Customizing the 2007 Office Fluent Ribbon for Developers (Part 3 of 3)) describes, to avoid conflicts between your add-in and other existing COM add-ins, which may want to add customizations to the same tab, you need to uniquely identify your add-in:
..in our case xmlns:x="Word_Shared_COM_AddIn.Connect"
<customUI xmlns="https://schemas.microsoft.com/office/2006/01/customui" xmlns:x="Word_Shared_COM_AddIn.Connect" onLoad="OnRibbonLoaded" loadImage="GetImage">
If you use a COM add-in to customize the Fluent UI, the namespace name must be the ProgID of the COM add-in, but the behavior is otherwise the same. When you use a shared add-in, the ProgID is AddInName.Connect. When you use Microsoft Visual Studio 2005 Tools for the 2007 Microsoft Office System (Visual Studio 2005 Tools for Office Second Edition) to create the add-in, the ProgID is the name of the add-in. |
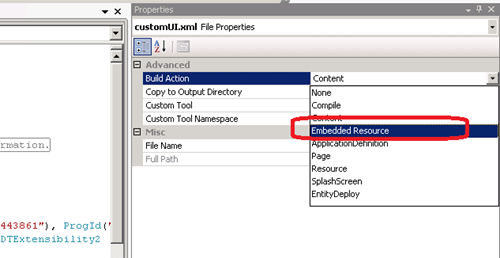
In the Solution Explorer, right-click customUI.xml, and then select Properties > select Build Action, and then from the scroll down menu select Embedded Resource.
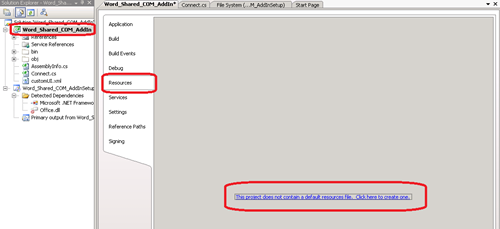
Next we need to add the XML customization file as an embedded resource in the project: select the Solution Explorer, right-click the Add-in project > go to Properties > click Resources > on the right-hand side, select “This project does not contain a default resources file. Click here to create one”.
Drag’n drop the customUI.xml file from the Project explorer onto the Resources window. Save and close it.
Adding the source code.
We need to implement the IRibbonExtensibility interface: in the Solution Explorer, right-click Connect.cs, and click View Code.
Scroll until you get to these declarations:
private object applicationObject;
private object addInInstance;
We need to modify the first declaration to create a reference to the Word application object:
private appWord.Application applicationObject;
Note: when building a Shared add-in targeting multiple Office programs you need to check which one is running: https://msdn.microsoft.com/en-us/library/aa289518(VS.71).aspx (Tips and Tricks: Building Microsoft Office Add-ins with Visual C# .NET and Visual Basic .NET);
Add the following line to the OnConnection method. This creates an instance of the Application object:
applicationObject =(appWord.Application)application;
In order to load our XML customization at runtime we need to implement the GetCustomUI method.
https://msdn.microsoft.com/en-us/library/aa338202(office.12).aspx
When the add-in loads, the IDTExtensibility2::OnConnection event is triggered, which initializes the add-in, just as in previous versions of Office. Next, Office calls either the QueryInterface method (for unmanaged add-ins) or the QueryService method (for managed add-ins), which determines whether the add-in implements the IRibbonExtensibility interface. If it does, Office calls the IRibbonExtensibility::GetCustomUI method, which returns the XML markup (from an XML customization file or from XML markup embedded in the procedure), and then Office loads the customized Fluent UI into the application. Finally, the customized UI is ready for the user. Warning: Because of the internal architecture of the Ribbon callback mechanism, it is important that you perform no initialization within the GetCustomUI method other than preparing and returning the XML markup for the Ribbon. Specifically, do not display dialog boxes or message windows from within this callback method. |
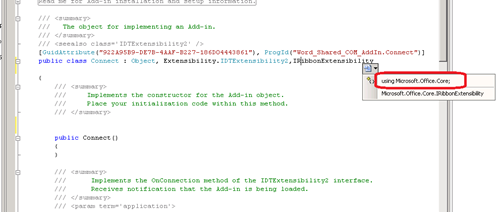
At the end of the public class Connect statement, add a comma, and then type IRibbonExtensibility > right-click, point to Implement Interface, and then click Implement Interface Explicitly.
This adds a stub for the only IRibbonExtensibility interface member: GetCustomUI. The implemented method looks like this:
string IRibbonExtensibility.GetCustomUI(string RibbonID)
{
return Properties.Resources.customUI;
}
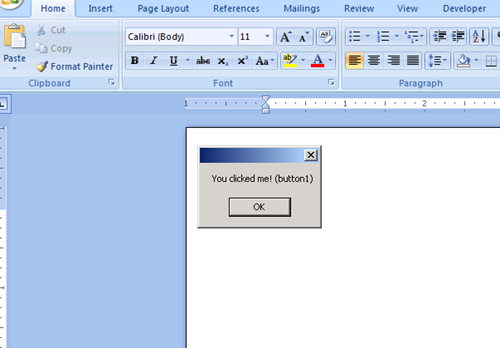
At this point we can add some functionality to our buttons: these callback functions are executed because they were defined in our XML file.
<button id="button" imageMso="HappyFace" label="Split Button" onAction="button1"/>
<menuSeparator id="separator1"/>
<button id="button1" label="Button 1" onAction="button2"/>
<button id="button2" label="Button 2" onAction="button3"/>
Note: You must define these methods as PUBLIC and they must contain an IRibbonControl argument.
Debugging the code.
Set the Add-in project to Release and build it (Project menu, click Build Solution). Before beginning, make sure that Word is closed.
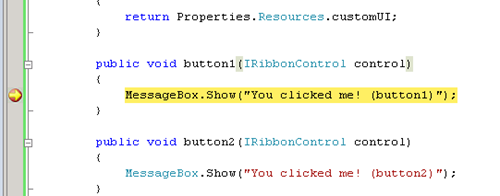
If you did something wrong, you might not see the customized Ribbon UI, so you’ll need to put a break-point in the code to check what’s happening.
Because of the particular loading behavior of Shared COM add-ins, you’ll have to manually register your project. Then, later after you finalize your solution, you can simply build the setup project and deploy it.
To make Visual Studio load Word when you debug your program, right click the add-in solution, go to Properties > select Debug > click the Start External Program radio button > browse to WinWord.exe.
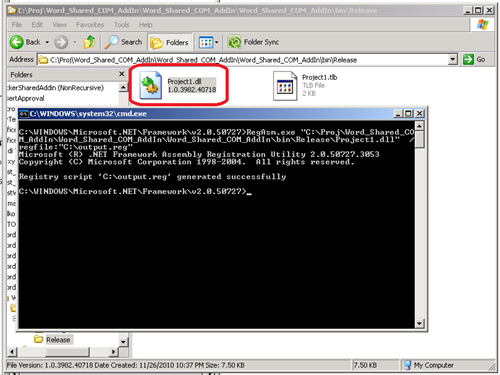
Then, you need to open a command prompt as administrator > run the following command to generate the registry information and replace FilePath with the path of the DLL.
C:\windows\microsoft.net\framework\v2.0.50727\regasm.exe “[path to your DLL – the one from Release folder ]” /regfile: “C:\output.reg”
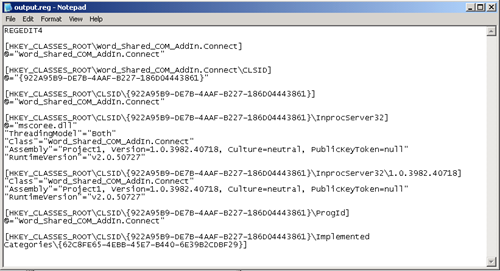
Find the output file (example C:\output.reg), open it and examine the contents:
[HKEY_CLASSES_ROOT\Word_Shared_COM_AddIn.Connect]
@="Word_Shared_COM_AddIn.Connect"
[HKEY_CLASSES_ROOT\Word_Shared_COM_AddIn.Connect\CLSID]
@="{922A95B9-DE7B-4AAF-B227-186D04443861}"
[HKEY_CLASSES_ROOT\CLSID\{922A95B9-DE7B-4AAF-B227-186D04443861}]
@="Word_Shared_COM_AddIn.Connect"
[HKEY_CLASSES_ROOT\CLSID\{922A95B9-DE7B-4AAF-B227-186D04443861}\InprocServer32]
@="mscoree.dll"
"ThreadingModel"="Both"
"Class"="Word_Shared_COM_AddIn.Connect"
"Assembly"="Project1, Version=1.0.3982.40718, Culture=neutral, PublicKeyToken=null"
"RuntimeVersion"="v2.0.50727"
[HKEY_CLASSES_ROOT\CLSID\{922A95B9-DE7B-4AAF-B227-186D04443861}\InprocServer32\1.0.3982.40718]
"Class"="Word_Shared_COM_AddIn.Connect"
"Assembly"="Project1, Version=1.0.3982.40718, Culture=neutral, PublicKeyToken=null"
"RuntimeVersion"="v2.0.50727"
[HKEY_CLASSES_ROOT\CLSID\{922A95B9-DE7B-4AAF-B227-186D04443861}\ProgId]
@="Word_Shared_COM_AddIn.Connect"
[HKEY_CLASSES_ROOT\CLSID\{922A95B9-DE7B-4AAF-B227-186D04443861}\Implemented Categories\{62C8FE65-4EBB-45E7-B440-6E39B2CDBF29}]
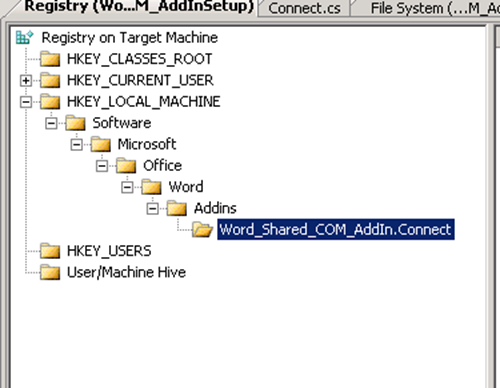
For your add-in to load, you need to add this registry key into the Office hive:
You can add the command that creates it to the .REG file you obtained before and then double-click it to deploy.
[HKEY_CLASSES_ROOT\Word_Shared_COM_AddIn.Connect]
@="Word_Shared_COM_AddIn.Connect"
[HKEY_CLASSES_ROOT\Word_Shared_COM_AddIn.Connect\CLSID]
@="{922A95B9-DE7B-4AAF-B227-186D04443861}"
[HKEY_CLASSES_ROOT\CLSID\{922A95B9-DE7B-4AAF-B227-186D04443861}]
@="Word_Shared_COM_AddIn.Connect"
[HKEY_CLASSES_ROOT\CLSID\{922A95B9-DE7B-4AAF-B227-186D04443861}\InprocServer32]
@="mscoree.dll"
"ThreadingModel"="Both"
"Class"="Word_Shared_COM_AddIn.Connect"
"Assembly"="Project1, Version=1.0.3982.40718, Culture=neutral, PublicKeyToken=null"
"RuntimeVersion"="v2.0.50727"
[HKEY_CLASSES_ROOT\CLSID\{922A95B9-DE7B-4AAF-B227-186D04443861}\InprocServer32\1.0.3982.40718]
"Class"="Word_Shared_COM_AddIn.Connect"
"Assembly"="Project1, Version=1.0.3982.40718, Culture=neutral, PublicKeyToken=null"
"RuntimeVersion"="v2.0.50727"
[HKEY_CLASSES_ROOT\CLSID\{922A95B9-DE7B-4AAF-B227-186D04443861}\ProgId]
@="Word_Shared_COM_AddIn.Connect"
[HKEY_CLASSES_ROOT\CLSID\{922A95B9-DE7B-4AAF-B227-186D04443861}\Implemented Categories\{62C8FE65-4EBB-45E7-B440-6E39B2CDBF29}]
[HKEY_LOCAL_MACHINE\SOFTWARE\Microsoft\Office\Word\Addins\Word_Shared_COM_AddIn.Connect]
"FriendlyName"="Word_Shared_COM_AddIn"
"Description"="Sample COM add-in - customizing the Word 2007 backstage menu."
"LoadBehavior"=dword:00000003
Read more about the registry structure needed to deploy an add-in here: https://msdn.microsoft.com/en-us/library/bb386106.aspx (Registry Entries for Application-Level Add-Ins);
Now you can run your add-in !!
You can now go to the source code and place a break-point…
The End.
I hope you enjoyed my article.
For any questions, feel free to add a comment or write me at cristib@microsoft.com

