Install SQL Server onto an Azure VM using PowerShell DSC
The Azure marketplace has quite a few prebuilt virtual machines with SQL Server already in them from versions SQL Server 2008R2 to SQL Server 2016. You can also use the BYOL versions to provide your own SQL Server license if you prefer. However, you may still wish to have more control over the installation process such as the SQL Server instance name, install location, installed features, etc. I’ve created a GitHub project here:
https://github.com/perktime/InstallSQLServerByDSCForAzure
These ARM templates will create a new base Windows VM using an Azure marketplace image, domain join the VM into an existing Windows AD domain and use PowerShell DSC to install SQL Server from Azure Files.
The DSC uses the xSQLServer PowerShell module from here: https://github.com/PowerShell/xSQLServer where you will also find additional documentation. Also note that currently not all potential parameters for SQL Server setup are implemented in the ARM template. You could either add them yourself to the ARM templates and SQLInstall.ps1 file or let me know and I might update ![]()
Prerequisites
Before you can use this solution, you will need to create a storage account (or use an existing one) and enable Azure Files for it.
1) Go to the Azure portal and create a new storage account:
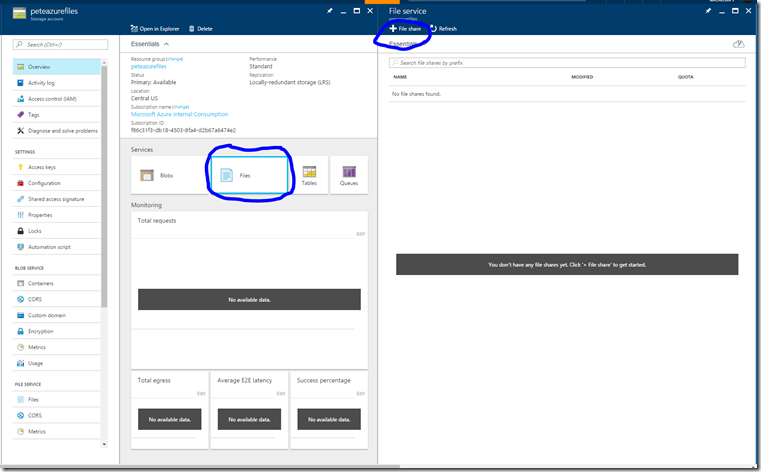
2) Once the storage account is done creating, you will need to create a file share for it. Click Files and then click “+ File Share”
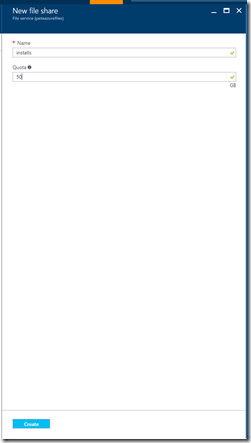
3) Supply a name and a quota and click Create
4) You will then need to download a version of SQL Server, create a folder for it in Azure Files and copy the SQL Server install files into that folder. You may find it quickest to do this right from an existing Azure VM in the same region to access the Microsoft VLSC site or MSDN or download a copy of SQL Server Developer Edition here: https://www.microsoft.com/en-us/sql-server/sql-server-editions-developers. Note that if you get the ISO, you will need to extract the files out of the ISO as this template currently does not support directly installing from the ISO.
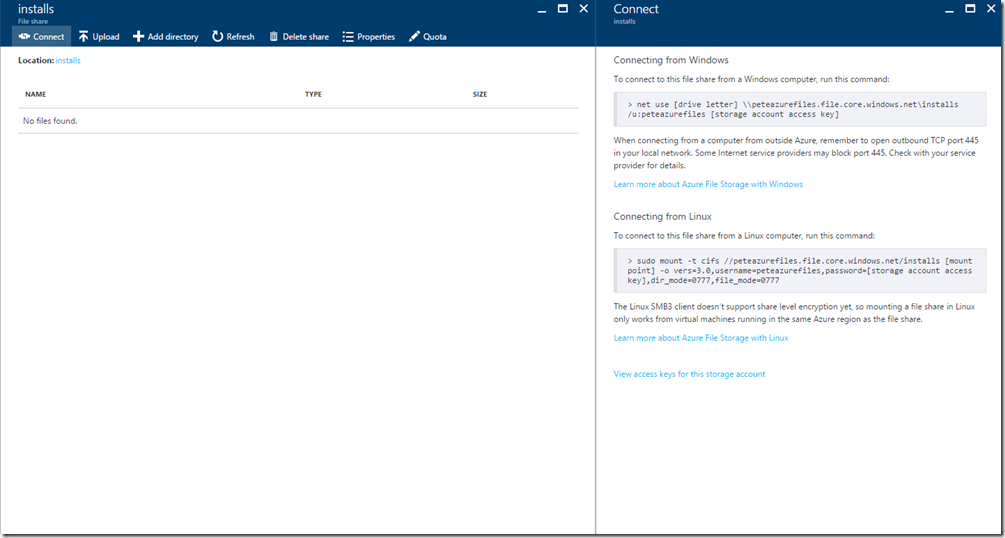
5) You will need to take note of the access key for this storage account as well as the Azure Files URL so that you can supply them to the azuredeploy.parameters.json file. If you click “Connect” on the file share, you can see the Azure Files UNC path as well as click the link for the access keys:
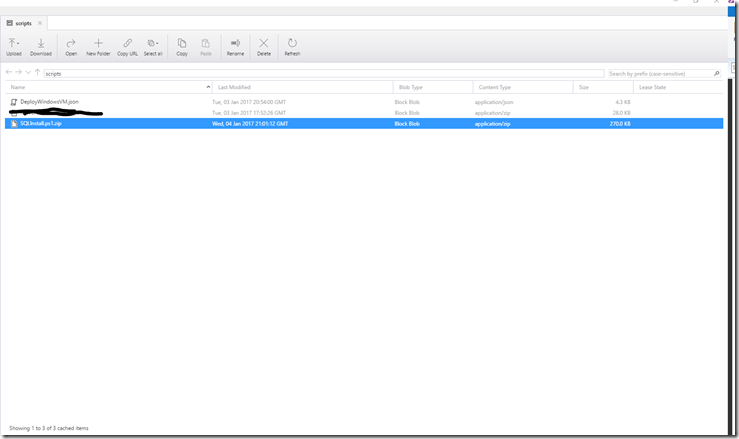
6) Next, you will need to copy the SQLinstall.ps1.zip and DeployWindowsVM.json files into your Azure Blob storage account (note: not in Azure Files). Using a tool like Azure Storage Explorer, copy these 2 files into a blob container that has public read access enabled:
Updating the azuredeploy.parameters.json file
The azuredeploy.parameters.json file has a number of parameters that you will need to update such as:
vmName: The computer name of the VM
vmSize: The desired Azure VM size and series. It is recommended that you use a series that supports SSD storage such as DS, GS or FS.
assetLocation: The location in Azure blob storage where the SQLInstall.ps1.zip and DeployWindowsVM.json are deployed into an Azure blob storage container with public read access.
AdminUserName: The local Windows administrator account
AdminPassword: The local Windows administrator account password
DomainUserName: The domain username that has domain join permissions
DomainPassword: The domain user’s password
existingDomainName: The name of the Windows domain you will be joining
existingOUPath (optional) : The OU where you want the computer account placed in Active Directory
existingVirtualNetworkName: The existing Azure virtual network where this VM will be placed
existingVirtualNetworkResourceGroup: The existing Azure virtual network resource group
storageAccountUri: The existing Azure blob storage account for this VM’s disks. Premium storage is recommended for SQL Server
bootdiagnosticsstorageAccountUri: The existing Azure blob storage account for boot diagnostics. Must be standard storage
windowsOSVersion: The version of Windows Server to use for the VM. Note that not all versions of SQL Server may be supported on all versions of Windows Server
subnetName: The existing subnet name where this VM will be placed
FileShareUserName: The Azure Files username. It should be the same as the first part of the Azure Files UNC path (e.g. if your Azure Files is \\peteazurefiles.file.core.windows.net then the username would be azurefiles
FileSharePassword: The Azure Files access key.
InstallDir: The folder where the SQL Server files are located (e.g. sql2016). It is not the full path
PackagePath: The path to Azure Files directory where the SQL Server install files are location (e.g. \\\\peteazurefiles.file.core.windows.net\\installs”)
location: The Azure data center location you wish to use
SQLAgentUserName: The domain\username for the SQL Agent account
SQLAgentPassword: The password for the SQL Agent account
SQLSAAccountPassword: The SQL SA Account password
SQLServiceUserName: The domain\username for the SQLService account
SQLServicePassword: The password for the SQLService account
Features: The installed features for SQL Server (SQLENGINE,FULLTEXT). Note that not all versions of SQL Server support the same features.
UpdateSource: This is the location where SQL Server setup searches for product updates. Use “MU” if you want to have SQL Server use Windows Update.
UpdateEnabled: This determines if SQL Server should update itself or not. Can be true or false.
InstallSharedDir: The installation path for shared SQL Files
InstallSharedWOWDir: The installation path for x86 shared SQL files
SQLInstanceName: The name of the SQL Instance
SQLInstanceDir: The installation path for the SQL instance files
SecurityMode: The SQL Security mode (either Windows or SQL). SQL is also known as Mixed Mode
SQLSysAdminAccounts: Array of accounts to be made SQL administrators.
Troubleshooting
In the event that your deployment fails and it’s because of an invalid parameter, Azure may not provide a helpful error message in this case and you may see this:
If this occurs, your best bet is to look at the SQL Server log file (e.g. “C:\Program Files\Microsoft SQL Server\130\Setup Bootstrap\Log\Summary.txt”)


