WINDOWS AZURE HOW-TO - Point-to-Site VPN Walk-Through
I’ll walk you through how to create a Point-to-Site VPN connection from your machine to Windows Azure. I’ll also walkthrough how to connect to your Azure Virtual Machines after the Point-to-Site VPN connection is created.
Let’s begin!
I will refer to Point-to-Site as “P2S” occasionally throughout these steps.
To allow for creating certificates and scripting I recommended using the following technologies:
· Windows 7 or 8
· Windows Server 2012
· Visual Studio 2012
· PowerShell
I like to work from a single directory so I recommend creating one in the root of C: on your local machine.
Options:
· Create manually
· Use Shell script: “MKDIR c:\AzureConnection”
· Use PowerShell: “[IO.Directory]::CreateDirectory("c:\AzureConnection")”
CERTIFICATES
You’ll need to create root and client certificates. The root certificate will be uploaded to Windows Azure during Point-to-Site VPN creation and the client certificate will be installed on all machines that will access the P2S connection.
CERTIFICATION CREATION PROCESS
1. Open a Visual Studio 2012 command prompt
2. Next you’ll need to create a root certificate:
Use the Visual Studio command prompt you opened and copy and paste the following:
· makecert -sky exchange -r -n "CN=Azure-P2S-Root-Cert" -pe -a sha1 -len 2048 -ss My
o Use whatever certificate name you’d like for the root certificate.
3. Next you’ll need to create a client certificate that will be installed on all machines that will access the P2S connection:
Open the Visual Studio cmd prompt, copy and paste the following:
· makecert.exe -n "CN=Client-VPN-Cert" -pe -sky exchange -m 96 -ss My -in "Azure-P2S-Root-Cert" -is my -a sha1
o Use whatever certificate name you’d like for the client certificate.
Now that you have the proper certificates created you’ll need to extract them from the certificate store from the machine where the certificates were created:
1. Open an MMC (Microsoft Management Console),
2. Click File and select Add/Remove Snap-in…
1. Click Certificates and then Add >,
2. Keep My user account selected,
3. Click Finish then click OK
1. Expand Certificates – Current User,
2. Expand the Personal folder,
3. Click the Certificates folder
EXPORTING ROOT CERTIFICATE
1. Right-click on the root certificate you created,
2. Select All Tasks,
3. Select Export…,
Click Next (you won’t need to private key for the root certificate so select No, do not export the private key if not selected by default):
Keep the default DER encoded binary (.CER) selected and click Next:
Browse to the folder (e.g. c:\AzureConnection) you created in the beginning:
Type a file name and click Save the Finish:
EXPORTING CLIENT CERTIFICATE
Now you’ll need to export the client certificate as a “.PFX”:
1. Right-click on the client certificate you created,
2. Select All Tasks,
3. Select Export…,
4. Click Next
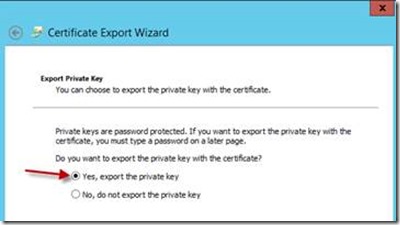
This time you will need to export the private key as well.
5. Select “Yes, export the private key”
6. Make sure “Personal Information Exchange” is selected and that “Include all certificate in the certification path if possible is selected”
7. Click Next
8. Type in a password (required)
9. Click next
10. Browse to the folder (e.g. AzureConnection) you created in the beginning:
11. Type in a file name and click Save then Finish:
ADD CLIENT CERTIFICATES TO MACHINES THAT WILL ACCESS THE P2S VPN CONNECTION
1. Now that you have both certificates created it’s time to install the client certificate on machines that will need access to the Windows Azure Point-to-Site VPN connection. Do this by copying the client certificate to the machine(s) you will allow to access the P2S VPN connection.
2. Once the client certificate is copied navigate to the folder the client certificate was saved in, right-click on the client certificate, and select Install PFX:
Q: What do I do with the root certificate?
A: We’ll work with the root certificate in a later step. J
CREATING A Point-to-Site VPN CONNECTION IN WINDOWS AZURE
1. Navigate to https://manage.windowsazure.com/ and either log into your account or sign up for a trial account.
2. Once you’re logged into Windows Azure you’ll see a variety of options on the left hand navigation. Go ahead and select NETWORKS from the list:
3. Select +NEW at the bottom left hand corner:
4. Select VIRTUAL NETWORK and then CUSTOM CREATE:
5. Under Virtual Network Details type in a name for your virtual network and either create a new affinity group or use an existing one. If you create a new affinity group you’ll need to type in a name as I have below:
6. Click the arrow below to move to the next step:
7. Click the arrow below to move to the next step:
8. Select “Configure point-to-site VPN” and click the arrow below.
To keep it simple I’m using default DNS servers provided by Azure. However if you’d like DNS name resolution from your DNS servers, you’ll have to add your own DNS servers to the fields provided.
DNS Servers
This setting is optional. You can add DNS servers to your virtual network for name resolution. If you want to have name resolution between this virtual network and your on-premises network, you should specify the DNS servers that are used for your on-premises name resolution. You can also specify public DNS servers. If you do not specify a DNS server, name resolution will be provided by Windows Azure.
Quick Tip
Use the IP addresses from the Azure virtual machines (I’ll show you how to do this toward the end) and add local entries to the \etc\hosts file to provide name resolution.
9. Click the arrow below to move to the next step:
10. Configure an address space or use the default:
11. Click the arrow below to move to the next step:
12. Click “add gateway subnet” and either leave default entry or modify:
13. Click the check mark to complete (setting up the network connection will take a few minutes to complete).
UPLOADING THE ROOT CERTIFICATE
Once the Point-2-Site network is created click on the new instance and select certificates:
Remember that root certificate you created and exported in the beginning? Well now is the time to upload it to Azure.
14. Select UPLOAD at the bottom of the screen
15. Browse to the folder created in the beginning (e.g. c:\AzureConnection)
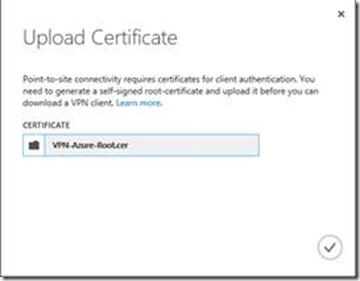
16. Select the root certificate you created and click the check to upload:
Once the root certificate is created you’re ready to establish a Point-to-Site VPN connection from your local machine to Windows Azure.
INSTALLING THE Point-to-Site VPN Connection on your machine(s)
NOTE: Make sure the client certificate is installed on any machine establishing the P2S VPN connection.
1. First you’ll need to log into Windows Azure and download the preconfigured VPN client (clients are offered in 32 bit and 64 bit)
2. From the right menu select NETWORKS and then select the VPN instance you want to work with.
3. Under “quick glance” you’ll see two client VPN download options:
4. Choose a package and download
5. Once the package is downloaded copy it to the machine(s) you’d like to establish a Point-to-Site VPN connections and double click to install.
ESTABLISHING THE Point-to-Site VPN Connection
For this step I’m using Windows 8
1. Click on the networking icon on the task bar:  and choose the name of the Point-to-Site VPN connection you installed and click connect (mine is shown below):
2. Click Connect on the dialog box:
3. Click Continue:
Congratulations! You’ve established a Point-to-Site VPN connection from your local machine to Windows Azure!
ACCESSING AZURE RESOURCES
Accessing Virtual Machines from a Point-to-Site VPN connection
1. To access Virtual Machines, the VMs will need to be associated with the affinity group you created when you created the Point-to-Site VPN connection. To look up the affinity group from Window Azure, navigate to NETWORKS and select the VPN connection you created.
a. IMPORTANT NOTE regarding existing virtual machines:
i. As of the current release you must create new VMs and attach to the VPN affinity group during the Azure VM setup process. Attaching pre-created VMs to a new affinity group is not supported at this time. If you already have VMs created, save the VM disk(s) and recreate the VM using the saved VM disk and add it to the VPN affinity group during the Azure VM setup process.
2. Click DASHBOARD
3. Under “quick glance” look for the AFFINITY GROUP name.
Once a virtual machine is part of the Point-to-Site VPN connections affinity group you’ll need to look up the IP address of the Azure VM to access if from your local machine or modify the etc/host file for rudimentary name resolution (of a DNS sever wasn’t defined).
How to find out what the IP address is for a Windows Azure Virtual Machine
1. Log into Windows Azure
2. From the menu on the right select VIRTUAL MACHINES
3. Select a Virtual Machine
4. Click DASHBOARD
5. Under “quick glance” look for the INTERNAL IP ADDRESS
This concludes the walk-though of creating a Point-to-Site VPN connection with Windows Azure.
ADDITIONAL RESOURCES
Sign up today for a Windows Azure free trial https://www.windowsazure.com/en-us/pricing/free-trial/
Azure Community Blog: https://www.windowsazure.com/en-us/community/blog/
Comments
Anonymous
January 01, 2003
Excellent work!!!Anonymous
January 01, 2003
Well doneAnonymous
January 01, 2003
Thanks. this is very useful. I want to know how many clients (required IP) are connected to the active VPN. is it possible then how? Not required the UI!Anonymous
January 01, 2003
Excellent blog. Loved it.Anonymous
October 21, 2013
Thanks for this write up!Anonymous
November 13, 2013
Excellent Post. Creating the Gateway is missing...Anonymous
November 13, 2013
The comment has been removedAnonymous
November 21, 2013
Hi Courtenay Bernier, Very nice your post, that was very helpful for me thx :) I have a one question, when i'm connected to the VPN Client, why my public IP has not changed? i always have the public ip of my FAI. Thanks KavunAnonymous
November 29, 2013
The comment has been removedAnonymous
April 10, 2014
Great walk-through as long as you are setting up with an administrator account. For security I only regularly use a standard account and the above works fine until you try to install the VPN client at which point I needed to supply the administrator password and subsequently the connection is only visible when logged in as administrator.Anonymous
July 04, 2014
Great instructions, but I wished you'd mentioned the affinity group stuff at the start!!Anonymous
October 31, 2014
Awesome work.. Grand solute..Anonymous
January 19, 2015
Thanks, You saved me a week to figure that out!Anonymous
July 06, 2015
Hi all, this is JJ Streicher-Bremer, Platforms PFE. A long time reader, first time poster.
I was recentlyAnonymous
August 13, 2015
Worked like a charm!Anonymous
June 08, 2016
Excellent after slogging for 2 hrs finally landed at this blog and it worked like a charm.ThanksAnonymous
September 07, 2016
Excellent ArticleAnonymous
September 07, 2016
Excellent Article indeedAnonymous
October 03, 2016
Hi Courtenay,Excellent Post. I have created the Point to Site connection with the help of your post.Thanks a lot.Bhageerath


