Azure Information Protection… a log journey
Azure Information Protection (AIP) provides the ability to protect and classify information. For example, AIP policies can be created and used to classify, label, and protect data from leaking such as credit card numbers, social security numbers, or classify, label, and protect based off key words and so on.
For this post, I will not dive into details about how data protection, classification and labeling work, because there is already plenty of great documentation the teams at Microsoft provide out there on the web. Rather I will focus on logging and reporting. I’ll assume you’re already familiar with AIP or are using it today in some fashion.
If you’re interested in learning more about Azure Information Protection and what it can do for your organization, please visit: https://www.microsoft.com/en-us/cloud-platform/azure-information-protection
Within the Azure Information Protection umbrella we have a service called Azure Rights Management Services (Azure RMS). You’ll hear Azure Information Protection and Azure RMS terms interchanged, however I’ll stick with the term Azure RMS for the next section of the post.
Azure RMS
Azure RMS provides the ability to protect content, whether it’s an email or file. Azure RMS templates which contain content permissions such as blocking printing, forwarding, editing, and much more.
To learn more about Azure RMS please visit: /en-us/information-protection/understand-explore/what-is-azure-rms
I encourage everyone to read through the Azure RMS FAQ as well because it will answer most questions: /en-us/information-protection/get-started/faqs-rms
Assuming you have Azure RMS set up and your users are protecting content, the next stage is to learn about how to access the Azure RMS logs. Log entries are generated as users apply Azure RMS templates files, share protected content with users, and when users attempt to open Azure RMS protected content.
The following link does a very good job at walking through accessing Azure RMS log files: /en-us/information-protection/deploy-use/log-analyze-usage
Once the logs are downloaded using the instructions provided in the previous link, use logparser (described within the link above) to consolidate the logs into a .CSV.
With a .CSV file full of Azure RMS log history we can create reports from it. We can create tables within Excel or use a cloud service such as Microsoft Power BI to import the logs into to create reports and dashboards or utilize Microsoft Log Analytics to upload the logs to create dashboards as well (more on Log Analytics in the next section).
For example, I imported the .CSV file to Power BI and created a report that shows Azure RMS protected documents and who accessed them:
I also created a Power BI report showing who shares the most Azure RMS protected files:
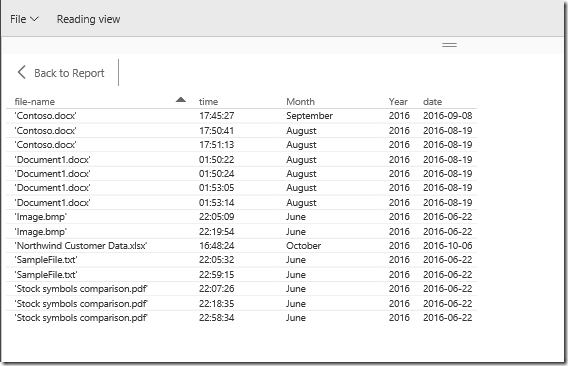
Lastly, I created a report to view when and what files were protected and shared:
The options are endless using services such as Microsoft Power BI and you can get as creative as you’d like with reporting and dashboards.
Classification and Labeling
Classification and Labeling provides users the ability to classify and label content. To learn more about classification and labeling and how to install the client please visit: /en-us/information-protection/understand-explore/what-is-information-protection
I encourage everyone to read through the Azure Information Protection FAQ as well because it will answer most questions: /en-us/information-protection/get-started/faqs-infoprotect
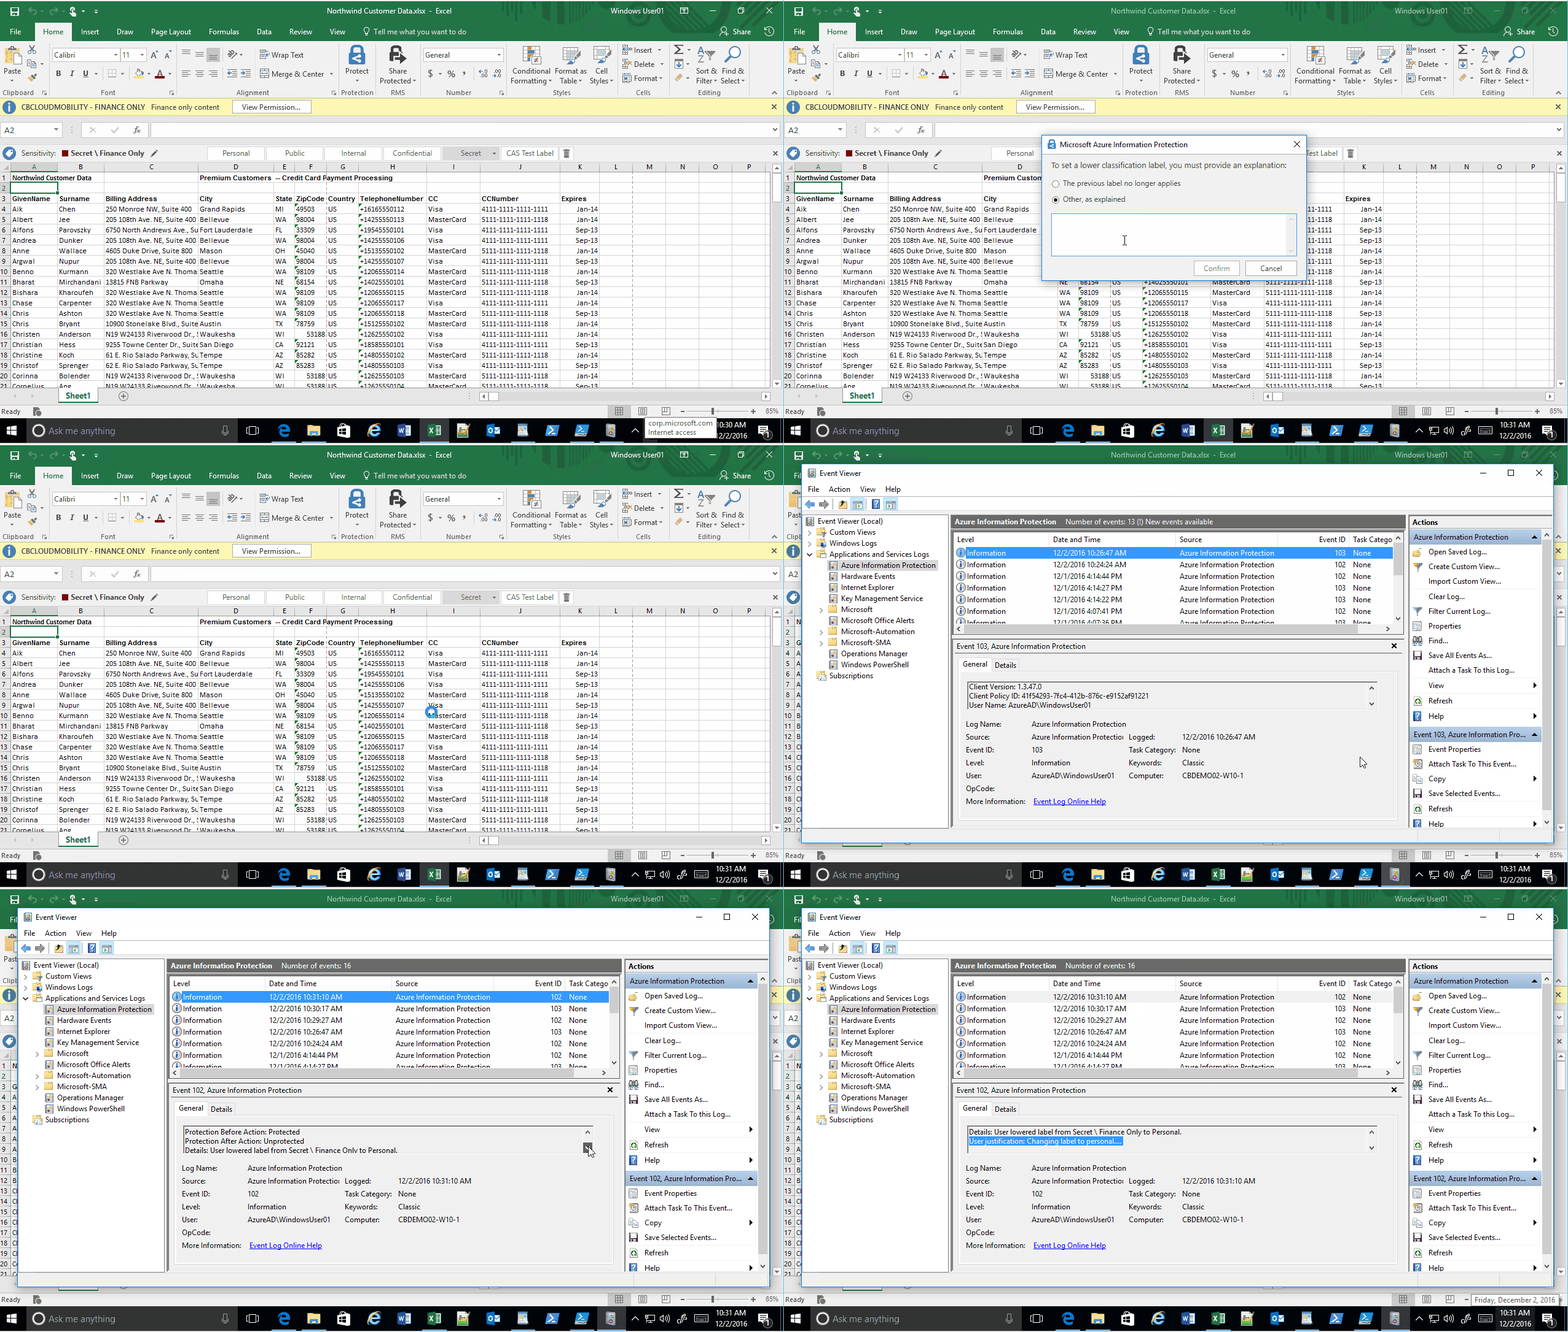
With classification and labeling, logging is localized to the Windows device via event viewer. Logging events occur when a user changes the classification label, for example changing a document labeled as confidential to personal. The classification profile I have configured requires a justification for changing the classification label and that justification is also logged in event viewer. However, having logs localized to a device makes it difficult to create a centralized report typically used for auditing or monitoring purposes. So, we must get creative with centralizing logging and reports for classification.
Microsoft offers a service called Log Analytics (part of the Operations Management Suite or OMS) that will ingest logs from a variety of formats. Log Analytics is similar to a SIEM (Security Information and Event Management) system, some may even call it a SIEM.
To view more details on Log Analytics please visit: https://azure.microsoft.com/en-us/documentation/articles/log-analytics-overview/
Working with Log Analytics
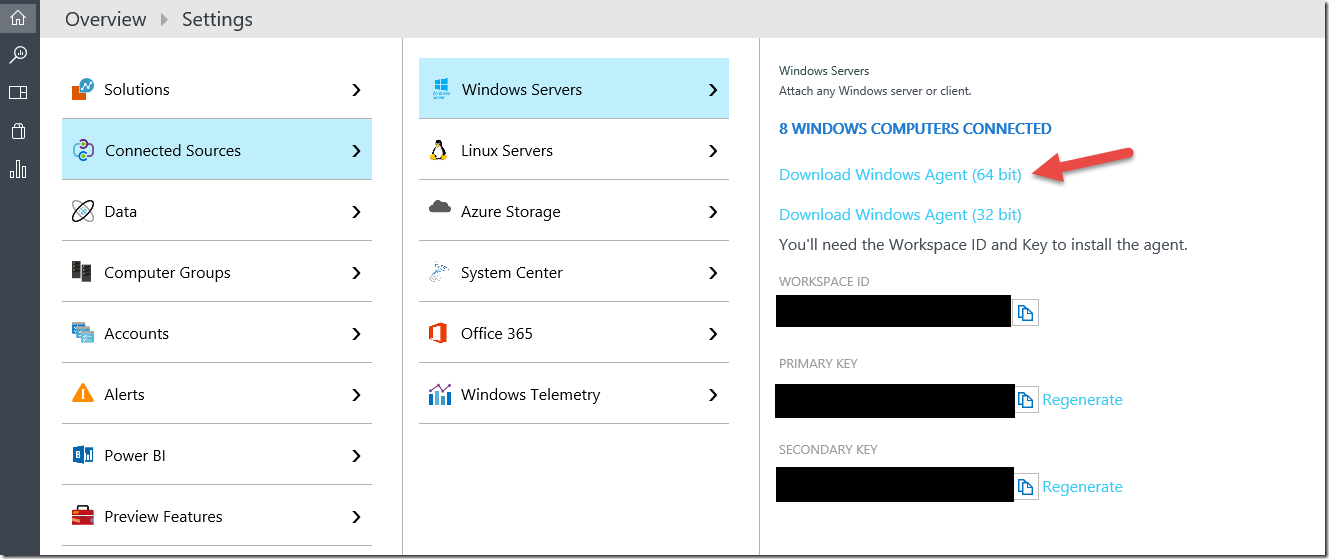
I have a Windows client where I downloaded the Log Analytics agent to (as well as has the Information Protection client installed). To download the Log Analytics agent, sign into https://www.microsoft.com/en-us/cloud-platform/operations-management-suite (create a trial if you don’t already have a subscription) and select the “Settings” cog on the left, then “Connected Sources” and download the version of the agent that aligns to your device (e.g. 32 or 64 bit).
Once the Log Analytics agent is downloaded to the Windows device with the classification client installed, install it and run through the wizard to register the device with the Log Analytics subscription.
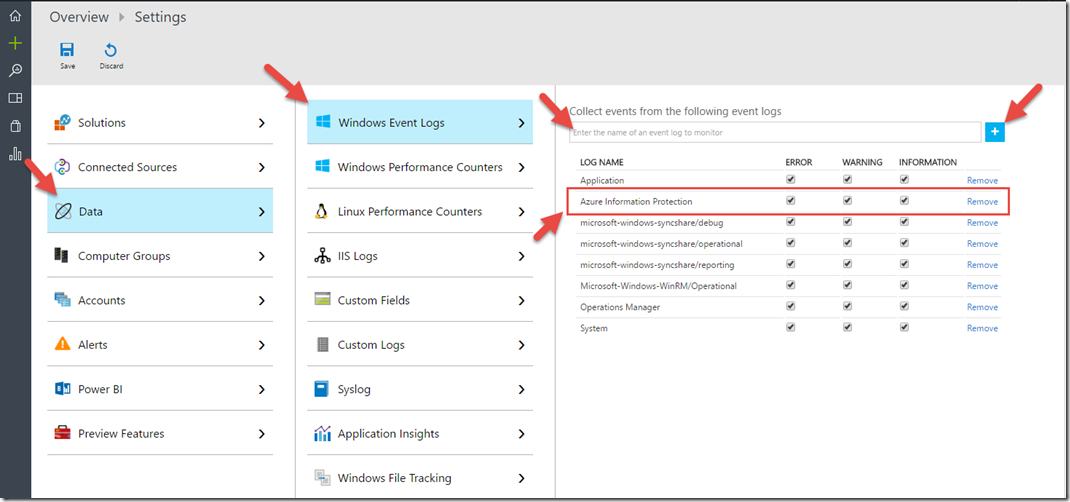
After client installation and registration is complete, within Log Analytics select the “Settings” cog and then select “Data” and “Windows Event Logs”. Add the Windows event logs you wish to monitor using the “+” sign. The “Azure Information Protection” log will contain the Azure Information Protection (classification) events.
Note: past events from Event Viewer will not be sent to Log Analytics, only new events that are created after the Log Analytics agent will. This is important because if there were classification label changes that took place before the Log Analytics agent was installed they will not be sent to Log Analytics, only new events post Log Analytics client install will.
Once the Log Analytics logging configuration is completed, start creating events by changing the classification label in a document. Watch the video below for an example:
December 2016 Update – with the release of the new AIP Client, new event IDs are now logged in Event Viewer as well as other features (updated images below). More details here: https://blogs.technet.microsoft.com/enterprisemobility/2016/12/07/azure-information-protection-december-preview-now-available/
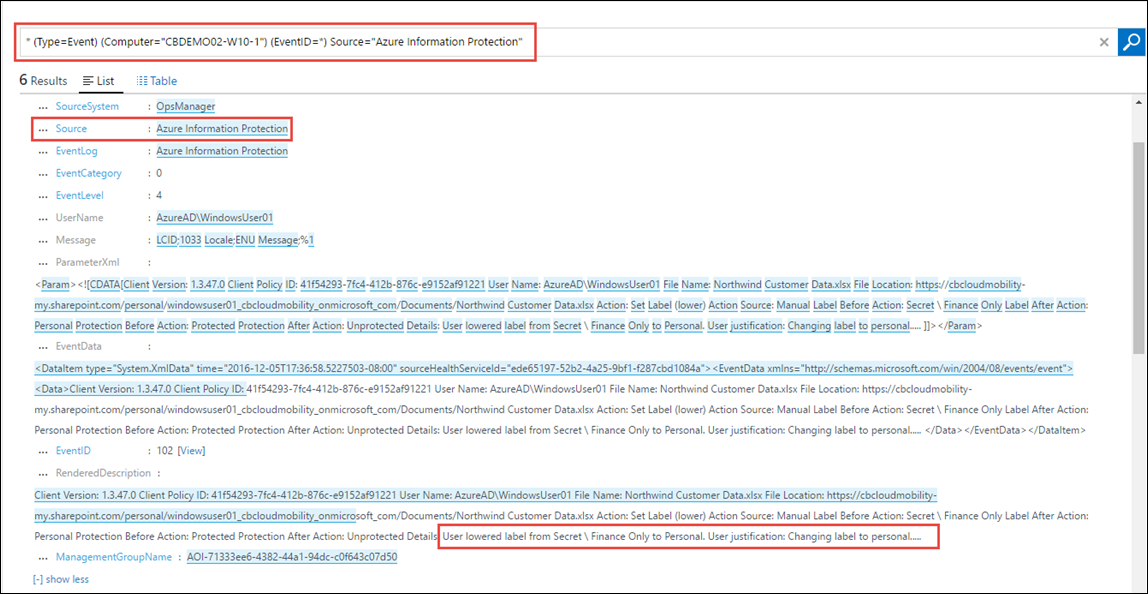
Now that we have logs in event viewer (and the device is connected to Log Analytics), navigate to Log Analytics and query for all Azure Information Protection events as shown below:
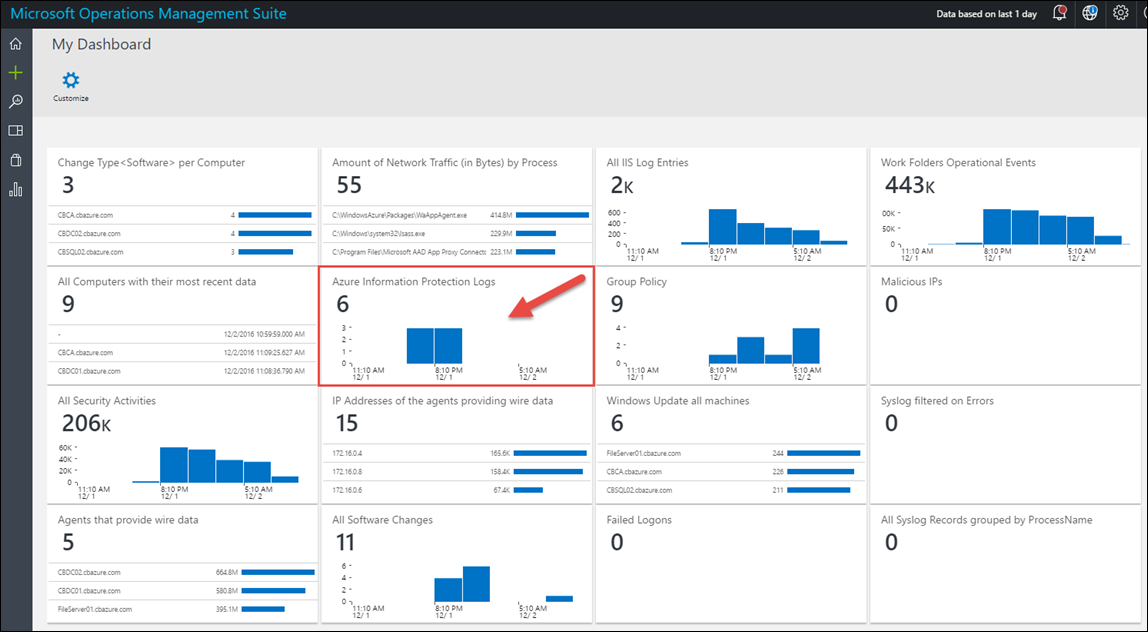
Save the query, give it a name, and add the query to your dashboard for a more real-time view as shown below:
That’s all for now, I hope you find this useful when you’re looking to manage logs that Azure Information Protection creates as well as creating reports and dashboards for visibility and compliance.


