Islands of Richness with Silverlight on an ASP.NET page
While I certainly think there are tons of interesting scenarios for a Silverlight application that takes over the full browser screen, there are also some interesting scenarios for putting Islands of richness on a predominately ASP.NET\HTML page. This could be to display video, show some rich visualization or animation.
In this walk through, I'll walk through using and customize the ASP.NET MediaPlayer control to give you an idea of how to add Video to an ASP.NET website.
In case you just want to skip to the end... here is the completed version.
(update: you'll need the server controls for this project, those should be available in the next couple of weeks.. )
Part 1: The Basic Media Player
1. Create a new ASP.NET WebSite. I called mine "MediaPlayerExample.
2. Create a new directory called "Media" and drop any WMV files you have in there
I am going to use this XBox trailer in the example, but feel free to use whatever you have.
3. Open Default.aspx, add ScriptManager and drag and drop the asp:MediaPlayer
4. using the smarttag on the right on the MediaPlayer control click on the Import Skin hyper link and load in the Expression skin from the Silverlight 2 SDK (note: this is coming out soon, stay toned)
C:\Program Files\Microsoft SDKs\Silverlight\v2.0\Libraries\Server\MediaPlayerSkins
This file contains the set of Xaml that controls the look and feel of the MediaPlayer.. Later we will show how to customize it to get exactly the look you want. Feel free to play with the others and find one you like.
5. Go ahead and set the MediaSource to the WMV file you added to your Media direction, select autoplay.
6. Then in source view, we want make the control a bit bigger, so set it to 640x480
     <asp:MediaPlayer ID="MediaPlayer1" runat="server"
        AutoPlay="True"
        Height="480" Width="640"
        MediaSkinSource="~/Expression.xaml"
        MediaSource="~/Media/sl1.wmv"  />
7. Hit F5, check out the fully working MediaPlayer... full DVD like controls, click to pause, double click for fullscreen, timeline scrubbing, buffering indicator, volume control... very complete!
Part 2: Encoding, Defining Captions and Chapter Markers
OK, that was super easy... let's say you now want to do something a just a bit richer. Maybe put some custom points in the move where the user can seek to easily. For this, we will use Expression Encoder.
1. Open up Expression Encoder and Import your movie
2. Under the Output tab, change the Directory to be the Media directory in your website and turn off Sub-folder by job ID. This makes it much quicker to do round trips during active development.
3. Setting chapter markers
Play the video (or just scrub across the timeline) and add Markers to interesting points in the video using the Markers section under the Metadata tab. Be sure to select the that you want a thumb nail, we will be using that later.
4. Setting the captions
You may want text captions to show up in the video stream during certain sections. The default skins support a particular script command for this called "caption". You will find this section right below Markers in the Metadata tab.
5. Hit encode
6. Back in VS we need to add the chapter markers
First, refresh the project in Solution Explorer to make the thumbnails show up
then in the property grid for MediaPlayer click on chapters
Then simply set up the chapter entries. Notice the name of the image can tell you what position in the stream to use.
7. Hit F5
Notice the captions are showing up... they are being pulled right out of the media stream... As users fast-forward and re-wind, these captions will stay in sync with the video.
In the upper left corner, notice there is a way to show the chapters. Check out the images we are using from the thumbnails they are screens expression encoder pulled right from the video. Click on one of them to go to this point.
Part 3: Customizing the Media Player Skin
OK, it is very cool to see what you can do out of the box, but what if I wanted to customize the skin for the media player. As I mentioned above, this is all defined in Xaml, so it is easy to edit that in VS or better yet, why not open it in Expression Blend and see what we can do!
1. In VS, open the Expression.xaml file in the root of the project. See that it is all just Xaml
2. Right click on Expression.xaml in the solution explorer and select "Edit in Blend"
3. Let's add a little spice to the CaptionArea. In blend, Right click and "View Xaml". Drill down into the xaml until you find CaptionArea
<Canvas x:Name="CaptionArea"
In the Properties area, have some fun... I picked I nice Blue-to-Green graident brush to be the foreground which proves I will never be a designer.
Save and go back to VS.. We get notified that the skin has been changed... It is excellent that VS and Expression share the same xaml file format.
5. In VS, hit F5
Notice the, ahh, cool, change to the caption area
What I showed in this step is how to customize the xaml for the media player. You can now really go wild with this and change the look completely, just remember to have all the same elements with the same x:Name and you will be set!
Part 4: Handing custom script commands in Ajax to show custom data
In part 2, I introduced Script Commands in Expression Encoder with the caption command. In this section I will show how to use your own custom script command to do something interesting on the client when a certain part of the movie is being played.
1. Add some xaml to the Expression.xaml skin file to show the price. In VS (or blend) open Expression.xaml and find the ChapterToggleButton canvas. Right above that add the following Xaml
    <Canvas x:Name="Pricing" Canvas.Left="16.5703" Canvas.Top="52.1174" Opacity="0">
      <Rectangle Stroke="Black" Width="607.037" Height="114.333" RadiusX="5" RadiusY="5">
        <Rectangle.Fill>
          <RadialGradientBrush GradientOrigin="0.75,0.25">
            <GradientStop Color="Yellow" Offset="0.0" />
            <GradientStop Color="White" Offset="1.0" />
          </RadialGradientBrush>
        </Rectangle.Fill>
      </Rectangle>
      <TextBlock Canvas.Left="5" Canvas.Top="5">Price: </TextBlock>
      <TextBlock x:Name="Pricing_Text" Canvas.Left="5" Canvas.Top="25"></TextBlock>
    </Canvas>
Right above the ChapterArea_Show Storyboard, add the following Xaml
     <Storyboard x:Name="Pricing_Show">
      <DoubleAnimation Storyboard.TargetName="Pricing" Storyboard.TargetProperty="(Opacity)" To="1" Duration="0:0:00.55" />
    </Storyboard>
    <Storyboard x:Name="Pricing_Hide" >
      <DoubleAnimation Storyboard.TargetName="Pricing" Storyboard.TargetProperty="(Opacity)" To="0" Duration="0:0:00.35" />
    </Storyboard>
2. Now we need to add some markers to the video stream to make these show up. In Expression Encoder add a couple of new Script Commands. Make the type be animate and the command be Price_Show and Price_Hide.
Encode and flip back to VS
3. In VS, open default.aspx and add the following JavaScript. What we are doing here is writing some Ajax code to get a hold of the MediaPlayer element and defining a couple of events. We want the _onMarkerReached event to be called each time one of the markers in the video is reached. It will then parse out the commands and call the appropriate method. So far, there is just one custom command: animate. When it is called, we call the _animate function which begins the animations we defined in xaml above.
     <script type="text/javascript">
    var player;

    function pageLoad() {
        player = $find('MediaPlayer1');
        player.add_pluginLoaded(_loaded);
    }

    function _loaded() {
        Sys.Debug.trace("loaded");
    }

    function _animate(e) {
        Sys.Debug.trace(e);
        if (!e || e === 'undefined') return;

        // Start the animation.
        var el = player.get_element().content.root.findname(e);
        if (el) {
            Sys.Debug.trace(el);
            el.begin();
        }
    }

    function _onMarkerReached(sender, args) {
        var marker = args.get_marker();
        if (marker.type === 'animate')
            _animate(marker.text);
    }
</script>
4. Next we need to write up the _onMarkerReached event so the MediaPlayer control calls it.
     <asp:MediaPlayer ID="MediaPlayer1" runat="server"
        AutoPlay="True"
        Height="480" MediaSkinSource="~/Expression.xaml"
        MediaSource="~/Media/sl1.wmv" Width="640"
        OnClientMarkerReached="_onMarkerReached">
5. Just to get a better look at what is going on, let's add a TextArea to use for Debugging output. Drop this anywhere on the page.
     <p />
    <textarea name="TraceConsole" id="TraceConsole"
        cols="40" rows="5"></textarea>
6. F5 to run it. Notice we get the custom xaml for the price to come up at the right time, and the debug window is showing us all the events that are bubbling through. If you miss it your can just rewind and it will show up again! That is the beauty of making it event based on the context of the video.
7. We can now look up the price dynamically to get up to the minute price information by calling a web service. Luckily this is very easy to do in with ASP.NET AJAX.
a. Add Item, then select Ajax-Enabled WCF service
b. Add the following method to the PriceService.cs file
 [OperationContract]
public string GetPrice()
{
    Random r = new Random((int)DateTime.Now.Ticks);
    return String.Format("{0:C}", r.NextDouble()*100);
}
c. Add the following to ScriptManager in default.aspx
     <asp:ScriptManager runat="server" ID="sm">
        <Services>
            <asp:ServiceReference Path="~/PriceService.svc" />
        </Services>
    </asp:ScriptManager>
d. Change _animate() to include an async call to the web service and in the response to that call, reach into the Xaml DOM and set the Pricing_Text field.
 function _animate(e) {
    Sys.Debug.trace(e);
    if (!e || e === 'undefined') return;

    // Start the animation.
    var el = player.get_element().content.root.findname(e);
    if (el) {
        Sys.Debug.trace(el);
        PriceService.GetPrice(_setPrice)
        el.begin();
    }
}
function _setPrice (price) {
        var el = player.get_element().content.root.findname('Pricing_Text');
        el.Text = price;
}
e. Hit F5 to run it and see the price gets set... it is different every time you replay the video because it is getting the up to the minute price. You can use FireBug or WebDevHelper to trace the Ajax calls to see what is happening under the covers. But it is basically an Async JSON call going out over XmlHttp.
What I showed you in this part was some very cool client side Ajax interactions with the media. I showed you how to add markers to the video stream that would cause events to happen in the client. I also showed how to respond to those events by calling a web service to get data from the server.
Part 5: Using Script Commands to localize the captions
Ok, one more cool script command to show.. What if we wanted to captions to be localized based on the culture of the client. That is easy to do with a script command.
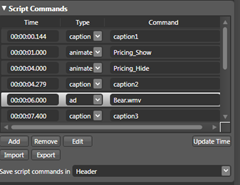
1. Go back to expression encoder and change all the captions to be a caption ID rather than the hard coded English string we saw earlier. My example looks like this:
2. Encode that and go back to VS
3. open Default.aspx and at the top in the page directive set the UICulture="auto" flag to tell ASP.NET we are going to have localized content.
<%@ Page Language="C#" AutoEventWireup="true" UICulture="auto"
4. Create a javascipt file named MediaPlayerResources.en-us for the English strings and MediaPlayerResources.fr-fr to hold the french resource strings in the root of the project
MediaPlayerResources.en-us.js
 /// <reference name="MicrosoftAjax.js"/>

Type.registerNamespace("Resources");

Resources.MediaPlayer = {
    caption1: "Start machine configuration.",
    caption2: "Case color.",
    caption3: "Black is the best case color to choose.",
    caption4: "HDMI socket pre-configured.",
    caption4: "Optional hard disk drive."
}
MediaPlayerResources.fr-fr.js
 /// <reference name="MicrosoftAjax.js"/>

Type.registerNamespace("Resources");

Resources.MediaPlayer = {
    caption1: "Commencer la configuration.",
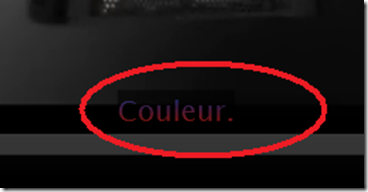
    caption2: "Couleur.",
    caption3: "Le noir est la meilleure couleur.",
    caption4: "Prise HDMI préconfigurée.",
    caption4: "Disque dur en option."
}
5. add a reference to these in the ScriptManager
     <asp:ScriptManager runat="server" ID="sm">
        <Services>
            <asp:ServiceReference Path="~/PriceService.svc" />
        </Services>
        <Scripts>
            <asp:ScriptReference Path="~/mediaplayerresources.js" ResourceUICultures="en-us,fr-fr,de-de" />
        </Scripts>
    </asp:ScriptManager>
6. Modify onMarkerReached to pull out the localized strings from the resource files
 function _onMarkerReached(sender, args) {
    var marker = args.get_marker();
    switch (marker.type)
    {
        case 'animate': _animate(marker.text); break;
        case 'caption': player.set_caption(Resources.MediaPlayer[marker.text]); break;
    }

}
7. F5 to run it... inIE, Under tools, Internet Options, Languages change the order so that fr-fr is first.
Notice the localized text!
Part 6: Using Script Commands to start an interstitial Ad
I have already shown how cool script commands can be. In this, last section I will show you one more very cool thing to do with Script commands.
1. Back in Encoder, add another ScriptCommand for Ad and have the command be the name of another WMV file. This is the file we want to be an ad..

You should have Bear.wmv on your windows vista machine, but if you don't you can get it here.
Encode
Add the bear.wmv file to your media directory.
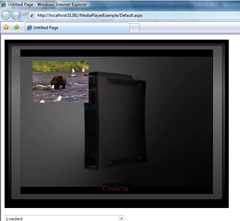
2. Back in VS, in default.aspx we need add some logic to handle the new ad command we just created. In this case I cam going to create a some new Xaml on the fly to create a Video in Video window to display the ad. Of course we also pause the main video so all the attention is on the ad.
 function _onMarkerReached(sender, args) {
    var marker = args.get_marker();
    switch (marker.type)
    {
        case 'animate': _animate(marker.text); break;
        case 'caption': player.set_caption(Resources.MediaPlayer[marker.text]); break;
        case 'ad':
            player.pause();
            var host = player.get_element();
            var x = host.content.createFromXaml("<MediaElement Source='media/" + args.get_marker().text
                + "' AutoPlay='true' MediaEnded='_adEnded' MediaFailed='_adError' Canvas.Top='60' Canvas.Left='80' Width='160' Height='120'/>");
            host.content.root.children.add(x);
        }
}
3. We need add a couple of event handlers to start the main player again.
 function _adEnded(sender, args)
    {
        sender.getParent().children.remove(sender);
        player.play();
    }
    function _adError(sender, args)
    {
        Sys.Debug.trace("Failed to Load Ad");
        _adEnded(sender);
    }
4. F5.. Notice the ad comes up, plays through and then the video picks up again.
In this section, I showed how to use Script Commands to add a dynamically add new Xaml content to the player. In this case an Ad.
Comments
Anonymous
February 18, 2008
PingBack from http://www.biosensorab.org/2008/02/18/islands-of-richness-with-silverlight-on-an-aspnet-page/Anonymous
February 18, 2008
You've been kicked (a good thing) - Trackback from DotNetKicks.comAnonymous
February 18, 2008
Awesome! Thanks bro.Anonymous
February 19, 2008
Brad Abrams has posted some more code. This time he walks you through using and customizing the ASP.NETAnonymous
February 19, 2008
Brad Abrams has posted some more code. This time he walks you through using and customizing the ASP.NETAnonymous
February 19, 2008
Silverlight ASP .NET Media PlayerAnonymous
February 20, 2008
Brad Abrams has a multi-part Silverlight on an ASP.NET page article, and Laurent Bugnion advises us onAnonymous
February 21, 2008
In this post Brad Abrams show you how can use and customize the ASP.NET MediaPlayer control to give youAnonymous
February 21, 2008
In this post Brad Abrams show you how can use and customize the ASP.NET MediaPlayer control to give youAnonymous
February 22, 2008
Silverlight 2.0 Almost Here!Anonymous
February 22, 2008
Woo, amazing tutorial Brad! excellent A++ work. keep it up! It's really nice to see the Expression Encoder "Commands" window. This is the first time I've came across this feature. Thanks!Anonymous
February 24, 2008
Brad Abrams has posted some more code. This time he walks you through using and customizing the ASP.NETAnonymous
February 24, 2008
Woo, amazing tutorial Brad! excellent A++ work. keep it up! It's really nice to see the Expression Encoder "Commands" window. This is the first time I've came across this feature. Thanks!Anonymous
March 04, 2008
hmm, dosen't work. Expressions blend can't see it to open, and when i open it in VS05 i get: Error 1 Could not load file or assembly 'System.Core, Version=3.5.0.0, Culture=neutral, PublicKeyToken=b77a5c561934e089' or one of its dependencies. The system cannot find the file specified. C:Documents and Settingsalek.gembinskiDesktopMediaPlayerExampleWeb.config 35Anonymous
March 05, 2008
As I am sure you have heard, we just published the Silverlight 2 Beta 1 .  In addition to all theAnonymous
March 05, 2008
As I am sure you have heard, we just published the Silverlight 2 Beta 1 .  In addition to all theAnonymous
March 05, 2008
As I am sure you have heard, we just published the Silverlight 2 Beta 1 .  In addition to all theAnonymous
March 05, 2008
Silverlight 2 Beta 1 is now available!! You can download from here: Microsoft Silverlight Tools BetaAnonymous
April 03, 2008
Hello, excellent article. however, i ha ve a question. If i were to view the source of the page in the browser, it gives me the location of the .wmv file. However, therfore, any body can download the .wmv file. if I do not want folks to download the file, how do i encrypt the location of the .wmv file? when i restrict the file download using IIS, it does NOT even show up in my browser? any ideas? --ravi


