Using Postman to call the Microsoft Graph API using Authorization Code Flow
Introduction
This article will help guide you through utilizing Postman to call a Microsoft Graph Call using the authorization code flow. This is part of a 5 part blog on accessing the Microsoft Graph API utilizing grant types : authorization code, implicit flow, client credentials, password, and refresh token flow. We will be utilizing the same Microsoft Graph call to reduce extraneous details on having to include setting up and finding the correct permissions for every Microsoft Graph Calls while still maintaining the consistency of setting up for the entire Microsoft Graph Call from start to finish.
Setting Up the AAD Application
The first step to getting access to the Microsoft Graph REST API is to setup an AAD Application Registration.
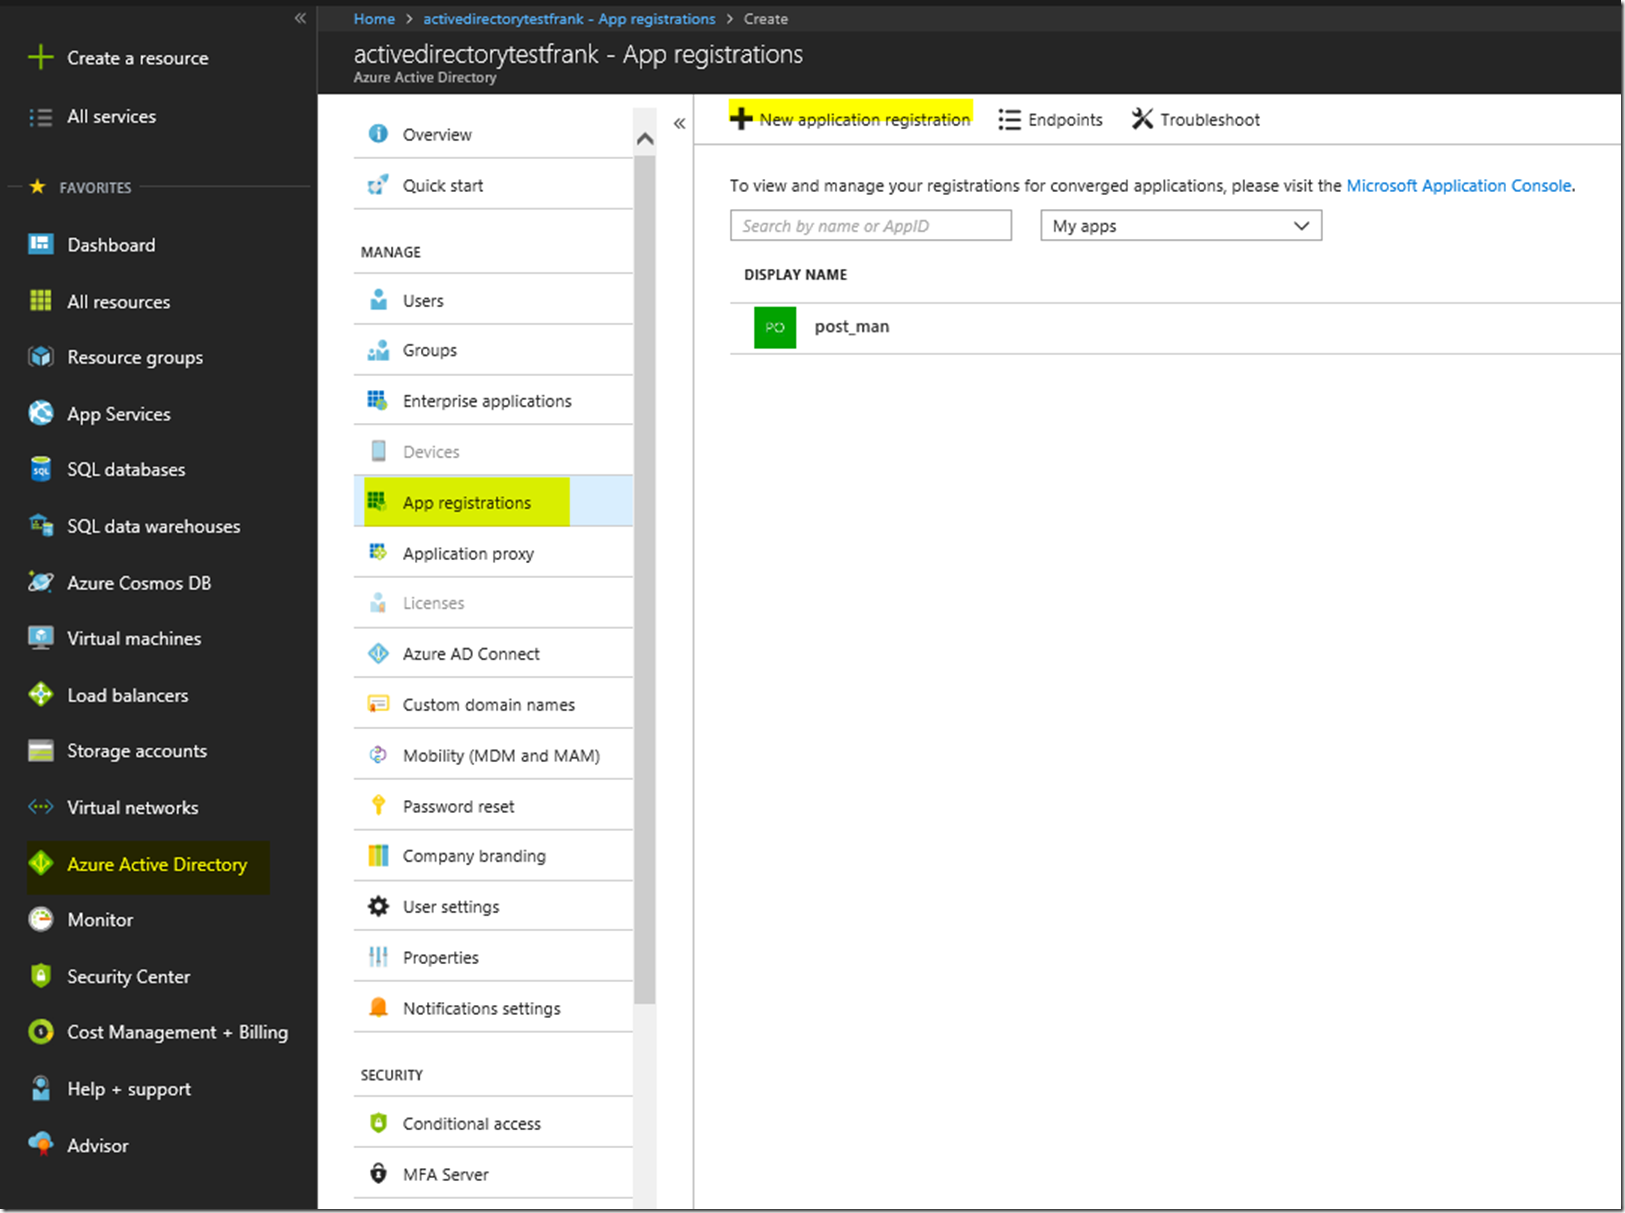
First we are going to want to create the AAD Application registrations in the portal. For this we will need to configure the application to be able to work with Postman so that we can make the call to the Microsoft Graph API. First we go to the Azure Active Directory Blade, go to App Registrations, and then create a new application registration.
From there we are going to want to create a web app with any name. Here I have set the name as web app and then we want to set the callback url to : https://www.getpostman.com/oauth2/callback and set the application type to web app/ API.
Note: that you can set whatever URLs you would like
You will have to click out of the sign-on URL to make it check whether or not if it’s correct.
After that we have created our web app, we will want to create a secret. Please keep track of the secret as you won’t be able to see the secret again. You will have to press save in order for the secret to generate.
With this information in hand, we will be able to move forward and connect to this AAD registration. But without the correct permissions we won’t be able to get an access token to make calls to the Microsoft Graph API.
Finding Which Permissions We Need for a Microsoft Graph Call Using Authorization Code Flow
Assuming we would like to have granular control on what the AAD Application registration has access to and what it doesn’t have access to. We are going to want to make sure that the AAD Application registration only has the permissions it needs to make the Microsoft Graph API calls that we are wanting to make.
There has been a separate blog post on finding the correct permissions for your graph API call listed below :
For this Authorization Code flow, we will want to set the required permission for Read all users' full profiles under Delegated Permissions. You can utilize the Application Permission as well, however you won’t get the permissions based on the user logging in, instead you will receive the permission on behalf of the Application.
Retrieving an Access token Using Authorization Code Grant Type Flow
When using the Authorization Code flow to get the access token, the preview feature of postman when requesting for an HTML page doesn’t properly load the HTML page. In addition to that I’m not sure if the preview feature would even properly add the cookies to Postman, so you won’t be able to make requests to the authorization endpoint and get the authorization code back and send that to the token endpoint.
However, Postman does include a way to get an Access token via OAuth2’s Authorization Code Grant type by going to the authorization tab in Postman and then requesting a new access token.
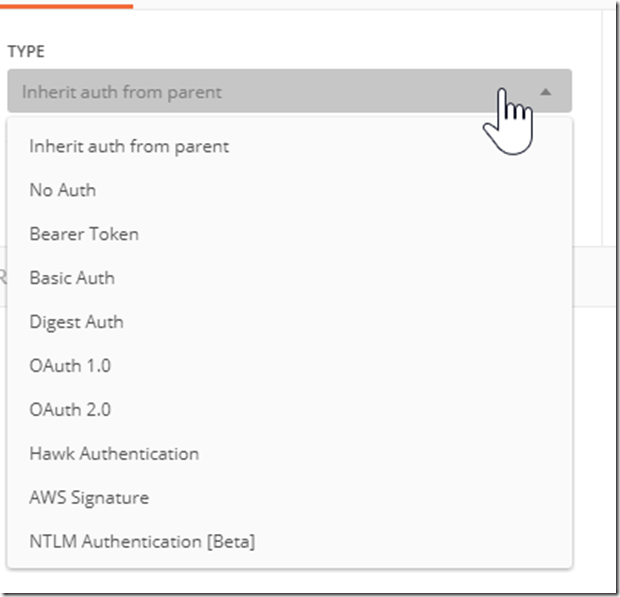
After opening up Postman click on the authorization tab shown in the picture below. After that, click on the highlighted drop down menu.
After clicking on the menu, we will want to click on OAuth 2.0
This will now change the User Interface and there will be a “Get a New Access Token” button on the right side now. Click on the button on the right side and that will open a new pop up section.
You will now be able to choose your grant type, this article is meant to follow the grant type authorization code.
The callback URL will be your first reply URL for your AAD Application Registration, I have set mine to orange.com.
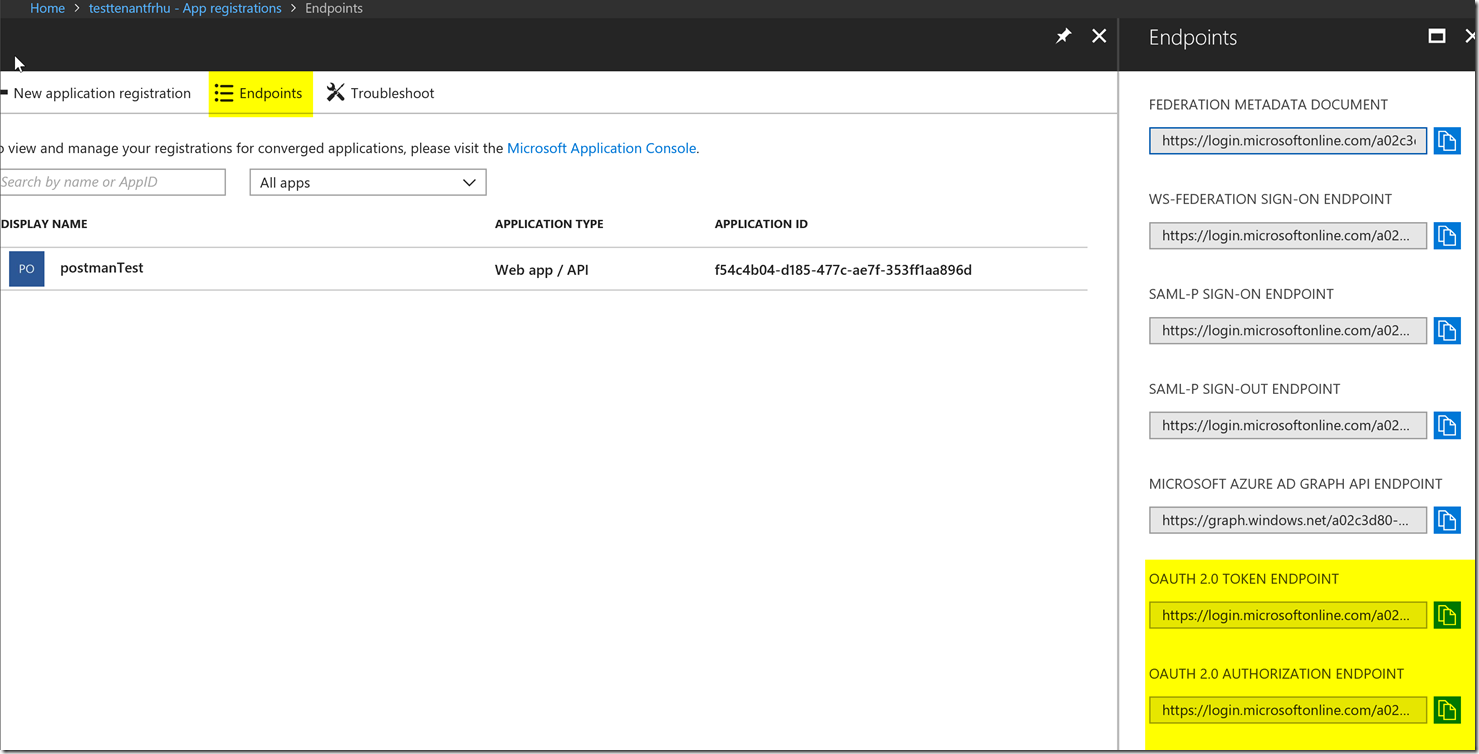
The Auth URL will be the auth endpoint for the tenant that your AAD Application Registration is in. You can find this in the picture below in your AAD App Registration blade.
Note that you will need to add the resource you are asking access to as a query parameter in your auth url. For example: https://login.microsoftonline.com/8839a17c-5ebf-496f-858e-0bd6c3038589/oauth2/authorize?resource=https://graph.microsoft.com This auth url is asking for authorization to get access to the Microsoft Graph.
The Access token URL is highlighted in the picture above, the OAuth 2.0 token endpoint URL.
The client ID is the application ID/Client ID for your AAD Application Registration. This is found when you first enter the blade for your AAD Application.
The client secret can be found by following the directions described here : https://blogs.msdn.microsoft.com/aaddevsup/2018/04/25/how-to-get-to-the-keyssecrets-from-azure-active-directory/
Note: There are some issues with Postman and utilizing the "Get New Access Token feature" when the client secret has a # and +. So you will need to continue to get a new secret until it doesn't have a + or # symbol in the client secret. This issue is described in the GitHub issue : https://github.com/postmanlabs/postman-app-support/issues/4555
The Client Authentication will work using either option, here I’m using "Send Client Credentials in Body” 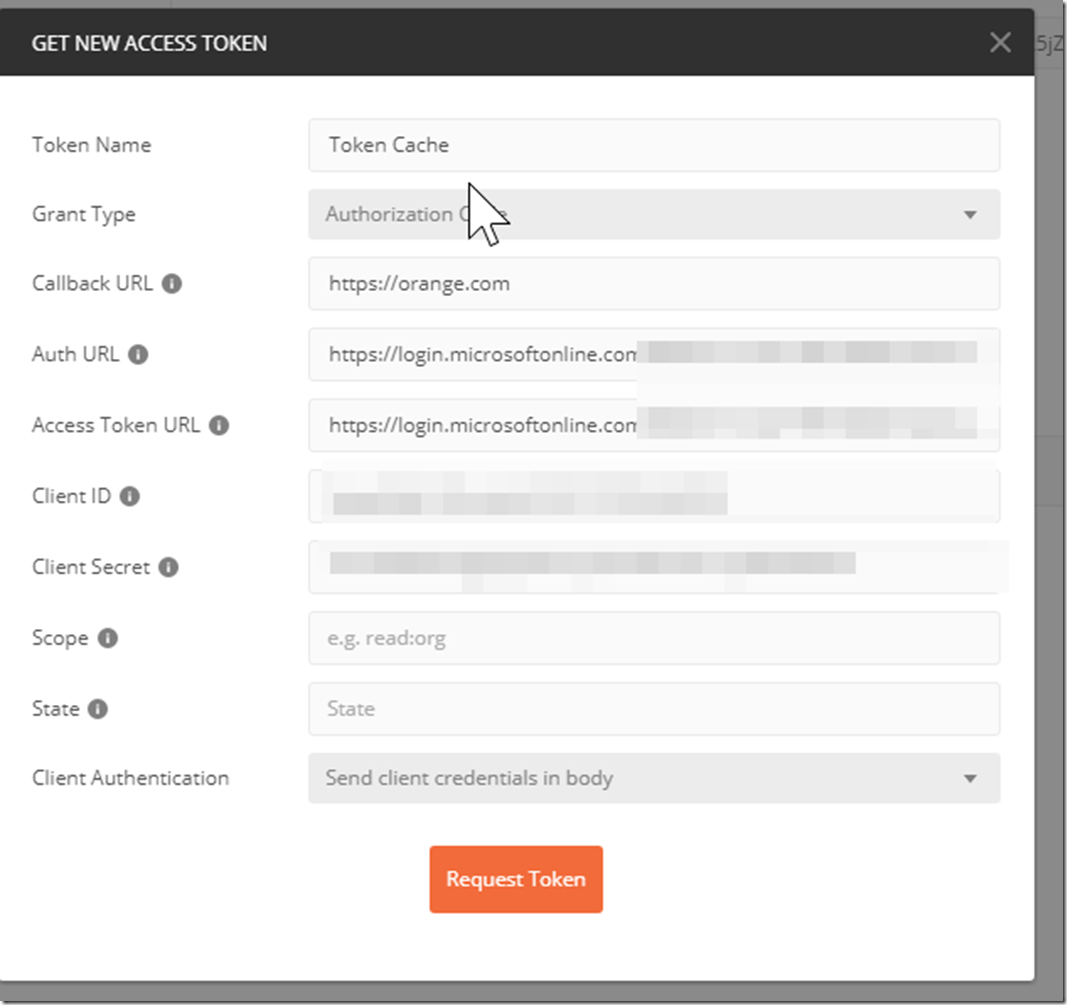
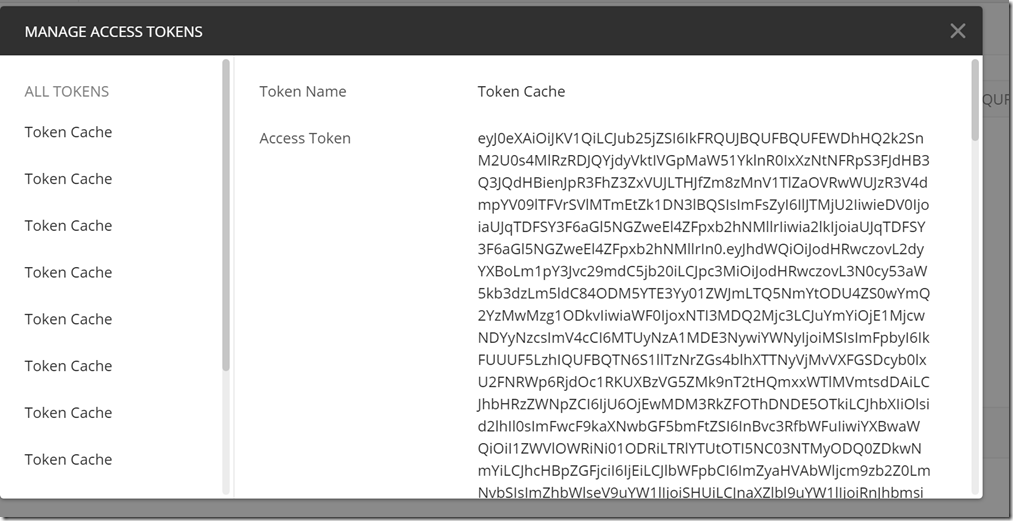
Now when you click on request token, an interactive pop up will show asking you to login. After you login with your username and password, it will then automatically go through the flow and send the authorization code to the token endpoint. After logging in you will receive the Access token, and it will look like the picture below.
Now that you have the access token you will want to add it to your headers. Postman will do this for you, but you have to remember to scroll down in the “Manage Access Tokens” frame and press “Use Token”.
Conclusion
We have gone through the steps to get an access token utilizing postman’s feature to request access tokens from the token endpoint by getting the authorization code from the authorization endpoint. If you would like to learn more about how the OAuth 2.0 flow works in terms of AAD Web Applications please take a look at this documentation that reviews how it works : https://docs.microsoft.com/en-us/azure/active-directory/develop/active-directory-protocols-oauth-code
If you have anymore issues feel free to open a support ticket and one of our engineers will reach out to you to resolve the issue.
Comments
- Anonymous
June 22, 2018
Excellent article - added to the bookmarks - Anonymous
August 09, 2018
Thank you so much for sharing, very useful. Really struggled a lot to get through that. You should highlight the trouble of having the + or # in the token. - Anonymous
November 07, 2018
Helpful article, but it seems like the author's thoughts were a bit rushed, and some things were not as clear as the author assumed.- Anonymous
November 09, 2018
Hey Spencer, Can you please clarify on which parts aren't very clear? And if there are any questions in regards to this please let me know and I will reply back to you as soon as possible.
- Anonymous
- Anonymous
February 04, 2019
Great Article.. Thanks. I have followed the steps provided, and I get a access token, but I'm getting an error when I try to do a basic graph query : https://graph.microsoft.com/v1.0/me{ "error": { "code": "InvalidAuthenticationToken", "message": "Access token validation failure.", "innerError": { "request-id": "925d5ba2-263b-4bb8-b8e9-eac544d05478", "date": "2019-02-04T20:27:55" } }}Any idea why that might be?Thanks so much.- Anonymous
February 19, 2019
Hello, to resolve this issue, we will need more information, please file a support ticket with Azure Support to help to debug this issue. Please obtain a fiddler trace beforehand. Thanks - Anonymous
February 28, 2019
Hi, I had the same issue, getting the:{“error”: {“code”: “InvalidAuthenticationToken”,“message”: “Access token validation failure.”,“innerError”: {“request-id”: “925d5ba2-263b-4bb8-b8e9-eac544d05478”,“date”: “2019-02-04T20:27:55”} In my case it just ended up being because I forgot to add the resource in the auth url. "Note that you will need to add the resource you are asking access to as a query parameter in your auth url. For example: https://login.microsoftonline.com/8839a17c-5ebf-496f-858e-0bd6c3038589/oauth2/authorize?resource=https://graph.microsoft.com" After I did that everything worked fine :) Hope that helps!
- Anonymous
- Anonymous
April 18, 2019
There is a missing field in getting new access Token, the field is resource. Though it generates the token but this token is not working with Azure Management APIs and giving error below{ "error": { "code": "InvalidAuthenticationTokenAudience", "message": "The access token has been obtained for wrong audience or resource '00000002-0000-0000-c000-000000000000'. It should exactly match with one of the allowed audiences 'https://management.core.windows.net/','https://management.core.windows.net','https://management.azure.com/','https://management.azure.com'." }}- Anonymous
April 23, 2019
Hello, the resource that AAD is referring to is the Audience value, the resource '00000002-0000-0000-c000-000000000000' is for Azure AD. You will need to make sure you get the right audience, and that you have the proper permissions set in the Azure AD Application Registration accordingly.If that doesn't resolve the issue, please file a support ticket and one of Microsoft's Support Engineers will reach out to help you resolve your issue and get you up and going.
- Anonymous
