Support and troubleshooting
This article provides information on how to troubleshoot common issues with Microsoft Connected Cache for ISPs.
Common issues
This section details a few common issues that customers face during the sign-up process.
Sign up errors
Cannot verify account
During sign-up, we verify the information you provide against what is present in Peering DB. Make sure the information for your ISP entry on Peering DB is up to date and matches what you provide during sign-up.
Invalid verification code
During sign-up, a verification code is sent to your NOC email address present in Peering DB. This code expires in 24 hours. If it's expired, you'll need to request a new verification code to complete the sign-up.
Unable to re-sign up
Delete any Microsoft Connected Cache resource that you're using before you resign up for the service. Deleting any existing Connected Cache resource unlocks your ASN, which allows you to successfully sign up.
Cache Node Errors
Network connectivity issues
Updating Docker's DNS can help resolve some connectivity issues. Try the following Docker DNS updates until one solves your connectivity problem. Once connectivity is established, there's no need to continue updating Docker's DNS.
Update Docker's DNS to use the Google DNS resolver
nano /etc/docker/daemon.json
Update the contents of this file to match the following example, which includes the public Google DNS resolver:
"log-driver": "json-file", "log-opts": {"max-size": "10m","max-file": "3"},"dns":["8.8.8.8", "8.8.4.4"]
Save and close using the command CTRL-X and then Y(es) to save
Restart Docker for this change to take effect:
systemctl restart docker
Rerun the IoT Edge Check command to validate proper connectivity:
iotedge check -verbose
Update Docker's DNS to use your company's DNS resolver
nano /etc/docker/daemon.json
Update the contents of this file to match the following example, which includes the public Google DNS resolver:
"log-driver": "json-file", "log-opts": {"max-size": "10m","max-file": "3"},"dns":["<Your companies DNS Resolver IP Address>"]
Save and close using the command CTRL-X and then Y(es) to save.
Restart Docker for this change to take effect:
systemctl restart docker
Rerun the IoT Edge Check command to validate proper connectivity:
iotedge check -verbose
Updating from Ubuntu 20.04 to 22.04
You can now provision Microsoft Connected Cache for ISP on Ubuntu 22.04. If you have a cache node provisioned on Ubuntu 20.04, you will need to uninstall it first before updating to Ubuntu 22.04. Once you have updated the system, download the provisioning package from Azure portal and run the provisioning script on the portal. For more information on provisioning cache node, visit, Create, provision and deploy cache node.
Diagnose and Solve Problems
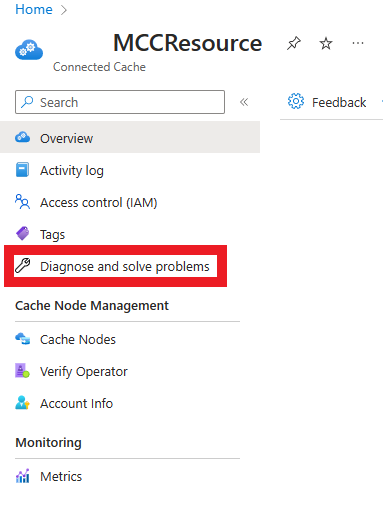
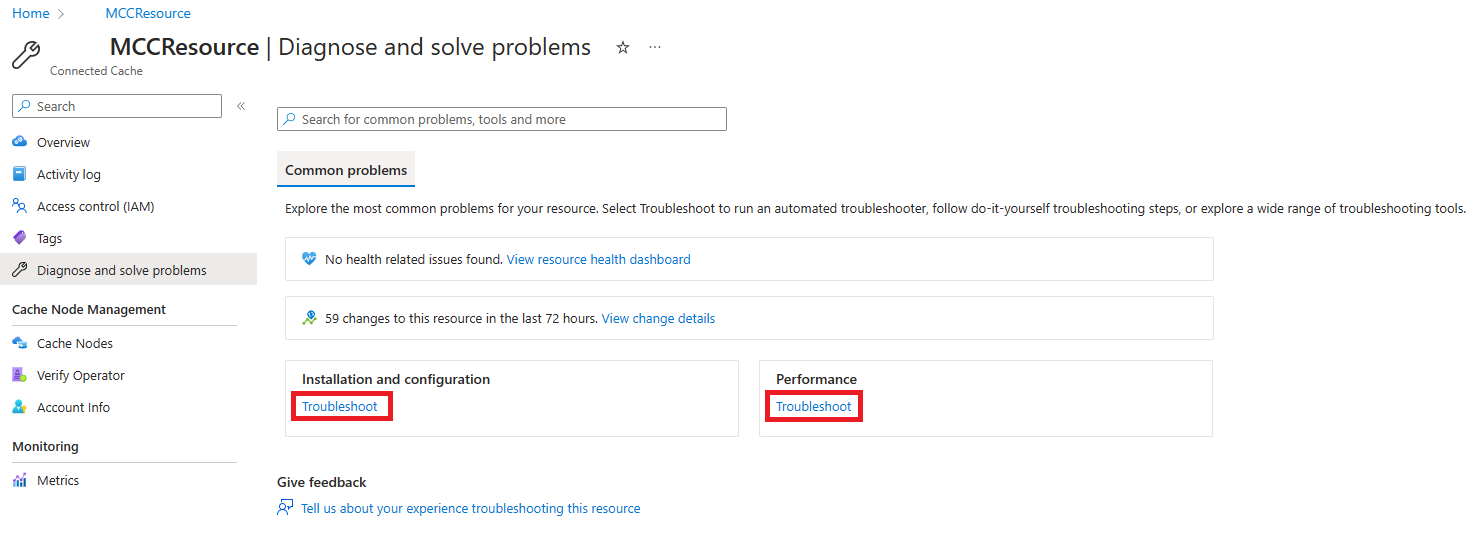
If this article isn't resolving the issue you're facing with your cache node, you can use the Diagnose and solve problems functionality within your Connected Cache resource to continue troubleshooting. Diagnose and solve problems contains solutions to most common problems that users might face as they onboard.
You can find Diagnose and solve problems on the left pane within your Connected Cache resource.
Within Diagnose and solve problems, select Troubleshoot under the type of problem you're facing and follow the prompts that narrow down the solution to the issue.
Steps to obtain an Azure subscription ID
To onboard onto Microsoft Connected Cache, you'll need an Azure subscription ID. Use the following steps to obtain your subscription ID:
- Sign in to the Azure portal.
- Select Subscriptions. If you don't see Subscriptions, type Subscriptions in the search bar. As you begin typing, the list filters based on your input.
- If you already have an Azure Subscription, skip to step 5. If you don't have an Azure Subscription, select + Add on the top left.
- Select the Pay-As-You-Go subscription. You'll be asked to enter credit card information, but you'll not be charged for using the Microsoft Connected Cache service.
- On the Subscriptions page, you'll find details about your current subscription. Select the subscription name.
- After you select the subscription name, you'll find the subscription ID in the Overview tab. Select the Copy to clipboard icon next to your Subscription ID to copy the value.

