System builder deployment of Windows 10 for desktop editions
This guide demonstrates how to create customized Windows 10 images that system builders can use to deploy to a line of devices, complete with customizations like apps, drivers, languages, and settings. We show how to make customizations both online and offline. We cover 64-bit and 32-bit Windows 10 for desktop editions (Home, Pro, Enterprise, and Education).
Prepare your lab environment
For your work PC (technician PC): If you plan to deploy only x64 devices, you can use either a Windows 10 x86 or x64 PC. However, if you plan to deploy x86 devices, you'll need an x86 PC for some steps.
Before starting the deployment procedure, you need to download the kits that will be used throughout the guide. Go to the Device Partner Center > Downloads and Installation > Understanding ADKs and OPKs. For a list of resources and kits that will be used and where to obtain them, see What you will need and where to get it.
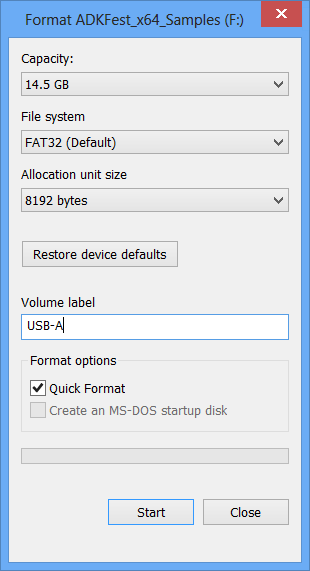
For this guide, we use two USB drives. USB-A will be used to boot the system in Windows Preinstallation Environment (WinPE). USB-B will be used to move files between computers, store deployment and recovery scripts, and store and apply created images. (You can also format a single USB drive to store both WinPE and your images).
| USB Hard Drive Name | Format | Minimum Size |
|---|---|---|
| USB-A | FAT32 | ~4GB |
| USB-B | NTFS | ~16GB x86 ~32GB amd64 |
Creating my USB-B
Format your USB drive and name it as follows:
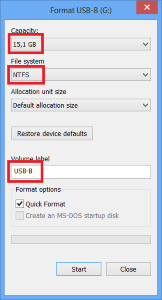
Then download USB-B.zip from the Microsoft Download Center. Save the .zip file to USB-B and extract the contents there. The contents of the configuration files included in USB-B are examples that you may change according to your branding and manufacturing choices. However, file names and hierarchy of the folders and files must be the same as demonstrated below in order to align your deployment procedure with this guide.
Customizations throughout the document
| Pass | Setting | Action |
|---|---|---|
| WinPE | Setup UI Language | EN-US |
| User Data | Preinstallation Product Key for ODR - Defined | |
| Specialize | Internet Explorer Home Page | in the answer file |
| OEM Name | Defined in the answer file | |
| OEM Logo | Defined in the answer file | |
| Model | Defined in the answer file | |
| Support Info | Defined in the answer file | |
| OOBE System | Reseal | Audit/OOBE |
| StartTiles | Square Tiles / SquareOrDesktopTiles set to pin only desktop apps | |
| TaskbarLinks (up to 6 pinned .lnk files) | Paint and Control Panel shortcuts have been set | |
| Themes | Custom Theme with the OEM logo as the desktop background has been set | |
| Visual Effects | SystemDefaultBackground set |
Additional customizations
Product deployment
- Office Single Image v16.5 OPK preloaded
Image customization
Adding language interface packs to Windows
Adding drivers and update packages
Adding OEM-specific logo and background files to Windows
Image size optimization
Pinning desktop applications to start srceen
Create a USB drive that can boot to WinPE
You must use the matching version of Windows ADK for the images being customized. For example, if you're building an image for Windows 10, version 1809, use the Windows ADK for Windows 10, version 1809. For more details about the Windows ADK, see the Windows 10 ADK Documentation Homepage.
Visit Download the Windows ADK and the Windows PE Add-On to download the ADK.
Install the Windows ADK, including the Deployment Tools and User State Migration Tool (USMT) features.
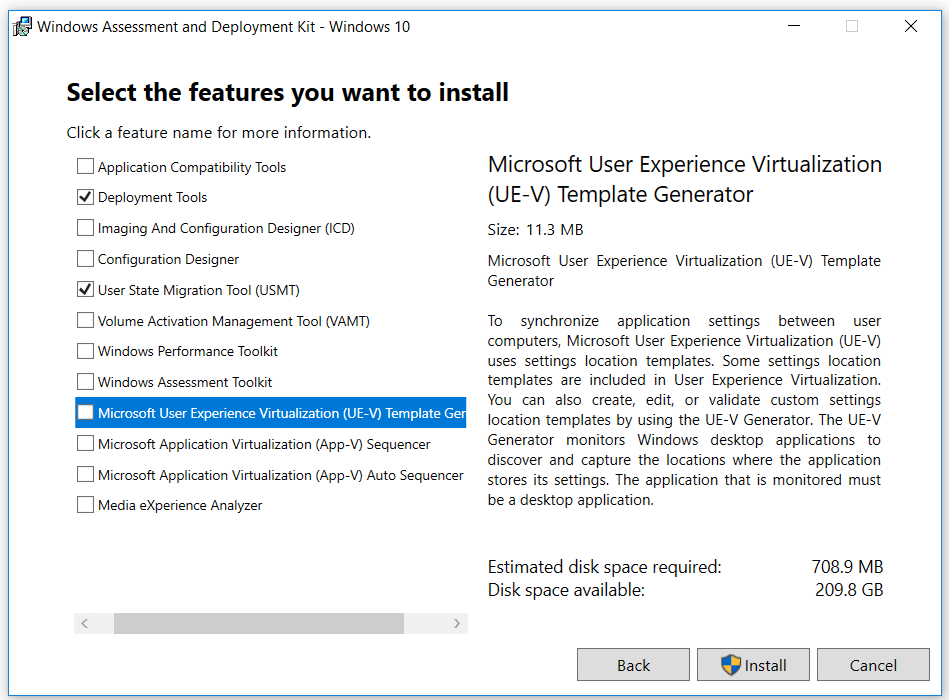
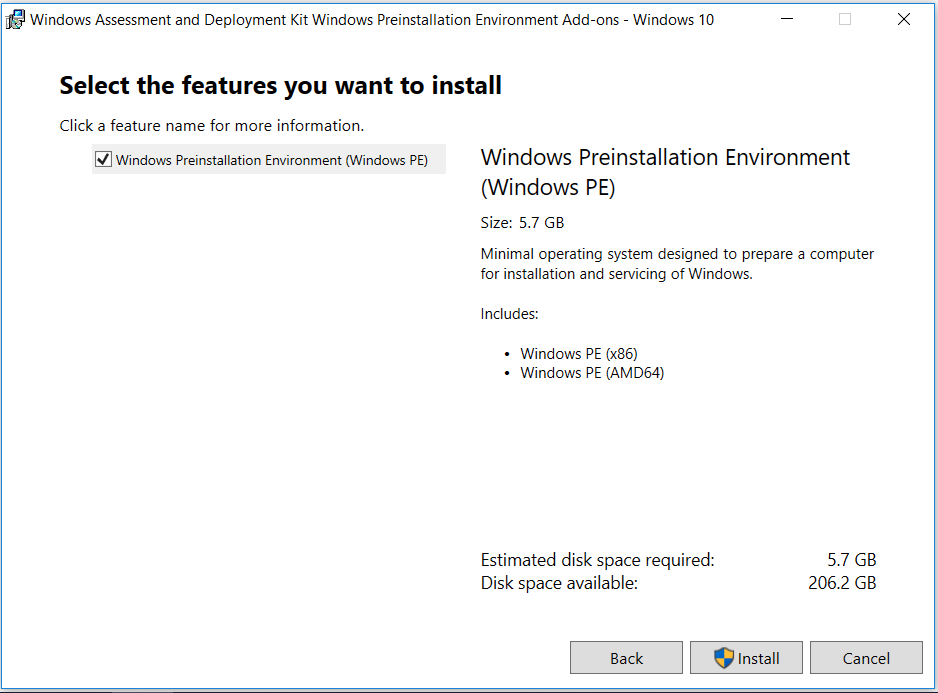
From the same page, download the Windows PE Add-on for the ADK.
Press the Windows key to display the Start menu. Type:
Deployment and Imaging Tools EnvironmentRight-click the name of the tool, and then click Run as administrator.
Windows ADK allows you to create Windows Preinstallation Environment. Copy base WinPE to new folder.
If you use an x64 Windows 10 image, copy the x64 WinPE folder structure:
Copype amd64 C:\winpe_amd64If you use an x86 Windows 10 image, copy the x86 WinPE folder structure:
Copype x86 C:\winpe_x86You may add packages and/or drivers to WinPE here, if you need them. Typically, the built-in WinPE drivers are enough.
Connect a USB drive that is at least 4 GB. Format it as shown in this diagram:
Make the inserted USB a new WinPE bootable USB.
If you use an x64 Windows 10 image, make an x64 WinPE USB:
MakeWinPEMedia /UFD C:\winpe_amd64 F:If you use an x86 Windows 10 image, make an x86 WinPE USB:
`MakeWinPEMedia /UFD C:\winpe_x86 F:
(Where F: is the drive letter of USB)
Install Windows with basic customizations
Use Windows 10 x86/x64 DVD media from a Microsoft Authorized Distributor.
See the Windows Guidelines for System Builders and Windows Policy for System Builders for information on how to tailor the customizations in your unattend.xml file.
Copy the
sources\Install.wimfile from the directory in the Windows 10 media that you will be deploying to your local Desktop (~3gb).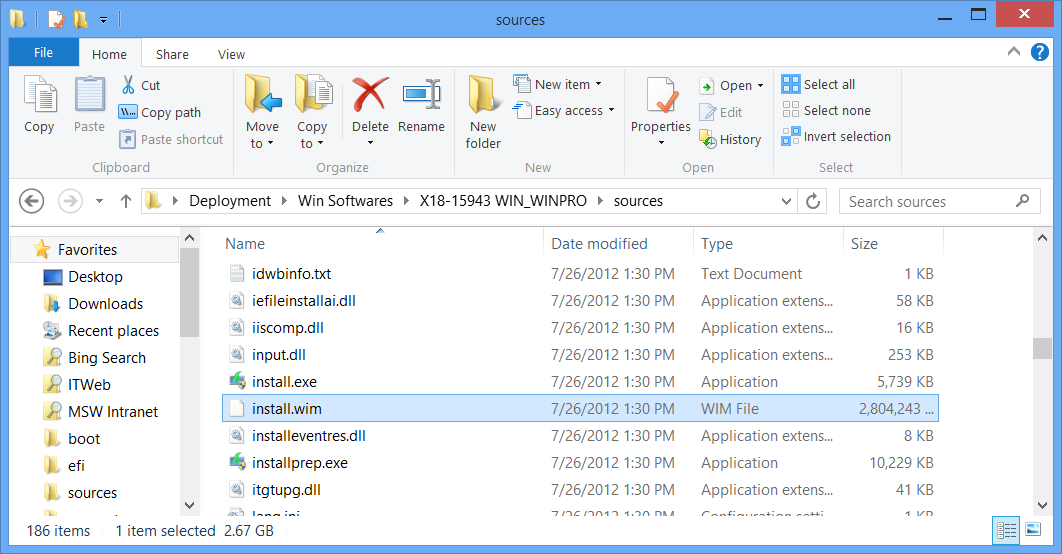
Run Windows System Image Manager to start creating an answer file from scratch. This tool allows you to create or manage your answer files in an easy and organized manner.
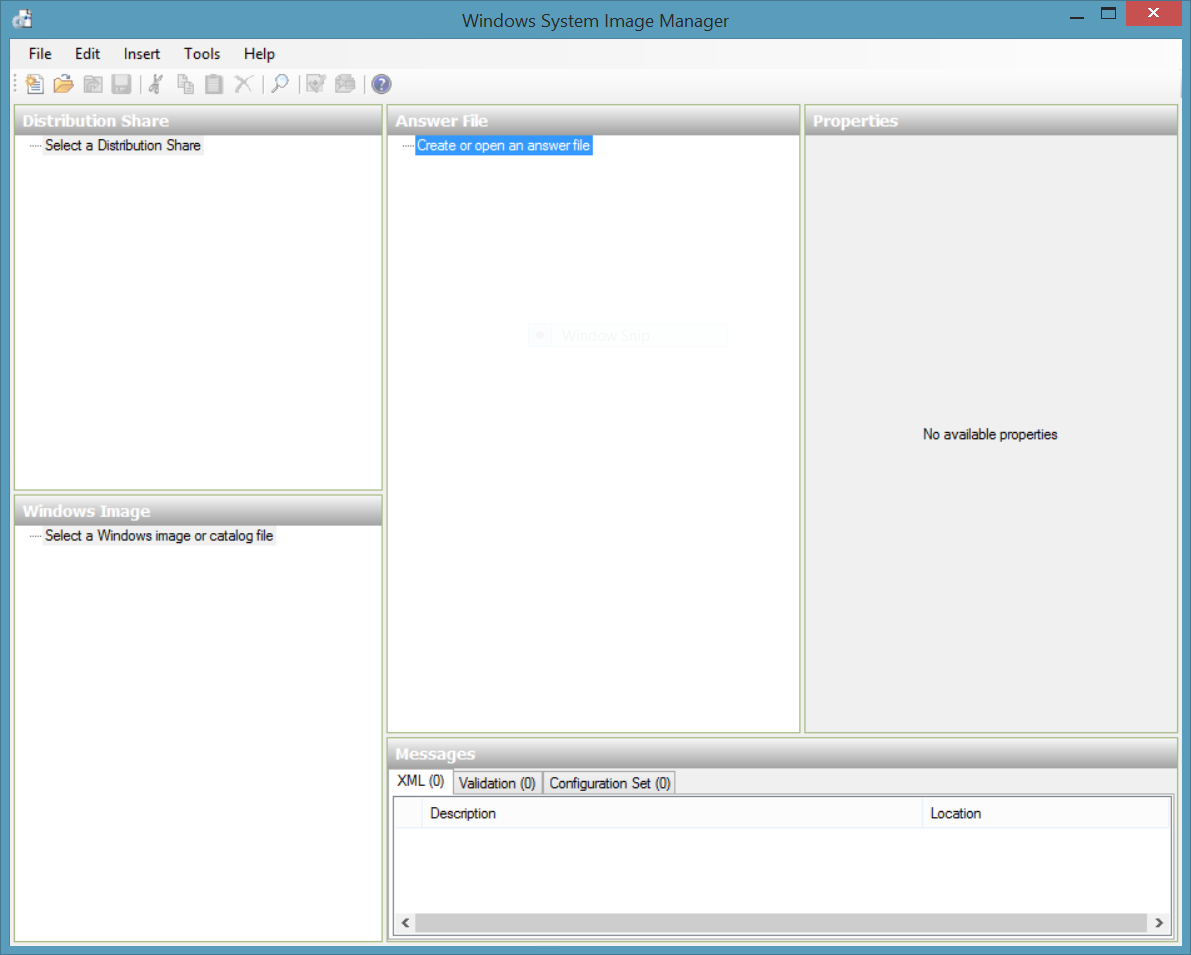
Navigate to File > Select Windows Image. Browse to your local desktop and select Install.wim. A catalog file (.clg) will be created for the specified wim.
Troubleshoot: Catalog creation may fail due to several reasons. Please make sure install.wim has read/write permissions. If you continue getting error, make sure correct architecture (x86 or x64) Windows 10 is installed on technician PC. If you are creating catalog for x64 Windows 10 image, you are required to use x64 Windows 10 installed on x64 Windows 10 computer. Install.wim image and Windows 10 ADK versions must be the same.
Open a sample answer file or create a new one.
USB-B\AnswerFiles\Unattend.xmlis the sample answer file included on USB-B.Click OK to associate the answer file with the Windows Image.
To add a driver to Windows PE, click Insert select Driver Path and select pass 1 windowsPE and then browse to the driver. Note: This step is optional and only required if a third-party driver is needed for use in the Windows Preinstallation Environment.
To add a package, click Insert, select Package, and then browse to the package you want to add. This step is optional.
Customize the answer file
Troubleshoot: A blank character in specialize | Microsoft-Windows-Shell-Setup | Computer Name will result in Windows installation failure.
See
USB-B\AnswerFiles\Unattend.xmlfor an example of an answer file that has basic customizations. -You may use the sample answer file and modify relevant parts or start from scratch by specifying some basic customizations.
Please see and use the Windows 10 default product key from Device Partner Center listed under Default product keys tab.
Add a product key that matches the Windows edition. This key isn't used to activate Windows, so you can reuse the same key for multiple installations:
- In the Answer File pane, select Components\1 windowsPE\amd64_Microsoft-Windows-Setup_neutral\UserData\ProductKey. In the ProductKey Properties pane, under Settings, enter the value next to Key.
Important
These product keys cannot be used for activation. You will need to type a software product key during the installation process for activation. These keys will be removed when sysprep generalize is run. The end user will be required to type the unique product key from the Certificate of Authenticity (COA) label when first booting Windows 10.
Add your support information:
In the Answer File pane, select Components\4 specialize\amd64_Microsoft-Windows-Shell-Setup_neutral\OEMInformation.
In the OEMInformation Properties pane, in the Settings section, update the following values: company name (Manufacturer), hours (SupportHours), phone number (SupportPhone), and website (SupportURL).
Prepare your computer to boot to audit mode after the Windows installation is complete:
In the Windows Image pane, expand Components, right-click amd64_Microsoft-Windows-Deployment, and then select Add Setting to Pass 7 oobeSystem.
In the Answer File pane, select Components\7 oobeSystem\amd64_Microsoft-Windows-Deployment _neutral\Reseal.
In the Reseal Properties pane, in the Settings section, add the following value: Mode =Audit.
Set the Internet Explorer home page:
In the Windows Image pane, right-click amd64_Microsoft-Windows-IE-InternetExplorer, and then select Add Setting to Pass 4 specialize.
In the Answer File pane, select Components\4 specialize\amd64_Microsoft-Windows-Microsoft-Windows-IE-InternetExplorer_neutral.
In the IE-InternetExplorer Properties pane, in the Settings section, select Home_page, and add the URL of your website.
OEMs can specify Disk Configuration which is used to create/modify disk partitions and set image installation partition. This step is optional and configuration is included in the sample answer file USB-B\AnswerFiles\Unattend.xml.
Save the answer file to USB-B\AnswerFiles\Unattend.xml and close Windows SIM.
Update images for each model: offline servicing
Before mounting and editing the image, make a copy. Use a filename that describes the changes you want to make for this model-specific image you're making, for example:
Dism /export-image /sourceimagefile:e:\images\install.wim /sourceindex:2 /destinationimagefile:e:\images\modelspecificimage.wim
Mount images
- Mount Windows image (ModelSpecificImage.wim). This process extracts the contents of the image file to a location where you can view and modify the mounted image.
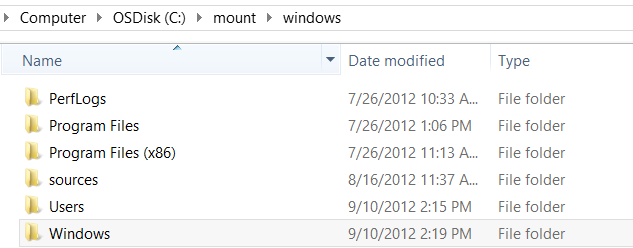
    Md C:\mount\windows

    Dism /Mount-Image /ImageFile:E:\Images\ModelSpecificImage.wim /Index:1  /MountDir:C:\mount\windows
Where E:\ is the drive letter of USB-B.
- Mount Windows RE Image file.
    Md c:\mount\winre

    Dism /Mount-Image /ImageFile:C:\mount\windows\Windows\System32\Recovery\winre.wim /index:1 /MountDir:C:\mount\winre
Troubleshoot: If mounting operation fails, make sure that you are using the Windows 10 version of DISM that is installed with the Windows ADK and not an older version from your technician computer. Don't mount images to protected folders, such as your User\Documents folder. If DISM processes are interrupted, consider temporarily disconnecting from the network and disabling virus protection.

Modify images
Add drivers
If you use an x64 Windows 10 image, add x64 drivers; if you use an x86 Windows 10 image, add x86 drivers.
- Adding driver packages one by one. (.inf files) SampleDriver\driver.inf is a sample driver package that is specific to the computer model. Type your own specific driver path. If you have multiple driver packages, skip to the next step.
    Dism /Add-Driver /Image:C:\mount\windows /Driver:"C:\SampleDriver\driver.inf"
    Dism /Add-Driver /Image:C:\mount\winre /Driver:"C:\SampleDriver\driver.inf"
- Multiple drivers can be added on one command line if you specify a folder instead of an .inf file. To install all of the drivers in a folder and all its subfolders, use the /recurse option.
Dism /Image:C:\mount\windows /Add-Driver /Driver:c:\drivers /Recurse
Review the contents of the %WINDIR%\Inf\ (C:\mount\windows\Windows\Inf) directory in the mounted Windows image to ensure that the .inf files were installed. Drivers added to the Windows image are named Oem*.inf. This is to ensure unique naming for new drivers added to the computer. For example, the files MyDriver1.inf and MyDriver2.inf are renamed Oem0.inf and Oem1.inf.
Verify your driver has been installed for both images.
    Dism /Image:C:\mount\windows /Get-Drivers
    Dism /Image:C:\mount\winre /Get-Drivers
Important: If the driver contains only the installer package and doesn't have an .inf file, you may choose to install the driver in AUDIT mode by double-clicking the corresponding installer package. Some drivers may be incompatible with Sysprep tool; they will be removed after sysprep generalize even if they have been injected offline.
In this case, you need to add an extra parameter to USB-B\AnswerFiles\UnattendSysprep.xml in order to persist the drivers in the image when the image will be generalized.
<PersistAllDeviceInstalls>true</PersistAllDeviceInstalls>
This property must be added to USB-B\AnswerFiles\UnattendSysprep.xml during generalize pass in order to persist the drivers in the image. For more information about the details of this property and how to add it to an answer file, see PersistAllDeviceInstalls.
Add languages
Get the Windows 10 Languages from the Microsoft OEM site or Device Partner Center. The LP ISO includes both .cabs and .appx Language Interface Packs.
To add languages, see Add languages to Windows.
Important
Language and LIP Versions must match other Windows component versions, for both the image and the ADK.**
If you use an x64 Windows 10 image, install x64 LIPs; if you use an x86 Windows 10 image, install x86 LIPs.
Copy the LIP to the USB-B\LanguagePack\x64 or USB-B\LanguagePack\x86 folder:
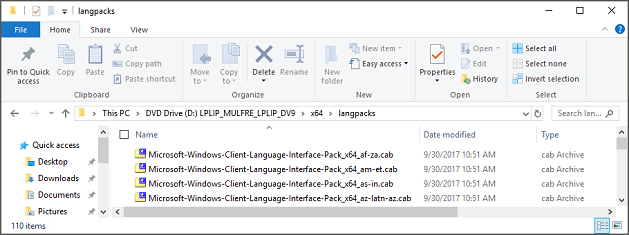
Apply the LIP to mounted image.
Amd64 architecture
DISM /Image:c:\mount\windows /Add-ProvisionedAppxPackage /PackagePath: E:\LIP_x64\LocalExperiencePack\eu-es\LanguageExperiencePack.eu-ES.Neutral.appx /LicensePath: E:\LIP_x64\LocalExperiencePack\License.xml
X86 architecture
DISM /Image:c:\mount\windows /Add-ProvisionedAppxPackage /PackagePath: E:\LIP_X86\LocalExperiencePack\eu-es\LanguageExperiencePack.eu-ES.Neutral.appx /LicensePath: E:\LIP_x86LocalExperiencePack\License.xml
Important
If you install an update (hotfix, general distribution release [GDR], or service pack [SP]) that contains language-dependent resources prior to installing a language pack, the language-specific changes in the update won't be applied when you add the language pack. You need to reinstall the update to apply language-specific changes. To avoid reinstalling updates, install language packs before installing updates.
Add update packages
If you use an x64 Windows 10 image, add x64 update packages; if you use an x86 Windows 10 image, add x86 update packages.
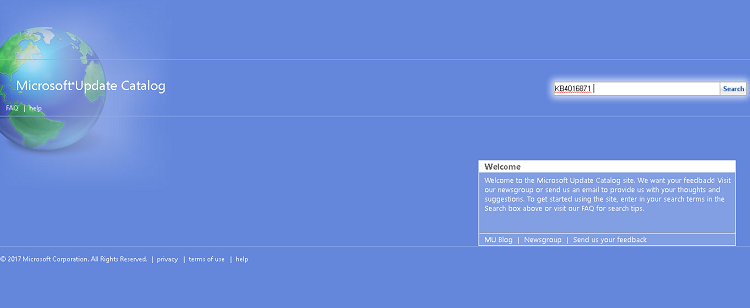
To get update packages, download them from Microsoft Update Catalog.
To see what packages you'll need to get, go to the Windows 10 Release information page to see which packages you should obtain from Microsoft Update Catalog.
Type every single update package one by one into the search box and click Search.
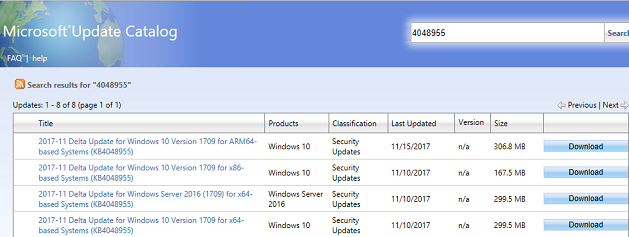
After each search completes, click Download next to the version and architecture of the package you wish to download.
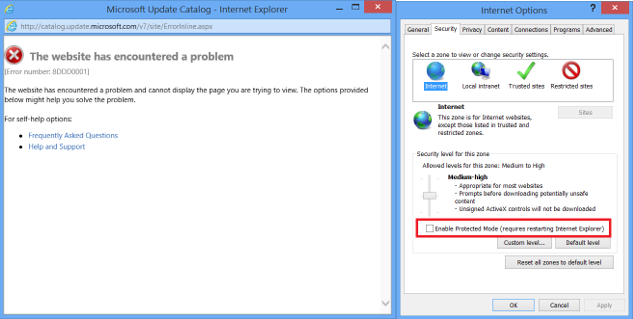
Note
If you encounter an error that says "The website has encountered a problem" when trying to download your updates, try turning off the pop-up blocker in IE or temporarily disabling Protected Mode in IE.
After downloading your update packages, add them to the image one by one by using the following command, substituting the filename in the command with the name of the files that you downloaded:
Amd64 architecture
Dism /Add-Package /Image:C:\mount\windows /PackagePath:"C:\windows10.0-kb4016871-x64_27dfce9dbd92670711822de2f5f5ce0151551b7d.msu"
X86 architecture
Dism /Add-Package /Image:C:\mount\windows /PackagePath:"C:\windows10.0-kb4016871-x86_5901409e58d1c6c9440e420d99c42b08f227356e.msu"
- Add updates to winre.wim (where they apply; not all updates apply to winre.wim)
Amd64 architecture
Dism /Add-Package /Image:C:\mount\winre /PackagePath:"C:\windows10.0-kb4016871-x64_27dfce9dbd92670711822de2f5f5ce0151551b7d.msu"
X86 architecture
Dism /Add-Package /Image:C:\mount\winre /PackagePath:"C:\ windows10.0-kb4016871-x86_5901409e58d1c6c9440e420d99c42b08f227356e.msu"
Add OEM specific visual customizations
Create OEM folder under C:\mount\windows\Windows\system32\ directory.
Create an OEM logo in .bmp format, with the size of 120px x 120 px. For more details, see the Windows Guidelines for System Builders.
Copy the OEM logo to the folder, for example:
C:\mount\windows\Windows\system32\OEM\FabrikamLogo.bmp. You'll reference this file location later in the unattend file in OEM Information | Logo property.
To display an OEM specific desktop background picture, the image file must be placed in %windir%\system32\OEM*Fabrikam.bmp* directory. Verify that the path is same in answer file corresponding to oobeSystem > Microsoft-Windows-Shell-Setup > Themes > DesktopBackground property. See the below image to add desktop background in an answer file.

Modify Start layout
The Start tile layout in Windows 10 provides OEMs the ability to append tiles to the default Start layout to include Web links, secondary tiles, Windows desktop applications, and universal Windows apps. OEMs can use this layout to make it applicable to multiple regions or markets without duplicating a lot of the work. In addition, OEMs can add up to three default apps to the frequently used apps section in the system area, which delivers sytem-driven lists o the user including important or frequently accessed system locations and recently installed apps.
- Create LayoutModification.xml.
Note
Start with the sample on USB-B\StartLayout\LayoutModification.xml as it conforms to the samples in this guide (Example Only).
The Sample LayoutModification.xml shows two groups called "Fabrikam Group 1" and "Fabrikam Group 2", which contain tiles that will be applied if the device country/region matches what's specified in Region (in this case, the regions are Germany and United States). Each group contains three tiles and the various elements you need to use depending on the tile that you want to pin to Start.
Keep the following in mind when creating your LayoutModification.xml file:
If you are pinning a Windows desktop application using the start:DesktopApplicationTile tag and you don't know the application's application user model ID, you need to create a .lnk file in a legacy Start Menu directory before first boot.
If you use the start:DesktopApplicationTile tag to pin a legacy .url shortcut to Start, you must create a .url file and add this file to a legacy Start Menu directory before first boot.
For the above scenarios, you can use the following directories to put the .url or .lnk files:
%APPDATA%\Microsoft\Windows\Start Menu\Programs\
%ALLUSERSPROFILE%\Microsoft\Windows\Start Menu\Programs\
Save the LayoutModification.xml file.
Add your LayoutModification.xml file to the Windows image. You'll need to put the file in the following specific location before first boot. If the file exists, you should replace the LayoutModification.XML that is already included in the image.
Copy E:\StartLayout\LayoutModification.xml c:\mount\windows\users\default\AppData\Local\Microsoft\Windows\Shell\
Where E: is the drive letter of USB-B.
- If you pinned tiles that require .url or .lnk files, add the files to the following legacy Start Menu directories:
- %APPDATA%\Microsoft\Windows\Start Menu\Programs\
- %ALLUSERSPROFILE%\Microsoft\Windows\Start Menu\Programs\
    Copy E:\StartLayout\Bing.url "C:\mount\windows\ProgramData\Microsoft\Windows\Start Menu\Programs\"
    Copy E:\StartLayout\Paint.lnk "C:\mount\windows\ProgramData\Microsoft\Windows\Start Menu\Programs\"
    Copy E:\StartLayout\Bing.url "C:\mount\windows\users\All Users\Microsoft\Windows\Start Menu\Programs\"
    Copy E:\StartLayout\Paint.lnk "C:\Mount\Windows\Users\All Users\Microsoft\Windows\Start Menu\Programs\"
Note
If you don't create a LayoutModification.xml file and you continue to use the Start Unattend settings, the OS will use the Unattend answer file and take the first 12 SquareTiles or DesktopOrSquareTiles settings specified in the Unattend file. The system then places these tiles automatically within the newly-created groups at the end of Start. The first six tiles are placed in the first OEM group, and the second set of six tiles are placed in the second OEM group. If OEMName is specified in the Unattend file, the value for this element is used to name the OEM groups that will be created.
Copy the answer file
You may want to make additional customizations through an unattend file. The sample unattend file on USB-B contains additional common customizations.
Copy /y E:\AnswerFiles\Unattend.xml C:\Mount\Windows\Windows\Panther
Where E:\ is USB-B.
Optimize WinRE
- Increase scratchspace size.
Dism /image:c:\mount\winre /set-scratchspace:512
- Cleanup unused files and reduce size of winre.wim
Dism /image:"c:\mount\winre" /Cleanup-Image /StartComponentCleanup /Resetbase
Unmount images
Close all applications that might access files from the image
Commit the changes and unmount the Windows RE image:
Dism /Unmount-Image /MountDir:"C:\mount\winre" /Commit
where C is the drive letter of the drive that contains the image.
This process can take a few minutes.
Make a backup copy of the updated Windows RE image.
Troubleshoot: If you cannot see winre.wim under the specified directory, use the following command to set the file visible:
    attrib -h -a -s C:\mount\windows\Windows\System32\Recovery\winre.wim
    Dism /export-image /sourceimagefile:c:\mount\windows\windows\system32\recovery\winre.wim /sourceindex:1 /DestinationImageFile:e:\images\winre_bak.wim
    Del c:\mount\windows\windows\system32\recovery\winre.wim
    Copy e:\images\winre_bak.wim c:\mount\windows\windows\system32\recovery\winre.wim
    ```

    When prompted, specify **F** for file

4.  Check the new size of the Windows RE image.

```console
    Dir "C:\mount\windows\Windows\System32\Recovery\winre.wim"
Use the following partition layout size guidance to determine the size of your recovery partition in CreatePartitions-<firmware>.txt files. The amount of free space left is after you copy winre.wim to the hidden partition.
Please reference Disk Partition rules for more information.
If the partition is less than 500 MB, it must have at least 50 MB of free space.
If the partition is 500 MB or larger, it must have at least 320 MB of free space.
If the partition is larger than 1 GB, we recommend that it should have at least 1 GB free.
    rem == Windows RE tools partition ===============
    create partition primary size=500
Optional: This section assumes you'd rather keep winre.wim inside of install.wim to keep your languages and drivers in sync. If you'd like to save a bit of time on the factory floor, and if you're OK managing these images separately, you may prefer to pull winre.wim from the image and apply it separately.
- Commit the changes and unmount the Windows image:
Dism /Unmount-Image /MountDir:"C:\mount\windows" /Commit
Where C is the drive letter of the drive that contains the image.
This process may take several minutes.
Deploy the image to new computers (Windows installation)
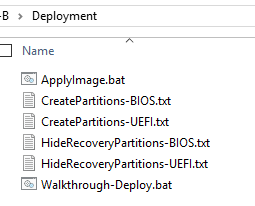
On the technician computer, locate the following files in USB-B/Deployment. Please see Creating My USB-B to create and place the files in correct paths.
Boot the reference computer and connect USB-A.
After WinPE starts, connect USB-B.
Type
diskpartto start Diskpart. Then typelist volumeto identify volume label of Windows Installation volume labelled "Windows" (For example: E:). Finally, typeexitto quit Diskpart.Apply the model-specific image:
E:\Deployment\ApplyImage.bat E:\Images\ModelSpecificImage.wim
Note
There are several pauses in the script. You will be prompted Y/N for the Apply operation if this is a Compact OS deployment.
Note
Only use Compact OS on flash-drive-based devices (solid-state drives), because Compact OS performance depends on the storage device capabilities. Compact OS is NOT recommended on rotational devices. For more information, see Compact OS.
- Remove USB-A and USB-B, and then type:
Exit
Update images manually by using AUDIT MODE (online servicing)
Important
Connecting the computer to internet is not recommended during manufacturing stages. We don't recommend getting updates from Windows Update in audit mode, as it will likely generate errors when you generalize + sysprep the machine from audit mode.
Add Office apps to your image
To add the Office apps to an image, use DISM with the /Add-ProvisionedAppxPackage option. This option also requires the following information for each app you add:
/PackagePath: This is only used to specify the path to the .appxbundle file for the shared code package./OptionalPackagePath: This is used to specify the path to the .appxbundle file for an individual app, such as Word or Excel./LicensePath: This is used to specify the path to the _License1.xml file for an individual app. This is needed for both the shared package and each of the optional app packages.
Extract the Office 16.5 OPK to C:\temp\lab\apps\Office Apps\Shared.Preinstallkit.
Use DISM to add all the Office apps to an offline image. The following example assumes the appxbundle and license xml files are in subdirectories on USB-B (D:). The example also excludes the /region switch because we want Office to appear in both the All Apps list, and as a Start Menu tile.
DISM /online /Add-ProvisionedAppxPackage /PackagePath="C:\temp\lab\apps\Office Apps\shared.PreinstallKit\shared.appxbundle" /OptionalPackagePath="C:\temp\lab\apps\Office Apps\excel.PreinstallKit\excel.appxbundle" /OptionalPackagePath="C:\temp\lab\apps\Office Apps\powerpoint.PreinstallKit\powerpoint.appxbundle" /OptionalPackagePath="C:\temp\lab\apps\Office Apps\word.PreinstallKit\word.appxbundle" /OptionalPackagePath="C:\temp\lab\apps\Office Apps\outlook.PreinstallKit\outlook.appxbundle" /OptionalPackagePath="C:\temp\lab\apps\Office Apps\publisher.PreinstallKit\publisher.appxbundle" /OptionalPackagePath="C:\temp\lab\apps\Office Apps\access.PreinstallKit\access.appxbundle" /LicensePath="C:\temp\lab\apps\Office Apps\shared.PreinstallKit\shared_license1.xml" /LicensePath="C:\temp\lab\apps\Office Apps\excel.PreinstallKit\excel_license1.xml" /LicensePath="C:\temp\lab\apps\Office Apps\powerpoint.PreinstallKit\powerpoint_license1.xml" /LicensePath="C:\temp\lab\apps\Office Apps\word.PreinstallKit\word_license1.xml" /LicensePath="C:\temp\lab\apps\Office Apps\outlook.PreinstallKit\outlook_license1.xml" /LicensePath="C:\temp\lab\apps\Office Apps\publisher.PreinstallKit\publisher_license1.xml" /LicensePath="C:\temp\lab\apps\Office Apps\access.PreinstallKit\access_License1.xml"
Note
You need to specify both an appxbundle and a license package for the shared package, as well as for each individual app that you want to install.
- Verify Office was installed:
Dism /Image:"C:\mount\windows" /Get-ProvisionedAppxPackages
where C is the drive letter of the drive that contains the image.
Review the resulting list of packages and verify that the list contains the Office Desktop Bridge apps, such as:
    ...
    Displayname : Microsoft.Office.Desktop.Access
    Version : 16000.8528.2136.0
    Architechture : neutral
    ResourceID : ~
    PackageName : Microsoft.Office.Desktop.Access_16000.8528.2136.0_neutral_~_8wekyb3d8bbwe
    Regions : None

    Displayname : Microsoft.Office.Desktop.Excel
    Version : 16000.8528.2136.0
    Architechture : neutral
    ResourceID : ~
    PackageName : Microsoft.Office.Desktop.Excel_16000.8528.2136.0_neutral_~_8wekyb3d8bbwe
    Regions : None
    ...
To have the apps appear on the Start screen, follow the steps in the next section: Configuring Start tiles and taskbar pins.
To complete the Office install, you'll need to unmount the image and commit your changes, which we'll do this after we've completed all customizations at the end of this lab.
Pin Office tiles to the Start menu
We'll pin the Office tiles to the Start menu so Windows won't remove the Office files during OOBE.
- Open a command prompt and type:
C:\Users\Default\AppData\Local\Microsoft\Windows\Shell\LayoutModification.xml.
- Add the following to layoutmodification to pin the Office apps to your Start Menu:
    <AppendOfficeSuite/>
    <AppendOfficeSuiteChoice Choice="DesktopBridgeSubscription"/>
Close and save layoutmodification.xml.
Note: for recovery purposes the layoutmodification.xml will need to be copied during recovery.
Open a command prompt and type:
copy C:\Users\Default\AppData\Local\Microsoft\Windows\Shell\LayoutModification.xml c:\Recovery\AutoApply
Once the machine is booted to desktop after going through OOBE, the Start menu will have the Office tiles added to the Start Menu.
Prepare recovery tools
Push-button reset can help users recover the OS while preserving their existing data and customizations without requiring them to back-up their data in advance.
Any languages, Universal Windows apps and Universal Windows drivers that are included in your image are automatically restored during push-button recovery operations. Make sure other customizations, like desktop apps and Start Menu customizations get restored, too.
In Windows 10, version 1809, you can use auto-apply folders to restore common Windows settings such as the Start Menu, taskbar layout, and OOBE customizations. For previous Windows versions, or to perform other actions after a push-button reset, use extensibility scripts instead. Sample extensibility scripts are included in the USB-B sample files.
Copy the ScanState tool to your USB key
The ScanState tool is included in the USB-B sample files you downloaded earlier.
You'll use ScanState tool to capture your classic Windows apps and settings so they can be restored later during a push-button reset recovery.
You can also get a copy using the tools in the Windows ADK:
On your technician PC
Start the Deployment and Imaging Tools Environment as administrator.
Run the CopyDandI.cmd script to copy the files to your USB key:
x64:
CopyDandI.cmd amd64 E:\ScanState_amd64
Where E: is the letter of USB-B drive.
If you're using an x86 Windows 10 image, make x86 Scanstate directory:
CopyDandI.cmd x86 e:\ScanState_x86
Where E: is the letter of USB-B drive.
Create a recovery package
On your reference PC
In Windows 10, version 1809, create auto-apply folders to restore common Windows settings such as the Start Menu, taskbar layout, and OOBE customizations.
Create a folder in your Windows image called
C:\Recovery\AutoApply
MkDir C:\Recovery\AutoApply
- Copy configuration files and the related asset files
- Unattend.xml:
copy Copy the unattend.xml file you want for recovery to `C:\Recovery\AutoApply\` and any asset files to `C:\Recovery\AutoApply\CustomizationFiles`
- Start menu:
Copy E:\StartLayout\LayoutModification.xml C:\Recovery\AutoApply\CustomizationFiles
- Taskbar pins:
copy
- Copy your TaskbarLayoutModification.xml to
C:\Recovery\AutoApply\and any asset files toC:\Recovery\AutoApply\CustomizationFiles - Copy
%windir%\System32\OOBE\infoand all its contents toC:\Recovery\AutoApply\OOBE
- Use ScanState to capture installed customizations into a provisioning package, and then save it to c:\Recovery\customizations.
Important
For push-button reset to recover your apps and customizations, you must store the packages file as a .ppkg file in the C:\Recovery\Customizations folder.
Run ScanState to gather app and customizations
x64:
mkdir c:\recovery\customizations
E:\ScanState_amd64\scanstate.exe /apps /ppkg C:\Recovery\Customizations\apps.ppkg /i:c:\recovery\oem\regrecover.xml config:E:\scanstate_amd64\Config_AppsAndSettings.xml /o /c /v:13 /l:C:\ScanState.log
Where E: is the drive letter of USB-B
x86:
E:\ScanState_x86\scanstate.exe /apps /ppkg C:\Recovery\Customizations\apps.ppkg /i:c:\recovery\oem\regrecover.xml /config:e:\scanstate_x86\Config_AppsAndSettings.xml /o /c /v:13 /l:C:\ScanState.log
Where E: is the drive letter of USB-B
- When ScanState completes successfully, delete scanstate.log and miglog.xml files:
   del c:\scanstate.log
   del c:\miglog.xml
Copy a backup of WinRE
During a PC deployment, winre gets moved. Before you capture a final image, copy the backup of winre.wim back into the Windows image.
Copy e:\images\winre_bak.wim c:\windows\system32\recovery\winre.wim
Reseal the image
Delete the installation folders and files you have created for the preloaded applications. Extra folders may increase the size of the .wim when the Windows image gets captured.
If Sysprep is open, close it and open an elevated command prompt.
Copy unattend.xml to the recovery folder to enable recovery of unattend settings during Push Button Reset.
copy USB-B\answerfiles\unattendsysprep.xml c:\Recovery\OEM\unattend.xml
- Generalize the image by using the answer file which reflects the changes made in the section Update images manually by using AUDIT MODE (online servicing).
These changes include Microsoft Office tile component pinned to the Start screen.
Cmd /c C:\Windows\System32\Sysprep\sysprep /unattend:c:\Recovery\OEM\Unattend.xml /generalize /oobe /shutdown
Boot reference computer and connect USB-A.
After WinPE has been booted connect USB-B.
Type
diskpartto start Diskpart. Then typelist volumeto identify volume label of Windows Installation volume labelled "Windows" (For example: E:). Finally, typeexitto quit Diskpart.Start cleanup of the image.
Important
By default, non-major updates (such as ZDPs, or LCUs) are not restored. To ensure that updates preinstalled during manufacturing are not discarded after recovery, they should be marked as permanent by using the /Cleanup-Image command in DISM with the /StartComponentCleanup option.
    MD e:\scratchdir
    dism /Cleanup-Image /Image:e:\ /StartComponentCleanup /scratchdir:e:\scratchdir
- Capture the image of the windows partition. This process takes several minutes.
dism /Capture-Image /CaptureDir:E:\ /ImageFile:F:\Images\ModelSpecificImage.wim /Name:"myWinImageWithMSIUpdated" /scratchdir:e:\scratchdir
Where E: is the volume label of Windows and F is the volume label of USB-B.
This will overwrite the image created in the section Deploy the image to new computers.
Deploy the image
Use the deployment script to layout the partitions on the device and apply the image. The applyimage.bat in USB-B\deployment folder will partition the device based on device mode.
Important
The Recovery partition must be the partition after the Windows partition to ensure winre.wim can be kept up-to-date during the life of the device.**
Run the following command to deploy your image to the reference PC:
E:\Deployment\applyimage.bat E:\Images\modelspecificimage.wim
Note
There are several pauses in the script. You will be prompted Y/N for the Apply operation if this is a Compact OS deployment.
Note
Only use Compact OS on high end storage devices because Compact OS performance depends on the storage device capabilities. Compact OS is NOT recommended on rotational devices or storage greater than 32 GB. For more information, see Compact OS.
Remove USB-A and USB-B and type exit to reboot your computer with Windows 10.
Finalize deployment
- Upon deploying your model specific image to destination computers, boot the computer with master image for the first time in AUDIT mode
Important
In order to minimize the first boot time, (Boot > Specialize > OOBE > Start screen) specialize pass must be completed in the factory. Specialize pass will configure hardware specific information which Windows will run on.
For more information about the first boot time requirements, see Windows Policy for System Builders.
Please note that at the end of the section Update images manually by using AUDIT MODE (online servicing), the system was sealed with OOBE mode. Please proceed with Audit. If the system boots in OOBE, press Ctrl+Shift+F3 in order to pass OOBE and boot in audit mode.
If you want to apply additional steps, such as executing OEM diagnostics tests and so on, apply them here.
Finally, run the Sysprep tool (C:\Windows\System32\Sysprep\sysprep.exe) and seal the system back to OOBE and Shutdown but without Generalize.
The system is ready to ship.
Important
If you are manufacturing a small amount of devices without using an image managing tool such as disk duplicators or Windows Deployment Service, you can choose to use the following practice:
- You can manufacture those devices by first booting in WinPE - inserting USB-A.
- Then insert USB-B where final manufacturing image is contained.
- Run the applyimage.bat script to apply the image.
- After you applied the image, follow the steps in this Finalize deployment section.
- Now the device is ready to be shipped with your final manufacturing image and PBR feature implemented.
- Finally, replicate the same procedure with the other devices.
Appendix
Differences between 64-bit and 32-bit deployment
It is recommended to consider 64-bit deployment versus 32-bit deployment disk footprint according to the storage of the device you are manufacturing.
The overall deployment flow mentioned in this guide doesn't differ between 64-bit and 32-bit deployment. Only some of the resource versions and the way those resources are created differs. The following table covers the x64/x86 distinctions.
| Distinction | Description | Related Section |
|---|---|---|
| Windows installed on technician PC | When Windows ADK gets installed on a technician PC the deployment tools in the ADK would be installed according to the architecture of the Windows on technician PC. In short if ADK is installed on Windows x64, the tools would be installed 64-bit version, or vice-versa. | Prepare your lab environment |
| Creating WinPE folder structure | WinPE differs between x64 and x86 architecture, so you have to use different commands to create a different WinPE folder for each architecture. | Create WinPE bootable USB |
| Drivers | Driver versions differ between different architectures. If you are manufacturing a 64-bit Windows image, please use x64 drivers, and vice-versa for 32-bit Windows. | Add drivers |
| Update Packages for Windows Image | Update package versions differ between different architectures. If you are manufacturing a 64-bit Windows image please use x64 update packages, and vice-versa for 32-bit Windows. | Add update packages |
| Language Interface Packs | If you will be using x64 Windows 10 image, install x64 LIPs or if you will be using x86 Windows 10 image install x86 LIPs. | Prepare the system for recovery with Push-button reset |
What you will need and where to get it
Before starting the deployment procedure OEM requires to download certain kits which will be used throughout the guide, such as Microsoft Office, update packages, language interface packs. Below is the complete list of resources/kits an OEM requires to download and where they download them.
| Resource/Kit | Available at | Related section |
|---|---|---|
| Windows 10 ADK | Download the Windows ADK | Create WinPE bootable USB |
| Windows 10 x64/x86 DVD Media (desired language) | Obtain Windows 10 media which you will be customizing from Microsoft Authorized Distributor | Install Windows with basic customizations |
| Windows 10 Default Product Keys | Default Product Keys are located at Device Partner Center listed under Default product keys tab | Customize the answer file |
| Language packs | Language packs are located at Device Partner Center listed under LIPs tab | Prepare the system for recovery with Push Button Reset |
| Update Packages | Obtain update packages by downloading from Microsoft Update Catalog. The detailed procedure downloading update packages is mentioned in the related section. | Add language interface packs |
| Microsoft Office v16.5 | Obtain Microsoft Office v16.5 by downloading from Device Partner Center | Microsoft Office v16.5 OPK |