Customize the Start layout
Tip
For the Windows 11 version of this topic, see Customize the Windows 11 Start layout
OEMs can customize the Start layout by adding an OEM group of tiles to the end of the Start layout. The layout is customized by creating a LayoutModification.xml file. After following the instructions below to customize the Start layout with the LayoutModification.xml file, use Windows Configuration Designer to add the file to the device image. See Add the LayoutModification.xml file to the device for instructions.
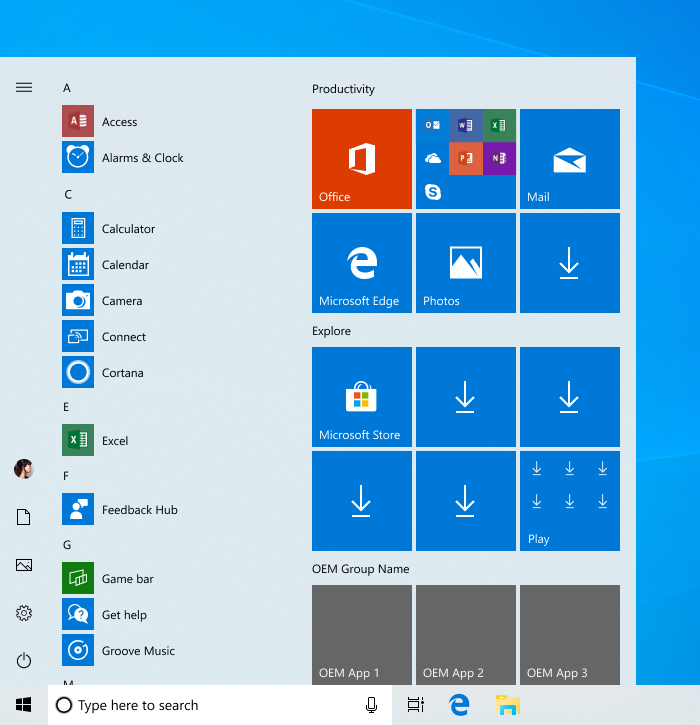
The following image shows the default Start layout for Home and Pro SKUs (non-domain joined) with the placement of an example OEM group of tiles. (The down arrow tiles represent apps specified by Microsoft that are dynamically delivered – see below for more details.)

LayoutModification.xml
The LayoutModification.xml file specifies the OEM group, group name, the tiles in the group, what app or website each tile launches, and the size and location of these tiles.
Sample LayoutModification.xml file
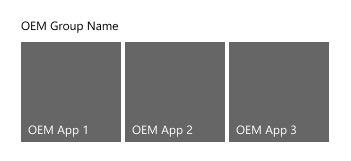
The sample LayoutModification.xml file below demonstrates how to pin three medium tiles to the OEM group that appear in a single row and that launch UWP apps. (Note: The AppUserModelID for the apps in this sample are not valid – see below for more details on how to find this ID.)
<LayoutModificationTemplate xmlns="http://schemas.microsoft.com/Start/2014/LayoutModification" xmlns:defaultlayout="http://schemas.microsoft.com/Start/2014/FullDefaultLayout" xmlns:start="http://schemas.microsoft.com/Start/2014/StartLayout" Version="1">
  <RequiredStartGroupsCollection>
    <RequiredStartGroups>
      <AppendGroup Name="OEM Group Name">
        <start:Tile Size="2x2" Column="0" Row="0" AppUserModelID="OEMApp1AUMID" />
        <start:Tile Size="2x2" Column="2" Row="0" AppUserModelID="OEMApp2AUMID" />
        <start:Tile Size="2x2" Column="4" Row="0" AppUserModelID="OEMApp3AUMID" />
      </AppendGroup>
    </RequiredStartGroups>
  </RequiredStartGroupsCollection>
</LayoutModificationTemplate>
This XML would create an OEM group that looks like this:

More info:
- To determine the overall look of the Start layout, the default layout is applied based on SKU and region, and then the
LayoutModification.xmlorUnattend.xmlfile is processed. - Comments are not supported in the
LayoutModification.xmlfile. - For an inclusive list of settings that can be configured in
LayoutModification.xml(including those NOT supported for OEM scenarios), other XML examples, and instructions on adding the XML file to the device, see Start layout XML for desktop editions of Windows 10 (Reference). - We recommend placing a backup copy of the file at
C:\Recovery\AutoApply\LayoutModification.xmlso it will be restored during a push-button reset.
Customizing the OEM group
The OEM group is three medium tiles wide and up to three medium tiles tall, but can include any supported combination of small, medium, wide, and large tile sizes to fill this space. One full row of medium tiles is visible by default, and the entire tile grid scrolls vertically to reveal more tiles if more than one row of medium tiles are pinned to the OEM group.
Beginning with Windows 10, version 1903:
- The two column layout is deprecated (medium layout).
- The option of four medium tiles (8-cell-wide) per row is deprecated.
- The two OEM groups are consolidated into a single group.
Note: These changes apply to new (or clean install) devices only. Devices that upgrade to Windows 10, version 1903, will not experience a change to their existing Start layout. New accounts created on a device that has been upgraded to 1903 will see the new Start layout, as well as devices that do a push button reset after the upgrade.
Tile sizes and position
start:Tile supports four different values for the Size attribute:
- Small tile (1x1)
- Medium tile (2x2)
- Wide tile (4x2)
- Large tile (4x4)
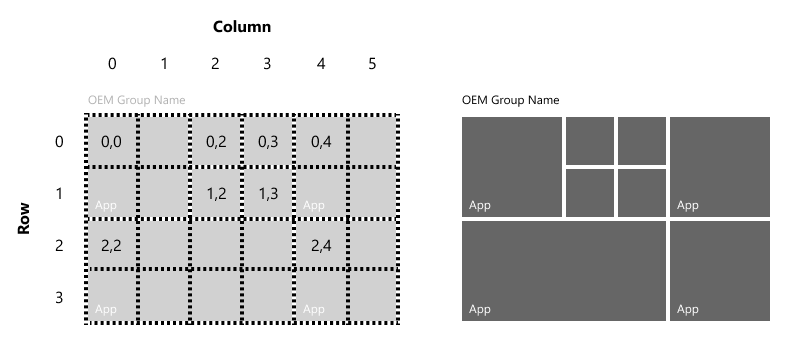
To position a start:Tile in the group, set the Row and Column attributes values. These attributes determine the position of the upper, left edge of the tile within the group. The 0,0 position is the first row, first column.
For example, the image below shows a sample group with small, medium, and wide tiles and their positioning.

We recommend that your tile layouts don't create the appearance of gaps in the layout.
Group name
Starting with Windows 10, version 1809, the OEM group must include a group name that describes either the OEM name or hardware brand. Exception: the group name can be ommitted if there's only a single row of tiles in the group, and the first tile in the row prominently contains the OEM or brand name or logo.
To set a group name, specify the Name attribute within the AppendGroup element, like this: <AppendGroup Name="OEM Group Name">
App tiles and web link tiles
Tiles can be configured to launch:
- A Universal Windows or Windows 8/8.1 app (using the
start:Tileelement) - A Windows (Win32) desktop application (using the
start:DesktopApplicationTileelement) - A web link that opens in Microsoft Edge (using the
start:SecondaryTileelement) or the default browser (using thestart:DesktopApplicationTileelement)
Note
Each tile pinned to the Start layout must launch a single app or website. It must not launch a group of apps or be a folder.
App tiles
Use the start:Tile element to pin a Universal Windows app or a Windows 8/8.1 app to the Start layout. To specify the app to launch, set the AppUserModelID attribute of start:Tile to the application user model ID (AUMID) associated with the app. The AUMID is case-sensitive.
Tip
To find the AUMID for an installed app, see Find the Application User Model ID of an installed app.
This example shows how to pin the Windows Calculator app:
<start:Tile
  AppUserModelID="Microsoft.WindowsCalculator_8wekyb3d8bbwe!App"
  Size="2x2"
  Row="0"
  Column="0"/>
Use the start:DesktopApplicationTile element to pin a Windows (Win32) desktop application to the Start layout. There are two ways to specify which application to launch for these tiles:
Set the
DesktopApplicationLinkPathto a path to a shortcut link (.lnk file) to a Windows (Win32) desktop application. The following shows how to pin the Command Prompt desktop application using the .lnk method:<start:DesktopApplicationTile DesktopApplicationLinkPath="%appdata%\Microsoft\Windows\Start Menu\Programs\System Tools\Command Prompt.lnk" Size="2x2" Row="0" Column="0"/>Set the
DesktopApplicationIDto the application's ID, if it's known. If the application doesn't have one, use the shortcut link option above. The following example shows how to pin the File Explorer Windows desktop application by specifying the desktop application ID:<start:DesktopApplicationTile DesktopApplicationID="Microsoft.Windows.Explorer" Size="2x2" Row="0" Column="0"/>
Important
In Windows 10, version 1803, all apps must either be pinned to the Start layout, and/or pre-installed using the new region parameter in DISM, otherwise they will be removed on any system that uses that layout. See Preinstall apps using DISM for guidance on using the new parameter.
Web link tiles
Web link tiles can open in Microsoft Edge by using a secondary tile, or the default browser by using a .url file.
To create a web link tile that will open in Microsoft Edge, add a SecondaryTile element to the layout and specify Edge in the AppUserModelID attribute.
<start:SecondaryTile
  AppUserModelID="Microsoft.MicrosoftEdge_8wekyb3d8bbwe!MicrosoftEdge"
  TileID="MyWeblinkTile"
  Arguments="https://www.fabrikam.com"
  DisplayName="Fabrikam"
  Square150x150LogoUri="ms-appx:///Assets/MicrosoftEdgeSquare150x150.png"
  Wide310x150LogoUri="ms-appx:///Assets/MicrosoftEdgeWide310x150.png"
  ShowNameOnSquare150x150Logo="true"
  ShowNameOnWide310x150Logo="false"
  BackgroundColor="#000000"
  Size="2x2"
  Row="0"
  Column="4"/>
To create a web link tile that will open in the default browser, create a .url file:
Right click on Desktop > New > Shortcut
Type a URL such as https://www.fabrikam.com
Click Next
Type a name for the shortcut such as Fabrikam and click Finish. The .url file is saved to your desktop.
Add the .url file to the image in the
%ALLUSERSPROFILE%\Microsoft\Windows\Start Menu\Programs\folder, and then add aDesktopApplicationTileelement to the layout:<start:DesktopApplicationTile DesktopApplicationID="https://www.fabrikam.com" Size="2x2" Row="0" Column="2"/>
Configuring Office tiles
Depending on your device and Windows version, you might install different versions of Office.
Current: Office Click-to-Run (C2R)
Beginning with Windows 10, version 1903, install the C2R version of Office using the Office pre-installation kit (OPK). When this version of Office is installed, don't add any Office-related tags to LayoutModification.xml. Windows will automatically detect the Office installation and add the appropriate tiles to Start, in an expandable folder. When a user clicks the expandable folder, the folder expands to show installed Office tiles.
Deprecated: Office Click-to-Run (C2R) for devices with downgrade facilitiation
For Windows 10 Pro standard versions (1809 and 1803 only, does not apply to 1903 or later) that include downgrade facilitation to Windows 7, add the following two tags to LayoutModification.xml:
<AppendOfficeSuite/>
<AppendOfficeSuiteChoice Choice="Desktop2016"/>
Deprecated: Office 365 Group (Centennial)
For Windows 10, version 1903, this setting is deprecated and shouldn't be used. If a PC is upgraded from Windows 10, version 1809, to Windows 10, version 1903, and a new user account is created, Office tiles will be displayed in the “Productivity” group instead of an "Office 365" group.
For Windows 10, version 1809, Office Desktop Bridge Subscription is required on all devices where the screen is 10.1 inches or larger and does not include downgrade facilitation to Windows 7. Use the matching Office Preinstallation Kit (OPK) 18.10.
In Windows 10, version 1803, Office Desktop Bridge Subscription is recommended on all devices where the screen is 10.1 inches or larger. Use the matching OPK 16.5.
For these versions only, add the following two tags to LayoutModification.xml:
<AppendOfficeSuite/>
<AppendOfficeSuiteChoice Choice="DesktopBridgeSubscription"/>
Deprecated: Office Desktop (Centennial)
In Windows 10, version 1803 only (do not use with 1809 or 1903), this option may be used for devices shipping with Activation for Office (AFO) Perpetual. For this scenario only, add the following two tags to LayoutModification.xml:
<AppendOfficeSuite/>
<AppendOfficeSuiteChoice Choice="DesktopBridge"/>
Deprecated: Office Mobile
In Windows 10, version 1903, do not install this on any device, regardless of screen size. Install the C2R version of Office instead.
In Windows 10, version 1803 or version 1809, required installation of Office Mobile for devices where the screen is less than or equal to 10.1 inches with no bundles/packaged keyboard. For this scenario only: add the following tag to LayoutModification.xml:
<AppendOfficeSuite/>
Customize the Start layouts for different regions
Use the Region attribute of the RequiredStartGroups tag in the LayoutModification.xml file to specify different Start layouts per region. To learn more, see RequiredStartGroups tag in the Start Layout XML Reference.
Alternatively, use multivariant capabilities in Windows provisioning to specify different Start layouts per region. To learn more, see Use Windows Provisioning multivariant support in the Start Layout XML Reference.
Dynamically delivered apps
Some apps in the Start layout are downloaded dynamically after the Out of Box Experience (OOBE) completes. If the device is on a metered network, or without network connectivity, app downloads are paused, and the user will see down arrows instead of the app name on the app tiles, as in the following image. The downloads start or resume after the network connects.

Beginning with Windows 10, version 1903, dynamically delivered apps will only exist on Home and Pro (non-domain joined) SKUs. Pro SKU variants (domain-joined), Enterprise, and EDU SKUs will not receive programmable tiles.
OEMs can also optionally specify whether dynamically delivered apps appear on devices used by Commercial customers on the Pro SKU. The following modification may only be used in the LayoutModification.xml file for commercial devices:
<LayoutOptions DeviceCategoryHint="Commercial" />
If this property is set, devices that ship with the Pro SKU will be treated as Commercial, meaning they will receive the Enterprise Start layout with fewer tiles and no dynamically delivered apps even if the end user doesn't join a domain during OOBE. This property may not be used for Home SKU, nor may it be used for Pro SKU devices that may be used by consumer customers.
Additionally, dynamically delivered apps will begin to transition to a "click-to-install" delivery mechanism. After OOBE, app and game programmable tiles will appear, but the app or game will not yet be downloaded to the device. When a customer launches a "click-to-install" app or game in Start, that specific app or game will download to the device without redirecting the user to the Store (assuming the user is connected to the internet). Not all apps and games will transition to "click-to-install" immediately.
Note: Due to government regulations, beginning with Windows 10, version 1809, dynamically delivered apps and games have been disabled for devices that select the China region during OOBE.
First run tasks
First Run Tasks are background tasks that are active when the user first signs into Windows. First Run Tasks are not available in LayoutModification.xml. However, you can still use them by including an Unattend.xml file with StartTiles tags using the same AppID as in LayoutModification.xml.
If the AppendGroup tag is present in LayoutModification.xml, it will override Unattend.xml for all Start pinning. However, if an Unattend.xml StartTiles tag exists for the same AppID as in LayoutModification.xml, the FirstRunTask from Unattend.xml will be respected.
For example, include a LayoutModfication.xml file specifying an app like this:
<start:Tile AppUserModelID="Microsoft.MicrosoftEdge_8wekyb3d8bbwe!MicrosoftEdge" Size="2x2" Row="0" Column="0"/>
Also include an Unattend.xml file specifying the same AppID like this:
<SquareOrDesktopTile5>
    <AppId>Microsoft.MicrosoftEdge_8wekyb3d8bbwe!MicrosoftEdge</AppId>
    <FirstRunTask>BackgroundTasks_Notifications.Services.MessagingBackgroundTask</FirstRunTask>
</SquareOrDesktopTile5>