Add or delete custom device images
If you want to use a custom device image, you can add it into your Azure subscription and then use it for provisioning Cloud PCs. You can use standard Azure Marketplace gallery images or create your own custom managed image. If you currently use an Azure Compute Gallery in Microsoft Azure, you can convert one of those images into a managed image. To convert, use the steps to export an image version to a managed disk and then create an image from a managed disk.
Note
- Windows 10 and Windows 11 images should not contain Azure Virtual Desktop client components. Additionally, you can't import Windows 10 and Windows 11 Multisession images into Windows 365.
- For information about support for Windows 11 custom device images, see What's New for Windows 365 Enterprise.
- You can also use existing built-in gallery images without customization for a stream-lined experience.
Add a custom device image
You can upload the custom image to the Windows 365 service by following these steps:
Sign in to the Microsoft Intune admin center.
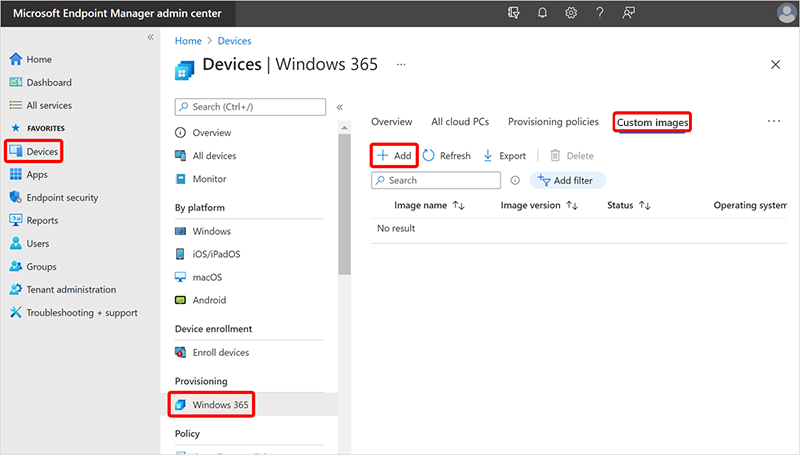
Select Devices > Windows 365 (under Provisioning) > Custom images > Add.

In the Add image pane, provide the following information:
- Image name: The name of the image you want to add.
- Image version: A version number of the image with this format: Major(int).Minor(int).Patch(int) format. For example: 0.0.1, 1.5.13.
- Subscription: Choose the Azure subscription where the image came from.
- Source Image: Choose an image to add. The list will populate with all custom images from your chosen subscription that meet the prerequisites.
Select Add to add the image to your device image list.
After successfully uploading the image, you'll see the uploaded image when selecting an image to create a provisioning policy.
Delete a custom device image
You can delete a custom image from Windows 365 by following these steps:
- Sign in to the Microsoft Intune admin center, select Devices > Windows 365 (under Provisioning) > Custom images.
- On the Device images page, select the check box next to the image > Delete.
- Select Yes on the confirmation pop up to permanently delete the image.
Device images being used in a provisioning policy can't be deleted. Delete the provisioning policy first and then the associated device image.
Next steps
For more information on virtual machines and creating custom images in Azure, see Virtual machines in Azure.