Manage required Python packages with requirements.txt
If you share your Python project with others, or use a build system to produce your Python application, you need to specify any required external packages. When you plan to copy your project to other locations where you need to restore an environment, you also need to define the required dependent packages.
The recommended approach for specifying external dependent Python packages is to use a requirements file (readthedocs.org). This file contains a list of pip commands that install any required versions of dependent packages for your project. The most common command is pip freeze > requirements.txt. This command records your environment's current package list into the requirements.txt file.
A requirements file contains precise versions of all installed packages. You can use requirements files to freeze the requirements of an environment. By using precise package versions, you can easily reproduce your environment on another computer. The requirements files include packages even if they're installed with a version range, as a dependency of another package, or with an installer other than pip.
Prerequisites
Visual Studio installed with support for Python workloads. For more information, see Install Python support in Visual Studio.
A requirements file. You can use an existing requirements file or generate a file as described in this article.
Technically, any filename can be used to track requirements. However, Visual Studio provides specific support for the requirements file named "requirements.txt." You can use the -r <full path to file> argument when you install a package to specify your preferred name for the file.
Install dependencies listed in requirements.txt
If you load a project that has a requirements.txt file, you can install all the package dependencies listed in the file.
In Solution Explorer, expand the project, and then expand the Python Environments node.
Locate the environment node that you want to install the packages for. Right-click the node, and select Install from requirements.txt.
You can monitor the package installation process in the Output window:
The output lists any required packages that are installed, along with any updates required for affected pip commands and the availability of newer pip versions.
Install dependencies in a virtual environment
You can also install the Python package dependencies in an existing virtual environment.
In Solution Explorer, expand your project, and then expand the Python Environments node.
Locate the virtual environment node that you want to install the packages for. Right-click the node, and select Install from requirements.txt.
If you need to create a virtual environment, see Use virtual environments.
Generate the requirements.txt file
If all the necessary Python packages for your project are already installed in an environment, you can generate the requirements.txt file in Visual Studio.
In Solution Explorer, expand your project, and then expand the Python Environments node.
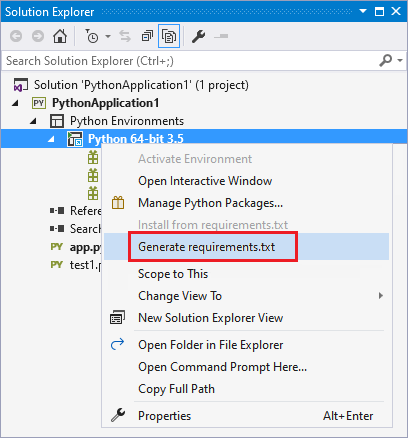
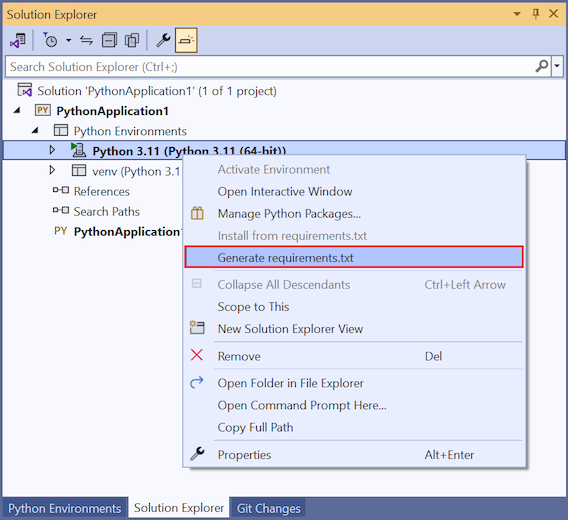
Locate the environment node for which you want to generate the requirements file. Right-click the node, and select Generate requirements.txt.
Refresh or add entries to an existing requirements.txt file
If the requirements.txt file already exists, Visual Studio displays a prompt with several options:
- Replace entire file: Overwrite all items, comments, and options defined in the
requirements.textfile. - Refresh existing entries: Update the version specifiers in the
requirements.textfile to match the currently installed version. - Update and add entries: Refresh existing requirements in the
requirements.textfile, and append all new package requirements to the end of the file.
Visual Studio runs pip to detect the current package requirements for the environment, and then updates your requirements.txt file based on your selection.
Manually install package dependencies
If pip doesn't install a package dependency defined in your requirements.txt file, the entire installation fails.
You have two options to address this issue:
Manually edit the
requirements.txtfile to exclude the failed package, and then rerun the installation process.Use pip command options to refer to an installable version of the package.
Update the requirements file with pip wheel
If you use the pip wheel command to compile a dependency, you can add the --find-links <path> option to your requirements.txt file.
Call the
pip wheelcommand to compile the list of required dependencies:pip wheel azureThe output shows the wheels built for the collected packages:
Downloading/unpacking azure
    Running setup.py (path:C:\Project\env\build\azure\setup.py) egg_info for package azure

Building wheels for collected packages: azure
    Running setup.py bdist_wheel for azure
    Destination directory: c:\project\wheelhouse
Successfully built azure
Cleaning up...
Append the
find-linksandno-indexoptions, along with the package version requirement to yourrequirements.txtfile:type requirements.txt --find-links wheelhouse --no-index azure==0.8.0Run the pip install process with your updated requirements file:
pip install -r requirements.txt -vThe output tracks progress for the installation process:
Downloading/unpacking azure==0.8.0 (from -r requirements.txt (line 3))
    Local files found: C:/Project/wheelhouse/azure-0.8.0-py3-none-any.whl
Installing collected packages: azure
Successfully installed azure
Cleaning up...
    Removing temporary dir C:\Project\env\build...


