Tutorial: Add icons to your matching game WinForms app
In this series of four tutorials, you build a matching game, where the player matches pairs of hidden icons.
In the matching game, a player selects a square to see an icon, then chooses another square. If the icons match, they stay visible. If not, the game hides both icons. In this tutorial, you assign icons to labels randomly. You set them to be hidden and then displayed when selected.
In this second tutorial, you learn how to:
- Add a Random object and a list of icons.
- Assign a random icon to each label.
- Add event handlers that show icons to the labels.
Prerequisites
This tutorial builds on the previous tutorial, Create a matching game application. If you haven't done that tutorial, go through that one first.
Add a Random object and a list of icons
In this section, you create a set of matching symbols for the game. Each symbol is added to two random cells in the TableLayoutPanel on the form.
You use new statements to create two objects.
The first is a Random object that randomly chooses cells in the TableLayoutPanel.
The second object is a List<T> object.
It stores the randomly chosen symbols.
Open Visual Studio. Your MatchingGame project appears under Open recent.
Select Form1.cs if you're using C#, or Form1.vb if you're using Visual Basic. Then select View > Code. As an alternative, select the F7 key or double-click Form1. The Visual Studio IDE displays the code module for Form1.
In the existing code, add the following code.
public partial class Form1 : Form
{
    // Use this Random object to choose random icons for the squares
    Random random = new Random();

    // Each of these letters is an interesting icon
    // in the Webdings font,
    // and each icon appears twice in this list
    List<string> icons = new List<string>()
    {
        "!", "!", "N", "N", ",", ",", "k", "k",
        "b", "b", "v", "v", "w", "w", "z", "z"
    };
If you're using C#, be sure you put the code after the opening curly brace and just after the class declaration (public partial class Form1 : Form). If you're using Visual Basic, put the code right after the class declaration (Public Class Form1).
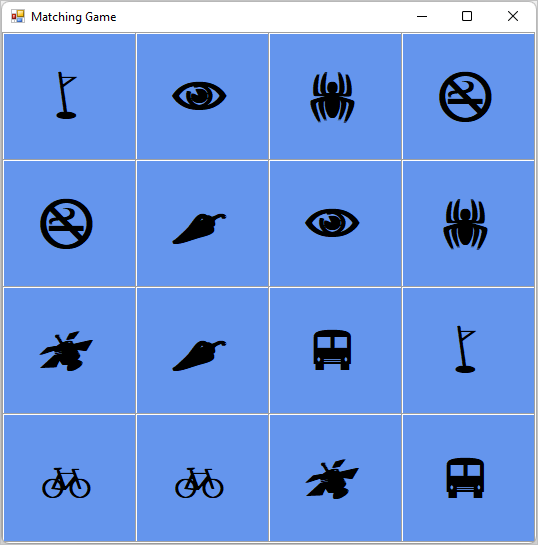
You can use list objects to keep track of different types of items. A list can hold numbers, true/false values, text, or other objects. In your matching game, the list object has 16 strings, one for each cell in the TableLayoutPanel panel. Each string is a single letter that corresponds to the icons in the labels. These characters appear in the Webdings font as a bus, a bike, and others.
Note
Lists can shrink and grow as needed, which is important in this program.
To learn more about lists, see List<T>. To see an example in C#, see A basic list example. To see an example in Visual Basic, see Using a Simple Collection.
Assign a random icon to each label
Each time you run the program, it assigns the icons randomly to the Label controls on your form by using an AssignIconsToSquares() method.
This code uses the keyword foreach in C# or For Each in Visual Basic.
Add the
AssignIconsToSquares()method toForm1.csorForm1.vb./// <summary> /// Assign each icon from the list of icons to a random square /// </summary> private void AssignIconsToSquares() { // The TableLayoutPanel has 16 labels, // and the icon list has 16 icons, // so an icon is pulled at random from the list // and added to each label foreach (Control control in tableLayoutPanel1.Controls) { Label iconLabel = control as Label; if (iconLabel != null) { int randomNumber = random.Next(icons.Count); iconLabel.Text = icons[randomNumber]; // iconLabel.ForeColor = iconLabel.BackColor; icons.RemoveAt(randomNumber); } } }
You can enter this code just below the code you added in the previous section.
Note
One of the lines is commented out on purpose. You add it later in this procedure.
The AssignIconsToSquares() method iterates through each label control in the TableLayoutPanel.
It runs the same statements for each of them.
The statements pull a random icon from the list.
- The first line converts the control variable to a label named iconLabel.
- The second line is an
ifstatement that checks to make sure the conversion worked. If the conversion does work, the statements in theifstatement run. - The first line in the
ifstatement creates a variable named randomNumber that contains a random number that corresponds to one of the items in the icons list. It uses the Next() method of the Random object. TheNextmethod returns the random number. This line also uses the Count property of the icons list to determine the range from which to choose the random number. - The next line assigns one of the icons list items to the Text property of the label.
- The next line hides the icons. The line is commented out here so you can verify the rest of the code before proceeding.
- The last line in the
ifstatement removes the icon that has been added to the form from the list.
Add a call to the
AssignIconsToSquares()method to the Form1 constructor inForm1.cs. This method fills the game board with icons. Constructors are called when you create an object.public Form1() { InitializeComponent(); AssignIconsToSquares(); }For Visual Basic, add the
AssignIconsToSquares()method call to theForm1_Loadmethod inForm1.vb.Private Sub Form1_Load(sender As Object, e As EventArgs) Handles MyBase.Load AssignIconsToSquares() End SubFor more information, see Constructors (C# programming guide) or Use constructors and destructors.
Save your program and run it. It should show a form with random icons assigned to each label.
Tip
If the Webdings icons don't display properly on the form, set the UseCompatibleTextRendering property of labels on the form to True.
Close your program, and then run it again. Different icons are assigned to each label.

The icons are visible now because you haven't hidden them. To hide them from the player, you can set each label's ForeColor property to the same color as its BackColor property.
Stop the program. Remove the comment marks for the commented line of code inside the loop in the
AssignIconsToSquares()method.
If you run the program again, the icons seem to have disappeared. Only a blue background appears. The icons are randomly assigned and are still there.
Add event handlers to labels
In this matching game, a player reveals a hidden icon, then a second one. If the icons match, they stay visible. Otherwise, both icons are hidden again.
To get your game to work this way, add a Click event handler that changes the color of the chosen label to match the background.
Open the form in the Windows Forms Designer. Select Form1.cs or Form1.vb, and then select View > Designer.
Choose the first label control to select it and double-click it to add a
Clickevent handler called label1 _Click() to the code.Then, hold the Ctrl key while you select each of the other labels. Be sure that every label is selected.
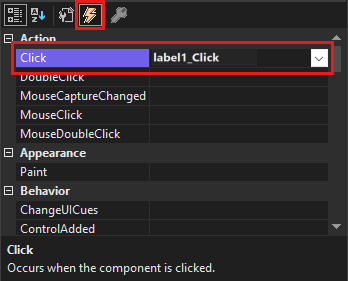
In the Properties window, select the Events button, which is a lightening bolt. For the Click event, select label1_Click in the box.

Select the Enter key. The IDE adds a
Clickevent handler called label1 _Click() to the code in Form1.cs or Form1.vb. Because you selected all the labels, the handler is hooked to each of the labels.Fill in the rest of the code.
/// <summary>
/// Every label's Click event is handled by this event handler
/// </summary>
/// <param name="sender">The label that was clicked</param>
/// <param name="e"></param>
private void label1_Click(object sender, EventArgs e)
{
    Label clickedLabel = sender as Label;

    if (clickedLabel != null)
    {
        // If the clicked label is black, the player clicked
        // an icon that's already been revealed --
        // ignore the click
        if (clickedLabel.ForeColor == Color.Black)
            return;

        clickedLabel.ForeColor = Color.Black;
    }
 }
Note
If you copy and paste the label1_Click() code block rather than entering the code manually, be sure to replace the existing label1_Click() code.
Otherwise, you'll end up with a duplicate code block.
Select Debug > Start Debugging to run your program. You should see an empty form with a blue background. Choose any of the cells in the form. One of the icons should become visible. Continue choosing different places in the form. As you choose the icons, they should appear.
![]()
Next steps
Advance to the next tutorial to learn how to change labels using a timer.