New Project Generation: Under the Hood, Part One
Ever thought about how to create your own project type? Wonder what actually happens when you create a new project? Let's take a peek under the hood and see what's really going on.
There are several tasks that Visual Studio coordinates for you:
It displays a tree of all available project types.
It displays a list of application templates for each project type and lets you pick one.
It collects project information for the application, such as project name and path.
It passes this information on to the project factory.
It generates project items and folders in the current solution.
The New Project Dialog Box
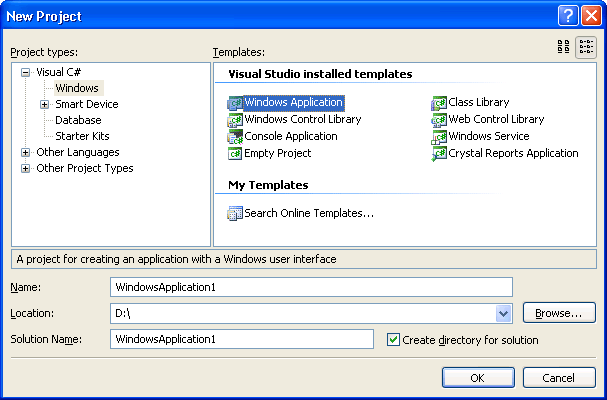
It all begins when you select a project type for a new project. Let's start by clicking New Project on the File menu. The New Project dialog box appears, looking something like this:

Let's take a closer look. The Project types tree lists the various project types you can create. When you select a project type like Visual C# Windows, you'll see a list of application templates to get you started. Visual Studio installed templates are installed by Visual Studio and are available to any user of your computer. New templates that you create or collect can be added to My Templates and are available only to you.
When you select a template like Windows Application, a description of the application type appears in the dialog box; in this case, A project for creating an application with a Windows user interface.
At the bottom of the New Project dialog box, you'll see several controls that gather more information. The controls you see depend on the project type, but generally they include a project Name text box, a Location text box and related Browse button, and a Solution Name text box and related Create directory for solution check box.
Populating the New Project Dialog Box
Where does the New Project dialog box get its information from? There are two mechanisms at work here, one of them deprecated. The New Project dialog box combines and displays the information obtained from both mechanisms.
The older (deprecated) method uses system registry entries and .vsdir files. This mechanism runs when Visual Studio opened. The newer method uses .vstemplate files. This mechanism runs when Visual Studio is initialized, for example, by running
devenv /setup
or
devenv /installvstemplates
Project Types
The position and names of the Project types root nodes, such as Visual C# and Other Languages, is determined by system registry entries. The organization of the child nodes, such as Database and Smart Device, mirrors the hierarchy of the folders that contain the corresponding .vstemplate files. Let's look at the root nodes first.
Project Type Root Nodes
When Visual Studio is initialized, it traverses the subkeys of the system registry key HKEY_LOCAL_MACHINE\SOFTWARE\Microsoft\VisualStudio\14.0\NewProjectTemplates\TemplateDirs to build and name the root nodes of the Project types tree. This information is cached for later use. Look at the TemplateDirs\{FAE04EC1-301F-11D3-BF4B-00C04F79EFBC}\/1 key. Each entry is a VSPackage GUID. The name of the subkey (/1) is ignored, but its presence indicates that this is a Project types root node. A root node may in turn have several subkeys that control its appearance in the Project types tree. Let's look at some of them.
(Default)
This is the resource ID of the localized string that names the root node. The string resource is located in the satellite DLL selected by the VSPackage GUID.
In the example, the VSPackage GUID is
{FAE04EC1-301F-11D3-BF4B-00C04F79EFBC}
and the resource ID (default value) of the root node (/1) is #2345
If you look up the GUID in the nearby Packages key and examine the SatelliteDll subkey, you can find the path of the assembly that contains the string resource:
<Visual Studio installation path>\VC#\VCSPackages\1033\csprojui.dll
To verify this, open the File Explorer and drag csprojui.dll into the Visual Studio directory.. The string table shows that resource #2345 has the caption Visual C#.
SortPriority
This determines the position of the root node in the Project types tree.
SortPriority REG_DWORD 0x00000014 (20)
The lower the number of the priority, the higher the position in the tree.
DeveloperActivity
If this subkey is present, then the position of the root node is controlled by the Developer Settings dialog box. For example,
DeveloperActivity REG_SZ VC#
indicates that Visual C# will be a root node if Visual Studio is set for Visual C++ development. Otherwise, it will be a child node of Other Languages.
Folder
If this subkey is present, then the root node becomes a child node of the specified folder. A list of possible folders appears under the key
HKEY_LOCAL_MACHINE\SOFTWARE\Microsoft\VisualStudio\11.0\NewProjectTemplates\PseudoFolders
For example, the Database Projects entry has a Folder key that matches the Other Project Types entry in PseudoFolders. So, in the Project types tree, Database Projects will be a child node of Other Project Types.
Project Type Child Nodes and .vstdir Files
The position of the child nodes in the Project types tree follows the hierarchy of the folders in the ProjectTemplates folders. For machine templates (Visual Studio installed templates), the typical location is \Program Files\Microsoft Visual Studio 14.0\Common7\IDE\ProjectTemplates\ and for user templates (My templates), the typical location is \My Documents\Visual Studio 14.0\Templates\ProjectTemplates\. The folder hierarchies from these two locations are merged to create the Project types tree.
For Visual Studio with C# developer settings, the Project types tree looks something like this:

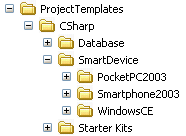
The corresponding ProjectTemplates folder looks like this:

When the New Project dialog box opens, Visual Studio traverses the ProjectTemplates folder and recreates its structure in the Project types tree with some changes:
The root node in the Project types tree is determined by the application template.
The node name can be localized and can contain special characters.
The sort order can be changed.
Finding the Root Node for a Project Type
When Visual Studio traverses the ProjectTemplates folders, it opens all .zip files and extracts any .vstemplate files. A .vstemplate file uses XML to describe an application template. For more information, see New Project Generation: Under the Hood, Part Two.
The <ProjectType> tag determines the project type for the application. For example, the \CSharp\SmartDevice\WindowsCE\1033\WindowsCE-EmptyProject.zip file contains an EmptyProject.vstemplate file that has this tag:
<ProjectType>CSharp</ProjectType>
The <ProjectType> tag, and not the subfolder in the ProjectTemplates folder, determines an application's root node in the Project types tree. In the example, Windows CE applications would appear under the Visual C# root node, and even if you were to move the WindowsCE folder to the VisualBasic folder, Windows CE applications still would appear under the Visual C# root node.
Localizing the Node Name
When Visual Studio traverses the ProjectTemplates folders, it examines any .vstdir files it finds. A .vstdir file is an XML file that controls the appearance of the project type in the New Project dialog box. In the .vstdir file, use the <LocalizedName> tag to name the Project types node.
For example, the \CSharp\Database\TemplateIndex.vstdir file contains this tag:
<LocalizedName Package="{462b036f-7349-4835-9e21-bec60e989b9c}" ID="4598"/>
This determines the satellite DLL and resource ID of the localized string that names the root node, in this case, Database. The localized name can contain special characters that are not available for folder names, such as .NET.
If no <LocalizedName> tag is present, the project type is named by the folder itself, SmartPhone2003.
Finding the Sort Order for a Project Type
To determine the sort order of the project type, .vstdir files use the <SortOrder> tag.
For example, the \CSharp\Windows\Windows.vstdir file contains this tag:
<SortOrder>5</SortOrder>
The \CSharp\Database\TemplateIndex.vstdir file has a tag with a larger value:
<SortOrder>5000</SortOrder>
The lower the number in the <SortOrder> tag, the higher the position in the tree, so the Windows node appears higher than the Database node in the Project types tree.
If no <SortOrder> tag is specified for a project type, it appears in alphabetical order following any project types that contain <SortOrder> specifications.
Note that there are no .vstdir files in the My Documents (My Templates) folders. User application project type names are not localized and appear in alphabetical order.
A Quick Review
Let's modify the New Project dialog box and create a new user project template.
Add a MyProjectNode subfolder to the \Program Files\Microsoft Visual Studio 14.0\Common7\IDE\ProjectTemplates\CSharp folder.
Create a MyProject.vstdir file in the MyProjectNode folder using any text editor.
Add these lines to the .vstdir file:
<TemplateDir Version="1.0.0">
    <SortOrder>6</SortOrder>
</TemplateDir>
Save and close the .vstdir file.
Create a MyProject.vstemplate file in the MyProjectNode folder using any text editor.
Add these lines to the .vstemplate file:
<VSTemplate Version="2.0.0" Type="Project" xmlns="http://schemas.microsoft.com/developer/vstemplate/2005">
    <TemplateData>
        <ProjectType>CSharp</ProjectType>
    </TemplateData>
</VSTemplate>
Save the.vstemplate file and close the editor.
Send the .vstemplate file to a new compressed MyProjectNode\MyProject.zip folder.
From the Visual Studio command window, type:
devenv /installvstemplatesOpen Visual Studio.
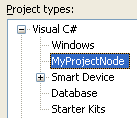
Open the New Project dialog box and expand the Visual C# project node.

MyProjectNode appears as a child node of Visual C# just under the Windows node.