Describe and refine your flow
Copilot for Power Automate is a powerful assistant that allows makers to create a cloud flow by providing a natural language description of the desired automation. Copilot provides an initial proposed flow, and then you can refine your description to get the proposed flow steps as close to your requirements as possible. You can continue to enhance the flow with remaining changes that meet your full requirements.
Consider this feature as an alternative way of starting a flow, similar to how you would choose a template. However, with templates, you're limited to only choosing the ones that are available. With Copilot, you can create a wider variety of automation by describing your automation scenario.
After you create the flow, it's almost ready to run. Before you can run your flow, you need to set up some remaining options on the different steps. For example, if you have a SharePoint action, you need to set up the SharePoint site and list information.
When you begin describing what you want from Copilot, you can start with merely a single word. For example, the following image shows "Teams" as the prompt (number 1 in the image below). Copilot helps by providing possible descriptions that you can choose from to refine your prompt.
After selecting the prompt (number 2 in the image above), or by selecting Generate based on your prompt (number 3 in the image above), Copilot presents you with a proposed flow. The image below shows a Suggested flow produced by selecting the Copilot prompt "When a keyword is mentioned in teams, post a message to a chat or a channel".
From this point, you have several choices to proceed:
Refine your original prompt to get the proposed flow closer to what you envisioned. You can do this in the field at the top, and then select the send icon in the lower right of the field (number 4 in the image above).
Select This isn't what I'm looking for to bring up a Help panel with links to start from a template or start from blank (number 5 in the image above).
Select Next to have Copilot check your connections and begin taking you down the path to build the flow (number 6 in the image above).
Select Cancel to stop the process and navigate to the Create screen.
How to describe what you need
When telling your copilot what you need, be as specific as possible. As shown in the previous example, including "...mentioned in teams" helps Copilot determine the connector to use. When you're too vague, Copilot must choose between multiple connectors that might handle a mention. A good example of this scenario is revising the prompt to include retrieving the specials that you want to reply with, as follows:
"When a keyword #specials is mentioned in teams use List rows in Excel to retrieve the specials and respond with the specials."
In response, Copilot selects the Microsoft Excel Online connector to retrieve the specials information. Keep in mind that Copilot might give you slightly different results for the same prompt.
In this case, you want Copilot to retrieve the information from a Microsoft Dataverse table. Therefore, you could change the prompt to be more specific, with something like this:
"When a keyword #specials is mentioned in Teams use the Dataverse List rows to retrieve the specials and post the specials back to Teams."
Now, the proposed flow uses Dataverse, which is more like what we want.
The next refinement is that you want to format the specials into HTML and post a message if no specials are available, as follows:
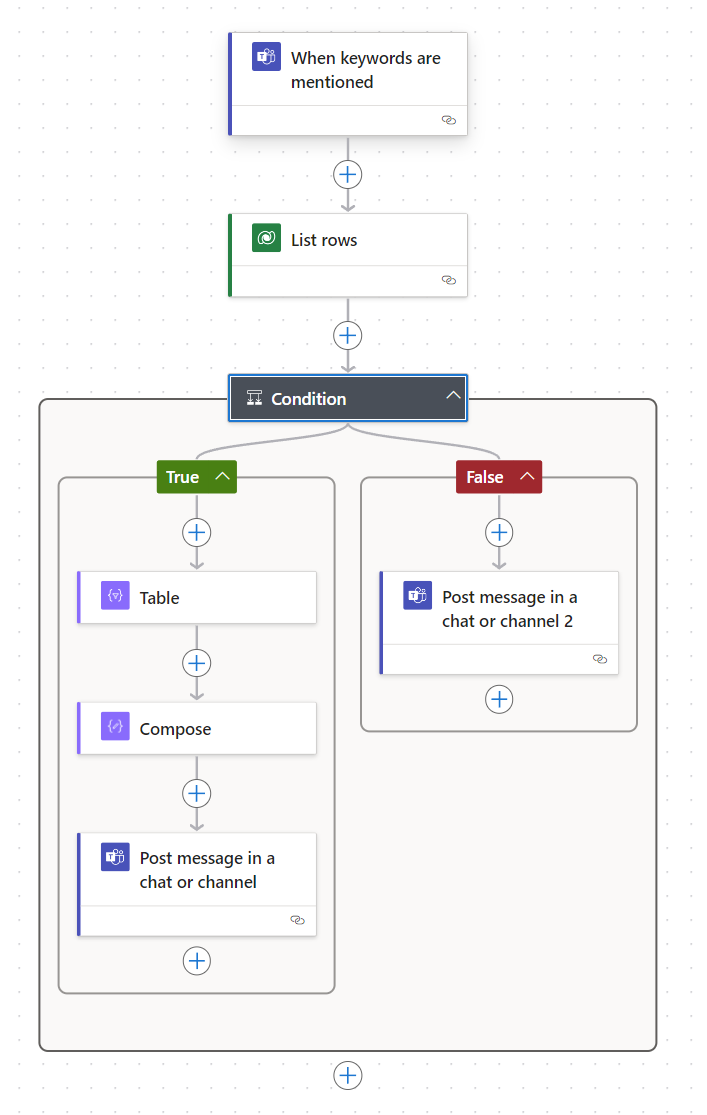
"When a keyword #specials is mentioned in teams use Dataverse List rows to retrieve the specials, and format them using Create HTML table if there are any rows post the html created to the teams channel otherwise post there "There are no specials available today."
Because this prompt gets you closer to the automation that you want to build, you can have Copilot create the flow. The following example shows what the cloud flow might look like in the Power Automate designer.
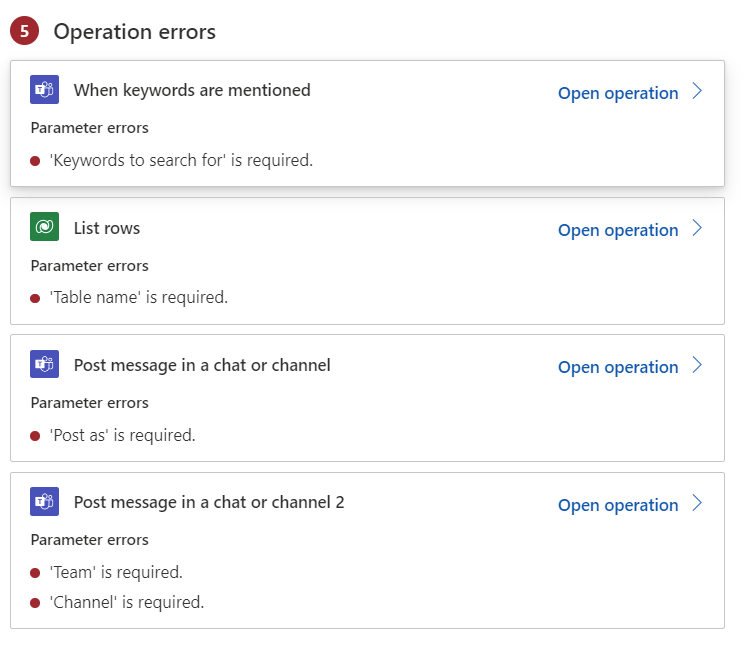
Your next step is to decide what you need to edit on the steps that Copilot created. The quickest way to view the required items is by using Flow checker.
After updating the errors, you should review the other steps to confirm that they're correct. For example, in the post message steps, Copilot added a message that's already created. You should review it to determine if it needs revision.
What you should refine before creating the flow
After Copilot presents the suggested flow, you should consider the following factors regarding what you should do and what you can do.
What you should do at this point:
Check if the flow trigger is using the correct connector.
Review the general order of proposed steps and what they're doing so that you can confirm that they make sense.
What you can do at this point:
Review the other suggested flows to determine if others are better.
Evaluate if you need error handling if any steps fail.
Assess whether you need alternate options.
Give extra instructions to add more tasks to complete.
You can complete all can-do items during initial creation or after you're in the editor.
In the next article, you'll learn about using Copilot to iterate on your cloud flow.

