Wizard-driven setup of Warehouse Management parameters
There are many things you can do when it comes to printing labels for your waves. These labels are used to support the palletizing of the cartons for a shipment. Customers, retailers for example, can have compliance issues that mandate the layout and content of the labels for each carton.
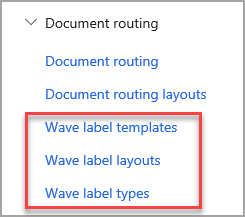
The screenshot below shows the menu options for the printing of the wave labels, located at Warehouse management > Setup > Document routing :

With the Wave label layouts, you can design how the label should be formatted:
Some of the key tasks that can be achieved with wave label printing are:
- Prints labels according to the number of cartons on a single work line, without using containerization. (A "carton" is a unit that is designated on unit sequence group lines.)
- Prints several different label sequences (for example, carton and pallet labels).
- Includes label enumeration (for example, 1/124, 2/124, ... 124/124), and define the range of enumeration (for example, work line, load line, or shipment).
- Creates and prints a bill of lading ID on labels before the bill of lading is generated.
- Creates a unique serial shipping container code (SSCC) for each carton, and include it on each label.
- Creates GS1-compliant number sequences for bill of lading IDs and SSCCs.
- Reprints labels from both mobile devices and the rich client.
- Voids labels (for example, in short pick scenarios), and reprint them.
- Clean up the wave label history.
- Improvements to document routing layouts are shared between document routing layouts and wave label layouts. These enhancements make it more efficient to label cartons before palletization. They especially benefit companies that ship to large retailers that automatically confirm order receipts by scanning each carton separately.
Document routing label layouts
Document routing label layouts define the way that labels are laid out and the data that is printed on them. You configure the printing trigger points when you set up mobile device menu items and work templates.
The information in this section applies to all document routing label layouts, including the layouts for license plate labels, container labels, custom labels, and wave labels.
You can print highly complex labels, provided that the printing device can interpret the text that is sent to it. For example, a ZPL layout that includes a bar code might resemble the following example.
^XA~TA000~JSN^LT0^MNW^MTD^PON^PMN^LH0,0^JMA^PR2,2~SD15^JUS^LRN^CI0^XZ
^XA
^MMT
^PW320
^LL0160
^LS0
^FT20,58^A0N,28,28^FH\^FDLabel:^FS
^FT20,81^AAN,18,10^FH\^FD$LicensePlateId$^FS
^BY1,3,17^FT20,106^BCN,,Y,N,N,A
^FD$LicensePlateId$^FS
^PQ1,,,Y^XZ
As part of the label printing process, the text $LicensePlateId$ in this example will be replaced with a data value. Several widely available label generation tools can help you format the text for the label layout. Many of these tools support the $FieldName$ format. In addition, Supply Chain Management uses special formatting logic as part of the field mapping for the document routing layout.
To see the values that will be printed, go to Warehouse management > Inquiries and reports > License plate labels.
Custom number formats
You can customize the formatting of numerical field values that are printed by using codes that have the following format.
$FieldName:FormatString$
Here is an explanation of this format:
FieldNameis the name of the data field (such as Qty).FormatStringdefines how the data must be printed.
The following examples show how you can customize the work quantity (Qty) field:
- To always show four digits (by using zeros as placeholders), use
$Qty:0000$. For example, if the quantity is 10, the label will show "0010." - To always show two decimal places, use
$Qty:0.00$. For example, if the quantity is 10, the label will show "10.00."
For a complete list of the available number format strings, see Custom numeric format strings.
Custom string formats
You can remove the first characters of a string by using the following field and format code.
$FieldName:#..$
Here, # specifies the number of characters to skip. For example, to print a Serial Shipping Container Code (SSCC) license plate number that doesn't include the first two characters, use $LicensePlateId:2..$. In this case, the license plate number 0011111111111222221 will be printed as "11111111111222221."
Custom date/time formats
The following example shows how you can control the format that is used to print dates.
$PrintedDate:dd-MM-yyyy$
In this example, the date April 30, 2020, will be printed as "30-04-2020."
For a complete list of the available date/time formats, see Custom date and time format strings.
Print individual lines from multiline data
If a data field contains multiple lines (that is, lines that are separated by line breaks), you can print an individual line by using the following format.
$FieldName[#]$
Here, # is the line number that you want to print. (Use 1 for the first line.)
For example, your system has an AdditionalAddress field that stores the following multiline address:
Contoso Inc.
123 Street Name
Some City, Some State
You can print this address, one line at a time, by using the following codes.
| Code | Text that is printed |
|---|---|
$AdditionalAddress[1]$ |
Contoso Inc. |
$AdditionalAddress[2]$ |
123 Street Name |
$AdditionalAddress[3]$ |
Some City, Some State |