Tutorial: Getting started with Always Encrypted
Applies to:
SQL Server
Azure SQL Database
Azure SQL Managed Instance
This tutorial teaches you how to get started with Always Encrypted. It will show you:
- How to encrypt selected columns in your database.
- How to query encrypted columns.
Note
If you're looking for information on Always Encrypted with secure enclaves, see the following tutorials instead:
Prerequisites
For this tutorial, you need:
- An empty database in Azure SQL Database, Azure SQL Managed Instance, or SQL Server. The below instructions assume the database name is ContosoHR. You need to be an owner of the database (a member of the db_owner role). For information on how to create a database, see Quickstart: Create a single database - Azure SQL Database or Create a database in SQL Server.
- Optional, but recommended, especially if your database is in Azure: a key vault in Azure Key Vault. For information on how to create a key vault, see Quickstart: Create a key vault using the Azure portal.
- If your key vault uses the access policy permissions model, make sure you have the following key permissions in the key vault:
get,list,create,unwrap key,wrap key,verify,sign. See Assign a Key Vault access policy. - If you're using the Azure role-based access control (RBAC) permission model, make you sure you're a member of the Key Vault Crypto Officer role for your key vault. See Provide access to Key Vault keys, certificates, and secrets with an Azure role-based access control.
- If your key vault uses the access policy permissions model, make sure you have the following key permissions in the key vault:
- The latest version of SQL Server Management Studio (SSMS) or the latest version of the SqlServer and Az PowerShell modules. The Az PowerShell module is required only if you're using Azure Key Vault.
Step 1: Create and populate the database schema
In this step, you'll create the HR schema and the Employees table. Then, you'll populate the table with some data.
Connect to your database. For instructions on how to connect to a database from SSMS, see Quickstart: Connect and query an Azure SQL Database or an Azure SQL Managed Instance using SQL Server Management Studio (SSMS) or Quickstart: Connect and query a SQL Server instance using SQL Server Management Studio (SSMS).
Open a new query window for the ContosoHR database.
Paste in and execute the below statements to create a new table, named Employees.
CREATE SCHEMA [HR];
GO

CREATE TABLE [HR].[Employees]
(
    [EmployeeID] [int] IDENTITY(1,1) NOT NULL
    , [SSN] [char](11) NOT NULL
    , [FirstName] [nvarchar](50) NOT NULL
    , [LastName] [nvarchar](50) NOT NULL
    , [Salary] [money] NOT NULL
) ON [PRIMARY];
Paste in and execute the below statements to add a few employee records to the Employees table.
INSERT INTO [HR].[Employees]
(
    [SSN]
    , [FirstName]
    , [LastName]
    , [Salary]
)
VALUES
(
    '795-73-9838'
    , N'Catherine'
    , N'Abel'
    , $31692
);

INSERT INTO [HR].[Employees]
(
    [SSN]
    , [FirstName]
    , [LastName]
    , [Salary]
)
VALUES
(
    '990-00-6818'
    , N'Kim'
    , N'Abercrombie'
    , $55415
);
Step 2: Encrypt columns
In this step, you'll provision a column master key and a column encryption key for Always Encrypted. Then, you'll encrypt the SSN and Salary columns in the Employees table.
SSMS provides a wizard that helps you easily configure Always Encrypted by setting up a column master key, a column encryption key, and encrypt selected columns.
In Object Explorer, expand Databases > ContosoHR > Tables.
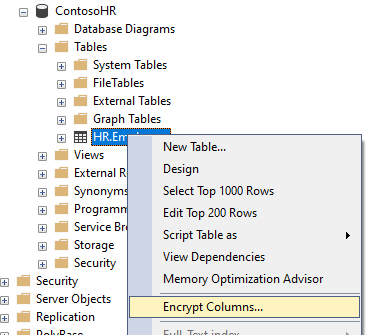
Right-click the Employees table and select Encrypt Columns to open the Always Encrypted wizard.
Select Next on the Introduction page of the wizard.
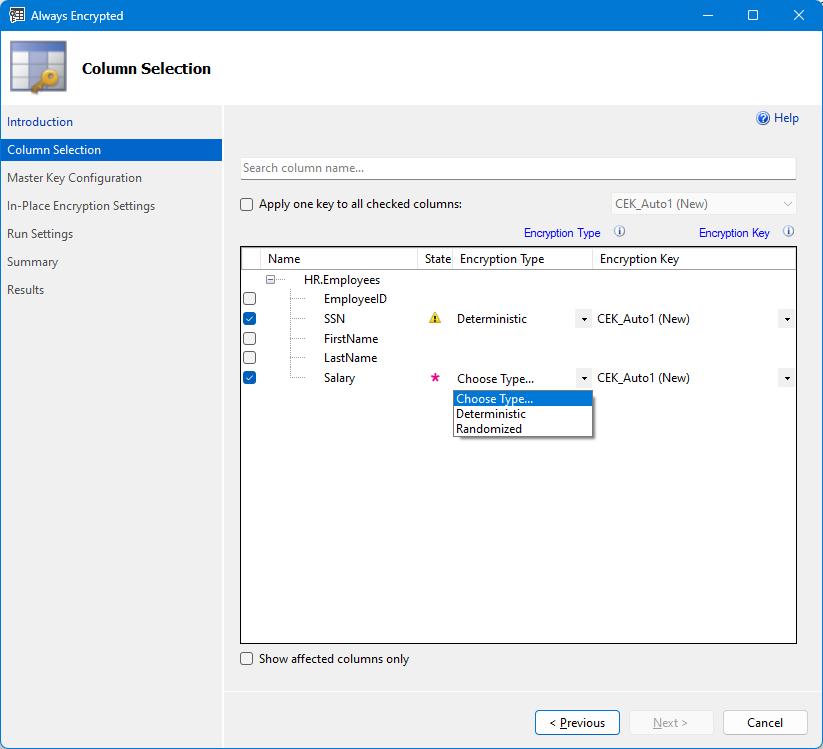
On the Column Selection page.
- Select the SSN and Salary columns. Choose deterministic encryption for the SSN column and randomized encryption for the Salary column. Deterministic encryption supports queries, such as point lookup searches that involve equality comparisons on encrypted columns. Randomized encryption doesn't support any computations on encrypted columns.
- Leave CEK-Auto1 (New) as the column encryption key for both columns. This key doesn't exist yet and will be generated by the wizard.
- Select Next.
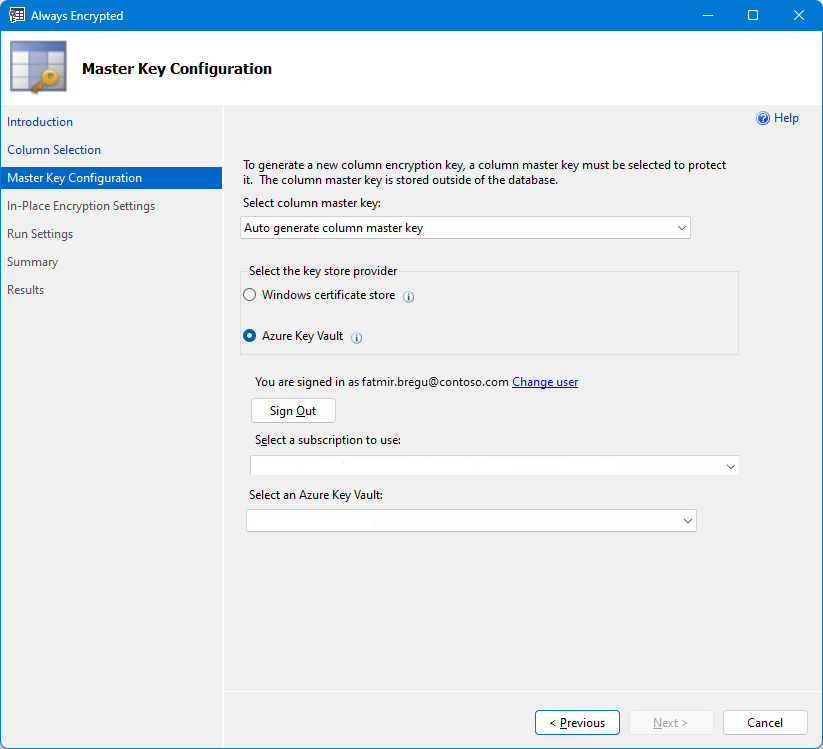
On the Master Key Configuration page, configure a new column master key that will be generated by the wizard. First, you need to select where you want to store your column master key. The wizard supports two key store types:
- Azure Key Vault - recommended if your database is in Azure
- Windows certificate store
In general, Azure Key Vault is the recommended option, especially if your database is in Azure.
To use Azure Key Vault:
- Select Azure Key Vault.
- Select Sign in and complete signing in to Azure.
- After you've signed in, the page will display the list of subscriptions and key vaults, you have access to. Select an Azure subscription containing the key vault, you want to use.
- Select your key vault.
- Select Next.
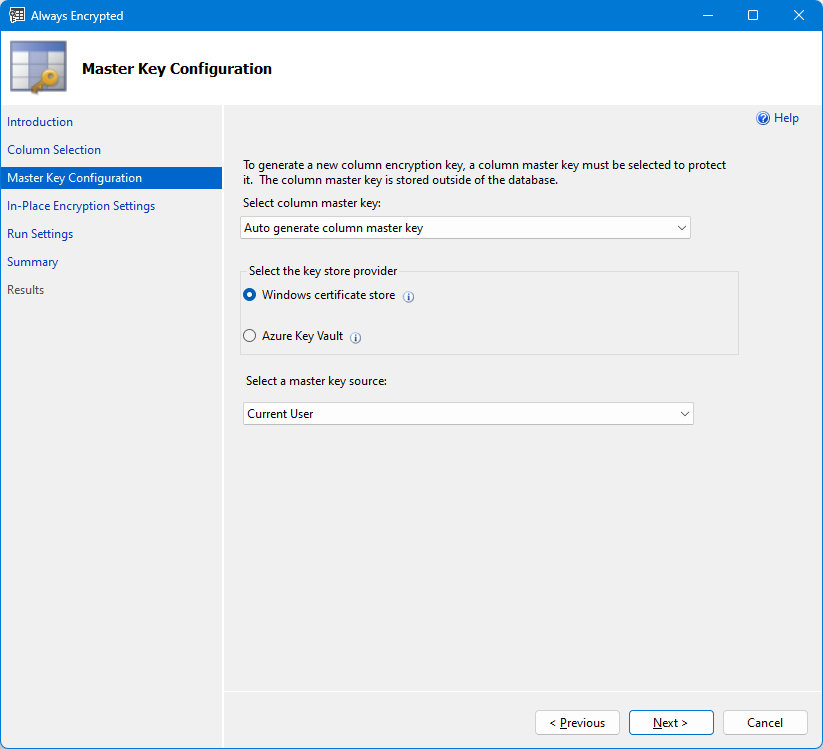
To use Windows certificate store:
Select Windows certificate store.
Leave the default selection of Current User - this will instruct the wizard to generate a certificate (your new column master key) in the Current User store.
Select Next.
On the In-Place Encryption Settings page, no additional configuration is required because the database does not have an enclave enabled. Select Next.
On the Run Settings page, you're asked if you want to proceed with encryption or generate a PowerShell script to be executed later. Leave the default settings and select Next.
On the Summary page, the wizard informs you about the actions it will execute. Check all the information is correct and select Finish.
On the Results page, you can monitor the progress of the wizard's operations. Wait until all operations complete successfully and select Close.
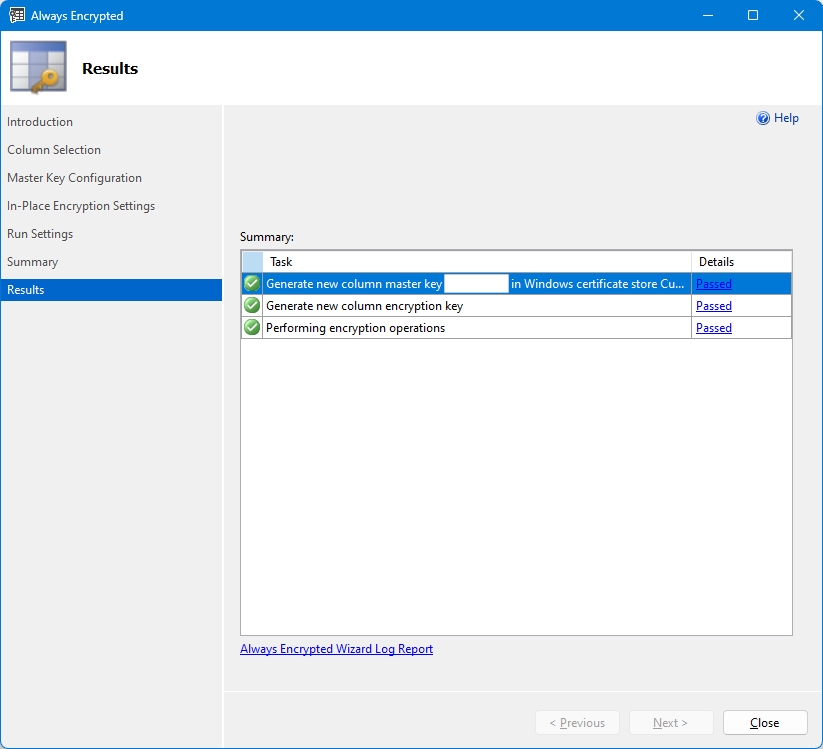
(Optional) Explore the changes the wizard has made in your database.
Expand ContosoHR > Security > Always Encrypted Keys to explore the metadata objects for the column master key and the column encryption that the wizard created.
You can also run the below queries against the system catalog views that contain key metadata.
SELECT * FROM sys.column_master_keys;
SELECT * FROM sys.column_encryption_keys
SELECT * FROM sys.column_encryption_key_values
In Object Explorer, right-click the Employees table and select Script Table as > CREATE To > New Query Editor Window. This will open a new query window with the CREATE TABLE statement for the Employees table. Note the ENCRYPTED WITH clause that appears in the definitions of the SSN and Salary columns.
You can also run the below query against sys.columns to retrieve column-level encryption metadata for the two encrypted columns.
SELECT
[name]
, [encryption_type]
, [encryption_type_desc]
, [encryption_algorithm_name]
, [column_encryption_key_id]
FROM sys.columns
WHERE [encryption_type] IS NOT NULL;
Step 3: Query encrypted columns
Connect to your database with Always Encrypted disabled for your connection.
- Open a new query window.
- Right-click anywhere in the query window and select Connection > Change Connection. This will open the Connect to Database Engine dialog.
- Select Options <<. This will show additional tabs in the Connect to Database Engine dialog.
- Select the Always Encrypted tab.
- Make sure Enable Always Encrypted (column encryption) isn't selected.
- Select Connect.
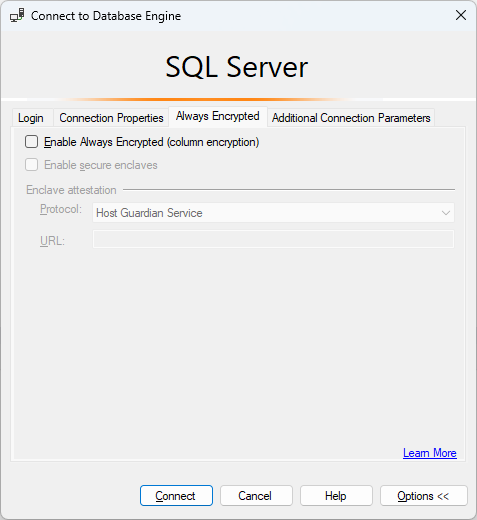
Paste in and execute the following query. The query should return binary encrypted data.
SELECT [SSN], [Salary] FROM [HR].[Employees]
Connect to your database with Always Encrypted enabled for your connection.
- Right-click anywhere in the query window and select Connection > Change Connection. This will open the Connect to Database Engine dialog.
- Select Options <<. This will show additional tabs in the Connect to Database Engine dialog.
- Select the Always Encrypted tab.
- Select Enable Always Encrypted (column encryption).
- Select Connect.
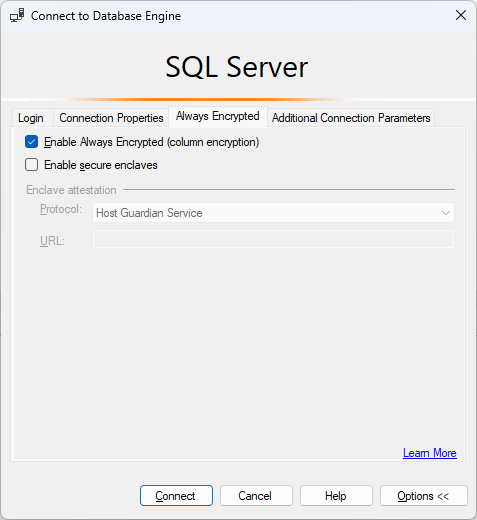
Rerun the same query. Since you're connected with Always Encrypted enabled for your database connection, the client driver in SSMS will attempt to decrypt data stored in both encrypted columns. If you use Azure Key Vault, you may be prompted to sign into Azure.

Enable Parameterization for Always Encrypted. This feature allows you to run queries that filter data by encrypted columns (or insert data to encrypted columns).
- Select Query from the main menu of SSMS.
- Select Query Options....
- Navigate to Execution > Advanced.
- Make sure Enable Parameterization for Always Encrypted is checked.
- Select OK.
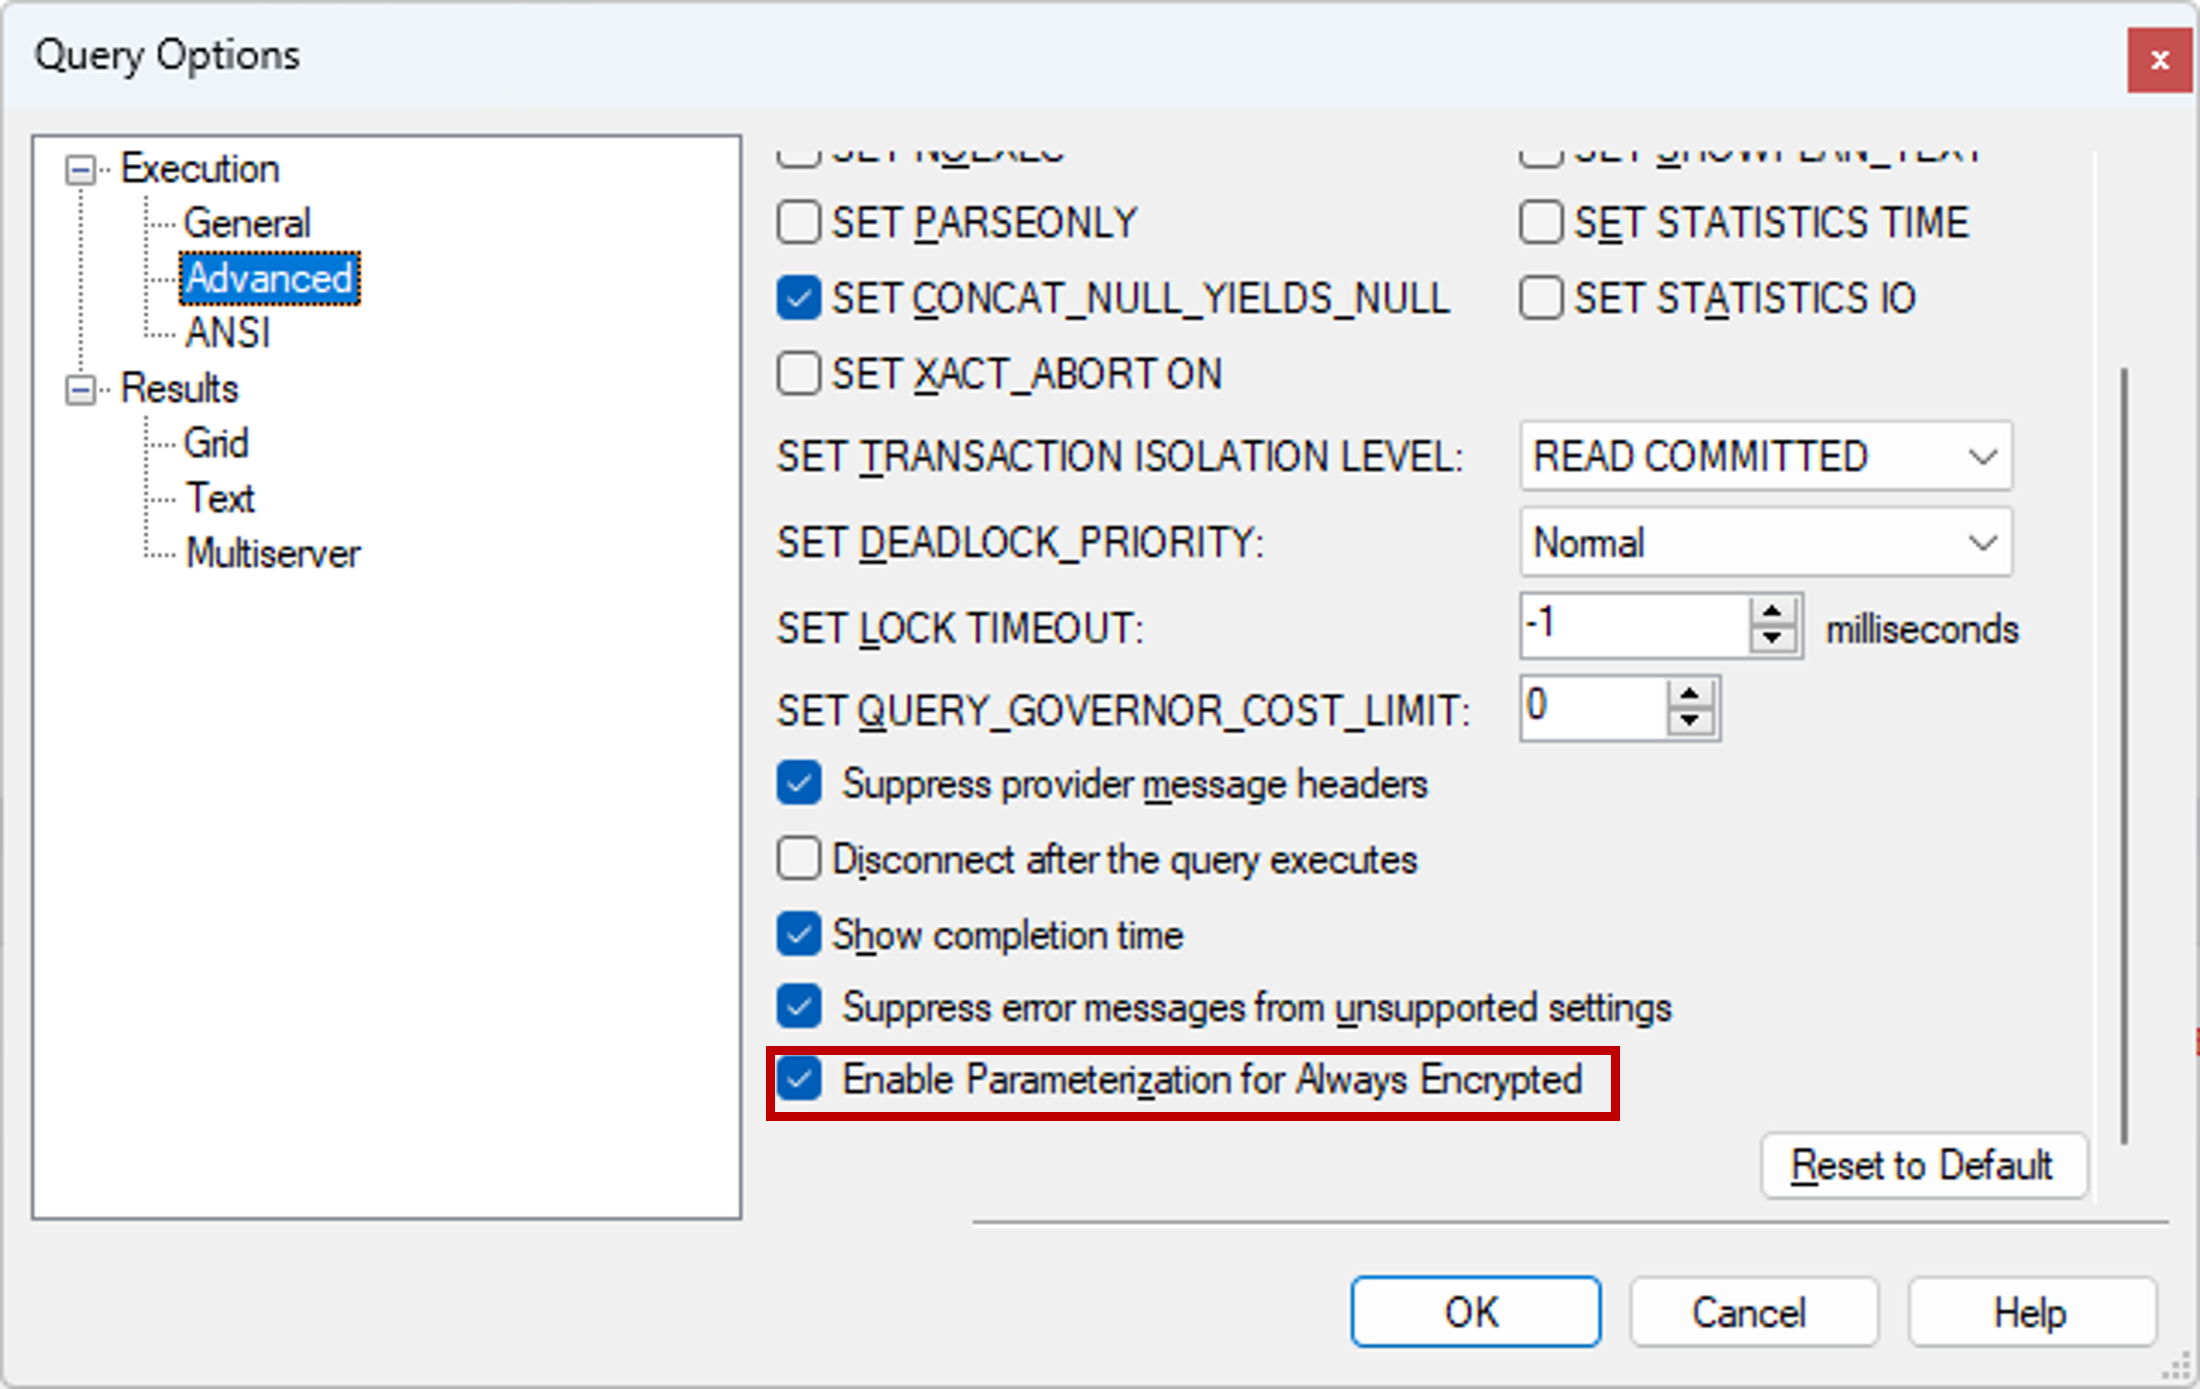
Paste in and execute the below query, which filters data by the encrypted SSN column. The query should return one row containing plaintext values.
DECLARE @SSN [char](11) = '795-73-9838'
SELECT [SSN], [Salary] FROM [HR].[Employees]
WHERE [SSN] = @SSN
Optionally, if you're using Azure Key Vault configured with the access policy permissions model, follow the below steps to see what happens when a user tries to retrieve plaintext data from encrypted columns without having access to the column master key protecting the data.
- Remove the key
unwrappermission for yourself in the access policy for your key vault. For more information, see Assign a Key Vault access policy. - Since the client driver in SSMS caches the column encryption keys acquired from a key vault for 2 hours, close SSMS and open it again. This will ensure the key cache is empty.
- Connect to your database with Always Encrypted enabled for your connection.
- Paste in and execute the following query. The query should fail with the error message indicating you're missing the required
unwrappermission.
SELECT [SSN], [Salary] FROM [HR].[Employees]- Remove the key