Authenticating Users with Active Directory Federation Services
Applies to: Microsoft Dynamics NAV 2018. See Microsoft Dynamics NAV 2017 version
Dynamics NAV supports Active Directory Federation Services (AD FS) authentication for authenticating users, without having to use the Access Control Service (ACS). This article walks you through the steps about how to set up AD FS authentication in AD FS Management console, and then how to configure it in Dynamics NAV.
Prerequisites
Your deployment must meet the following prerequisites:
Active Directory Federation Services (AD FS) is installed on the computer that you want to prepare as the federation server.
For more information, see Active Directory Federation Services.
To complete the steps in this article, you will need to know the public URL for AD FS server. This URL needs to be accessible from a web browser on the computer that is running the Microsoft Dynamics NAV Server instance.
Note
The steps in this article are based on using the AD FS version on Windows Server 2016, but should also work with earlier versions of AD FS. Be aware that some dialog box references in the steps might be slightly different in earlier versions of AD FS.
A working Dynamics NAV deployment that includes the following components:
Microsoft Dynamics NAV Server
Microsoft Dynamics NAV Web Server components installed and configured to use SSL (https)
For more information, see How to: Install the Web Server Components and How to: Configure SSL to Secure the Connection to Microsoft Dynamics NAV Web Client.
Microsoft Dynamics NAV Windows client (optional)
Microsoft Dynamics NAV Server Administration tool (optional)
Microsoft Dynamics NAV Administration Shell (optional)
Configure AD FS to allow Dynamics NAV authentication
These steps are done by using the AD FS Management console on the server where AD FS is running.
Set up a Relying Party Trust for the Dynamics NAV client
You must complete these steps separately for Microsoft Dynamics NAV Web client and Microsoft Dynamics NAV Windows client.
Open Server Manager on the computer that is running AD FS, and the choose AD FS to start AD FS Management.
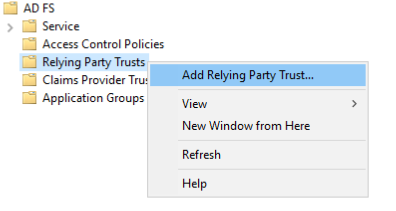
Right-click Relying Party Trusts, and then choose Add Relying Party Trust. The Add Relying Party Trust Wizard appears.
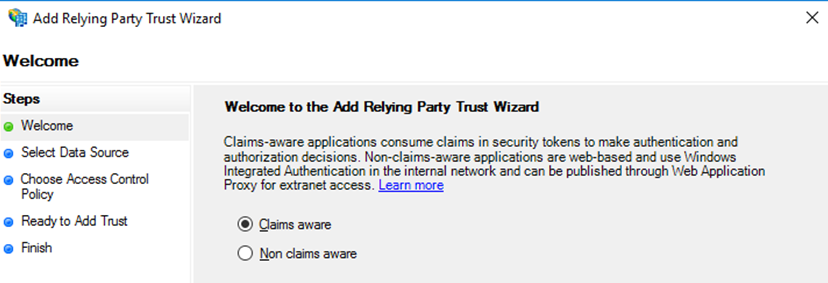
In the Welcome step, choose Claims aware, and then choose Start.
In the Select Data Source step, choose Enter data about the relying party manually, and then choose Next.
In the Specify Display Name step, give the relying party a name, such as
Dynamics NAV Web ClientorDynamics NAV Windows Client, and then choose Next.In the Configure Certificate step, choose Next to skip specifying the token encryption certificate.
This assumes that the Microsoft Dynamics NAV Web client is running https.
In the Configure URL step, select the Enable support for the WS-federation Passive protocol check box.
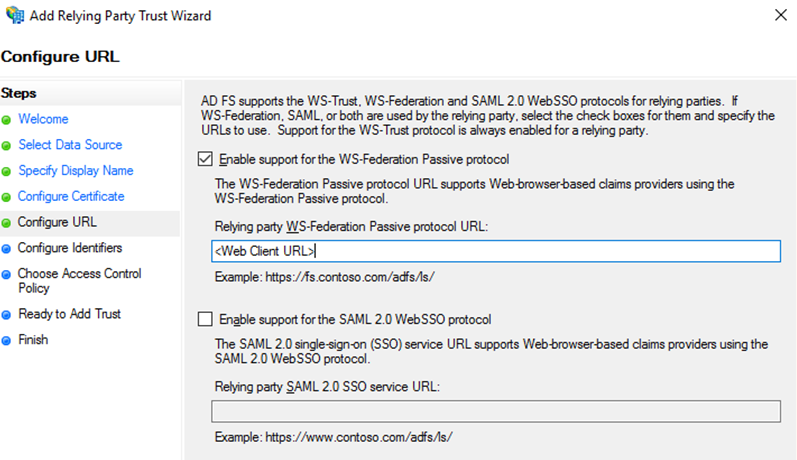
Then, in Relying party WS-Federation Passive Control URL field, enter the URL for the Dynamics NAV client according to the following:
If you are setting up AD FS for the Microsoft Dynamics NAV Web client, set this to the full URL for the Web client. The URL typically has the format:
https://[web-server-computer]:[port]/[web-instance]Replace
<webserver-instance>with the instance name of the Web server instance as defined in IIS for your installation. Make sure that the case matches exactly. For example:https://MyWebServer:8080/DynamicsNAV110or
https://corp.sample.com/DynamicsNAV110If you are setting up AD FS for the Microsoft Dynamics NAV Windows client, you can use any URL as long as it is in the form of a trusted URL, such as
https://mynavwinclientorhttps://www.cronus. com. The URL does not have to point to a valid target, it is only used by AD FS to validate the client. For example, you could just use the domain name of your site or the name of the computer that is running the Microsoft Dynamics NAV Windows client:https://corp.sample.comor
https://MyComputerName
Choose Next to continue.
Note
This is the URL to which AD FS will be allowed to issue authentication tokens.
In the Configure Identifiers step, in the Relying party trust identifier field, remove the Microsoft Dynamics NAV Web client URL, and then add one of the following URL instead:
- If you are setting up AD FS for the Microsoft Dynamics NAV Web client, add the URL:
https://dynamicsnavwebclient - If you are setting up AD FS for the Microsoft Dynamics NAV Windows client, add the URL:
https://dynamicsnavwinclient
Choose Next to continue.
Important
This is the URL which is used to identify the relying party, and it has to be unique for the AD FS setup. This URL will be used as the wtrealm parameter in the WSFederationLoginEndpoint setting of the Microsoft Dynamics NAV Server instance configuration (CustomSettings.config file).
- If you are setting up AD FS for the Microsoft Dynamics NAV Web client, add the URL:
In the Choose Access Control Policy step, setup multi-factor authentication if required, and then choose Next.
Review the configuration, and then choose Next.
On the Finish step, select the Configure claims issuance policy for the application check box, and then choose Next.
Based on whether you will be using SAML tokens or JSON Web Tokens (JWT), which are supported from AD FS 3.0 and later), you need to add different claims. Complete one of the following procedures for your token type.
Set up support for SAML 1.0 tokens
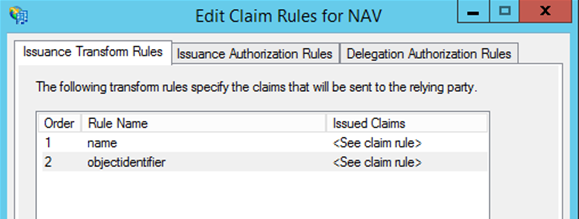
In the Edit Claim Rules dialog box, choose Add Rule.
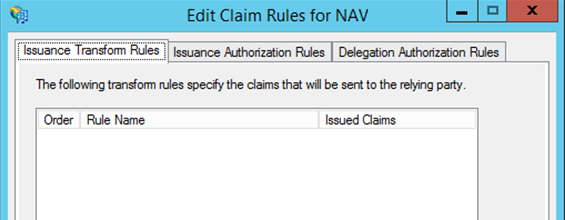
In the Select Rule Template step, choose Transform an incoming Claim template, and then choose Next.
In the Edit Rule step, set the Claim rule name to
name, the Incoming claim type toUPN, and the Outgoing claim type toName. Choose OK when done.Repeat steps 1 to 3 to add another rule, except this time, set the Claim rule name to
objectidentifier, the Incoming claim type toPrimary SID, and the Outgoing claim type to:https://schemas.microsoft.com/identity/claims/objectidentifierChoose OK when done.
Close the Edit Claim Rules dialog box.
Set up support for JSON Web tokens (JWT)
JWT tokens are not supported by AD FS 2.0 or Microsoft Dynamics NAV 2015 (Cummulative Update 14 and earlier).
In the Edit Claim Rules dialog box, choose Add Rule.

In the Select Rule Template step, choose Send Claims Using a Custom Rule template, and then choose Next.
Set the Claim rule name to `name```, and the Custom rule to:
c:[Type == "https://schemas.xmlsoap.org/ws/2005/05/identity/claims/upn"] => issue(Type = "unique_name", Issuer = c.Issuer, OriginalIssuer = c.OriginalIssuer, Value = c.Value, ValueType = c.ValueType);Repeat steps 1 to 3 to add another custom rule, and set the Claim rule name to
objectidentifier, and the Custom rule to:c:[Type == "https://schemas.microsoft.com/ws/2008/06/identity/claims/primarysid"] => issue(Type = "oid", Issuer = c.Issuer, OriginalIssuer = c.OriginalIssuer, Value = c.Value, ValueType = c.ValueType);Close the Edit Claim Rules dialog box.

Start Window Powershell, and run the following command to define the token type for the relying party to be JWT:
Set-ADFSRelyingPartyTrust –TargetIdentifier "<Relying party trust identifier>" –EnableJWT $trueReplace
<Relying party trust identifier>with the relying party trust identifier that you added in AD FS for the client, for example:Set-ADFSRelyingPartyTrust –TargetIdentifier "https://dynamicsnavwebclient" –EnableJWT $trueor
Set-ADFSRelyingPartyTrust –TargetIdentifier "https://dynamicsnavwinclient" –EnableJWT $true
Configure Dynamics NAV to use AD FS authentication
To setup Dynamics NAV for ADFS authentication, you must modify the configuration of the Microsoft Dynamics NAV Server, Microsoft Dynamics NAV Web client, and Microsoft Dynamics NAV Windows clients.
Dynamics NAV Server instance setup
The Microsoft Dynamics NAV Server instance must be configured to allow claims based authentication. You can do this by using the Microsoft Dynamics NAV Server Administration tool, the Set-NAVServerConfiguration cmdlet in the Dynamics NAV Administration Shell, or by modifying the server instance's CustomSettings.config file directly.
Set the Credential Type (ClientServicesCredentialType) to
NavUserPasswordorAccessControlService.If you set this to
NavUserPassword, client users can use either NavUserPassword or claims based authentication to access Dynamics NAV. The CustomSetting.config file should include the following line:<add key="ClientServicesCredentialType" value="NavUserPassword"/>If you set this to
AccessControlService, only clients that use claims based authentication will be allowed to access Dynamics NAV. The CustomSetting.config file should include the following line:<add key="ClientServicesCredentialType" value="AccessControlService"/>
Set the WS-Federation Metadata Location (ClientServicesFederationMetadataLocation) to the URL that defines the federation metadata XML document for your AD FS. The URL has the following format:
https://[Public URL for AD FS server]/federationmetadata/2007-06/federationmetadata.xmlReplace
[Public URL for AD FS server]with the URL for your installation, such asMyADFSServerorcorp.sample.com.For example, when you are done, the CustomSettings.config file should include a key similar to the following:
<add key="ClientServicesFederationMetadataLocation" value="https://MyADFSServer/federationmetadata/2007-06/federationmetadata.xml"/>or
<add key="ClientServicesFederationMetadataLocation" value="https://corp.sample.com/federationmetadata/2007-06/federationmetadata.xml"/>Note
This URL must to be accessible from a browser on the computer running the Microsoft Dynamics NAV Server.
For the Microsoft Dynamics NAV Web client, set the WSFederationLoginEndpoint (WSFederationLoginEndpoint) to point to the AD FS login page for authenticating users.
https://<Public URL for ADFS server>/adfs/ls/?wa=wsignin1.0%26wtrealm=<Relying party trust identifier>%26wreply=<Dynamics NAV Web Client URL>/SignIn" />Replace
[Public URL for AD FS server]with the URL for your installation.Replace
<Relying party trust identifier>with the exact value that was specified as the Relying party trust identifier in the earlier task (Set up a Relying Party Trust for the Dynamics NAV clients).Replace
<Dynamics NAV Web Client URL>with the full URL for your Web client, such ashttps://MyWebServer:8080/DynamicsNAV110/WebClient. This must be the exact same value that was specified for Relying party WS-Federation Passive Control URL field in the Relying Party Trust set up for the client in AD FS.For example, when you are done, the CustomSettings.config file should include a key similar to the following:
<add key="WSFederationLoginEndpoint" value="https://MyWebServer/adfs/ls/?wa=wsignin1.0%26wtrealm=https://dynamicsnavwebclient%26wreply=https://MyWebServer:8080/DynamicsNAV110/SignIn" />or
<add key="WSFederationLoginEndpoint" value="https://corp.sample.com/adfs/ls/?wa=wsignin1.0%26wtrealm=https://dynamicsnavwebclient%26wreply=https://corp.sample.com/DynamicsNAV110/SignIn" />Restart the Microsoft Dynamics NAV Server instance.
Tip
You can use the Set-NAVServerInstance cmdlet to restart the service instance.
Dynamics NAV Web Client setup
You configure the Microsoft Dynamics NAV Web client by modifying it's configuration file.
Change the ClientServicesCredentialType setting to AccessControlService as shown:
"ClientServicesCredentialType": "AccessControlService",
The configuration changes are automatically picked up by the Internet Information Service (IIS). For more information about modifying the configuration file, see Configuring Dynamics NAV Web Client by Modifying the Navsettings.json File.md
Tip
Instead of re-configuring the existing web client, consider using the New-NAVWebServerInstance cmdlet in the Dynamics NAV Administration Shell to add an additional web client instance, and leave the existing instance running NavUserPassword authentication.
Dynamic NAV Windows client setup (optional)
You configure the Microsoft Dynamics NAV Windows client by modifying the ClientUserSettings.config file for each client installation.
Set the ClientServicesCredentialType to
AccessControlServiceas shown:<add key="ClientServicesCredentialType" value="AccessControlService" />This means that authentication is delegated to the URL that is specified by ACSUri setting.
Set the ACSUri setting to the AD FS login page as shown:
<add key="ACSUri" value="https://<Public URL for ADFS server>/adfs/ls/?wa=wsignin1.0%26wtrealm=<Relying party trust identifier>%26wreply=<Relying Party Trust Endpoint>" />Replace
<Public URL for AD FS server<with the URL for your installation.Replace
<Relying party trust identifier>with the exact value that was specified as the Relying party trust identifier in the earlier task (Set up a Relying Party Trust for the Dynamics NAV clients).Replace
<Relying Party Trust Endpoint>with the same value that was specified for Relying party WS-Federation Passive Control URL field in the Relying Party Trust set up for the Microsoft Dynamics NAV Windows client in AD FS.For example:
<add key="ACSUri" value="https://corp.sample.com/adfs/ls/?wa=wsignin1.0%26wtrealm=https://dynamicsnavwinclient%26wreply=https://corp.sample.com" />Restart the Microsoft Dynamics NAV Windows client.
Dynamic NAV User setup
You must map the user accounts in Dynamics NAV to corresponding user accounts in AD FS. The mapping is based on the User Principal Name (UPN) that is assigned to the user in Active Directory. The UPN is the user's name in email address format, such as username@realm.
You can do this by using the Dynamics NAV client. Open the User Card page for a user, and then in the Office 365 Authentication section, set the Authentication Email field to the UPN of the AD FS user.
When you initially set the Authentication Email, the Authentication Status will be Inactive. After the first time the user signs in to Dynamics NAV by using AD FS, the status will be change to Active. This means that the Primary SID from AD FS has been registered on the user in Dynamics NAV, and all subsequent authentication mappings will be done on the Primary SID and not on the Authentication Email (UPN).
See Also
Configuring the Dynamics NAV Server
Users and Credential Types
How to: Create Microsoft Dynamics NAV Users