Build your first Project task pane add-in
In this article, you'll walk through the process of building a Project task pane add-in.
Prerequisites
Node.js (the latest LTS version). Visit the Node.js site to download and install the right version for your operating system.
The latest version of Yeoman and the Yeoman generator for Office Add-ins. To install these tools globally, run the following command via the command prompt.
npm install -g yo generator-officeNote
Even if you've previously installed the Yeoman generator, we recommend you update your package to the latest version from npm.
Office connected to a Microsoft 365 subscription (including Office on the web).
Note
If you don't already have Office, you might qualify for a Microsoft 365 E5 developer subscription through the Microsoft 365 Developer Program; for details, see the FAQ. Alternatively, you can sign up for a 1-month free trial or purchase a Microsoft 365 plan.
- Project 2016 or later on Windows
Create the add-in
Run the following command to create an add-in project using the Yeoman generator. A folder that contains the project will be added to the current directory.
yo office
Note
When you run the yo office command, you may receive prompts about the data collection policies of Yeoman and the Office Add-in CLI tools. Use the information that's provided to respond to the prompts as you see fit.
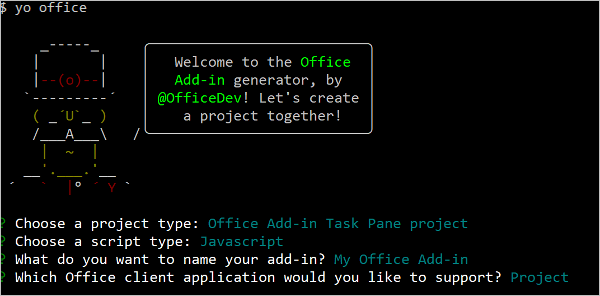
When prompted, provide the following information to create your add-in project.
- Choose a project type:
Office Add-in Task Pane project - Choose a script type:
JavaScript - What do you want to name your add-in?
My Office Add-in - Which Office client application would you like to support?
Project

After you complete the wizard, the generator creates the project and installs supporting Node components.
Explore the project
The add-in project that you've created with the Yeoman generator contains sample code for a very basic task pane add-in.
- The ./manifest.xml file in the root directory of the project defines the settings and capabilities of the add-in.
- The ./src/taskpane/taskpane.html file contains the HTML markup for the task pane.
- The ./src/taskpane/taskpane.css file contains the CSS that's applied to content in the task pane.
- The ./src/taskpane/taskpane.js file contains the Office JavaScript API code that facilitates interaction between the task pane and the Office client application. In this quick start, the code sets the
Namefield andNotesfield of the selected task of a project.
Try it out
Navigate to the root folder of the project.
cd "My Office Add-in"Start the local web server.
Note
Office Add-ins should use HTTPS, not HTTP, even while you're developing. If you're prompted to install a certificate after you run one of the following commands, accept the prompt to install the certificate that the Yeoman generator provides. You may also have to run your command prompt or terminal as an administrator for the changes to be made.
If this is your first time developing an Office Add-in on your machine, you may be prompted in the command line to grant Microsoft Edge WebView a loopback exemption ("Allow localhost loopback for Microsoft Edge WebView?"). When prompted, enter
Yto allow the exemption. Note that you'll need administrator privileges to allow the exemption. Once allowed, you shouldn't be prompted for an exemption when you sideload Office Add-ins in the future (unless you remove the exemption from your machine). To learn more, see "We can't open this add-in from localhost" when loading an Office Add-in or using Fiddler.
Run the following command in the root directory of your project. When you run this command, the local web server will start.
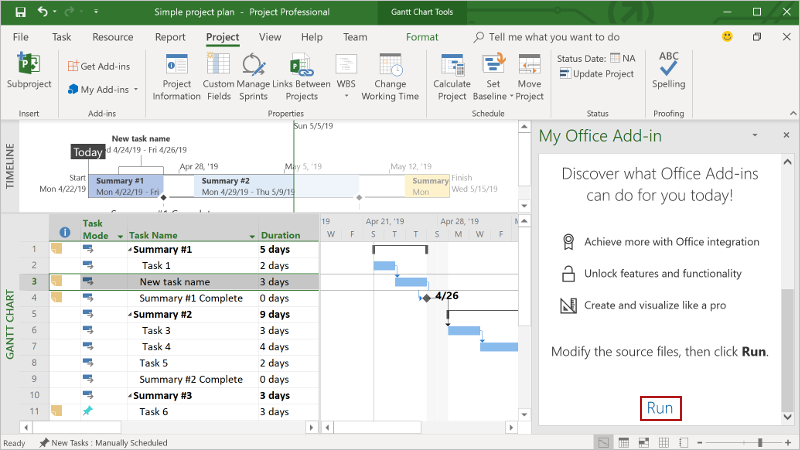
npm run dev-serverIn Project, create a simple project plan.
Load your add-in in Project by following the instructions in Sideload Office Add-ins on Windows.
Select a single task within the project.
At the bottom of the task pane, choose the Run link to rename the selected task and add notes to the selected task.

When you want to stop the local web server and uninstall the add-in, follow these instructions:
To stop the server, run the following command.
npm stopTo uninstall the sideloaded add-in, see Remove a sideloaded add-in.
Next steps
Congratulations, you've successfully created a Project task pane add-in! Next, learn more about the capabilities of a Project add-in and explore common scenarios.
Troubleshooting
Ensure your environment is ready for Office development by following the instructions in Set up your development environment.
Some of the sample code uses ES6 JavaScript. This isn't compatible with older versions of Office that use the Trident (Internet Explorer 11) browser engine. For information on how to support those platforms in your add-in, see Support older Microsoft webviews and Office versions. If you don't already have a Microsoft 365 subscription to use for development, you might qualify for a Microsoft 365 E5 developer subscription through the Microsoft 365 Developer Program; for details, see the FAQ. Alternatively, you can sign up for a 1-month free trial or purchase a Microsoft 365 plan.
- The automatic
npm installstep Yo Office performs may fail. If you see errors when trying to runnpm start, navigate to the newly created project folder in a command prompt and manually runnpm install. For more information about Yo Office, see Create Office Add-in projects using the Yeoman Generator.
See also
Office Add-ins