Set up per-app Virtual Private Network (VPN) for iOS/iPadOS devices in Intune
In Microsoft Intune, you can create and use Virtual Private Networks (VPNs) assigned to an app. This feature is called per-app VPN. You choose the managed apps that can use your VPN on devices managed by Intune. When you use per-app VPNs, end users automatically connect through the VPN, and get access to organizational resources, like documents.
This feature applies to:
- iOS 9 and newer
- iPadOS 13.0 and newer
Check your VPN provider's documentation to see if your VPN supports per-app VPN.
This article shows you how to create a per-app VPN profile, and assign this profile to your apps. Use these steps to create a seamless per-app VPN experience for your end users. For most VPNs that support per-app VPN, the user opens an app, and automatically connects to the VPN.
Some VPNs allow username and password authentication with per-app VPN. Meaning, users need to enter a username and password to connect to the VPN.
Important
- On iOS/iPadOS, per-app VPN isn't supported for IKEv2 VPN profiles.
Per-app VPN with Microsoft Tunnel or Zscaler
Microsoft Tunnel and Zscaler Private Access (ZPA) integrate with Microsoft Entra ID for authentication. When using Tunnel or ZPA, you don't need the trusted certificate or SCEP or PKCS certificate profiles (described in this article).
If you have a per-app VPN profile set up for Zscaler, then opening one of the associated apps doesn't automatically connect to ZPA. Instead, the user needs to sign into the Zscaler app. Then, remote access is limited to the associated apps.
Prerequisites
Your VPN vendor can have other requirements for per-app VPN, like specific hardware or licensing. Be sure to check with their documentation, and meet those prerequisites before setting up per-app VPN in Intune.
Export the trusted root certificate
.cerfile from your VPN server. You add this file to the trusted certificate profile you create in Intune, described in this article.To export the file:
On your VPN server, open the administration console.
Confirm that your VPN server uses certificate-based authentication.
Export the trusted root certificate file. It has a
.cerextension.Add the name of the certificate authority (CA) that issued the certificate for authentication to the VPN server.
If the CA presented by the device matches a CA in the Trusted CA list on the VPN server, then the VPN server successfully authenticates the device.
To prove its identity, the VPN server presents the certificate to the device. The device must accept the certificate without prompting the user. To confirm the automatic approval of the certificate, you create a trusted certificate profile in Intune (in this article). The Intune trusted certificate profile must include the VPN server's root certificate (
.cerfile) issued by the Certification Authority (CA).-
To create the policy, at a minimum, sign into the Microsoft Intune admin center with an account that has the Policy and Profile Manager built-in role. For more information on the built-in roles, go to Role-based access control for Microsoft Intune.
Step 1 - Create a group for your VPN users
Create or choose an existing group in Microsoft Entra ID. This group:
- Must include the users or devices that will use per-app VPN.
- Will receive all the Intune policies you create in this article.
For the steps to create a new group, go to Add groups to organize users and devices.
Step 2 - Create a trusted certificate profile
Import the VPN server's root certificate issued by the CA into an Intune profile. This root certificate is the .cer file you exported in Prerequisites (in this article). The trusted certificate profile instructs the iOS/iPadOS device to automatically trust the CA that the VPN server presents.
Sign in to the Microsoft Intune admin center.
Select Devices > Manage devices > Configuration > Create > New policy.
Enter the following properties:
- Platform: Select iOS/iPadOS.
- Profile type: Select Trusted certificate.
Select Create.
In Basics, enter the following properties:
- Name: Enter a descriptive name for the profile. Name your profiles so you can easily identify them later. For example, a good profile name is iOS/iPadOS trusted certificate profile for myApp.
- Description: Enter a description for the profile. This setting is optional, but recommended.
Select Next.
In Configuration settings, select the folder icon, and browse to your VPN certificate (
.cerfile) that you exported from your VPN administration console.Select Next, and continue creating the trusted certificate profile. You can save the profile and assign it later.
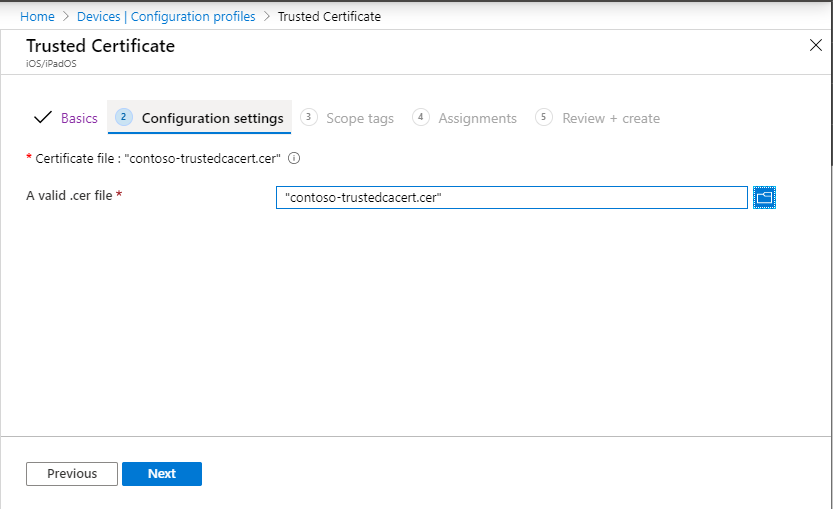
When you're ready to assign the profile, assign this profile to the group you created in Step 1 - Create a group for your VPN users (in this article). When you assign the profile, the users or devices in the group receive the policy the next time they check-in with the Intune service.
Step 3 - Create a SCEP or PKCS certificate profile
The trusted root certificate profile you created in step 2 allows the device to automatically trust the VPN Server.
In this next step, create the SCEP or PKCS certificate profile in Intune. The SCEP or PKCS certificate provides credentials from the iOS/iPadOS VPN client to the VPN server. The certificate allows the device to silently authenticate without prompting for a username and password.
To configure and assign the client authentication certificate in Intune, go to one of the following articles:
- Configure infrastructure to support SCEP with Intune
- Configure and manage PKCS certificates with Intune
Be sure to configure the certificate for client authentication. You can set client authentication directly in SCEP certificate profiles (Extended key usage list > Client authentication). For PKCS, set client authentication in the certificate template in the certificate authority (CA).
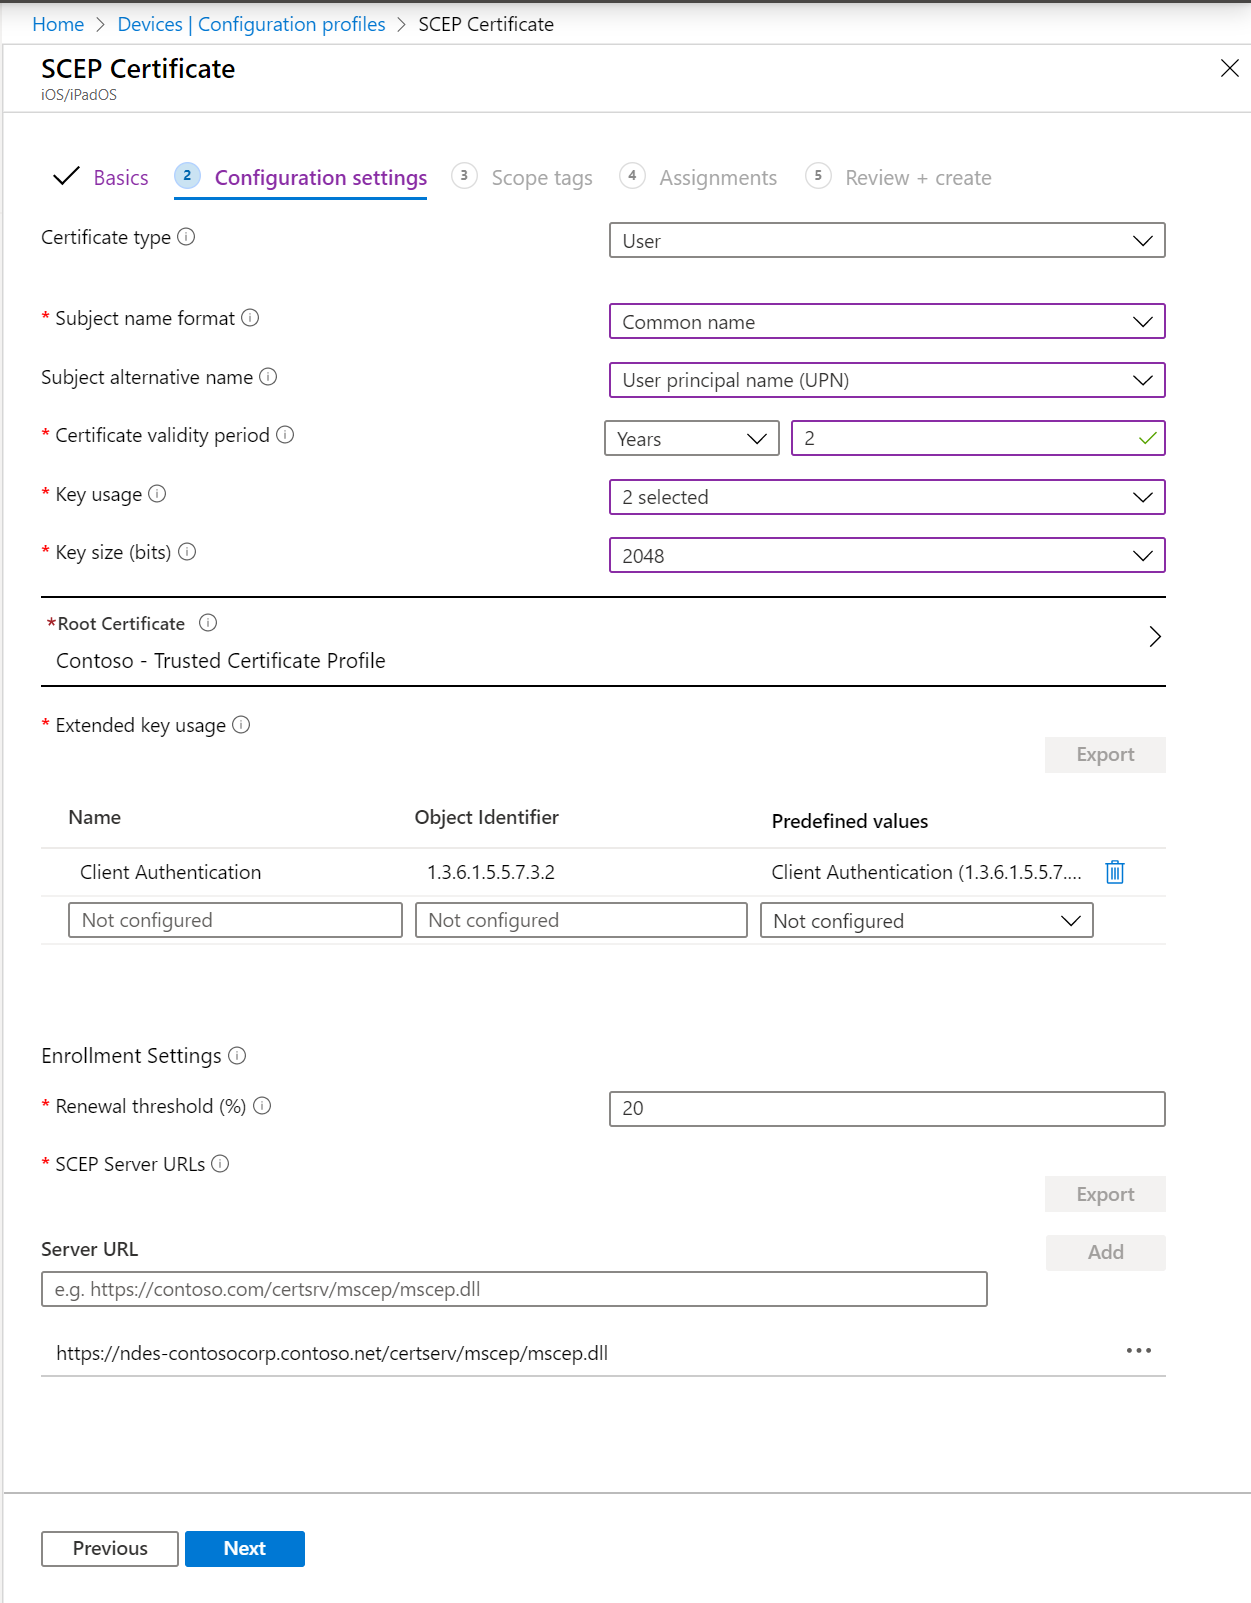
When you're ready to assign the profile, assign this profile to the group you created in Step 1 - Create a group for your VPN users (in this article). When you assign the profile, the users or devices in the group receive the policy the next time they check-in with the Intune service.
Step 4 - Create a per-app VPN profile
This VPN profile includes the SCEP or PKCS certificate that has the client credentials, the VPN connection information, and the per-app VPN flag that enables the per-app VPN used by the iOS/iPadOS application.
In the Microsoft Intune admin center, select Devices > Manage devices > Configuration > Create > New policy.
Enter the following properties and select Create:
- Platform: Select iOS/iPadOS.
- Profile type: Select VPN.
In Basics, enter the following properties:
- Name: Enter a descriptive name for the custom profile. Name your profiles so you can easily identify them later. For example, a good profile name is iOS/iPadOS per-app VPN profile for myApp.
- Description: Enter a description for the profile. This setting is optional, but recommended.
In Configuration settings, configure the following settings:
Connection type: Select your VPN client app.
Base VPN: Configure your settings. iOS/iPadOS VPN settings describes all the settings. When using per-app VPN, be sure you configure the following properties as listed:
- Authentication method: Select Certificates.
- Authentication certificate: Select an existing SCEP or PKCS certificate > OK.
- Split tunneling: Select Disable to force all traffic to use the VPN tunnel when the VPN connection is active.
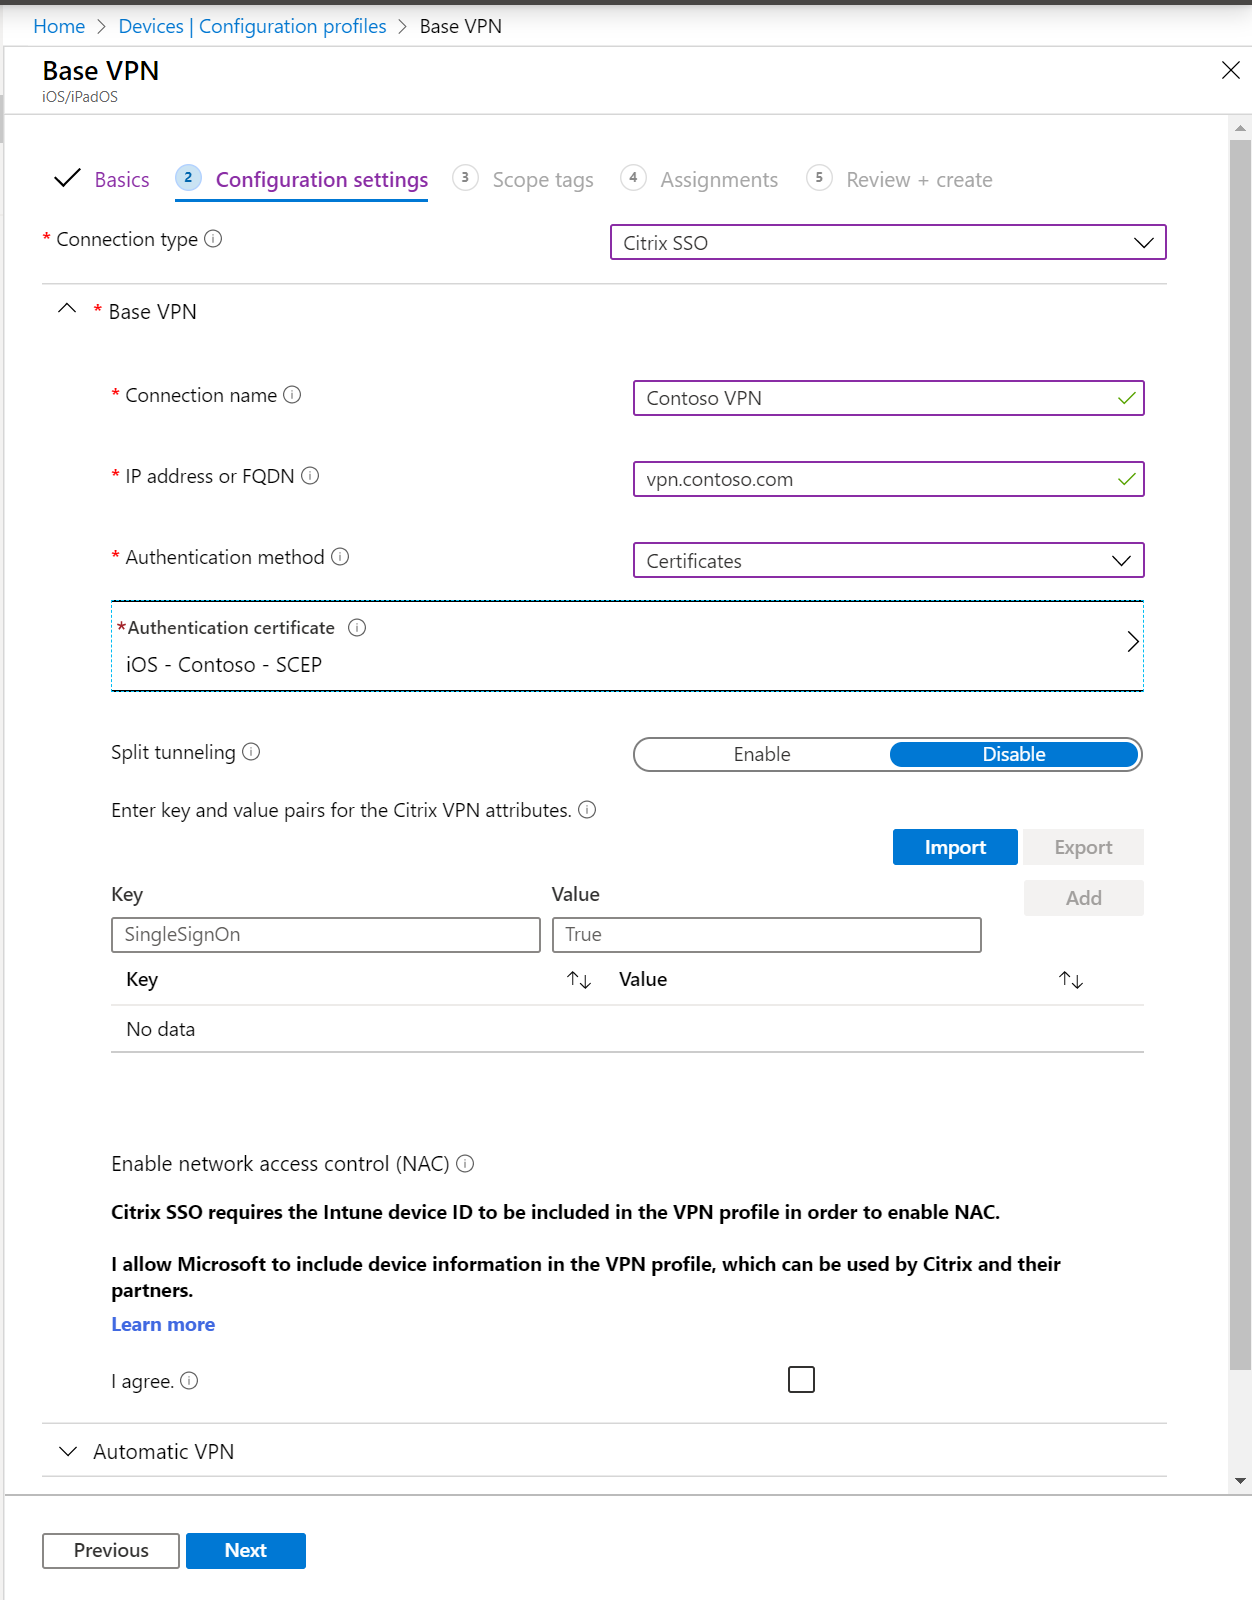
For information on the other settings, go to iOS/iPadOS VPN settings.
Automatic VPN > Type of automatic VPN > Per-app VPN
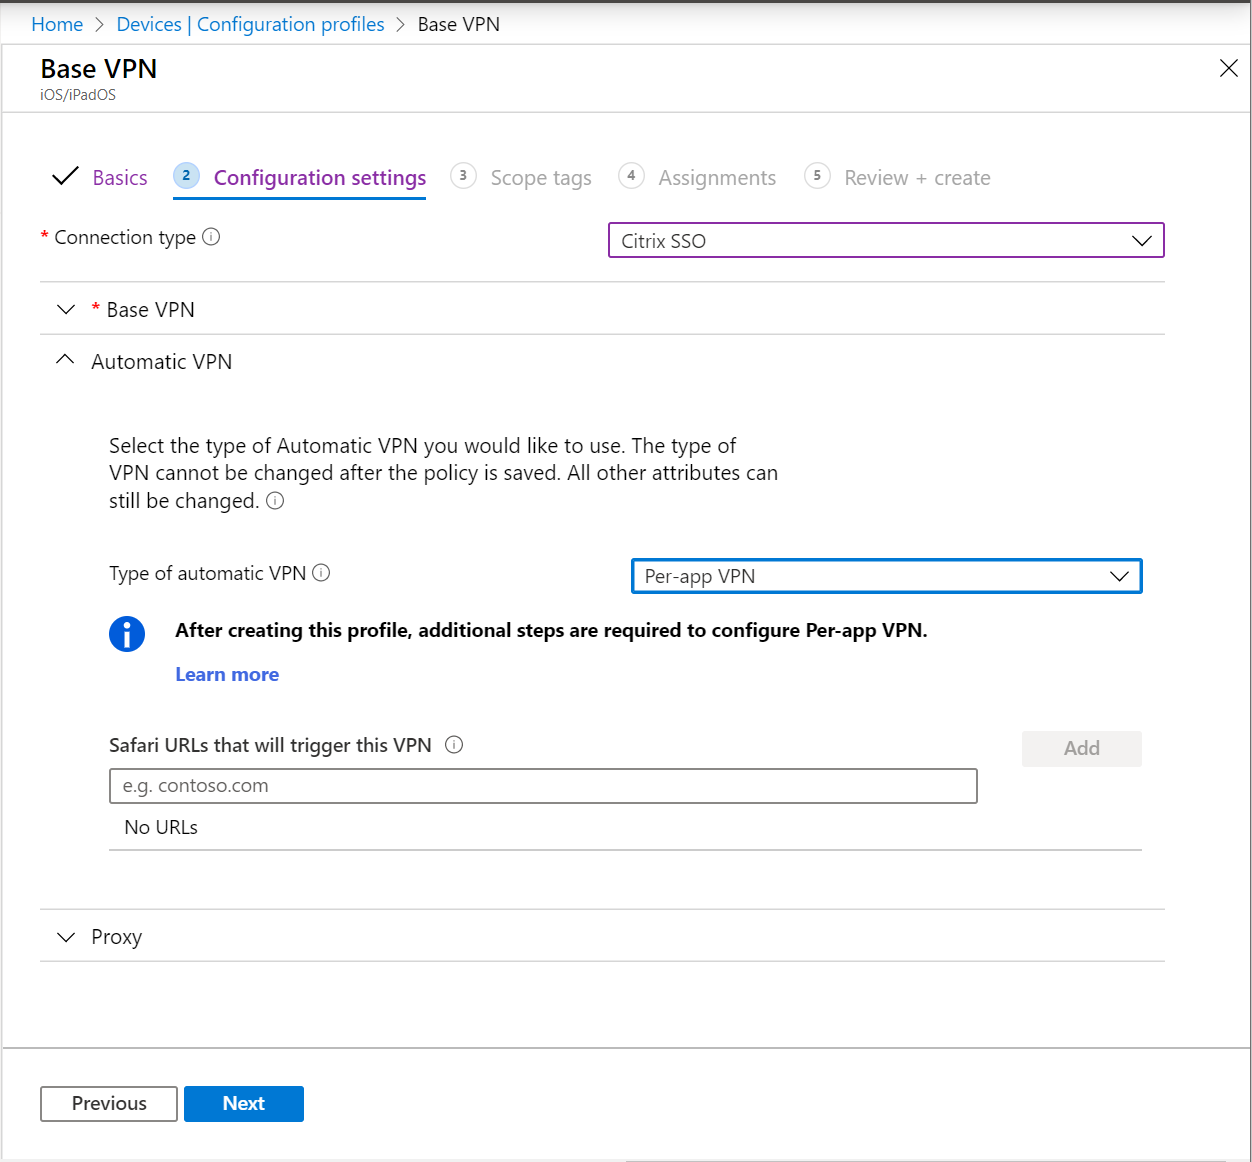
Select Next, and continue creating the VPN profile.
When you're ready to assign the profile, assign this profile to the group you created in Step 1 - Create a group for your VPN users (in this article). When you assign the profile, the users or devices in the group receive the policy the next time they check-in with the Intune service.
Step 5 - Associate an app with the VPN profile
After adding your VPN profile, associate the app and Microsoft Entra group to the profile.
In the Microsoft Intune admin center, select Apps > All Apps.
Select an app from the list > Properties > Assignments > Edit.
Go to the Required or Available for enrolled devices section.
Select Add group > Select the group you created in Step 1 - Create a group for your VPN users (in this article) > Select.
In VPNs, select the per-app VPN profile you created in Step 4 - Create a per-app VPN profile (in this article).
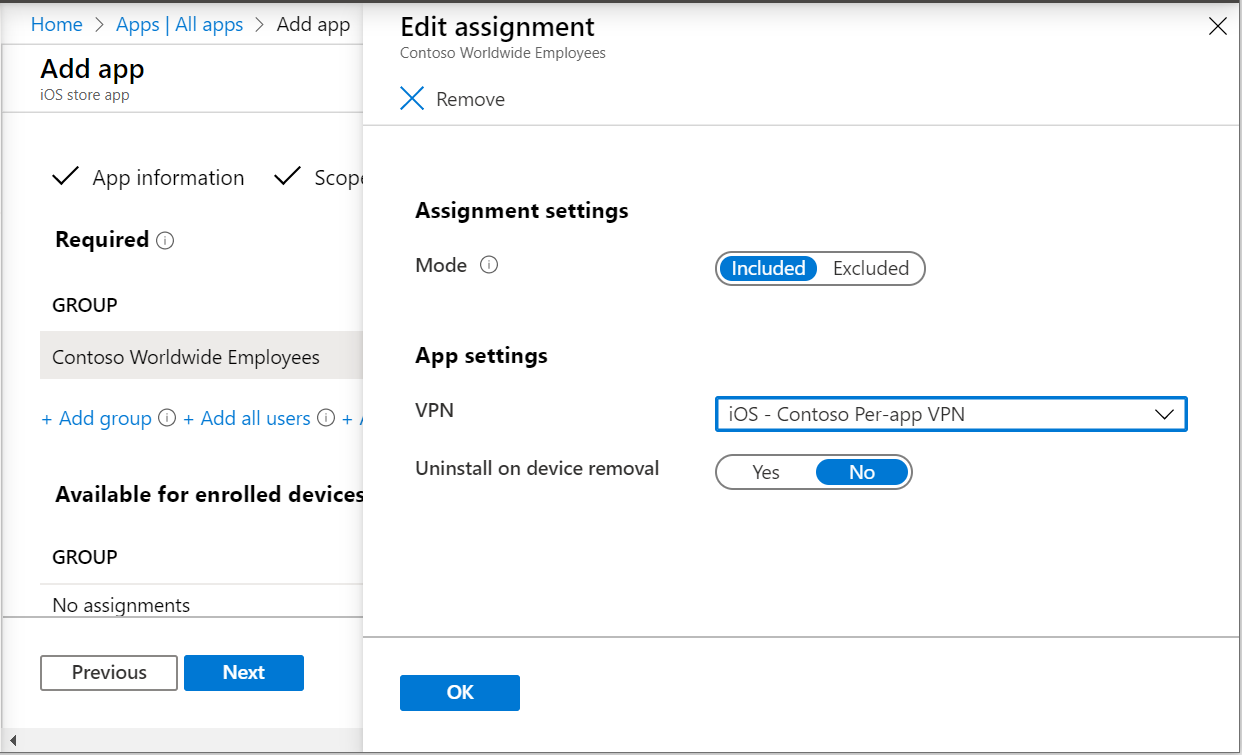
Select OK > Save.
When all of the following conditions exist, an association between an app and a profile remains until the user requests a reinstall from the Company Portal app:
- The app was targeted with available install intent, and
- The profile and the app are assigned to the same group, and
- The end user requested the app install in the Company Portal app. This request results in the app and profile being installed on the device, and
- You remove or change the per-app VPN configuration from the app assignment.
When all of the following conditions exist, an association between an app and a profile is removed during the next device check-in:
- The app was targeted with required install intent, and
- The profile and the app are assigned to the same group, and
- You remove the per-app VPN configuration from the app assignment.
Verify the connection on the iOS/iPadOS device
With your per-app VPN set up and associated with your app, verify the connection works from a device.
Before you attempt to connect
Make sure you deploy all the policies described in this article to the same group. Otherwise, the per-app VPN experience won't work.
If you're using the Pulse Secure VPN app or a custom VPN client app, then you can choose to use app-layer or packet-layer tunneling:
- For app-layer tunneling, set the ProviderType value to app-proxy.
- For packet-layer tunneling, set ProviderType value to packet-tunnel.
Check your VPN provider's documentation to make sure you're using the correct value.
Connect using the per-app VPN
Verify the zero-touch experience by connecting without having to select the VPN or type your credentials. The zero-touch experience means:
- The device doesn't ask you to trust the VPN server. Meaning, the user doesn't see the Dynamic Trust dialog box.
- The user doesn't have to enter credentials.
- When the user opens one of the associated apps, the user's device is connected to the VPN.
Related articles
- To review iOS/iPadOS settings, go to VPN settings for iOS/iPadOS devices in Microsoft Intune.
- To learn more about VPN setting and Intune, go to configure VPN settings in Microsoft Intune.