Capabilities in Configuration Manager technical preview version 1807
Applies to: Configuration Manager (technical preview branch)
This article introduces the features that are available in the technical preview for Configuration Manager, version 1807. Install this version to update and add new features to your technical preview site.
Review the technical preview article before installing this update. That article familiarizes you with the general requirements and limitations for using a technical preview, how to update between versions, and how to provide feedback.
Known issues
Issues with Microsoft 365 software updates
If you manage Microsoft 365 updates using technical preview branch versions 1806 and 1806.2, they may fail to install on clients.
Workaround
Delete existing deployment packages and software update groups for Microsoft 365.
Starting on July 31, 2018, sync Microsoft 365 software updates and deploy only the latest updates.
The following sections describe the new features to try out in this version:
Community Hub
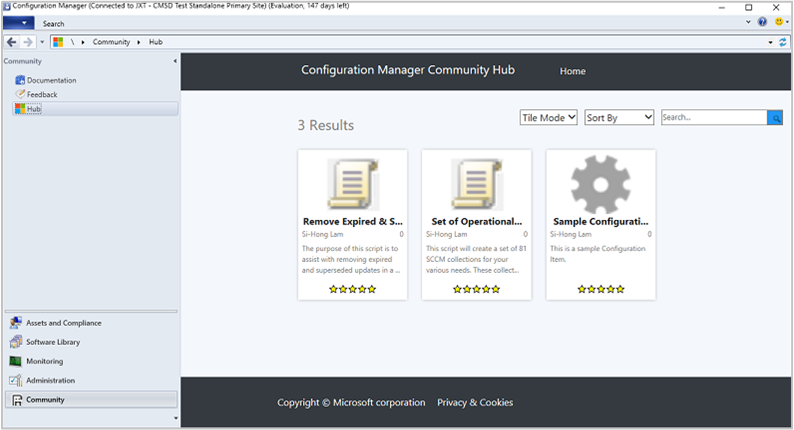
The Community Hub is a centralized location for sharing useful Configuration Manager objects with others. See the new Community workspace in the Configuration Manager console, and select the Hub node. Use the Community Hub to download the following types of Configuration Manager objects:
- Scripts
- Configuration items

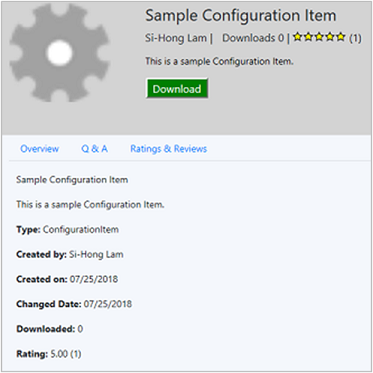
To see more details about an available item, click it in the hub. From the details page, click Download to acquire the item. When you download an item from the hub, it's automatically added to your site.

The Community workspace also includes the following nodes:
Documentation: Displays the Configuration Manager documentation library
Feedback: Displays the Configuration Manager product feedback site
Prerequisites
Use the Configuration Manager console on a client OS.
- Alternatively but not recommended: on a server OS, disable Internet Explorer: Enhanced Security Configuration.
The computer with the console requires internet access, and connectivity to the following sites:
https://aka.mshttps://comfigmgr-hub.azurewebsites.nethttps://configmgronline.visualstudio.com
Known issue
Contributing items to the hub isn't currently available in this version.
Specify the drive for offline OS image servicing
Based on your feedback, now specify the drive that Configuration Manager uses during offline servicing of OS images. This process can consume a large amount of disk space with temporary files, so this option gives you flexibility to select the drive to use.
Try it out!
Try to complete the tasks. Then send Feedback with your thoughts on the feature.
In the Configuration Manager console, go to the Administration workspace, expand Site Configuration, and select the Sites node. In the ribbon, click Configure Site Components and select Software Update Point.
Switch to the Offline Servicing tab, and specify the option for A local drive to be used by offline servicing of images.
By default, this setting is Automatic. With this value, Configuration Manager selects the drive on which it's installed.
During offline servicing, Configuration Manager stores temporary files in the folder, <drive>:\ConfigMgr_OfflineImageServicing. It also mounts the OS images in this folder.
Review the OfflineServicingMgr.log log file.
Co-managed device sync activity from Intune
Display in the Configuration Manager console whether a co-managed device is active with Microsoft Intune. This state is based on data from the Intune Data Warehouse. The Client Status dashboard in the Configuration Manager console shows Inactive clients using Intune. This new category is for co-managed devices that are inactive with Configuration Manager, but have synchronized with the Intune service in the past week.
Try it out!
Try to complete the tasks. Then send Feedback with your thoughts on the feature.
If you've already set up your site for co-management:
In the Configuration Manager console, go to the Administration workspace, expand Cloud Services, and select the Co-management node. Click Properties in the ribbon.
Switch to the Reporting tab. Click Sign In and authenticate. Then click Update to enable read permissions for the Intune Data Warehouse.
After the site syncs with Intune, go to the Monitoring workspace, and select the Client Status node. In the Overall Client Status section, see the row for Inactive clients using Intune.
For more information about enabling co-management, see Co-management for Windows 10 devices.
Repair applications
Based on your feedback, now specify a repair command line for Windows Installer and Script Installer deployment types.
Try it out!
Try to complete the tasks. Then send Feedback with your thoughts on the feature.
In the Configuration Manager console, open the properties of a Windows Installer or Script Installer deployment type.
Switch to the Programs tab. Specify the Repair program command.
Deploy the app. On the Deployment Settings tab of the deployment, enable the option to Allow end users to attempt to repair this application.
Known issue
The new button in Software Center for users to Repair the app isn't visible in this version.
Approve application requests via email
Configure email notifications for application approval requests. When a user requests an application, you receive an email. Click links in the email to approve or deny the request, without requiring the Configuration Manager console.
Prerequisites
To send email notifications
Enable the optional feature Approve application requests for users per device.
Configure email notification for alerts.
To approve or deny requests from email
If you don't configure these prerequisites, the site sends email notification for application requests without links to approve or deny the request.
In the site properties, Enable REST endpoint for all providers roles on this site and allow Configuration Manager cloud management gateway traffic. For more information, see OData endpoint data access.
- Restart the SMS_EXEC service after enabling the REST endpoint
Onboard the site to Azure services for Cloud Management
Manually configure the following settings for this native app in Microsoft Entra ID:
Redirect URI:
https://<CMG FQDN>/CCM_Proxy_ServerAuth/ImplicitAuth. Use the fully qualified domain name (FQDN) of the cloud management gateway (CMG) service, for example, GraniteFalls.Contoso.com.Manifest: set oauth2AllowImplicitFlow to true:
"oauth2AllowImplicitFlow": true,
Try it out!
Try to complete the tasks. Then send Feedback with your thoughts on the feature.
In the Configuration Manager console, deploy an application as available to a user collection. On the Deployment Settings page, enable it for approval. Then enter a single email address to receive notification.
Note
Anyone in your Microsoft Entra organization who receives the email can approve the request. Don't forward the email to others unless you want them to take action.
As a user, request the application in Software Center.
You receive an email notification similar to the following example:

Note
The link to approve or deny is for one-time use. For example, you configure a group alias to receive notifications. Meg approves the request. Now Bruce can't deny the request.
Improvement to script output
You can now view detailed script output in raw or structured JSON format. This formatting makes the output easier to read and analyze. If the script returns valid JSON-formatted text, then view the detailed output as either JSON Output or Raw Output. Otherwise the only option is Script Output.
Example: Script output is valid JSON
Command: $PSVersionTable.PSVersion
Major  Minor  Build  Revision
-----  -----  -----  --------
5      1      16299  551
Example: Script output isn't valid JSON
Command: Write-Output (Get-WmiObject -Class Win32_OperatingSystem).Caption
Microsoft Windows 10 Enterprise
Try it out!
Try to complete the tasks. Then send Feedback with your thoughts on the feature.
In the Configuration Manager console, go to the Assets and Compliance workspace, and select the Device Collections node. Right-click a collection, and select Run Script. For more information on creating and running scripts, see Create and run PowerShell scripts from the Configuration Manager console.
Run a script on the target collection.
On the Script Status Monitoring page of the Run Script wizard, select the Summary tab at the bottom. Change the two drop-down lists at the top to Script Output and Data Table. Then double-click the results row to open the Detailed Output dialog box.
On the Script Status Monitoring page of the Run Script wizard, select the Run Details tab at the bottom. Double-click a results row to open the Detailed Output dialog box for that device.
Improvement to third-party software updates
You can now modify the properties of custom catalogs.
For more information, see Third-party software updates support for custom catalogs.
Next steps
For more information about installing or updating the technical preview branch, see Technical preview.
For more information about the different branches of Configuration Manager, see Which branch of Configuration Manager should I use?