Deploy Azure Landing Zone for Nonprofits
The Azure Landing Zone for Nonprofits is a preconfigured, scalable foundation for managing cloud infrastructure in nonprofit organizations. It provides a blueprint for setting up core Azure services, such as networking, management, identity, and security. It ensures that cloud resources are efficiently managed and securely governed from the start. Its simple design offers nonprofit organizations a way to rapidly deploy cloud environments that align with best practices for scalability, security, and compliance.
The Azure Landing Zone for Nonprofits offers a comprehensive setup that includes management group structures, policy enforcement, logging, monitoring, and network connectivity. It integrates security features such as Microsoft Defender for Cloud, backup and disaster recovery services, and Azure Key Vault for secrets management. Deploying the landing zone gives you a secure, scalable foundation for your Azure resources, letting you focus on delivering mission-critical services while benefiting from strong governance and operational efficiency.
Follow the steps in this article to deploy the Azure Landing Zone for Nonprofits using Azure Resource Manager templates (ARM templates). In this deployment, you configure core infrastructure elements such as management groups, log analytics, networking, Azure security, and more.
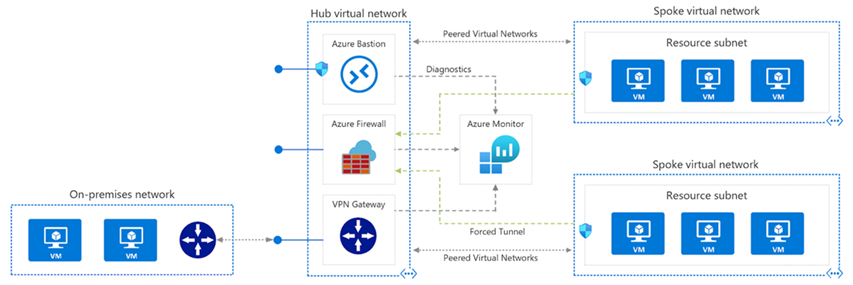
This image is a network diagram showing a hub and spoke deployment for identity management and connectivity subscription.
These instructions help you successfully deploy an Azure landing zone tailored for nonprofit organizations, providing a scalable and secure platform for managing resources and workloads. The elevated permissions allow you to configure essential elements like management groups, network topology, and security settings.
Have questions or need more help? See Find a partner.
Management group and subscription organization
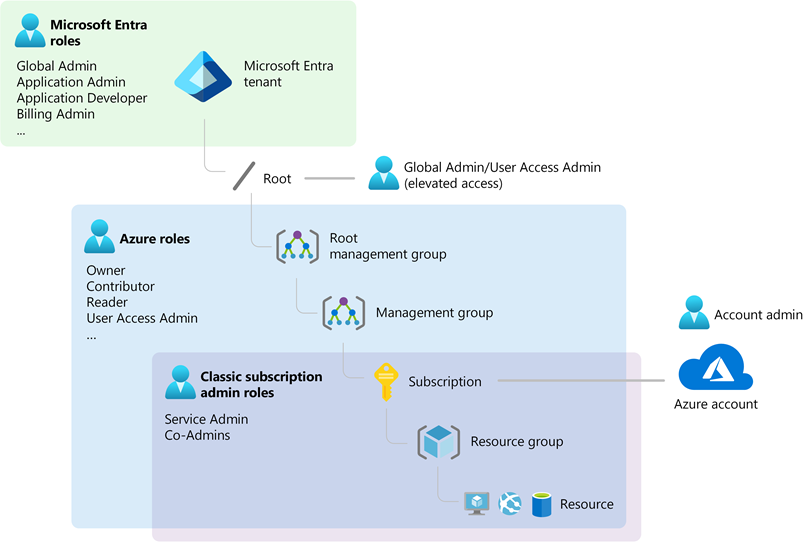
First, understand the difference between Microsoft Entra ID roles and Azure role-based access control (RBAC) roles.
Microsoft Entra ID roles control the administrative privileges to tenant-wide services such as Microsoft Entra ID, and other Microsoft services including Microsoft Teams, Microsoft Exchange Online, and Microsoft Intune.
Azure RBAC roles control the administrative privileges to Azure resources such as virtual machines, subscriptions, and resource groups.
The Azure RBAC Owner and User Access Administrator roles can modify the role assignments on Azure resources. By default, the Microsoft Entra Global Administrator role doesn't have permission to manage access to Azure resources. It must be explicitly enabled. For more information, go to Elevate access to manage all Azure subscriptions and management groups.
Important
Microsoft recommends that you use roles with the fewest permissions. This practice helps improve security for your organization. Global Administrator is a highly privileged role that should be limited to emergency scenarios when you can't use an existing role.
This diagram shows the relationship between Microsoft Entra ID roles and Azure RBAC roles:
Prerequisites
Because Azure Landing Zone for Nonprofits is a complete, end-to-end setup of your Azure tenant as a whole, you need the Owner permission at the Azure tenant root scope. These instructions explain how a Global Admin in Microsoft Entra ID can elevate themselves or others to have the required permissions before starting the deployment.
Note
Both the role assignment and deployment are a one-off exercise. After deployment, we recommend that you remove the role assignment from the tenant root scope in Azure.
To deploy Azure Landing Zone for Nonprofits on Microsoft Azure, you need:
Dedicated Azure subscriptions: You need two different Azure subscriptions. Different platform components must have multiple dedicated subscriptions. This requirement ensures easier management, higher security, and enables a standalone compliance process.
A global admin in Microsoft Entra ID: A user with global admin rights in the Microsoft Entra ID environment where you plan to deploy the landing zones must initiate the deployment.
Elevation of privileges:
Elevate the global admin privileges to grant the User Access Administrator role at the tenant root scope (/).
Perform an explicit role assignment (Azure RBAC) at the tenant root scope using Azure CLI or PowerShell.
Elevate access for deployment
To manage resources across the tenant, temporarily elevate your access as a global admin. After deployment, remove the elevated access.
Sign into the Azure portal as the global admin.
Navigate to Microsoft Entra ID > Properties.
Under Access management for Azure resources, set the toggle to Yes.

Grant explicit access at tenant root scope
Use either Azure CLI or PowerShell to assign the necessary permissions to the user performing the deployment.
Note
You don't have to be a global admin to deploy Azure landing zones. This role assignment can be made to a different user or group.
Using Bash (Azure CLI):
# Sign into AZ CLI, this will redirect you to a web browser for authentication if required
az login

# Assign Owner role to Tenant root scope ("/") as Owner (fetches object Id of the current user)
az role assignment create --scope '/' --role 'Owner' --assignee-object-id $(az ad signed-in-user show --query "objectId" --output tsv)
Using PowerShell:
# Sign in to Azure from PowerShell, this redirects you to a web browser for authentication if required
Connect-AzAccount

# Get object Id of the current user for the role assignment
$user = Get-AzADUser -UserPrincipalName (Get-AzContext).Account

# Assign Owner role to Tenant root scope ("/") as a User Access Administrator
New-AzRoleAssignment -Scope '/' -RoleDefinitionName 'Owner' -ObjectId $user.Id
Note
It can take up to 15 minutes for permissions to propagate at the tenant root scope. Sign out and sign back in to refresh the token before proceeding with the deployment.
Prepare inputs
Gather all required input values before starting the deployment. These values are used throughout the process and are listed in the following table.
You must provide details such as:
- Azure subscription and deployment region
- Network configuration (for example, Virtual Network name and subnet details)
- Security settings (for example, Key Vault name, Recovery Services Vault name)
- Management group structure
Some values, such as Key Vault names, must be globally unique and might need modification.
Note
These values are also referenced in the deployment steps in the next section. Keep them handy while following the steps.
| Section | Field | Description | Example value |
|---|---|---|---|
| Deployment location | Directory | Tenant value | [your_org].onmicrosoft.com |
| Deployment location | Region | Select the Azure region that's right for you and your customers. Keep in mind that not every resource is available in every region. | East US |
| Management Group and Subscription Organization | Management Group prefix | Management group prefix to create the management group hierarchy under the tenant root group. | Nonprofit_ |
| Management and Connectivity | Subscription | Azure subscription to deploy resources. | Nonprofit-SubscriptionName1-PROD |
| Management and Connectivity | Azure Monitor | Deploy Log Analytics workspace and enable monitoring for your platform and resources. | Yes |
| Management and Connectivity | Log Analytics Data Retention (days) | Number of days for data retention. | 30 |
| Management and Connectivity | Virtual Network Name | Name of the Virtual Network for networking resources. | ntwrk01 |
| Management and Connectivity | Virtual Network Address Prefix | The CIDR block defining the address space for the Virtual Network. | 10.0.0.0/16 |
| Management and Connectivity | Subnet Name | Name of the subnet inside the Virtual Network. | subnet01 |
| Management and Connectivity | Subnet Address Prefix | The CIDR block for the subnet. | 10.0.1.0/24 |
| Management and Connectivity | VPN Gateway Subnet | Subnet reserved for the VPN Gateway. | 10.0.2.0/27 |
| Management and Connectivity | Enable DDoS Protection | Option to enable Distributed Denial-of-Service (DDoS protection). | Yes |
| Management and Connectivity | Enable Microsoft Defender for Cloud | Option to enable Microsoft Defender for enhanced security. | Yes |
| Management and Connectivity | Recovery Services Vault Name | Name of the Azure Recovery Services Vault for backups. | recoveryKeyVault01 |
| Management and Connectivity | Key Vault Name | Name of the Azure Key Vault for storing secrets. This value must be globally unique, so consider adding the organization name or a suffix value. | keyVault01 |
| Landing Zone | Subscription | Subscription to deploy the landing zone resources. This subscription must be different from the one provided previously under Management and Connectivity. | Nonprofit-SubscriptionName2-PROD |
| Landing Zone | Virtual Network Name | Name of the Virtual Network for the landing zone. | spokeVNet01 |
| Landing Zone | Virtual Network Address Prefix | Address space assigned to the landing zone Virtual Network. | 10.1.0.0/16 |
| Landing Zone | Subnet Name | Name of the subnet for landing zone workloads. | subnet01 |
| Landing Zone | Subnet Address Prefix | Address range for the landing zone subnet. | 10.1.1.0/24 |
| Landing Zone | Key Vault Name | Key Vault for storing secrets in the landing zone. This value must be globally unique, so consider adding the organization name or a suffix value. | keyVault02 |
| Landing Zone | Recovery Services Vault Name | Vault for backups in the landing zone. | recoveryKeyVault02 |
Deploy Azure Landing Zone
Important
Make sure you prepare the input values before following the deployment steps.
In Microsoft Cloud Solution Center on the Azure Landing Zone for Nonprofits tile, select Go to setup.
On the Deployment location tab, select the Azure region where you want to deploy the resources. Choose the region that aligns with compliance requirements and the geographic location of your users. Select Next.
On the Management Group and Subscription Organization tab, you organize subscriptions and management groups for the platform. In the Management Group prefix field, provide a unique prefix for the management group structure (maximum 10 characters). For example, NPO. Select Next.
On the Management and Connectivity tab, configure core platform services such as identity, management, and connectivity.
Under Management subscription in the Subscription dropdown, select a subscription for core management resources.
Under Azure Monitor, select Yes for Deploy Log Analytics workspace and enable monitoring for your platform and resources. Select the number of days you want for Log Analytics Data Retention (days).
Configure the hub and spoke networking topology.
Example hub network configuration:
- Virtual Network Name: ntwrk01
- Virtual Network Address Prefix: 10.0.0.0/16
- Subnet Name: subnet01
- Subnet Address Prefix: 10.0.1.0/24
- VPN Gateway Subnet: 10.0.2.0/27
- Recovery Services Vault Name: recoveryKeyVault01
- Key Vault Name: keyVault01
Select Next.
On the Management and Connectivity tab, configure spoke networks, backup and recovery, and workload landing zones.
Under Landing Zone subscription in the Subscription dropdown, select a subscription. Make sure this subscription is different from the one selected in step 4a.
Complete the spoke network settings.
- Spoke network: Provide the network name and address prefix for workload-specific spoke VNets.
- Backup and recovery: Configure a Recovery Services vault for backup and disaster recovery.
- Key Vault: Set up Azure Key Vault for secrets management.
Example spoke network configuration:
- Virtual network name: spokeVNet01
- Virtual network address prefix: 10.1.0.0/16
- Subnet name: subnet01
- Subnet address prefix: 10.1.1.0/24
- Key Vault Name: keyVault02
- Recovery Services vault name: recoveryKeyVault02
Select Review + Create, and then select Create.
Post-deployment tasks
Policy and governance: Review and refine the policies applied across management groups.
Monitoring: Ensure log analytics and monitoring systems are properly configured for your environment.
Networking: Verify the hub and spoke topology is correctly established and VPN gateways are configured.
Troubleshoot
This section outlines common errors and issues during the deployment or operation of the Azure Landing Zone for Nonprofits and provides steps to resolve them.
Conflict: Failed to add subscription to management group
This error occurs because there's a conflict when trying to add a subscription to a management group.
Make sure the subscription selected in the landing zone is different from the one used for the management and connectivity configurations. This separation ensures optimal resource management and security compliance across different operational environments.
Conflict: The vault name is already in use. Vault names are globally unique, so it's possible that the name is already taken
This error message indicates that the deployment failed due to a conflict with the vault name. The specific error code is VaultAlreadyExists, which means the vault name is already in use.
Causes for this issue include:
Vault name conflict: The vault name is already in use by another Key Vault.
Recoverable state: If the vault with the name was recently deleted, it might still be in a recoverable state and not yet purged.
To resolve this issue, you can:
Select a different name: Select a different, unique name for the key vault that isn't in use.
Purge the vault: If you're sure the vault name isn't taken and it was recently deleted, you need to purge the vault before reusing the name. You can follow the instructions in the provided link to purge the vault: Purge a key vault.