Configure Microsoft Entra Multifactor Authentication Server to work with AD FS in Windows Server
If you use Active Directory Federation Services (AD FS) and want to secure cloud or on-premises resources, you can configure Microsoft Entra Multifactor Authentication Server to work with AD FS. This configuration triggers two-step verification for high-value endpoints.
In this article, we discuss using Microsoft Entra Multifactor Authentication Server with AD FS beginning with Windows Server 2016. For more information, read about how to secure cloud and on-premises resources by using Microsoft Entra Multifactor Authentication Server with AD FS 2.0.
Important
In September 2022, Microsoft announced deprecation of Microsoft Entra Multifactor Authentication Server. Beginning September 30, 2024, Microsoft Entra Multifactor Authentication Server deployments will no longer service multifactor authentication requests, which could cause authentications to fail for your organization. To ensure uninterrupted authentication services and to remain in a supported state, organizations should migrate their users’ authentication data to the cloud-based Microsoft Entra Multifactor Authentication service by using the latest Migration Utility included in the most recent Microsoft Entra Multifactor Authentication Server update. For more information, see Microsoft Entra Multifactor Authentication Server Migration.
To get started with cloud-based MFA, see Tutorial: Secure user sign-in events with Microsoft Entra Multifactor Authentication.
If you use cloud-based MFA, see Securing cloud resources with Microsoft Entra Multifactor Authentication and AD FS.
Existing customers that activated MFA Server before July 1, 2019 can download the latest version, future updates, and generate activation credentials as usual.
Secure Windows Server AD FS with Microsoft Entra Multifactor Authentication Server
When you install Microsoft Entra Multifactor Authentication Server, you have the following options:
- Install Microsoft Entra Multifactor Authentication Server locally on the same server as AD FS
- Install the Microsoft Entra Multifactor Authentication adapter locally on the AD FS server, and then install Multifactor Authentication Server on a different computer
Before you begin, be aware of the following information:
- You don't have to install Microsoft Entra Multifactor Authentication Server on your AD FS server. However, you must install the multifactor authentication adapter for AD FS on a Windows Server 2012 R2 or Windows Server 2016 that is running AD FS. You can install the server on a different computer if you install the AD FS adapter separately on your AD FS federation server. See the following procedures to learn how to install the adapter separately.
- If your organization is using text message or mobile app verification methods, the strings defined in Company Settings contain a placeholder, <$application_name$>. In MFA Server v7.1, you can provide an application name that replaces this placeholder. In v7.0 or older, this placeholder isn't automatically replaced when you use the AD FS adapter. For those older versions, remove the placeholder from the appropriate strings when you secure AD FS.
- The account that you use to sign in must have user rights to create security groups in your Active Directory service.
- The multifactor authentication AD FS adapter installation wizard creates a security group called PhoneFactor Admins in your instance of Active Directory. It then adds the AD FS service account of your federation service to this group. Verify that the PhoneFactor Admins group was created on your domain controller, and that the AD FS service account is a member of this group. If necessary, manually add the AD FS service account to the PhoneFactor Admins group on your domain controller.
- For information about installing the Web Service SDK with the user portal, see deploying the user portal for Microsoft Entra Multifactor Authentication Server.
Install Microsoft Entra Multifactor Authentication Server locally on the AD FS server
Download and install Microsoft Entra Multifactor Authentication Server on your AD FS server. For installation information, read about getting started with Microsoft Entra Multifactor Authentication Server.
In the Microsoft Entra Multifactor Authentication Server management console, click the AD FS icon. Select the options Allow user enrollment and Allow users to select method.
Select any additional options you'd like to specify for your organization.
Click Install AD FS Adapter.

If the Active Directory window is displayed, that means two things. Your computer is joined to a domain, and the Active Directory configuration for securing communication between the AD FS adapter and the multifactor authentication service is incomplete. Click Next to automatically complete this configuration, or select the Skip automatic Active Directory configuration and configure settings manually check box. Click Next.
If the Local Group window is displayed, that means two things. Your computer isn't joined to a domain, and the local group configuration for securing communication between the AD FS adapter and the multifactor authentication service is incomplete. Click Next to automatically complete this configuration, or select the Skip automatic Local Group configuration and configure settings manually check box. Click Next.
In the installation wizard, click Next. Microsoft Entra Multifactor Authentication Server creates the PhoneFactor Admins group and adds the AD FS service account to the PhoneFactor Admins group.
On the Launch Installer page, click Next.
In the multifactor authentication AD FS adapter installer, click Next.
Click Close when the installation is finished.
When the adapter has been installed, you must register it with AD FS. Open Windows PowerShell and run the following command:
C:\Program Files\Multifactor Authentication Server\Register-MultiFactorAuthenticationAdfsAdapter.ps1To use your newly registered adapter, edit the global authentication policy in AD FS. In the AD FS management console, go to the Authentication Policies node. In the Multifactor authentication section, click the Edit link next to the Global Settings section. In the Edit Global Authentication Policy window, select Multifactor authentication as an additional authentication method, and then click OK. The adapter is registered as WindowsAzureMultiFactorAuthentication. Restart the AD FS service for the registration to take effect.

At this point, Multifactor Authentication Server is set up to be an additional authentication provider to use with AD FS.
Install a standalone instance of the AD FS adapter by using the Web Service SDK
- Install the Web Service SDK on the server that is running Multifactor Authentication Server.
- Copy the following files from the \Program Files\Multifactor Authentication Server directory to the server on which you plan to install the AD FS adapter:
- MultiFactorAuthenticationAdfsAdapterSetup64.msi
- Register-MultiFactorAuthenticationAdfsAdapter.ps1
- Unregister-MultiFactorAuthenticationAdfsAdapter.ps1
- MultiFactorAuthenticationAdfsAdapter.config
- Run the MultiFactorAuthenticationAdfsAdapterSetup64.msi installation file.
- In the multifactor authentication AD FS adapter installer, click Next to start the installation.
- Click Close when the installation is finished.
Edit the MultiFactorAuthenticationAdfsAdapter.config file
Follow these steps to edit the MultiFactorAuthenticationAdfsAdapter.config file:
- Set the UseWebServiceSdk node to true.
- Set the value for WebServiceSdkUrl to the URL of the multifactor authentication Web Service SDK. For example: https://contoso.com/<certificatename>/MultiFactorAuthWebServiceSdk/PfWsSdk.asmx, Where <certificatename> is the name of your certificate.
- Edit the Register-MultiFactorAuthenticationAdfsAdapter.ps1 script by adding
-ConfigurationFilePath <path>to the end of theRegister-AdfsAuthenticationProvidercommand, where <path> is the full path to the MultiFactorAuthenticationAdfsAdapter.config file.
Configure the Web Service SDK with a username and password
There are two options for configuring the Web Service SDK. The first is with a username and password, the second is with a client certificate. Follow these steps for the first option, or skip ahead for the second.
- Set the value for WebServiceSdkUsername to an account that is a member of the PhoneFactor Admins security group. Use the <domain>\<user name> format.
- Set the value for WebServiceSdkPassword to the appropriate account password. The special character "&" can't be used in the WebServiceSdkPassword.
Configure the Web Service SDK with a client certificate
If you don't want to use a username and password, follow these steps to configure the Web Service SDK with a client certificate.
- Obtain a client certificate from a certificate authority for the server that is running the Web Service SDK. Learn how to obtain client certificates.
- Import the client certificate to the local computer personal certificate store on the server that is running the Web Service SDK. Make sure that the certificate authority's public certificate is in Trusted Root Certificates certificate store.
- Export the public and private keys of the client certificate to a .pfx file.
- Export the public key in Base64 format to a .cer file.
- In Server Manager, verify that the Web Server (IIS)\Web Server\Security\IIS Client Certificate Mapping Authentication feature is installed. If it isn't installed, select Add Roles and Features to add this feature.
- In IIS Manager, double-click Configuration Editor in the website that contains the Web Service SDK virtual directory. It's important to select the website, not the virtual directory.
- Go to the system.webServer/security/authentication/iisClientCertificateMappingAuthentication section.
- Set enabled to true.
- Set oneToOneCertificateMappingsEnabled to true.
- Click the ... button next to oneToOneMappings, and then click the Add link.
- Open the Base64 .cer file you exported earlier. Remove -----BEGIN CERTIFICATE-----, -----END CERTIFICATE-----, and any line breaks. Copy the resulting string.
- Set certificate to the string copied in the preceding step.
- Set enabled to true.
- Set userName to an account that is a member of the PhoneFactor Admins security group. Use the <domain>\<user name> format.
- Set the password to the appropriate account password, and then close Configuration Editor.
- Click the Apply link.
- In the Web Service SDK virtual directory, double-click Authentication.
- Verify that ASP.NET Impersonation and Basic Authentication are set to Enabled, and that all other items are set to Disabled.
- In the Web Service SDK virtual directory, double-click SSL Settings.
- Set Client Certificates to Accept, and then click Apply.
- Copy the .pfx file you exported earlier to the server that is running the AD FS adapter.
- Import the .pfx file to the local computer personal certificate store.
- Right-click and select Manage Private Keys, and then grant read access to the account you used to sign in to the AD FS service.
- Open the client certificate and copy the thumbprint from the Details tab.
- In the MultiFactorAuthenticationAdfsAdapter.config file, set WebServiceSdkCertificateThumbprint to the string copied in the previous step.
Finally, to register the adapter, run the \Program Files\Multifactor Authentication Server\Register-MultiFactorAuthenticationAdfsAdapter.ps1 script in PowerShell. The adapter is registered as WindowsAzureMultiFactorAuthentication. Restart the AD FS service for the registration to take effect.
Secure Microsoft Entra resources using AD FS
To secure your cloud resource, set up a claims rule so that Active Directory Federation Services emits the multipleauthn claim when a user performs two-step verification successfully. This claim is passed on to Microsoft Entra ID. Follow this procedure to walk through the steps:
Open AD FS Management.
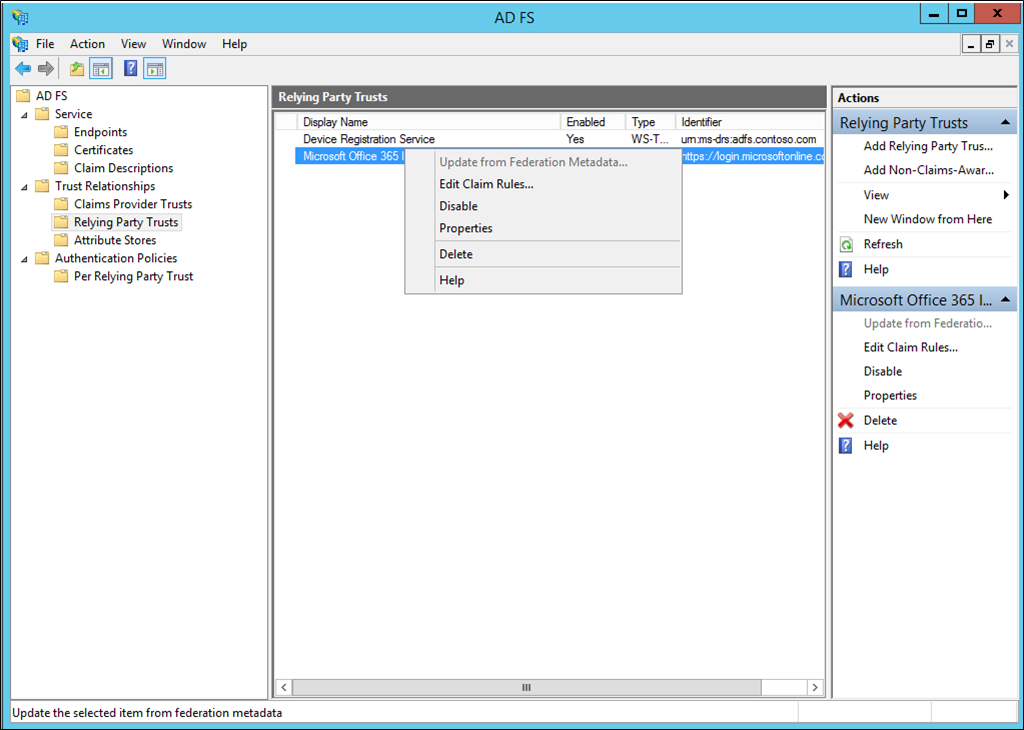
On the left, select Relying Party Trusts.
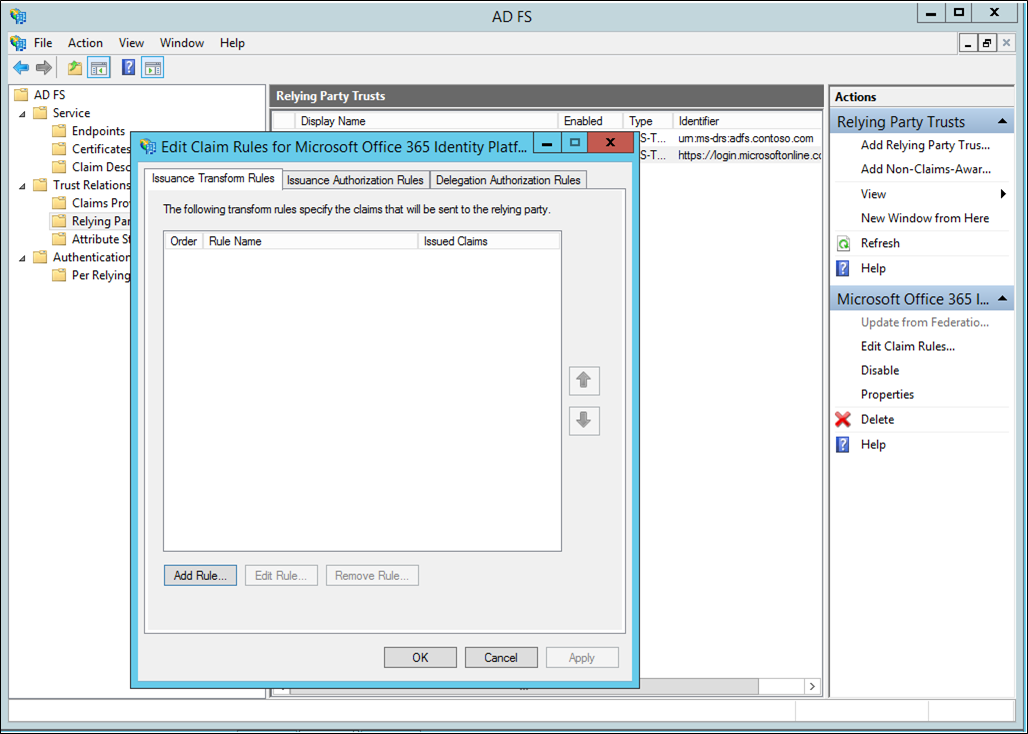
Right-click on Microsoft Office 365 Identity Platform and select Edit Claim Rules…

On Issuance Transform Rules, click Add Rule.

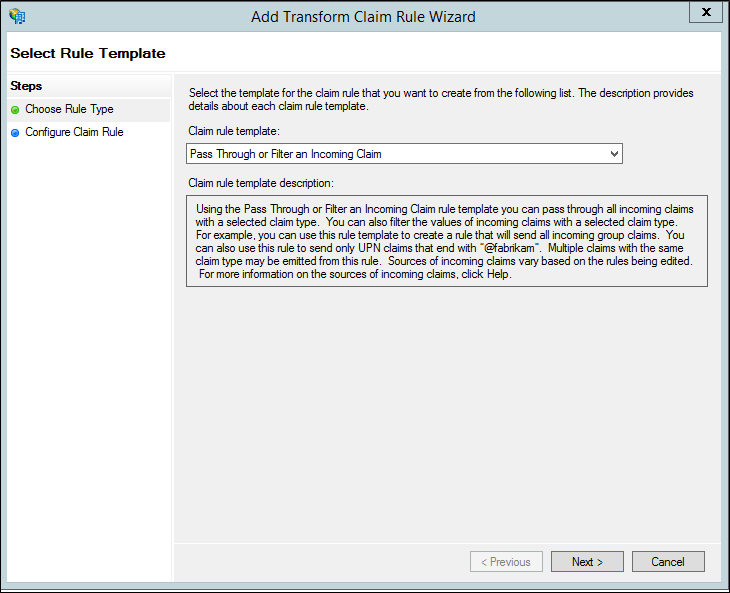
On the Add Transform Claim Rule Wizard, select Pass Through or Filter an Incoming Claim from the drop-down and click Next.

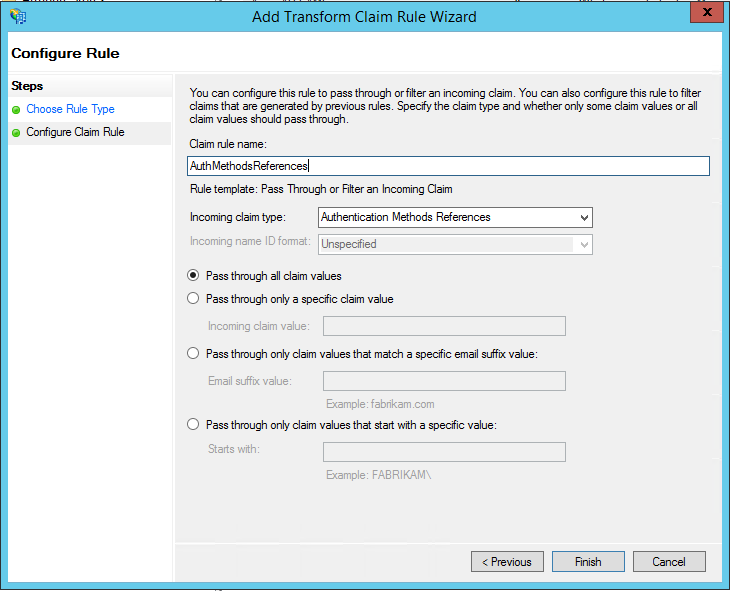
Give your rule a name.
Select Authentication Methods References as the Incoming claim type.
Select Pass through all claim values.

Click Finish. Close the AD FS Management console.
Troubleshooting logs
To help with troubleshooting issues with the MFA Server AD FS Adapter use the steps that follow to enable more logging.
- In the MFA Server interface, open the AD FS section, and check the Enable logging checkbox.
- On each AD FS server, use regedit.exe to create string value registry key
Computer\HKEY_LOCAL_MACHINE\SOFTWARE\WOW6432Node\Positive Networks\PhoneFactor\InstallPathwith valueC:\Program Files\Multifactor Authentication Server\(or other directory of your choice). Note, the trailing backslash is important. - Create
C:\Program Files\Multifactor Authentication Server\Logsdirectory (or other directory as referenced in Step 2). - Grant Modify access on the Logs directory to the AD FS service account.
- Restart the AD FS service.
- Verify that
MultiFactorAuthAdfsAdapter.logfile was created in the Logs directory.
Related topics
For troubleshooting help, see the Microsoft Entra Multifactor Authentication FAQs