Change approval and requestor information settings for an access package in entitlement management
Each access package must have one or more access package assignment policies, before a user can be assigned access. When an access package is created in the Microsoft Entra admin center, the Microsoft Entra admin center automatically creates the first access package assignment policy for that access package. The policy determines who can request access, and who if anyone must approve access.
As an access package manager, you can change the approval and requestor information settings for an access package at any time by editing an existing policy or adding a new extra policy for requesting access.
This article describes how to change the approval and requestor information settings for an existing access package, through an access package's policy.
Approval
In the Approval section, you specify whether an approval is required when users request this access package. The approval settings work in the following way:
- Only one of the selected approvers or fallback approvers needs to approve a request for single-stage approval.
- Only one of the selected approvers from each stage needs to approve a request for multi-stage approval for the request to progress to the next stage.
- If one of the selected approved in a stage denies a request before another approver in that stage approves it, or if no one approves, the request terminates and the user doesn't receive access.
- The approver can be a specified user or member of a group, the requestor's Manager, Internal sponsor, or External sponsor depending on who the policy is governing access.
For a demonstration of how to add approvers to a request policy, watch the following video:
For a demonstration of how to add a multi-stage approval to a request policy, watch the following video:
Note
Approvers are not able to approve their own access package requests.
Change approval settings of an existing access package assignment policy
Follow these steps to specify the approval settings for requests for the access package through a policy:
Sign in to the Microsoft Entra admin center as at least an Identity Governance Administrator.
Tip
Other least privilege roles that can complete this task include the Catalog owner and the Access Package assignment manager.
Browse to Identity governance > Entitlement management > Access packages.
On the Access packages page, open an access package.
Either select a policy to edit or add a new policy to the access package
- Select Policies and then Add policy if you want to create a new policy.
- Select the policy you wish to edit and then select edit.
Go to the Request tab.
To require approval for requests from the selected users, set the Require approval toggle to Yes. Or, to have requests automatically approved, set the toggle to No. If the policy allows external users from outside your organization to request access, you should require approval, so there's oversight on who is being added to your organization's directory.
To require users to provide a justification to request the access package, set the Require requestor justification toggle to Yes.
Now determine if requests require single or multi-stage approval. Set the How many stages to the number of stages of approval needed.
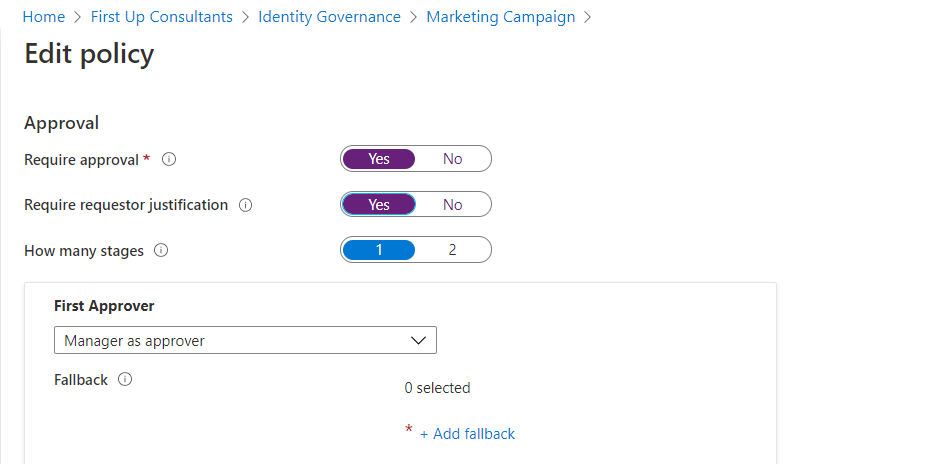
Use the following steps to add approvers after selecting how many stages you require:
Single-stage approval
Add the First Approver:
If the policy is set to govern access for users in your directory, you can select Manager as approver. Or, add a specific user by selecting Add approvers after selecting Choose specific approvers from the dropdown menu.
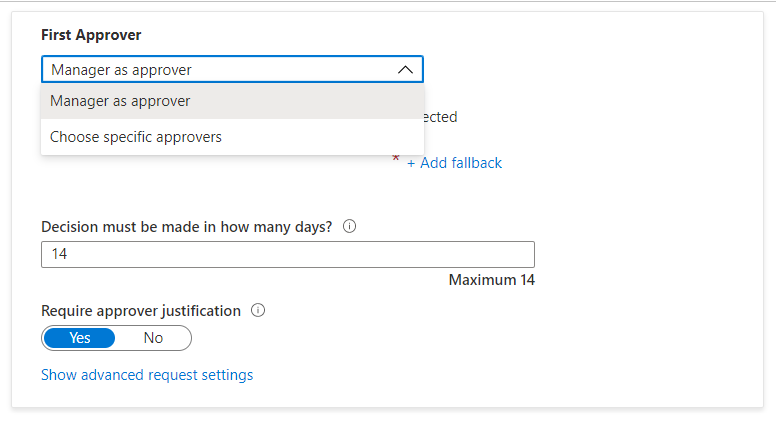
If this policy is set to govern access for users not in your directory, you can select External sponsor or Internal sponsor. Or, add a specific user by clicking Add approvers or groups under Choose specific approvers.

If you selected Manager as the first approver, select Add fallback to select one, or more users or groups in your directory to be a fallback approver. Fallback approvers receive the request if entitlement management can't find the manager for the user requesting access.
The manager is found by entitlement management using the Manager attribute. The attribute is in the user's profile in Microsoft Entra ID. For more information, see Add or update a user's profile information using Microsoft Entra ID.
If you selected Choose specific approvers, select Add approvers to choose one, or more, users or groups in your directory to be approvers.
In the box under Decision must be made in how many days?, specify the number of days that an approver has to review a request for this access package.
If a request isn't approved within this time period, it's automatically denied. The user has to submit another request for the access package.
To require approvers to provide a justification for their decision, set Require approver justification to Yes.
The justification is visible to other approvers and the requestor.
Multi-stage approval
If you selected a multi-stage approval, you need to add an approver for each extra stage.
Add the Second Approver:
If the users are in your directory, add a specific user as the second approver by selecting Add approvers under Choose specific approvers.
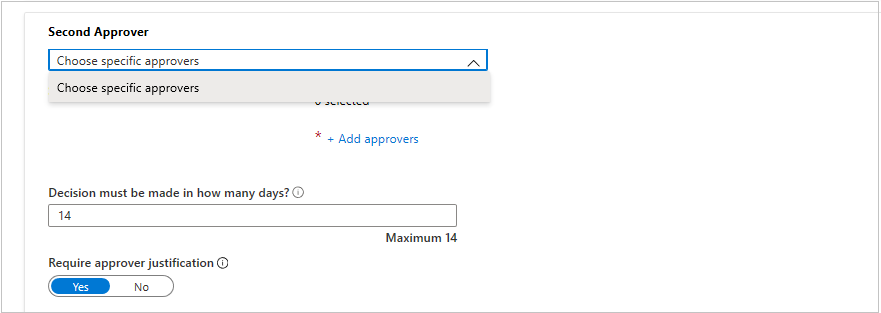
If the users aren't in your directory, select Internal sponsor or External sponsor as the second approver. After selecting the approver, add the fallback approvers.
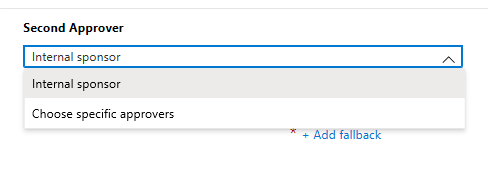
Specify the number of days the second approver has to approve the request in the box under Decision must be made in how many days?.
Set the Require approver justification toggle to Yes or No.
You also can add an extra stage for a three-stage approval process. For example, you might want an employee’s manager to be the first stage approver for an access package. But, one of the resources in the access package contains confidential information. In this case, you could designate the resource owner as a second approver and a security reviewer as the third approver. That allows a security team to have oversight into the process and the ability to, for example, reject a request based on risk criteria not known to the resource owner.
Add the Third Approver:
If the users are in your directory, add a specific user as the third approver by clicking Add approvers under Choose specific approvers.
If the users aren't in your directory, you also can select Internal sponsor or External sponsor as the third approver. After selecting the approver, add the fallback approvers.
Note
- Like the second stage, if the users are in your directory and **Manager as approver** is selected in either the first or second stage of approval, you will only see an option to select specific approvers for the third stage of approval.
- If you want to designate the manager as a third approver, you can adjust your selections in the previous approval stages to ensure that **Manager as approver** isn’t selected. Then, you should see **Manager as approver** as an option in the dropdown.
- If the users aren’t in your directory and you have not selected **Internal sponsor** or **External sponsor** as approvers in previous stages, you will see them as options for **Third Approver**. Otherwise, you will only be able to select **Choose specific approvers**.
Specify the number of days the third approver has to approve the request in the box under Decision must be made in how many days?.
Set the Require approver justification toggle to Yes or No.
Alternate approvers
You can specify alternate approvers, similar to specifying the primary approvers who can approve requests on each stage. Having alternate approvers help ensure that the requests are approved or denied before they expire (timeout). You can list alternate approvers alongside the primary approver on each stage.
By specifying alternate approvers on a stage, if the primary approvers were unable to approve or deny the request, the pending request gets forwarded to the alternate approvers, per the forwarding schedule you specified during policy setup. They receive an email to approve or deny the pending request.
After the request is forwarded to the alternate approvers, the primary approvers can still approve or deny the request. Alternate approvers use the same My Access site to approve or deny the pending request.
You can list people or groups of people to be approvers and alternate approvers. Ensure that you list different sets of people to be the first, second, and alternate approvers. For example, if you listed Alice and Bob as the first stage approver(s), list Carol and Dave as the alternate approvers. Use the following steps to add alternate approvers to an access package:
Under the approver on a stage, select Show advanced request settings.

Set If no action taken, forward to alternate approvers? toggle to Yes.
Select Add alternate approvers and select the alternate approver(s) from the list.
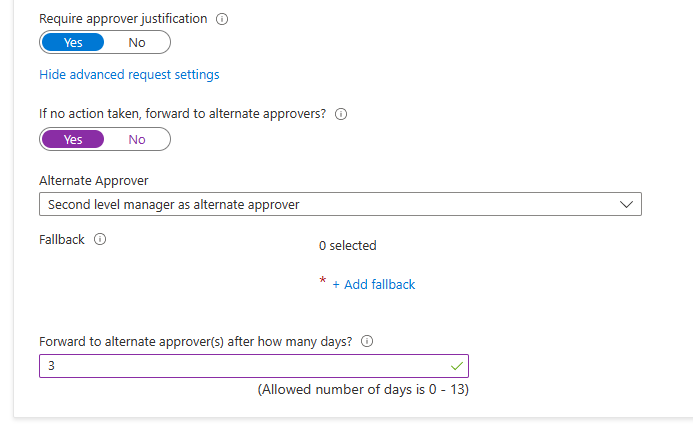
If you select Manager as approver for the First Approver, you have an extra option, Second level manager as alternate approver, available to choose in the alternate approver field. If you select this option, you need to add a fallback approver to forward the request to in case the system can't find the second level manager.
In the Forward to alternate approver(s) after how many days box, put in the number of days the approvers have to approve or deny a request. If no approvers have approved or denied the request before the request duration, the request expires (timeout), and the user has to submit another request for the access package.
Requests can only be forwarded to alternate approvers a day after the request has been initiated. To use alternate approval, the request time-out needs to be at least four days.
Enable requests
If you want the access package to be made immediately available for users in the request policy to request, move the Enable toggle to Yes.
You can always enable it in the future after you have finished creating the access package.
If you selected None (administrator direct assignments only) and you set enable to No, then administrators can't directly assign this access package.

When new requests are enabled, you can specify whether you want to Allow managers to request on behalf of their employees (preview).

Select Next.
Collect additional requestor information for approval
In order to make sure users are getting access to the right access packages, you can require requestors to answer custom text field or Multiple Choice questions at the time of request. The questions will then be shown to approvers to help them make a decision.
Go to the Requestor information tab and select the Questions sub tab.
Type in what you want to ask the requestor, also known as the display string, for the question in the Question box.
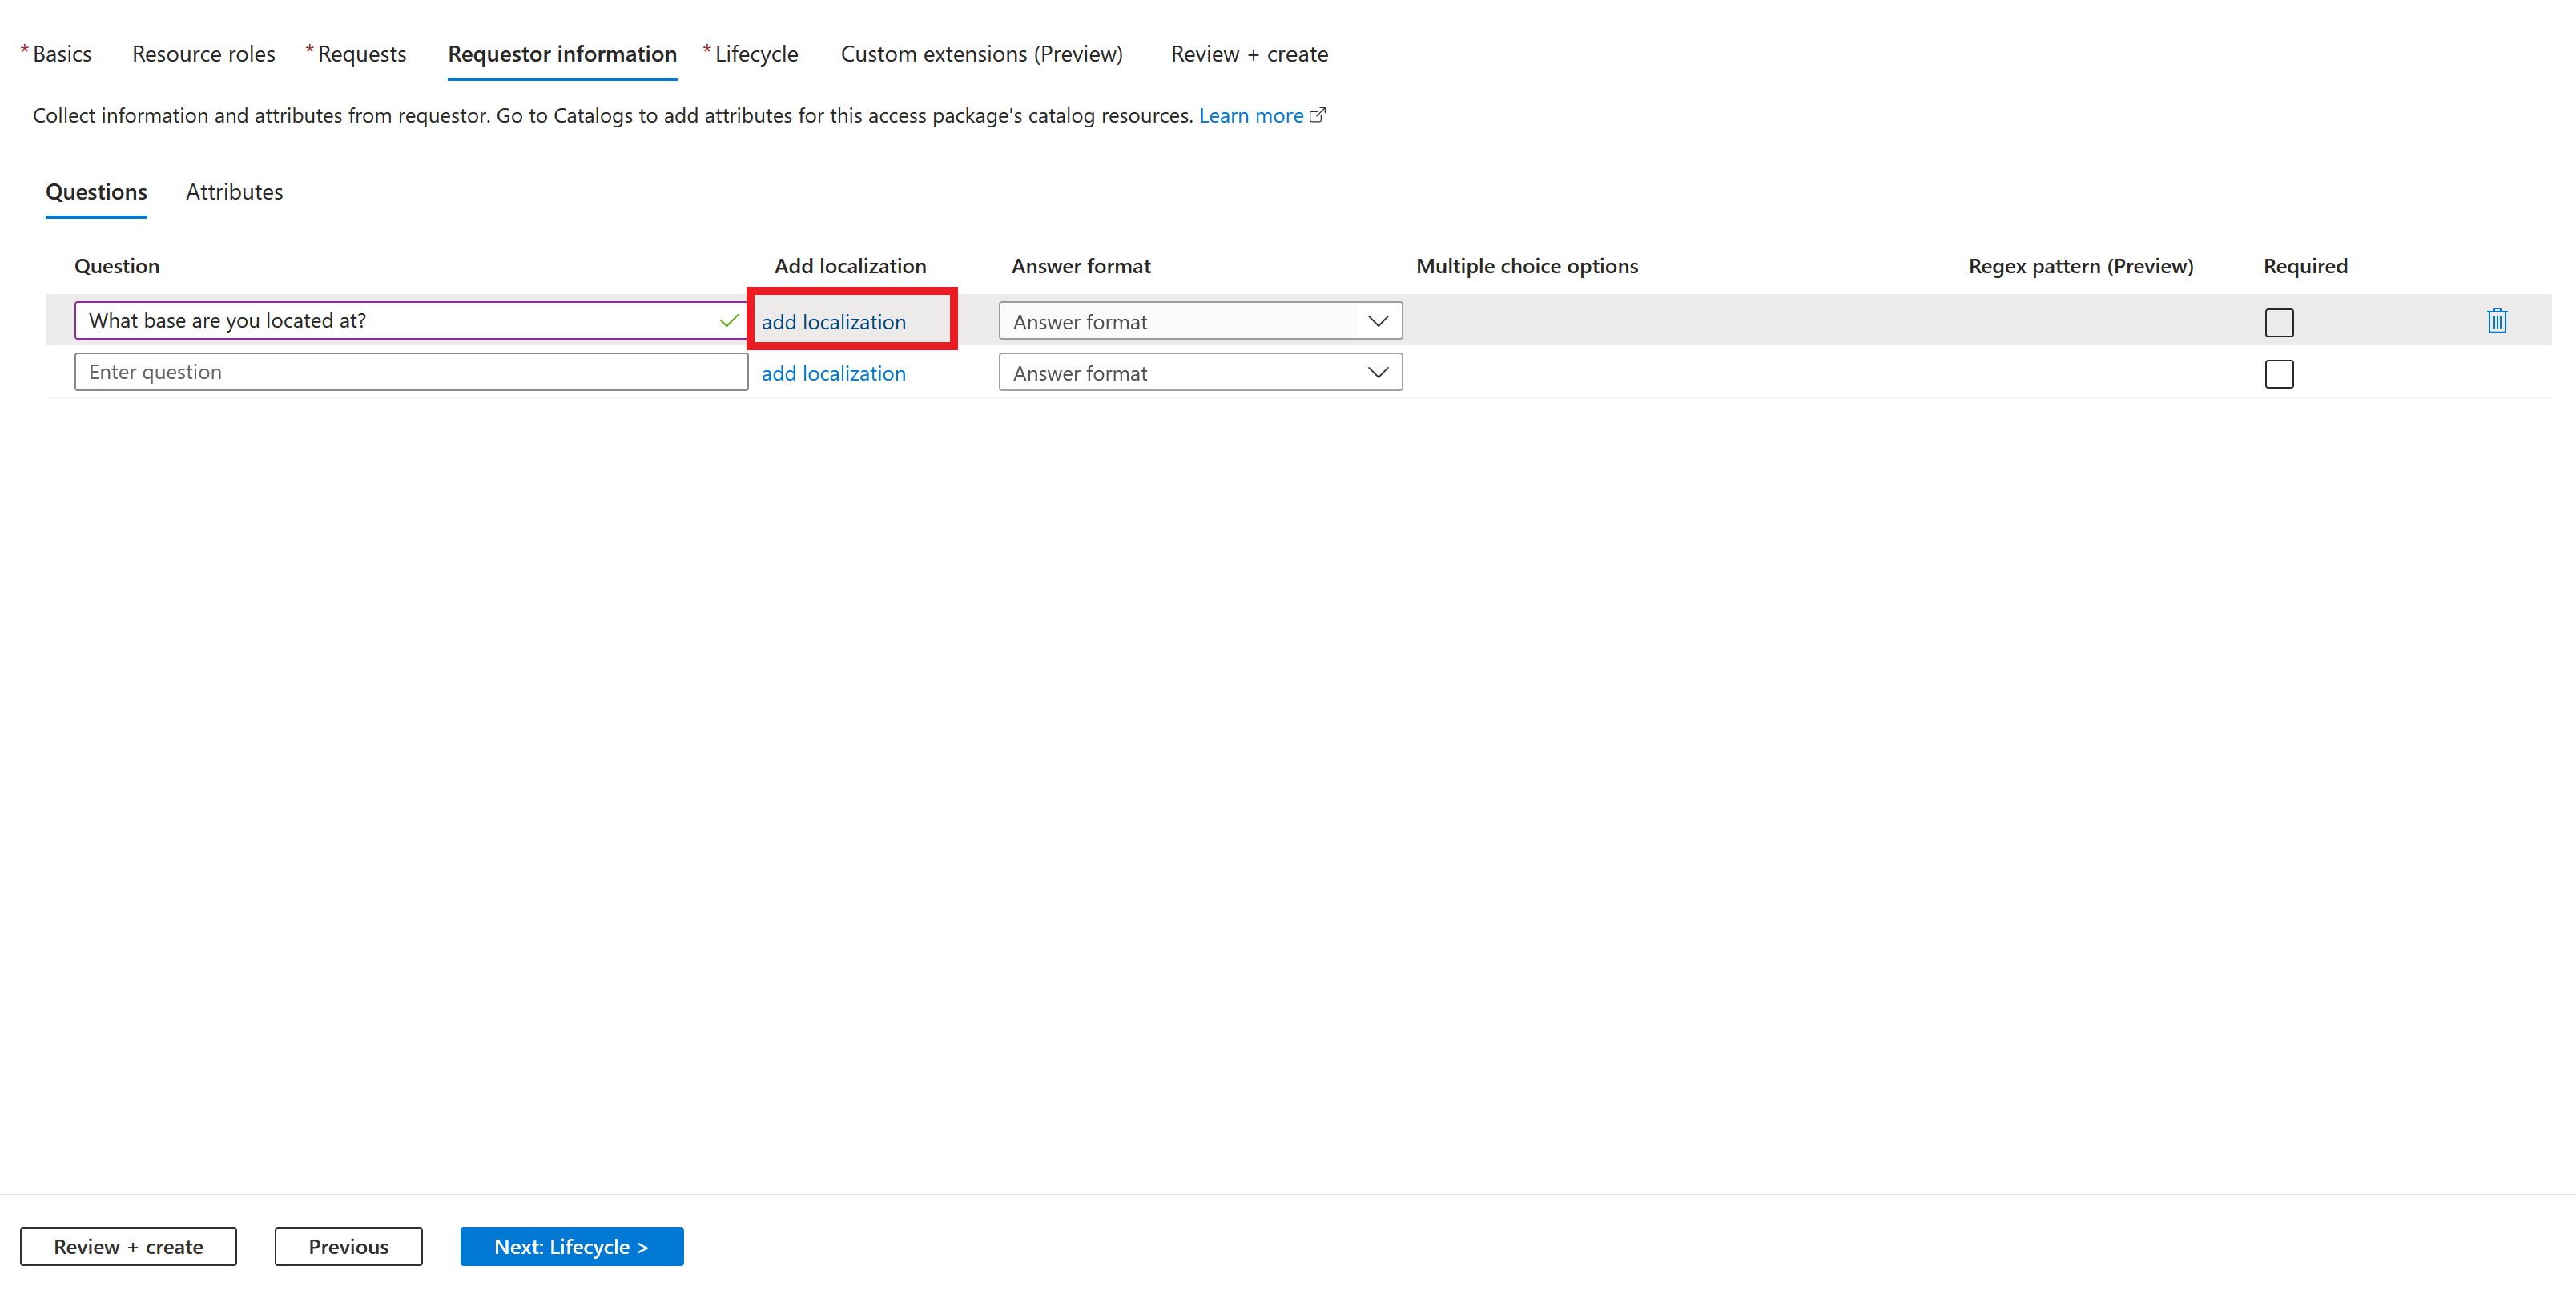
If the community of users who need access to the access package don't all have a common preferred language, then you can improve the experience for users requesting access on myaccess.microsoft.com. To improve the experience, you can provide alternative display strings for different languages. For example, if a user's web browser is set to Spanish, and you have Spanish display strings configured, then those strings are displayed to the requesting user. To configure localization for requests, select add localization.
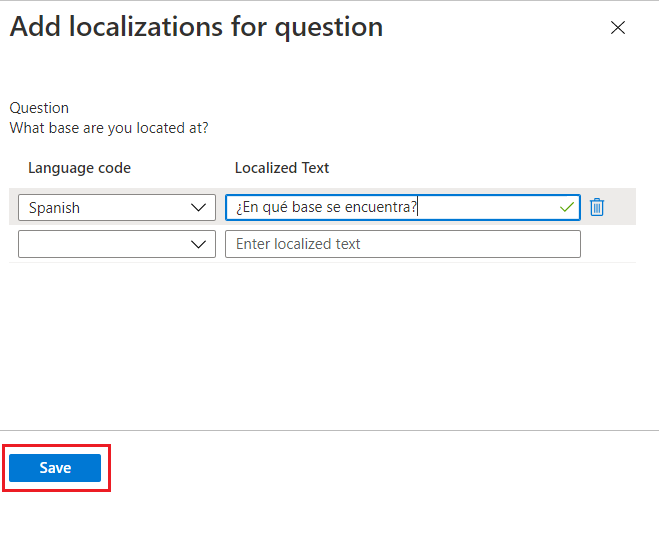
- Once in the Add localizations for question pane, select the language code for the language in which you're localizing the question.
- In the language you configured, type the question in the Localized Text box.
- Once you've added all the localizations needed, select Save.
Select the Answer format in which you would like requestors to answer. Answer formats include: short text, Multiple Choice, and long text.
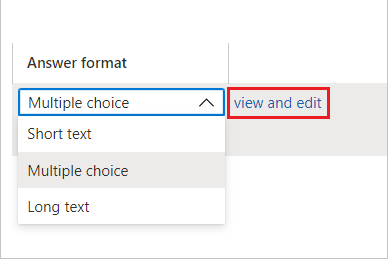
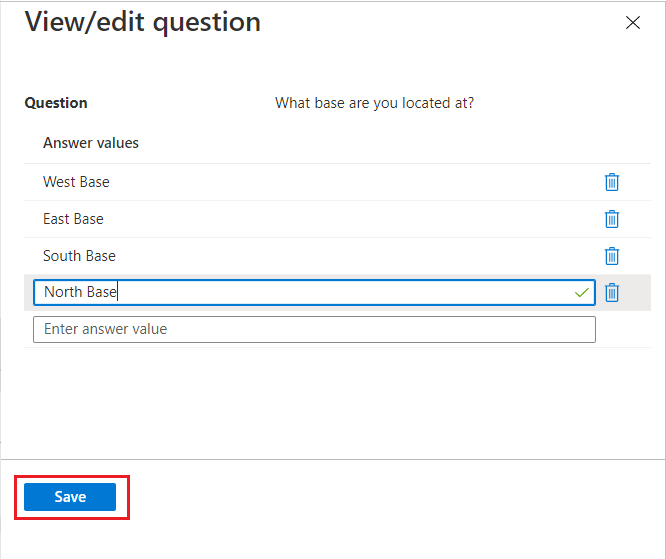
If selecting Multiple Choice, select on the Edit and localize button to configure the answer options.
- After selecting Edit and localize the View/edit question pane opens.
- Type in the response options you wish to give the requestor when answering the question in the Answer values boxes.
- Type in as many responses as you need.
- If you would like to add your own localization for the Multiple Choice options, select the Optional language code for the language in which you want to localize a specific option.
- In the language you configured, type the option in the Localized text box.
- Once you add all of the localizations needed for each Multiple Choice option, select Save.
If you would like to include a syntax check for text answers to questions, you can also specify a custom regex pattern.
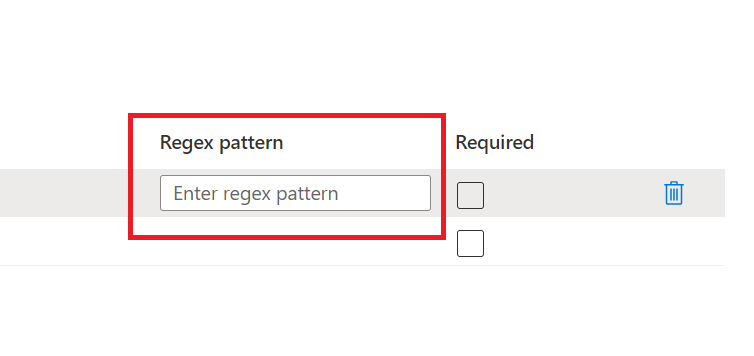 If you would like to include a syntax check for text answers to questions, you can also specify a custom regex pattern.
To require requestors to answer this question when requesting access to an access package, select the check box under Required.
Fill out the remaining tabs (for example, Lifecycle) based on your needs.
After you configure requestor information in your access package's policy, can view the requestor's responses to the questions. For guidance on seeing requestor information, see View requestor's answers to questions.