Authenticate to Azure OpenAI from an Azure hosted app using Microsoft Entra ID
This article demonstrates how to use Microsoft Entra ID managed identities and the Microsoft.Extensions.AI library to authenticate an Azure hosted app to an Azure OpenAI resource.
A managed identity from Microsoft Entra ID allows your app to easily access other Microsoft Entra protected resources such as Azure OpenAI. The identity is managed by the Azure platform and doesn't require you to provision, manage, or rotate any secrets.
Prerequisites
- An Azure account that has an active subscription. Create an account for free.
- .NET SDK
- Create and deploy an Azure OpenAI Service resource
- Create and deploy a .NET application to App Service
Add a managed identity to App Service
Managed identities provide an automatically managed identity in Microsoft Entra ID for applications to use when connecting to resources that support Microsoft Entra authentication. Applications can use managed identities to obtain Microsoft Entra tokens without having to manage any credentials. Your application can be assigned two types of identities:
- A system-assigned identity is tied to your application and is deleted if your app is deleted. An app can have only one system-assigned identity.
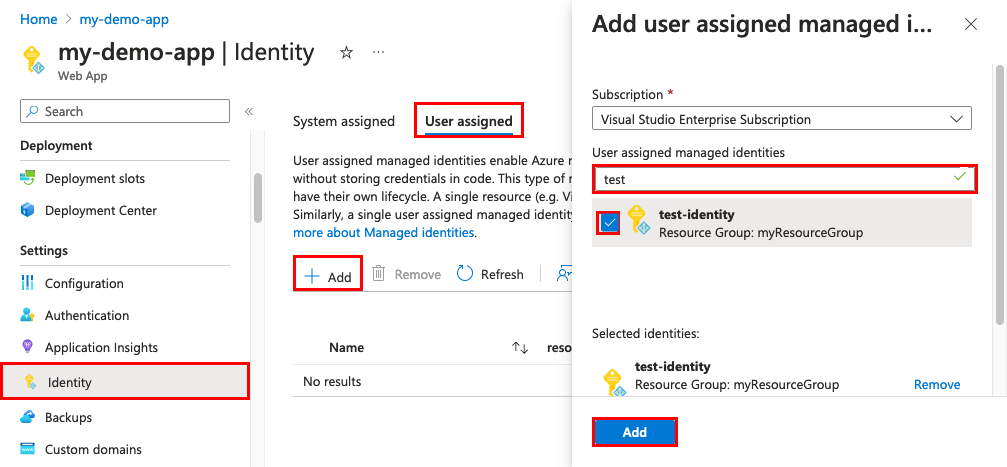
- A user-assigned identity is a standalone Azure resource that can be assigned to your app. An app can have multiple user-assigned identities.
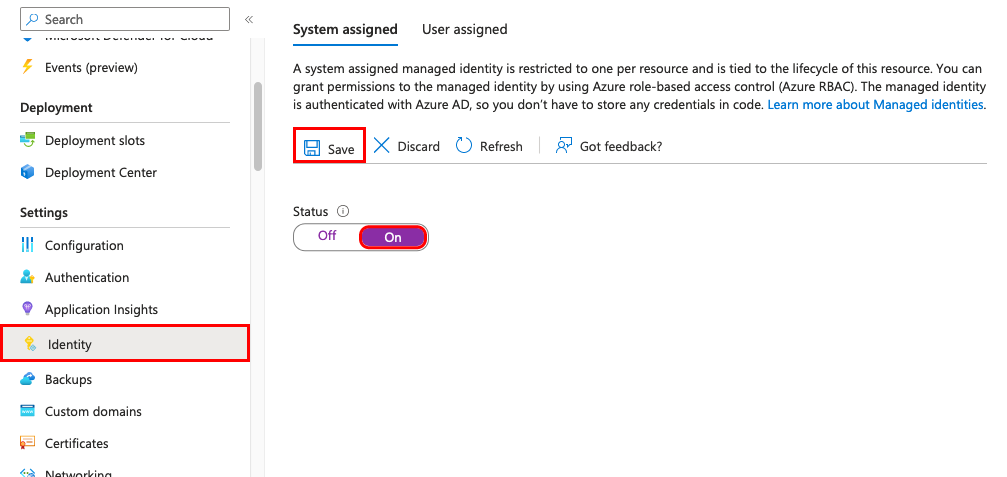
Navigate to your app's page in the Azure portal, and then scroll down to the Settings group.
Select Identity.
On the System assigned tab, toggle Status to On, and then select Save.
Note
The preceding screenshot demonstrates this process on an Azure App Service, but the steps are similar on other hosts such as Azure Container Apps.
Run the az webapp identity assign command to create a system-assigned identity:
az webapp identity assign --name <appName> --resource-group <groupName>
Add an Azure OpenAI user role to the identity
In the Azure Portal, navigate to the scope that you want to grant Azure OpenAI access to. The scope can be a Management group, Subscription, Resource group, or a specific Azure OpenAI resource.
In the left navigation pane, select Access control (IAM).
Select Add, then select Add role assignment.

On the Role tab, select the Cognitive Services OpenAI User role.
On the Members tab, select the managed identity.
On the Review + assign tab, select Review + assign to assign the role.
You can use the Azure CLI to assign the Cognitive Services OpenAI User role to your managed identity at varying scopes.
az role assignment create --assignee "<managedIdentityObjectID>" \
--role "Cognitive Services OpenAI User" \
--scope "/subscriptions/<subscriptionId>/resourcegroups/<resourceGroupName>/providers/<providerName>/<resourceType>/<resourceSubType>/<resourceName>"
Implement identity authentication in your app code
Add the following NuGet packages to your app:
dotnet add package Azure.Identity
dotnet add package Azure.AI.OpenAI
dotnet add package Microsoft.Extensions.Azure
dotnet add package Microsoft.Extensions.AI
dotnet add package Microsoft.Extensions.AI.OpenAI
The preceding packages each handle the following concerns for this scenario:
- Azure.Identity: Provides core functionality to work with Microsoft Entra ID
- Azure.AI.OpenAI: Enables your app to interface with the Azure OpenAI service
- Microsoft.Extensions.Azure: Provides helper extensions to register services for dependency injection
- Microsoft.Extensions.AI: Provides AI abstractions for common AI tasks
- Microsoft.Extensions.AI.OpenAI: Enables you to use OpenAI service types as AI abstractions provided by Microsoft.Extensions.AI
In the
Program.csfile of your app, create aDefaultAzureCredentialobject to discover and configure available credentials:// For example, will discover Visual Studio or Azure CLI credentials // in local environments and managed identity credentials in production deployments var credential = new DefaultAzureCredential( new DefaultAzureCredentialOptions { // If necessary, specify the tenant ID, // user-assigned identity client or resource ID, or other options } );Create an AI service and register it with the service collection:
string endpoint = builder.Configuration["AZURE_OPENAI_ENDPOINT"];
string deployment = builder.Configuration["AZURE_OPENAI_GPT_NAME"];

builder.Services.AddChatClient(
    new AzureOpenAIClient(new Uri(endpoint), credential)
    .AsChatClient(deployment));
Inject the registered service for use in your endpoints:
app.MapGet("/test-prompt", async (IChatClient chatClient) =>
{
    return await chatClient.CompleteAsync("Test prompt", new ChatOptions());
})
.WithName("Test prompt");
Tip
Learn more about ASP.NET Core dependency injection and how to register other AI services types in the Azure SDK for .NET dependency injection documentation.